You Say Refrigerator, I Say FERMigerator: Converting a Refrigerator into a Fermentation Chamber

Refrigerator ThermostatDave Juliano shares how to convert a refrigerator to a fermentation chamber without losing the freezer function.
Having an extra refrigerator is often a blessing to the home brewer – it can be converted to serve kegged beer, or to provide controlled fermentation temperatures to improve the quality of your beer.  The one thing these two uses have in common is that, with few exceptions, the temperature range of a commercial refrigerator is too cold for the typical “kegerator” or “fermigerator”.
How Most Fermentation Chambers Work
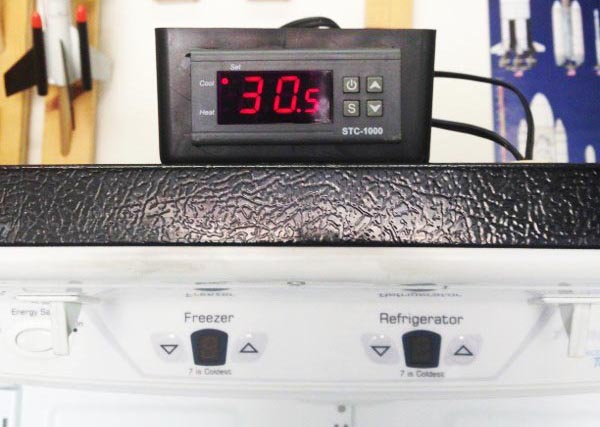
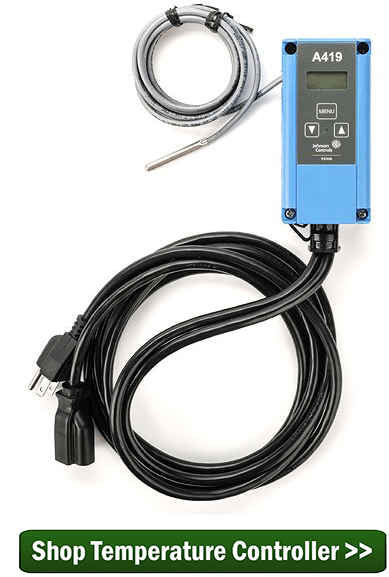
Several companies make plug-in thermostats to solve this problem, and the versions I’ve seen (Ronco and Johnson) all work in a similar fashion: the temp control unit plugs into the wall, the fridge (or freezer) plugs into the unit, and the thermometer probe portion of the unit is placed into the refrigerator compartment. Typically, the internal thermostat of the fridge (or freezer, we’ll just call them fridges for simplicity from here on) is set to its lowest point. When the external thermostat senses that the internal temperature is too warm, it energizes the control unit, which powers on the fridge. This allows the compressor to run, cooling the compartment.
Once the external thermostat senses that the temperature is correct, it de-energizes the control unit, effectively pulling the plug on the appliance. This means that if you open the door in this state, the light will not turn on. It also means that the freezer only runs when cold air is needed. Now is a good time to note that most modern refrigerators that have a freezer only chill the air in the freezer – if the fridge needs to cool down, the computer in the unit opens a damper and activates a fan that blows some of the cold air from the freezer into the fridge compartment.
The FERMigerator
Shop Temperature ControllerAs you can probably see, using an external temp controller like this is easy, but compromises the use of your appliance. My plan to convert a refrigerator to a fermentation chamber enables the fridge to be set at a user-definable temperature while leaving the freezer unchanged. This way, excess food from the house can be kept frozen, hops can be stored, or the fridge can be put into service as an extra food-fridge if the need arises.
To do this, you will need the following supplies (Read through the instructions before going to collect anything, as you’ll need to make some measurements of your existing system before you buy some of the components):

  • A temperature controller – Make sure to buy the model that suits your local power requirements, 110VAC for those of us in North America. These also may be available in Fahrenheit options, mine is in Celsius.
  • A project box – These can be found at Radio Shack or an electronics shop. Get the temperature controller first, and then find a box that is about twice as deep.
  • A regular duplex outlet – necessary if heating is desired (not covered in this article)
  • An extension cord – to power the temperature controller, also not covered here
  • A small piece of perfboard – from your local Radio Shack or electronics shop
  • Two 1/4w resistors, the values of which will be determined below – electronics shop or Radio Shack

You’ll also need the following tools:

  • An electric or cordless drill with a 1/4” bit
  • Soldering iron
  • Wire cutters
  • A digital multimeter and knowledge of how to use it to measure resistance (don’t worry – it’s easy-peasy)
  • Assorted hand tools to access the necessary bits of the fridge controller

The best place to start this project is to look up your particular model of fridge on an online appliance parts website. Look for the controlling circuitry for the fridge – this project will replace the factory thermistor with the new temperature controller. Be sure you’re looking at the right one! The freezer compartment will have the exact same device, but we want to leave that alone. The photos I’ve included are from a 2002 Amana French-door bottom freezer. When looking online, I could tell that the part I was after was housed in the control assembly at the top of the fridge compartment where the two doors meet. Once you’ve identified its location, unplug the fridge and begin carefully disassembling the trim around it to get to it, and then we’ll begin.
Steps To Convert A Refrigerator To A Fermentation Chamber

  1. Make sure the appliance is unplugged!
  2. Using wire cutters (if required — some thermistors are replaceable and may just have spade connectors holding them in) cut out the thermistor. Mine looked like a large white cylinder.
  3. Multimeter for checking sensor resistance.
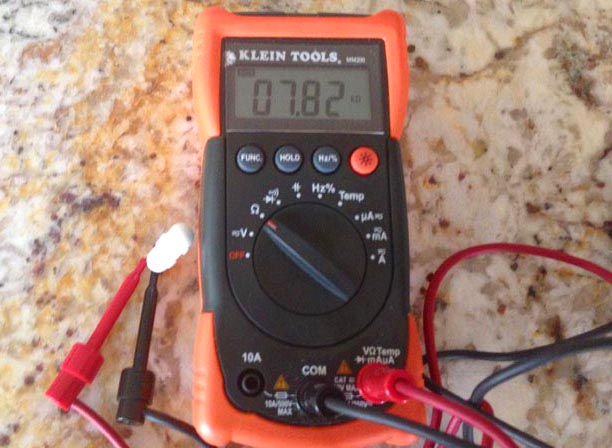
Using the multimeter set to read resistance (Ohms), connect the leads to each wire from the thermistor at room temperature.Here, mine is reading 7.82K Ohms at about 78°F. The temperature isn’t important – we just want to know that what the fridge computer reads from the thermistor is two states – hot and cold. Hot is any temperature above where we want to be. I brew ales and plan to lager, and saw no reason to ferment higher than this. If you’re doing something different, adjust the ambient temperature of this step accordingly!From this information, I know that when the fridge computer reads 7.82K Ohms, it will want to turn on to cool the fridge down.
  4. Keeping the multimeter set and the thermistor connected, now place the thermistor in a glass of ice water. This is 32°F, and represents the “cold” side of my needs. When the fridge computer reads 24.54K ohms, I know it will turn off.
  5. Now comes some math and a little knowledge of electronics.  If 7.82K ohms equals “ON” and 24.54K ohms equals “OFF”, how do I trick the fridge computer into reading those?This is where the temperature controller comes into play. Unlike some other external temp controllers, this one is a relay (electronic switch).  When it says to turn on, it closes a switch, which completes contacts. If those contacts happen to be wired to a 120VAC outlet, it will deliver 120VAC, just like the Ronco and Johnson units we discussed previously. If, however, we wire the relay to a couple of resistors, we can electrically trick the fridge computer into reading one of the two previously determined values, allowing the existing fridge computer and electronics to do the actual work of cooling the fridge down. Resistors, when wired in series, increase their resistance by the sum of the parts.  In other words, if R1 and R2 are put end to end, R1+R2=Rtot.  If they’re wired in parallel, however, we get the inverse: Rtot=(R1xR2)/(R1+R2).  This is important because we need the fridge computer to read a higher resistance to turn off, and a lower resistance to turn on.Schematic for resistors when coverting refrigerator.
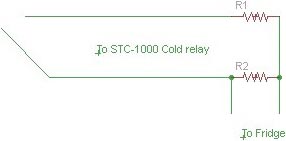
The STC-1000 will close the relay when the external probe reads a temperature above the set point, so when that relay closes, we want the fridge computer to read <8K ohms.  When the temperature falls below the set point, the relay opens, so we want the fridge computer to read >24K ohmsI designed this simple schematic so that the fridge computer was reading R2 directly, and when the relay closed, R1 would be added to R2 in parallel, dropping the resistance read by the fridge, telling it to start to cool.
  6. Here’s that math bit – how do we determine which values of resistor to use for this? Here’s how I did it.  The values I measured weren’t standard resistor sizes, so I rounded.R2 must be 27K, since that’s the “Off” state, so to determine what value resistor I needed to give us 8K in the “On” state, I did math. There are websites that help with this, like this one. Type in the two known values (R2 and Rtot), and it tells us the value of R1 is 11.37K
    _________________________________________________________
    NOTES:
    11.37K isn’t a standard size either, so I found 12K in my parts bin.
    8000=(27000*X)/(27000+X)
    Solve for X
    X=11368,Or: (MATH+BEER+GOOGLE=RESULT)X=11.37K
    Keep in mind the following things:
    Always use the same units- 1k ohm = 1000ohms
    Remember that the lower resistance is the “On” state, and the higher resistance is the “Off” state.
    ________________________________________________________
  7. Armed with these numbers, go to Radio Shack and buy some 12K and 27K resistors, and a small piece of Perfboard, wire, an enclosure, solder, iron, whatever you don’t have. The project from here is simple.
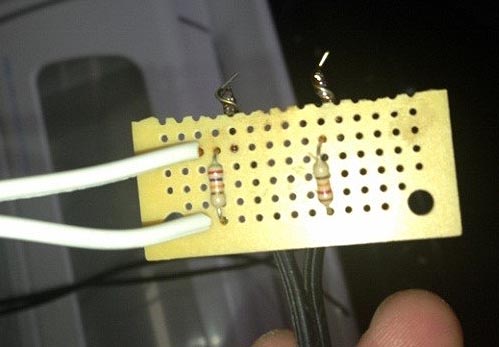
  8. Assemble the perfboard. I soldered the two resistors to the perfboard, using their leads to make the connections, and also two pigtails of braided wire. The white wire was cut off of the end of the old thermistor, and the black is just some speaker wire I had that will connect to the temperature controller relay.  Follow the schematic from above to ensure you have it wired correctly.
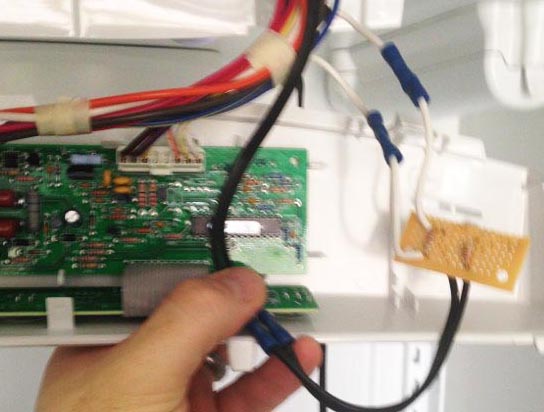
  9. Wire it in: the white wires got crimped back in to where the thermistor was removed. The black wires got crimped onto the wires coming from the “Cold” relay on the STC-1000. Neither of these connections has a polarity to worry about. I had previously drilled a hole in the top of my fridge case by first making sure no refrigerant lines were in the way (check YouTube for lots of great videos on how to do this!).
  10. Thermostat panel for used when you conver a refrigerator to a fermentation chamber.
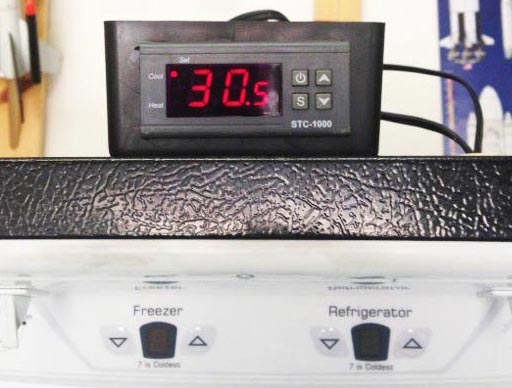
I tucked the bit of board and the wire into the shroud that holds the fridge electronics, and reinstalled the panels and covers. I did have to drill a small hole in the plastic shroud to allow the black wire from the temp controller out.
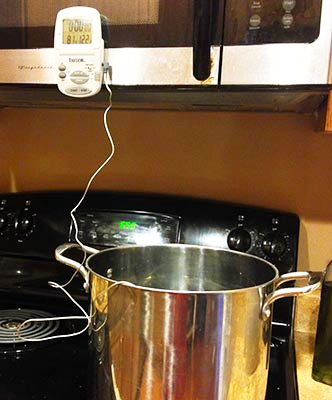
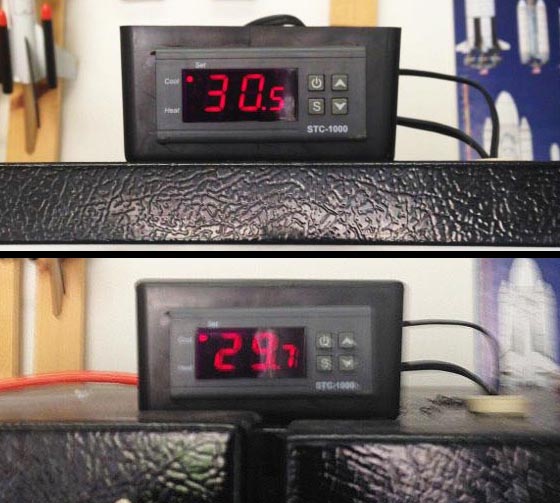
  11. With everything plugged in and cooling, the STC-1000 is now in control of the fridge, while the factory-provided temperature circuitry was still in control of the freezer, and I could watch the temperature drop in the fridge!  (Remember, this is Celsius, and in my garage in Tucson)

And that’s how you convert a refrigerator to a fermentation chamber or kegerator, and still use the freezer portion for storing hops or whatever else you need cold.
——————————————————————————————————————-
Dave Juliano is a DIY homebrewer and maintains a homebrew website detailing many of his projects.

Cloning Ithaca Beer Co.’s Flower Power – Pt. 1: Developing a Recipe

Glass Of Flower Power IPAThere’s nothing quite as exciting as receiving the gift of beer. When a friend visited from up north with a case of one of his favorite local beers, I knew was in for a treat. For the first time, I was introduced to Ithaca Beer Co.’s Flower Power. It is likely their most popular beer, available all over Ithaca and worthy of very good ratings on Beer Advocate. It’s bright golden in color, with a wonderful aroma of honey and hops. The delicious American hop flavor – piles of that citrus, tropical fruit, spice, and pine – is something I’d love to have on tap at home.
The first step in developing a clone beer recipe is the research. Usually a brewery’s site will give some information as to the ingredients:

  • Two-row pale and honey malt
  • Simcoe, Chinook, Citra, Ahtanum, and Centennial hops
  • Dry hops: Simcoe, Amarillo, Centennial
  • Yeast – we’ll assume American ale yeast

As far as the specs go, I’m always surprised how different states and breweries label their beers. Some have ABV and IBU information, some don’t. The website tells us that the beer has five hop additions, including dry hops, but they don’t tell us anything about IBUs. All we get is:

  • ABV 7.5%

With that information, I feel comfortable putting together a grain bill. The hop schedule takes a little guesswork. To achieve a balance, I will go for roughly a 1:1 BU:GU ratio. The next step for developing a clone beer recipe will be to brew the beer and see how it turns out!
Shop Brewing HopsFlower Power Clone Recipe – Attempt 1
Specs
OG: 1.076
FG: 1.019
ABV: 7.5%
IBUs: 77
SRM: 9
Ingredients
14.5 lbs. Weyermann pale ale malt
1 lb. Gambrinus honey malt
.5 oz. Simcoe hops at :60
Shop Malted Grains1 oz. Chinook hops at :20
1 oz. Citra hops at :10
1 oz. Ahtanum hops at :0
1 oz. Centennial hops at :0
1 oz. Centennial hops dry hopped for 7 days
1 oz. Simcoe hops dry hopped for 7 days
1 oz. Amarillo hops dry hopped for 7 days
1 packet Wyeast 1056: American Ale Yeast
Directions
The night before brewing, prepare a 2L yeast starter. On brew day, mash crushed grains at 152˚F for 60 minutes. Sparge with enough water to collect about 6.5 gallons of wort. Bring to a boil and boil for 60 minutes, adding hops according to schedule above. At end of boil, chill wort, steeping the Ahtanum and Centennial hops during the whirlpool. Transfer wort to clean, sanitized fermenter. Pitch yeast and ferment at 68˚F until complete. Transfer to a secondary fermenter and add dry hops. After 7-10 days, bottle or keg, aiming for about 2.4 vols CO2.
The next step is to brew it! Stay tuned to hear how it turns out! Do you have any tips for developing a clone beer recipe? Please share them below.
—————————————————————–
Review the whole Flower Power clone brewing process below:

—————————————————————–
David Ackley is a beer writer, homebrewer, and self-described “craft beer crusader.” He holds a General Certificate in Brewing from the Institute of Brewing and Distilling and is founder of the Local Beer Blog.

ExBeeriment: Water Boil Test

Water BoilingThere are all sorts of different ways to start homebrewing – various setups, recipes and equipment to use.
When I first began brewing extract kits at home, I used my stovetop and a soup pot for my batches, but have since upgraded to brewing outside with a gas burner and a proper, five-gallon pot. Moving outside also helps mitigate any potential mess – a boil over looks much less daunting on a concrete slab in the backyard than all over a stove and kitchen floor.
I haven’t brewed on my stovetop since my first batches years ago, mostly to avoid any mess, but also because I figured using my 55,000 BTU gas cooker made my brew day shorter and more efficient.
It wasn’t until now that I wanted to (unscientifically) put that to the test.
Using only water, I wanted to see how quickly I could reach brew-day temperature thresholds using my electric range stovetop and a Bayou Classic propane burner. My goal was specific to extract brewing, so I wanted to see how quickly I could reach 155 degrees when I’d normally steep grains for 25 minutes, then how long it would take to boil the water.
I decided to only use water since it offered an easy control – no matter where you’re brewing, water will still heat at the same rate. It’s just a matter of what the heat source is providing. I decided to also use the same three-gallon soup pot I previously used for my extract batches before investing in a five-gallon pot to accommodate occasional partial mash brew days.
First, I went outside to test my propane cooker with two gallons of 81-degree (F) water. I wanted to track how fast the water would hit 100 degrees for the sake of posterity, then mark at 155 degrees and hold the temperature for 25 minutes before raising it to a boiling temperature of 212 degrees.
I figured it would be a quick experience and here’s how it broke down:Water Boil Test - 5 Gallons

Propane Burner Boil Time

Minutes Degrees (F)
1:40 100
6:55 155
32:00 156
34:38 212 (boil)

Seems reasonable enough. Then I took another two gallons of 81 degree (F) water and set up the cooled soup pot on my General Electric stovetop. Here’s the time breakdown for this portion:
Water Boiling - 2 Gallons

Electric Stove Boil Time

Minutes Degrees (F)
4:15 100
12:30 155
37:35 157
39:03 212 (boil)
In comparison to my propane cooker, I certainly didn’t expect this. In all, using the stovetop only took me 4:25 more than my gas cooker. Knowing that, it would make me rethink the necessity of brewing outside with my cooker, especially during winter months.
Shop Brew KettlesOf course, there are all sorts of variables to consider, however, from the age of your stove (mine is less than a year old) to how much grain you’re using to steep. These kinds of results in time might not be universal, but do give a peek into what you might generally expect from a brew day.

If you’re thinking of making the plunge into a gas cooker, check out these two options and don’t forget a big enough pot, too.
————————————————————————————————————————-
Bryan Roth is a beer nerd and homebrewer living in Durham, North Carolina. You can read his thoughts on beer and the beer industry on his blog, This Is Why I’m Drunk, and send him suggestions on how to get his wife to drink craft beer via Twitter at @bryandroth.

Simple Style Guide: Brewing A Schwarzbier Recipe

Two Mugs Of SchwarzbierOne of my all-time favorite beer styles is the German Schwarzbier. Brewing a Schwarzbier recipe is a great experience, as well. This “black beer” is a dark lager, similar to the Munich dunkel. Though sometimes more brown than black, schwarzbier is an interesting combination of dark, roasty flavors and a smooth, light mouthfeel. While many drinkers assume dark beer is heavy, schwarzbier is in fact quite smooth, and yet full of flavor. It features the chocolate and coffee malt flavors of a stout, but without the aggressive roasty flavor or the fruity and spicy esters from ale yeast.

According to the BJCP Guidelines, schwarzbier generally falls within the following specs:

  • OG: 1.046 – 1.052
  • FG: 1.010 – 1.016
  • ABV: 4.4 – 5.4%
  • IBUs: 22 – 32
  • SRM: 17 – 30

Consider the following tips when brewing a schwarzbier recipe.

Water
As Randy Mosher points out, “Water is a key element, not just marketing fodder.” Never is this more important than when brewing a lager. For starters, be sure to dechlorinate your water by boiling it or treating it with Campden tablets. The Munich water profile is well-suited for brewing dark lagers, so you may wish to add some calcium carbonate to your brewing water. Use a mash water calculator to help you figure out what additions to use.
Shop Malted Barley Grains
Malt
German dark lagers are famous for using a large proportion (sometimes 100%) of Munich malt in the grain bill. Some interpretations may include a portion of pilsner malt as well.
The dark color in a Schwarzbier recipe usually comes from debittered malt, such as Carafa II, which contributes the dark color and chocolate/coffee flavors of a stout, but without the astringent bitterness of roasted barley or black malt. Only about 4-8 oz. of Carafa is needed to adjust color.
Hops
Since this is a malt-forward beer, we’re not too worried about flavor and aroma contributed by late addition hops. That said, all the hops in this beer should be of the noble hop or German hop variety. Hallertauer, Tettnanger, and Spalt would all be good options. Aim for about 22-32 IBUs.
Yeast
A German lager yeast will be the most authentic for brewing a Schwarzbier recipe, though some homebrewers get good results with a Kölsch yeast. Whichever you use, be sure to do a nice, long secondary fermentation to lager the beer and smooth it out, about two months.
Try the all-grain schwarzbier recipe below, or the malt extract schwarzbier recipe here!
Recipe: Doktor Schnurrbart Schwarzbier (via Radical Brewing)
(5-gallon batch, all-grain)
Specs
OG: 1.061
ABV: 4.1 – 4.9%
IBUs: 26
Color: ruby brown
Ingredients
9 lbs. Munich malt
1 lb. pale malt or pilsner malt
8 oz. Carafa II malt
2 oz. Spalt hops at :90
Wyeast 2206: Bavarian Lager Yeast, Wyeast 2565: Kölsch Yeast, Mangrove Jack’s M84: Bohemian Lager Yeast, or Saflager W-34/70
Directions
Perform a two-step mash: 30 minutes at 95˚F followed by 60 minutes at 153˚F. A decoction mash is the most authentic, though a double infusion mash will work just fine. Sparge with enough water at 170˚F to collect about 6.5 gallons of wort. Add Spalt hops and boil for 90 minutes. Primary fermentation for about 3-4 weeks according to yeast package instructions (usually about 50˚F), followed by about 6 weeks at 35-40˚F.
Have you ever thought about brewing a Schwarzbier recipe? If so, then this is a great time to try it!
——————————————————————————————————————
David Ackley is a beer writer, brewer, and self-described “craft beer crusader.” He holds a General Certificate in Brewing from the IBD and is founder of the Local Beer Blog.

10 Best Home Brewing Resources

Home Brewing Resources On Computer With BeerIn the wide world of homebrew information, what resources to you use for information? When I need to look up a concept, technique, or research for a beer recipe, these are some of the resources I come back to time and again. Along with this blog, these are the 10 best home brewing resources.

  1. How to Brew – John Palmer’s seminal title is available in its entirety on the web. His book walks the beginning homebrewer through brewing a batch from start to finish, eventually diving into more detailed concepts for the advanced brewer. The book is also available in print.
  2. Brew Your Own Magazine – Brew Your Own is a great magazine for all levels of homebrewer. Each issue has a good mix of techniques, beer recipes, experiments, and projects. Many articles are also available online.
  3. Zymurgy Magazine – One of the benefits of American Homebrewers Association membership is a subscription to Zymurgy magazine. It’s full of great tips and beer recipes, and is also available as a mobile app. It’s a great home brewing resource.
  4. Homebrewing for Dummies – An excellent “how to” book for extract, partial mash, and all-grain brewers. Despite the name, it actually gets pretty technical. Also contains a number of award-winning beer recipes.
  5. Designing Great Beers– This home brewing book is a must read for anyone who wants to build their own beer recipes. Ray Daniels analyzes hundreds of recipes to determine some guidelines for brewing the major BJCP beer styles.Download Home Brew eBook For Free
  6. BJCP Style Guidelines – For the competitive homebrewer, the BJCP style guidelines is an indispensable resource. They detail what a homebrewer should seek to achieve when brewing a particular style, from flavor, aroma, and appearance, to overall impression and standard ingredients. The 2008 guidelines have recently been updated in favor of the 2014 version.
  7. Brewer’s Friend – Brewer’s Friend is a free website with dozens of calculators for building beer recipes, calculating IBUs, adjusting mash water, and more. There’s also a premium membership option, which allows you to create and store an unlimited number of recipes on the site, as well as apps for your mobile phone.
  8. HomebrewTalk.com – Has anyone else ever tried your great homebrewing idea? Chances are they have, and chances are someone has written about it on the HomebrewTalk forums. Also look into the HomebrewTalk articles section for a variety of tips and tricks.
  9. Homebrewing on Reddit – Perhaps the most active homebrewing forum on the Internet these days is on Reddit. If you’re unfamiliar with Reddit, it’s basically a massive forum with a variety of subjects, or subreddits, to which users can post content and questions. The homebrewing subreddit has close to 100,000 subscribers and includes some good advice along the sidebar. Be sure to look into the weekly roundtable discussions and the annual competitions.
  10. The E. C. Kraus Homebrewing Ebook – Our new ebook is the ultimate jumpstart guide to homebrewing! It guides you through how to brew extract and all-grain batches of beer, addresses some key FAQs, and also includes several of our favorite beer recipes. It’s one of the best home brewing resources around, and it’s free to download!

What do you think are some of the best home brewing resources?
————————————————————————————————————–
David Ackley is a beer writer, brewer, and self-described “craft beer crusader.” He holds a General Certificate in Brewing from the IBD and is founder of the Local Beer Blog.

Infected Homebrew Beer? 4 Ways to Step Up Your Cleaning & Sanitation

Pour What Beer. This Is Not An Infected Homebrew Beer.Having an infected homebrew beer happens to the best of us homebrewers at least once. In the interest of time or effort, you start cutting corners on your cleaning and sanitation regime. Maybe you notice a strange white film growing on the surface of your beer. Maybe something tastes sour or just plain “off.” It’s time to take a close look at your equipment and procedures to make sure everything is properly cleaned and sanitized before brewing another batch.
1. Check your bottles. A telltale sign that you’re experiencing some kind of infection is a ring of scum that forms in the neck of the beer bottle. This is a classic symptom of an infected homebrew beer. If you’ve had problems with back-to-back batches it’s possible that this is the source of the contamination. Soak the beer bottles in a hot water bath of One Step, then scrub them with a bottle brush to remove the deposits. Rinse well. Just to be sure, give them a nice long soak in a solution of bleach and water. Use unscented bleach, cold water, and a ratio of 1 ounce bleach per gallon of water. Give them at least 20-30 minutes to soak. (Note: Do not soak stainless steel in bleach.) Rinse well with hot water to drive off any residual chlorine. Follow this with a soak in your regular sanitizer before bottling your next batch.
2. Check your fermenters. If you’ve seen scum or mold on the surface of your beer while it’s in the bucket or carboy, you can be sure the source of the contamination is further up the line. Try the cleaning regimen above on your fermenter. If there is one, pay special attention to the spigot, taking it apart to scrub it inside and out.
Shop One Step Cleanser3. Check your racking equipment. Another possible cause of an infected homebrew beer is your racking equipment. Your auto-siphon, tubing, and bottling wand are a little more difficult to clean, so it’s important to clean them immediately after using them. If you suspect that your racking equipment is the source of your contamination, you may want to consider replacing them. Luckily these items are relatively inexpensive. It’s much better to replace a few feet of tubing rather than dump a batch.
4. Avoid aeration and too much headspace. Infection often comes from air being introduced to your homebrew after fermentation. After primary fermentation, a nice blanket of CO2 covers the beer, but you may lose that protective blanket if you move your homebrew to secondary fermentation. Minimize headspace in the secondary fermentation to avoid contact with air. Also, do your best to avoid splashing during racking from one fermenter to another or into your bottling bucket.
Making sure you don’t have infected homebrew beers isn’t difficult once you identify the common contamination points. Scrub well, use bleach when necessary, and replace equipment that’s past it’s prime to keep your beer fresh and tasting great!
—————————————————————————————————————–
David Ackley is a beer writer, brewer, and self-described “craft beer crusader.” He holds a General Certificate in Brewing from the Institute of Brewing and Distilling and is founder of the Local Beer Blog.

What is Gruit? (3 Gruit Ale Recipes)

Ingredients For A Gruit Ale RecipeIn the modern world of craft beer and homebrew, hops take center stage. Many brewers and drinkers enjoy pushing the limits on just how hoppy a beer can be. But it wasn’t always this way. Before their use became widespread, hops were actually frowned upon in favor of the wide range of herbs and spices that were used to flavor beer. These herbed beers of antiquity are known as gruit.
Gruit is a term that refers to both the mixture of herbs and spices used to flavor beer or mead as well as the alcoholic beverage flavored with such herbs and spices. There’s no one particular mixture of herbs and spices used in gruit – every brewer had their own proprietary combination.
Though the plants used in gruit can vary quite a bit, below are some of the usual suspects you will find in a gruit ale recipe:

  • myrica gale
  • wild rosemary
  • yarrow
  • juniper
  • spruce tips
  • birch tips
  • bay
  • nettles
  • marjoram
  • chamomile
  • rose hips
  • lavender
  • elder flowers
  • dried licorice root
  • fennel seed

Give one of these gruit ale recipes a shot to get a taste of some medieval!
Mumm (adapted from the Homebrewer’s Garden)
(five-gallon batch, partial mash recipe)
Specs 
OG: 1.055 – 1.062
FG: 1.018 – 1.014
ABV: 5.7 – 6.7
Ingredients
3.3 lbs. light LME
3.3 lbs. wheat LME
.75 lb. caramel 60L malt
.33 lb. wheat malt
1.5 lbs. steel cut oats
.25 lb. rye malt
.25 lb. black patent malt
.25 lb. roasted barley
1 oz. Northern Brewer hops at :60 (9 AAUs)
Any six herbs/spices from the list above (use 1/4 to 1/2 oz. of each)
Wyeast 3068: Weihenstephaner Weizen Yeast
Directions
Mash the crushed grains in 1.5 gallons of water at 148˚F for 60 minutes. Sparge with .5 gallons water at 170˚F. Add the LME and bring to a boil. Add hops and herbs/spices and boil for 60 minutes. Chill wort and transfer to a clean, sanitized fermenter. Add enough cool, clean, chlorine-free water to make 5 gallons. Pitch yeast when wort is 70˚F or below. Ferment at 65-70˚F for 1-2 weeks. Bottle with 2/3 cup priming sugar and condition for 3-6 weeks or longer before drinking.
Gruit Ale Recipe (from Sacred & Herbal Healing Beers)
(one-gallon batch, all-grain recipe)
Ingredients
1.75 lbs. pale malt
1.5 lbs. Carapils malt
1.5 grams myrica gale
1.5 grams marsh rosemary
1.5 grams yarrow
ale yeast
Directions
Heat one gallon of water to 170˚F and mash in the grains. Let mash rest for three hours, stirring occasionally. Sparge with 170˚F water to collect just over 1 gallon of wort. Add herbs and boil for 90 minutes. Chill wort to 70˚F or below, transfer to a clean, sanitized fermenter, and pitch yeast. Prime with 24 grams of corn sugar and bottle. Condition for four months before drinking.
Do It To It Gruit (from Radical Brewing)
(five-gallon batch, partial mash recipe)
Specs
OG: 1.054
ABV: 4.5 – 5.2
IBUs: 10
SRM: ~25
Ingredients
5 lb. amber DME
.5 lb. caramel 60L malt
1 lb. smoked malt
.25 lb. chocolate malt
2 oz. juniper berries
5 g. bog myrtle (myrica gale)
5 g. caraway
5 g. mugwort
5 g. winemaker’s tannin or grape seeds
3 g. rosemary
3 g. ground cloves
3 g. cardamom
3 bay leaves
Belgian or German ale yeast
Directions
Mash crushed grains for one hour at 154˚F. Sparge and collect about 6.5 gallons of wort. Boil for 90 minutes. In the last five minutes, add all of the herbs/spices. Cool wort, transfer to a clean, sanitized fermenter, and pitch yeast. Condition for at least 6-8 weeks before drinking.
Have you ever brewed a gruit ale recipe? What herbs and spices did you use? Here some more information on brewing beer with herbs.
—————————————————————————————————————–
David Ackley is a beer writer, brewer, and self-described “craft beer crusader.” He holds a General Certificate in Brewing from the Institute of Brewing and Distilling and is founder of the Local Beer Blog.

Proposed Updates to the BJCP Style Guidelines

Beer JudgesIf you attended the National Homebrewers Conference in Grand Rapids, you may have heard that the Beer Judge Certification Program has been hard at work updating the BJCP Style Guidelines. Gordon Strong, President of the Beer Judge Certification Program, gave a presentation about the proposed changes to the BJCP Style Guidelines at the conference. Chip Walton of the video blog Chop & Brew recorded Gordon’s talk. I’ve transcribed some of the main changes below.
Want to learn more about the BJCP? Read Become a Beer Judge! by Jason McLaughlin.
First, why change the style guidelines?

  • The last update to the guidelines was in 2008, with the last styles added way back in 2004. Brewing has changed a lot in the past 10 years – it’s time for an update!
  • To embrace the growing number of international homebrewers – the current guidelines are focused on styles brewed in the US.
  • To represent some historical beer styles (like Kentucky Common) that have become popular in recent years.
  • To include new ingredients, especially hop varieties, which are being used. For example, recent American hop varieties may go beyond citrus and pine to include grapefruit, tropical, strawberry, “skunk”, and a number of other flavor/aroma descriptors.
  • To improve the use of the guidelines in competition.

Is anything staying the same?
The four ways beers are described will remain the same: appearance, aroma, flavor, mouthfeel – but more focus will be placed on perception as opposed to statements about ingredients and process:

  • Expanded overall impression descriptions, more “consumer-level”
  • Comments section: Will focus on interesting facts, not perception
  • History section: A brief synopsis of the history of the style
  • New section: Characteristic Ingredients will list the important ingredients needed to brew that style of beer
  • New section: Style Comparison: Will suggest how it’s similar or different to related styles
  • New section: Entry instructions added
  • Revised and updated some commercial examples of various style
  • New glossary
  • New section: Using the Style Guidelines – Emphasizes that these are guidelines, not end-all-be-all specification

Shop Beer Recipe KitsNew Styles
Several styles and style categories will be added to the BJCP Guidelines to represent some of the popular new styles and those traditional styles experiences a resurgence.
New styles, Historical category:

  • Gose – a sour beer with coriander and salt
  • Grodziskie – a Polish smoked wheat beer
  • Lichtenhainer – a Berliner-style sour beer with smoked malt
  • Sahti – a traditional Finnish beer made with juniper
  • Kentucky Common – similar to a dark cream ale
  • Pre-Prohibition Porter – a Yuengling-style or “Pennsylvania” porter
  • Pre-Prohibition Lager – formerly classic American pilsner
  • Roggenbier – German rye beer, moved from category 15
  • London Brown Ale – formerly Southern English brown ale

New styles, American wild ale category (brewers must declare a base style!):

  • Brett beer – beer fermented with brettanomyces (not necessarily all brett, and not necessarily sour)
  • Mixed fermentation sour beer – a sour beer fermented with a mix of yeasts and/or bacteria
  • Soured fruit beer – sour beer with fruit

New styles, Czech lager category (similar to German lagers, but generally hoppier):

  • Czech light lager
  • Czech amber lager
  • Czech dark lager
  • Czech pilsner (formerly Bohemian pilsner)

New styles, going into existing categories:

  • German leichtbier – like a german light lager
  • Trappist single – not known as such in Belgium, but often referred to that way, low alcohol table beer
  • English golden ale – golden bitter or summer ale
  • Australian Sparkling Ale – a smooth and balanced ale showcasing Australian ingredients
  • American Strong Ale – a catch-all for strong beers, not quite barley wine but not an IPA, Arrogant Bastard is an example
  • Wheatwine – a barleywine made with wheat
  • International Pale Lager – these are the green bottle imports & mass market Euro beers (formerly premium American lager)
  • International Amber lager – similar to above but amber in color
  • Kellerbier (Munich and Franconian variants) – fresh lager, German in origin

New Specialty IPA Subcategory
Exciting to many, there will be a new category for Specialty IPA, with descriptions for:

  • Black IPA
  • Brown IPA
  • Red IPA
  • White IPA
  • Belgian IPA
  • Rye IPA

Brewers will be able to specify strength (Session, Standard, Double) and also combine different styles.
Shop Draft SystemsModified Styles
These styles will be modified or changed as follows:

  • Premium American Lager – split into Standard American Lager and International Pale Lager
  • Oktoberfest – traditional (amber) renamed to Marzen, modern (gold) called a festbier
  • Rye beer removed from the American wheat category, moved to a Alternative Grains specialty category
  • Scottish 60 & 70 combined into Scottish light
  • Scottish 80 & 90 combined in to Scottish heavy
  • English Brown Ale – formerly northern brown ale, but expanded
  • Dry stout split into Irish stout and Irish extra stout
  • Tropical stout split from foreign extra stout
  • Weizenbock – gold versions allowed
  • Fruit lambic – sweetness and carbonation specified, sweet allowed
  • Old ale – overlay on new a English strong ale category

Renamed Styles
To reduce confusion, the following style will be renamed:

  • Lite American lager > American Light Lager
  • Standard American Lager > American Lager
  • Dortmunder Export > German Exportbier
  • German Pilsner/Pils > German Pils
  • Dark American Lager > International Dark Lager
  • Schwarzbier (Black Beer) > Schwarzbier
  • Maibock/Helles Bock > Helles Bock
  • traditional Bock > Dunkles Bock
  • Northern German Altbier > rolled into International Amber Lager
  • California Common Beer > California Common
  • Dusseldorfer Altbier > Altbier
  • Standard/Ordinary Bitter > Ordinary bitter
  • Special/Best/Premium Bitter > Best Bitter
  • Extra Special/Strong Bitter > Strong Bitter
  • Strong Scotch Ale > Scottish Wee Heavy
  • Mild > Dark Mild
  • Brown Porter > English porter
  • Robust Porter > American porter
  • Imperial IPA > Double IPA
  • Weizen/Weissbier > Weissbier
  • Dunkelweizen > Dunkels weissbier
  • Belgian Specialty Ale > deleted
  • Flanders Brown Ale (Oud Bruin) > Oud Bruin
  • Straight (unblended) Lambic > Lambic
  • Christmas/Winter Specialty > Winter Seasonal Beer
  • Classic Rauchbier > Rauchbier

Specialty-Type Beers
The specialty beers will have more specific entry categories, rather than just referencing classic styles. These will have more detailed explanations for what’s allowed.

  • Fruit Beer – fruit beer, fruit and spice beer (fruit dominant), specialty fruit beer – with other fermentables
  • Spiced Beer – spice/herb/vegetable beers, winter seasonal beer, autumn seasonal beer
  • Alternative Fermentables – alternative grain beers, honey beers
  • Smoked Beer – Classic style smoked beer, specialty smoked beer
  • Wood-Aged Beer – wood-aged beer, specialty wood-aged beer (might include a wine barrel or bourbon barrel)
  • Specialty Beer – clone beer, mixed style beer, experimental beer
  • Belgian Specialty will get wrapped into Specialty Beer

Updates to Meads and Ciders

  • Gave spiced mead its own category
  • Added berry mead and stone fruit mead category
  • Added fruit and spice mead to spiced mead
  • Added historical mead to specialty mead

Cider

  • common cider now called new world cider
  • added ice cider and cider with Herbs/Spices to Specialty Cider and Perry (to include hopped ciders)

Other Changes
Electronic version of the guidelines will include categorization, as well as a sorting feature of the guidelines so you can re-group styles by similarities.
As you can see, the changes to the BJCP Guidelines are quite extensive! Review Gordon’s slides here and the video presentation here. See the draft guidelines here.
——————————————————————————————————————-
David Ackley is a beer writer, brewer, and self-described “craft beer crusader.” He holds a General Certificate in Brewing from the Institute of Brewing and Distilling and is founder of the Local Beer Blog.

6 Great Beers To Brew For Football Season!

Beer made from homebrew recipe kit that goes good with football.Just like apple pie, baseball and Cracker Jacks, and mac & cheese, beer and football is a classic combination. For football season you need something you can drink over the course of a three-hour game, a tasty session beer that’s just as good for tailgating as it is for sharing with friends around the tube. Granted, just about any beer goes well with football, but some seem to fit the season better than others.
Consider brewing one or more of these homebrew recipe kits to enjoy throughout the football season.

  • Steam Freak Buddy Light – This homebrew recipe kit delivers the ideal tailgating beer, a light American lager that’s easy to drink. A clone of Peyton Manning’s favorite beer, the Buddy Light kit will be perfect for playing cornhole, throwing the pigskin around the parking lot, and washing down a portion of burgers and brats.
  • Steam Freak Fat Liar – Balance is the main feature of this American amber ale. Floral hops and biscuity malts combine to deliver a pleasant, drinkable, moderately hopped beer with some roasted notes to keep things interesting.
  • Brewer’s Best German Oktoberfest – Although football is an American sport, sometimes it’s nice to enjoy some beer styles from across the pond. This malt-forward German lager fits the bill perfectly. Coming out at about 5.5% ABV with some malty sweetness and just a hint of hops, this amber beer is made for a long fall day of drinking.
  • Steam Freak Blue Noon – This Blue Moon clone kit satisfies all the requirements of a Shop Homebrew Recipe Kitsgood football beer: light, flavorful, and easy-drinking. Orange peel and coriander bring an interesting combination to the beer, while wheat gives it some body. Feel free to serve with a wedge of orange or lemon.
  • Steam Freak Steam Stoker Stout – If you find yourself tailgating in the snow, you might be ready for a dark, roasty, higher gravity thirst quencher with a little extra alcohol to keep the cold at bay. This homebrew recipe kit delivers about 7% ABV and roughly 50 IBUs, packing plenty of punch to keep you warm well into the fourth quarter.
  • Brewcraft Pacific Northwest Pale Ale – For the West Coast hop heads out there, this homebrew recipe kit features the classic, citrus/pine combination of Cascade and Centennial hops, supported by some toasty and malty specialty grains for a tasty malt flavor. It’s a well-balanced beer at 5.3% ABV, 54 IBUs.

What do you think – what’s the perfect homebrew recipe kit to make for football season? Tell us below!
—————————————————————————————————————–
David Ackley is a beer writer, brewer, and self-described “craft beer crusader.” He holds a General Certificate in Brewing from the Institute of Brewing and Distilling and is founder of the Local Beer Blog.

Brew & Review: Tasting Steam Freak Special Bitter – Pt. 5

Glass of bitter beerAt long last, the Steam Freak Special Bitter has been brewed, fermented, kegged, and is now ready to drink. Now it’s time to taste the beer and figure out if it can be improved in any way.
Here are the notes from my taste test of the Steam Freak Special Bitter beer recipe kit.
Tasting Notes: Steam Freak Special Bitter Recipe Kit
Final Stats:
OG: 1.048
FG: 1.017
ABV: 4.1%
IBUs: ~25
SRM: ~15

  • Aroma – Primarily caramel and toffee, with just a touch of spicy hop aroma from the last minute decision to add some Cascade dry hops.
  • Appearance – Very dense, foamy, off-white head that sticks around for at least a couple minutes. Head retention probably due in part to the Carapils malt. Medium-dark amber color, a little darker than expected, but still appropriate for the style. Somewhat hazy. I didn’t use any finings, so they will probably help next time around.
  • Flavor – First thing I get from this beer recipe kit is the caramel/toffee malt sweetness, followed by some spicy and floral hops flavor. The beer finishes dry with a slightly mineral aftertaste.
  • Mouthfeel – Neither too heavy nor too light – just right. Slightly dry finish.Shop Beer Recipe Kits
  • Overall – Overall I’m pleased with how the beer turned out. It’s well-balanced, moderate gravity, and with plenty of flavor to keep things interesting.

If I were to brew this beer recipe kit again I might consider making a few changes:

  1. Move some of the liquid malt extract to a late addition and add some aroma hops during the boil. This should bring a little hop bitterness and aroma to the forefront. Any low alpha acid hop variety will do, but Kent Goldings and/or Fuggles would be two of the most authentic options.
  2. Also, looking back over my homebrewing notes, I recall that I ran out of Irish moss. A teaspoon or two added during the last ten minutes of the boil would likely help with the haze.
  3. I will probably not prime the keg next time. I’m glad I tried it, but I ended up pulling a good bit of yeast out of the keg for the first few pints. Good old force carbonation will work just fine.

All in all, the opportunity to brew the Steam Freak Special Bitter was a good one. I got to review some extract brewing techniques and try my hand at a style I’d never brewed before.
Which Steam Freak beer recipe kit would you like to try?
Read the other posts of this review! Part 1 | Part 2 | Part 3 | Part 4 | Part 5 |
—————————————————————————————————————-
David Ackley is a beer writer, brewer, and self-described “craft beer crusader.” He holds a General Certificate in Brewing from the Institute of Brewing and Distilling and is founder of the Local Beer Blog.