 Last week I put together a clone recipe for Ithaca Beer Co.’s Flower Power, a deliciously hoppy American IPA. As I prepare to brew the beer, the next thing I will focus on is a water profile and making brewing water adjustments necessary.
I’ve been getting relatively obsessed with water profiles and brewing water chemistry lately. After conducting an experiment with gypsum, I am absolutely convinced that it can have an effect on the perception of hop flavor. I’ve also noticed that including elements like magnesium, which are beneficial to yeast health, my fermentations have appeared stronger and healthier.
To figure out how to adjust the brewing water for this IPA, I need two sets of figures: a source water profile and a target water profile. There are several programs that can help with these water calculations, but in this case I’ll use the water adjustment calculator on Brewer’s Friend. It’s free to use and relatively straightforward. Let’s walk through how to use it.
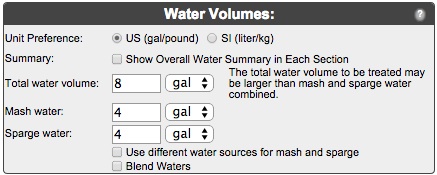
1. Input water volumes
Here I will stick with the defaults:
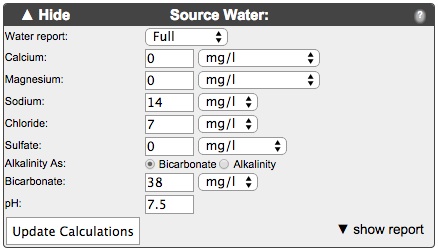
2. Input source water profile
Here’s what my municipal water profile looks like:
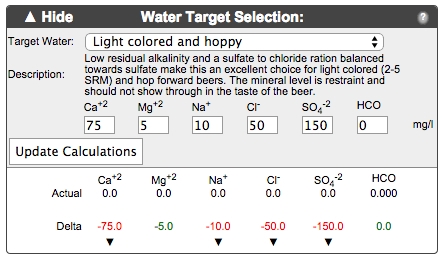
3. Select a target water profile and compare source water to target water
Here I’ll choose the “light colored and hoppy” water profile. Brewer’s Friend also provides target water profiles for many of the major brewing cities of the world.
After clicking on Update Calculations, I can now see the difference between my source water and the target water profile. A number in green is relatively close to the target, a number in red is off. The arrows show whether your water has too much or too little of a given mineral. It’s easy to play around with the Salt Additions (next box down) to see how they will adjust the water profile.
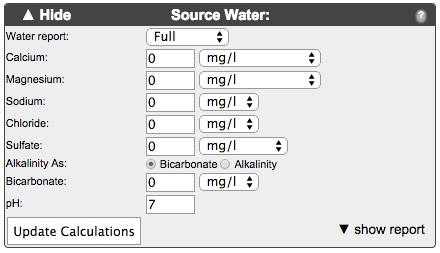
One trouble spot in this example is the alkalinity. Since I can’t add minerals to remove alkalinity, I have to change my source water by using reverse osmosis or distilled water. That’s the only way to get the HCO levels down to 0 (as far as I know).
In this case, I’ve gone back to edit my input water to match distilled water:
4. Compare source water to target water and determine salt additions
Now I can play around with the mineral salt addition inputs to get the brewing water profile adjusted to as close to the target as possible. Here’s the initial difference between the two waters:
And here’s the mineral salt combination I’ve found that will get me pretty close to the target water profile I need:
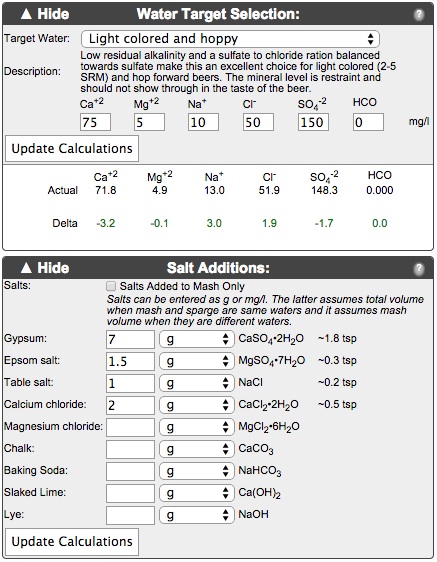
On brew day, I’ll use a small digital scale to weigh out the different mineral salts. This mineral salt combination will be added to the total water used in the beer recipe – all 8 gallons as determined in the original water volume input. For now, I can add the additions to my homebrewing notes so they’ll be ready when I need them.
The Water Calculator goes on to include brewing water adjustments and inputs for adjusting mash pH as well, but I’ll save you the trouble and just say that in this case none are needed. Feel free to play around with the calculator to determine whether you need to add any acids to acidify your mash.
Next, stay tuned for the Flower Power Brew Day!
—————————————————————–
Review the whole Flower Power clone brewing process below:
- Part 1: Developing a Recipe
- Part 2: Brewing Water Adjustments
- Part 3: Brew Day
- Part 4: Primary Fermentation Mishaps
- Part 5: Bottling & Kegging
- Part 6: A Conditioning Taste Test
- Part 7: Final Side-by-Side and Recipe Edits
—————————————————————–
David Ackley is a beer writer, homebrewer, and self-described “craft beer crusader.” He holds a General Certificate in Brewing from the Institute of Brewing and Distilling and is founder of the Local Beer Blog.