How Patience Makes Better Homebrew

Man watching home brewing timeline and fermentation times It was a rookie mistake.
I was excited for my latest batch of homebrew – a saison – and paid more attention to the timeline and fermentation times than the beer itself. After two weeks in primary and two more in secondary, I figured it was ready to carbonate, so into bottles it went.
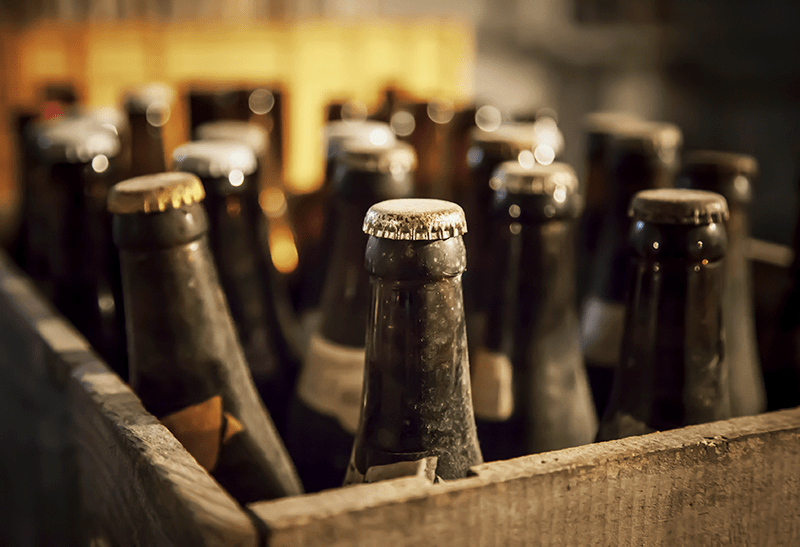
Then I opened a bottle a week later and noticed a lot of foam. I waited another week, and half the beer was gone by the time I poured it into my glass. It was a gusher, forcing ounce upon ounce of white foam up the neck of the bottle and into my sink.
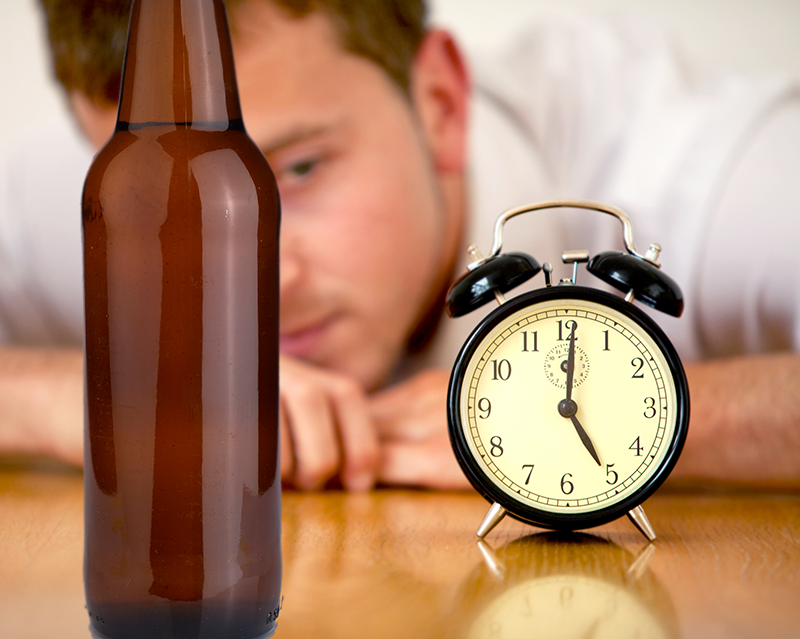
That’s when it really hit home: patience is a virtue for everyone, but for homebrewers, it’s a necessity.
In most cases – especially this one – it’s a matter of paying attention to the beer instead of any preset home brewing timelines. Forget about fermentation times; focus on the beer. Yes, you can have expectations for the length of a brew day, but sometimes it’s important to take a step back and take stock of how time – or lack thereof – can impact your beer.

Time is more than the calendar

In the case of my saison, it was important for me to set aside my own expectations. The lesson? Ignore human timeframes when it comes to home brewing.
Even if you’re making a batch for a special event or occasion, build in extra time for unforeseen problems, or just to allow the beer to do its own thing. The best way to confirm that a beer is finished is to take your hydrometer and check its final gravity. Taste the sample to add another layer to your test.
To be extra thorough, give it another day or two after it has reached final gravity just to be safe.

Slow working yeast

Another aspect to consider is the yeast doing the work inside your carboy. While some yeasts offer fast attenuation like Safale S-04 or Lallemand’s Nottingham, several need more time to offer the depth of flavors you seek from your brew.
If you’re making a porter or bitter, Wyeast 1028 (London Ale) is a great option. It’s even flexible enough to build up a beer to as much as 11 percent ABV, but requires plenty of time to get there. Other slow-moving options include Wyeast 1728 (Scottish Ale) and Wyeast 1099 (Whitbread Ale). All these strains can enhance the layer of flavors in your beer, but let them take their time in doing so. The fermentation times will typically be longer.

Wait on your bottles

While I suffered the impact of bottle bombs with my saison, one hidden truth I’ve found with many of my batches is that the best tasting beer usually comes when I’ve almost run out.
Even when I’m lucky to have a fully carbonated homebrew after one week in the bottle, I’ve started a habit of setting aside at least a six-pack to drink later than I normally would. Drinking an IPA as fresh as possible is a good idea, but a porter or honey-basil ale probably won’t get hurt by resting for a few more weeks. Remember to consider the temperature of your storage area and ingredients you’ve used in the beer, including yeast, when setting aside bottles to age longer than the rest of your batch.
There are many lessons to learn when it comes to home brewing, but one of the most important I’ve taken away is to not get hung up on having a beer ready in an absolute set timeframe. Don’t focus on whether or not your home brewing timeline is what was expected. Don’t worry if your fermentation times are longer than they should be. The beer will be ready when it’s ready.
—–
Bryan Roth is a beer nerd and homebrewer living in Durham, North Carolina. You can read his thoughts on beer and the beer industry on his award-winning blog, This Is Why I’m Drunk, and send him suggestions on how to get his wife to drink craft beer via Twitter at @bryandroth.

Is Homebrewing Art Or Science?

Artist rendition of homebrew.What gets you excited about homebrewing? Is it the art of recipe development? Or the science behind fermentation and mashing? The creativity behind combining malt, hops, and yeast, or the learning that comes from every single batch of beer you make? These are the thoughts that crop up when we ponder the question: Is homebrewing art or science. While some may lean towards either the art or the science side of homebrewing, my guess is that for most of us, we’re drawn to both aspects of the hobby.

The Science of Homebrewing
One could spend a lifetime trying to understand the science behind making beer. Indeed, many do. It’s the science side of homebrewing that helps us understand the specific actions that allow four ingredients to combine into a flavorful, alcoholic beverage known as beer.
First, we have the science of water. Not all water is created equal. What is the make-up of your brewing water? Is it pure, like the soft water of the home of Pilsner in the Czech Republic? Or is it hard, like the sulfate-rich water of Burton-on-Trent, homeland of Shop Malted GrainsEnglish pale ales. Knowing the mineral content of the water you brew with can help you optimize mashing, fermentation, and flavor.
How about the science of malting? Why does grain need to be malted? It’s the malting process that begins to convert the energy in the grain into what will become fermentable sugar and eventually alcohol. Malting also affect the flavor and color of the grain and creates a whole range options that allow beer to be light or dark, sweet or roasty, and everything in between.
The science of hops reveals what makes beer bitter. It helps us understand IBUs and why an IPA stands apart from a pale ale. Understanding hop oils allows us to grasp how beers can taste and smell like citrus, pine, or grapefruit.
Finally, my favorite science of homebrewing, the science of beer yeast, the mysterious microorganism responsible for converting sugar into alcohol and carbon dioxide, explains how the other ingredients can magically transform a sugary porridge into an Shop Hopselixir that relaxes the body and soothes the senses.

The Art of Homebrewing
Brew masters have a deep understanding of their craft, not only the brewing side of the equation, but also the sensory side. For without understanding the way that flavor can change our mood or remind us of a special memory, brewers would just be shooting in the dark.
Brewers have to understand the flavors that different ingredients bring to a beer. Science can begin to explain flavor, but to fully understand it, a brewer needs experience. They need the vocabulary to describe the flavor, and only experience can help them understand how much is too much. While some scientific measurements (BU/GU) can help to facilitate an understanding of balance, only experience can help brewers develop an inherent knowledge of it.
There is an art to homebrewing – a creativity, but creativity isn’t just haphazardly throwing in whatever ingredients come to mind. The art is in understanding balance. Shop Beer Recipe KitsHow much hop bitterness is appropriate for a Bohemian pilsner? How much coriander should be used in a Belgian wit? One could easily follow a recipe, but a true artist will know from experience when enough is enough.
And of course there’s an art to the act of brewing. There’s a certain art to learning how and when to transfer beer from one fermenter to another, and a certain art to bottling without losing a drop of beer. Again, the art is improved with experience.

Putting It Together

So, is homebrewing art or science? My approach is that through understanding the science of homebrewing, we begin to develop the artistic skill needed to create truly wonderful beer. This is something that only comes through practice and repetition. Through science with develop our art of homebrewing. John Palmer agrees:
“Brewing is an art as well as a science. Some people may be put off by the technical side of things, but this is a science that you can taste. The science is what allows everyone to become the artist.”Shop Home Brew Starter Kit
Yes, homebrewing is both an art and a science. The beginning homebrewer may focus on the art of the brewing procedures before getting into the science of different ingredients and techniques. Then maybe combine the two into the art and science behind recipe development. I believe that a large part of this hobby’s appeal is that homebrewing fits so easily into both categories. It’s both.
What’s your take? Do you learn more toward the art of homebrewing or toward the science of homebrewing?

—–
David Ackley is a beer writer, homebrewer, and self-described “craft beer crusader.” He holds a General Certificate in Brewing from the Institute of Brewing and Distilling and is founder of the Local Beer Blog.

How Long Does It Take to Make Beer?

He Knows How Long It Takes To Make BeerWhen discussing how long it takes to make beer at home or the brewing timeline, we can separate the question into two parts: how much time is spent actively working on the beer vs. the time the beer is sitting in the fermenter or the beer bottles. While the beer will need weeks or months before it’s at it’s best to drink, the number of active hours actually spent brewing is relatively low.

Hands-on vs. Hands-off Time
My all-grain brew days usually take about six hours from start to finish, including cleaning, but a lot of that time is spent waiting for water to heat, for the mash to convert, and for the wort to boil. (During this time I’m able to multitask and do some chores around the house.) Add to that an hour or so for transferring to secondary and an hour or so for bottling, and the active time for making a batch of beer is about 8-10 hours, spread out over two or three days. You can shave off an hour or so if you’re brewing with malt extract or doing a partial mash. Here’s more information on these brewing methods.
The bulk of the time that it takes to make beer actually involves very little work on the part of the homebrewer. During fermentation and conditioning, it’s the yeast that does all the work of converting sugar into alcohol and developing flavor.Shop Homebrew Starter Kit
The question of how long it takes beer to ferment and condition is largely dependent on beer style. On the short end, a low-gravity ale can take as little as 2-3 weeks if you have a way to force carbonate the beer. However, homebrew almost always improves with some aging, and some beer styles simply take longer to ferment and condition than others.

Ales vs. Lagers
When we ask: how long does it take to make beer?, we can’t ignore the difference between ales and lagers. In general, ales are ready to drink sooner that lagers. It’s not unusual to open the first beer after 4-6 weeks of fermentation and conditioning. Lagers, on the other hand, ferment more slowly at cooler fermentation temperatures, and then go through a cold lagering phase, which may last 6-8 weeks or longer. A standard lager may take 2-3 months or longer from brew day to bottling.Shop Winemaking For Dummies

Amount of Fermentable Sugars

In general, the higher the gravity, or the amount of fermentable sugar in the wort, the longer it takes to ferment. High-gravity ales and lagers both benefit from extended conditioning, during which time the yeast cleans up some undesirable fermentation byproducts, harsh alcohols mellow out, and the different flavors in the beer meld together. Many brewers age barleywines and Russian imperial stouts for a year or longer.
One theory states that for every gravity point in the final gravity, age the beer for one week. This is a technical way of saying the more body your beer has, the more aging it will benefit from. In general, this theory would support aging your average beer for 2-3 months before drinking. Of course there are no absolute rules in brewing. Determining when a beer is ready to drink will come from experience and your ability to taste when a beer has reached its peak flavor.
Shop Steam Freak Kits
Conclusion
So, how long does it take to make beer at home? Though the amount of time from start to finish can be as little as a month, most of that time is spent allowing the beer to ferment and condition. In general, expect to spend 6-10 hours of hands-on time brewing, and 2-4 months between brew day and drinking. That said, you will often be rewarded for being patient and allowing your homebrew the time it needs to develop the best flavor.
—–
David Ackley is a beer writer, brewer, and self-described “craft beer crusader.” He holds a General Certificate in Brewing from the Institute of Brewing and Distilling and is founder and editor of the Local Beer Blog.

What's The Best Mash Tun Design For Homebrewing?

Grains Into Coller Mash TunMaking the switch to all-grain homebrewing involves making some important decisions around equipment. In particular, what kind of mash tun should you get? Which mash tun design is the best? In this blog post, I’ll walk you through the options, but first, what is a mash tun?
A mash tun is simply a vessel where crushed grains are mixed with hot water. During the mashing process, sugars are extracted from the grains and into the liquid, which is called wort. At the end of the mash, the wort is drawn out of the mash tun and into a boiling kettle. A perforated false bottom holds behind all of the spent grain.
Now let’s cover the options when deciding what kind of mash tun design to buy.

3 Basic Mash Tun Designs from Which to Choose: 

1. Brew in a Bag (BIAB)
OK, the first option isn’t exactly a mash tun, but for many homebrewers, it’s the easiest and most economical way to get into all-grain brewing.
The way it works is that a mesh straining bag (grain bag) is fitted into a brew kettle filled with water, then the crushed grains are added to the bag. After the mash (usually 60 minutes), just pull out the bag of grains.
For best results, the water in the brew kettle should be pre-heated before setting up the bag. You want to avoid the possibility of the grain bag coming in direct contact with the heat source, so some bungee cords might come in handy.Brew in a Bag
The bottom line: Brew in a Bag is an economical mash tun design for homebrewing, but requires some effort to keep the grain bag away from the kettle.

2. The Mash Tun Cooler
The mash tun cooler is a great option for all-grain home brewers. Mash tun design is still affordable, yet offers a setup that closely mimics the multi-vessel system used by professional brewers.
The ability to lauter, or shower the grain bed with hot water as you draw off the wort, can help improve mash efficiency over the BIAB method. The mash tun cooler setup also tends to be very efficient at holding heat.
There are just a couple drawbacks with the mash tun cooler system. For one, they’re easily scratched. As a result, they can be hard to clean. These issuesMash Tun can be remedied by being mindful of what you use to clean the mash tun (something non-abrasive – a cloth or rag is best. The other issue with this mash tun design is that you can’t apply direct heat to the plastic mash tun, making it a challenge to do step mashes. To raise the temperature of the mash, you have to add hot water. Dialing this in can be a challenge, but luckily there are online calculators and brewing software available to help you through the process.
The bottom line: A mash tun cooler system is a great middle-of-the-road option for all-grain homebrewing.

2. Stainless Steel Mash Tun
Not only does the stainless steel mash tun look cool, it’s also extremely durable and easy to clean. Most come with a build in thermometer.
The main advantage of the stainless steel mash tun is that you can apply heat directly to the kettle, making it easier to dial in your mash temperature to the degree.
The main drawback of a stainless steel mash tun is the price. But with that price tag you get quality construction that will last a lifetime. A stainless steel mash tun is an Stainless Steel Mash Tuninvestment for the long term, and if you ever want to sell it, you can probably get back most of what you paid for it.
The bottom line: A stainless steel mash tun design is the best option for serious brewers – if you can afford it. 

So what kind of mash tun design do you use? Is it working for you, or do you plan to upgrade?

—–
David Ackley is a beer writer, homebrewer, and self-described “craft beer crusader.” He holds a General Certificate in Brewing from the Institute of Brewing and Distilling and is founder of the Local Beer Blog.

8 Killer Tips For Bottling Beer

Capper For Bottling BeerOf all the processes involved in making beer at home, the one that most often gets in people’s way of enjoying the hobby is bottling process. Why is this?
Maybe it’s the sheer number of beer bottles that have to be cleaned and sanitized. Maybe it’s all the labels that have to come off the beer bottles. Whatever the reason, chances are someone has come up with a way to make it less of a chore. Here are some tips that will help make bottling beer easier.

Tips for Bottling Beer

  1. Start with clean beer bottles without labels – This might not make financial sense for some people, but I believe that a lot of the frustration of bottling beer comes from having to remove labels from the beer bottles you recycle. If you dread the idea of peeling labels from 50+ beer bottles, just go ahead and buy a couple boxes of new beer bottles and save yourself the headache.
  1. Rinse beer bottles as soon as they’re empty – You’ll thank yourself later. This will prevent funk from growing inside the beer bottle, making it much easier to prep the beer bottles for filling. Soak them once in cleanser, soak again in sanitizer such as Basic A, and you’re ready to go. This is my favorite tip for bottling beer. It can save a lot of time!
  1. Use a bottle washer – For the bottles you forgot to rinse out, take advantage of the strong blast of water from a carboy and bottle washer. One oShop Bottle Washerf these will let you rapidly clean a batch of beer bottles in no time flat. Also works great for cleaning out your siphon tubing!
  1. Sanitize bottles in the dishwasher – This is my second favorite tip for bottling beer. Sanitizing your glass beer bottles in the dishwasher can save you a lot of work. Just load them in and set the dishwasher to the “sanitize” or “high heat” cycle. You’ll need to start them well in advance of when you plan to bottle, but at least you can do other tasks in the meantime. This works best if the labels are already removed.
  1. Clear your space ahead of time – This is a good tip for any stage of the homebrewing process, not just bottling beer. Keeping your workspace from getting cluttered will go a long way towards preventing mishaps and making things run smoothly. Take a few extra minutes before bottling to put everything in its place.
  1. Sit down while bottling your beer – I like to hook up my bottle filler to the bottling bucket with a 2-inch section of transfer tubing. Then I can have a seat while filling the beer bottles. It definitely helps to save the back! Also make it easier to grab a swig or two from previously bottled beer.
  1. Enlist a friend – Get a friend or significant other to help and cutShop Bottle Cappers your bottling time commitment in half. One person fills the beer bottles, the other caps the beer bottles. Just be sure to repay them with some homebrew!
  1. Switch to kegging! – OK, this tip for bottling beer is a bit of a cop-out, but if bottling really gets on your nerves, why not get yourself a homebrew draft system? Not only do you avoid bottling beer altogether, you get to drink your beer in three or four days instead of 14!

What tips to you have for bottling beer?
—–
David Ackley is a beer writer, homebrewer, and self-described “craft beer crusader.” He holds a General Certificate in Brewing from the Institute of Brewing and Distilling and is founder of the Local Beer Blog.

Secondary Fermentation: 3 Ways Your Beer Will Thank You For It!

Beer Going Into Secondary FermentationThere’s an old adage when it comes to making your own beer:
Ask ten homebrewers one question and you’ll get eleven different answers.
For such a unique, do-it-yourself hobby, there are all sorts of ways to approach homebrewing with just as many opinions and processes to consider. But for me, one area stands out as clear as a golden pilsner. I always rack my beer into a secondary fermentation.
It’s a step that may not be completely necessary for every beer you brew, but between habit and success, I’ve made a secondary fermentation a regular part of my brewing process. I believe it’s an effort worth the minimal investment in time – about an hour to transfer and clean up – especially since you just need a second fermentation vessel to pull it off.
So what is a secondary fermentation, anyway? It’s very simple. A secondary fermentation is done by moving your beer to a another fermenter towards the end of fermentation. This could be anywhere from the 3rd to 7th day. Ideally, leave your beer in secondary fermentation for at least one week, but feel free to add more time if additional ingredients are added for flavor.
Shop Carboys
So why should you consider putting your beer in a secondary fermentation?
Here are three good reasons to put your beer through a secondary fermentation:

  1. Manipulate the flavor of your beer
    Because primary fermentation can be rather vigorous and even violent, it’s not worth adding additives/adjuncts to your beer right away. A secondary fermentation offers the perfect time to add fruit, wood, or other flavorings to provide layers of complex flavor to your beer. You’ll be able to maximize taste and aroma without the threat of losing anything. Of course, this is the right time to dry hop, too, which allows all the oils of the hops to be transferred directly into your beer instead of getting boiled off in the wort on brew day. Get all the hoppy characteristics you look for without adding bitterness.
  1. Improve the taste Shop Steam Freak Kits
    Leaving beer on a collection of trub for too long can start to negatively impact the taste of your beer, maybe even creating off-flavors from autolysis. Racking your beer to a secondary fermenter can prevent this. On the flip side, moving a secondary fermentation will give the yeast one more chance to chew up the intricate sugars floating around in your beer, to clean up potential off-flavors (like diacetyl), and help flavors meld together.
  1. Get a clearer beer
    You can use Irish moss or Whirfloc tablets in the boil, but post-brew day, another easy way to clarify your homebrew is to get it off remaining yeast and trub from primary fermentation and allow it to condition a little longer in a new carboy. It also means less sediment to deal with once you’re ready to bottle your homebrew. If you make lots of darker beers, including porters or stouts, doing the two-stage fermentation may not be as necessary. But since I make many lighter beers like IPAs, wheat ales and even a blonde now and then, it matters a lot.Shop Irish Moss

The Bottom Line…
Putting your beer through a secondary fermentation does mean you have to spend a little more time with it (about an hour), and if you’re not thorough in sanitation there is chance for infection. However, in the grand scheme of things, your beer will more often than not look and taste better in the end.
—–
Bryan Roth is a beer nerd and homebrewer living in Durham, North Carolina. You can read his thoughts on beer and the beer industry on his award-winning blog, This Is Why I’m Drunk, and send him suggestions on how to get his wife to drink craft beer via Twitter at @bryandroth.

6 All-Grain Brewing Tips For The First-Timer

Crushed grains for all-grain brewingSo you’ve finally decided to brew your first batch of all grain beer, congrats! Brewing with grains is a big step towards brewing just like the pros.
Thinking back on my beginning homebrew experiences, here are some handy all grain brewing tips for brewing your first batch of all grain homebrew. This are just little tricks and pointers that I’ve learned along the way while learning how to brew all grain beers.

All Grain Brewing Tips

  1. Brew with a friend – Brewing with others is often more enjoyable than brewing solo, but it’s also nice to have an extra set of hands. Better yet, if your friend has experience with all grain brewing, they’ll probably be able to give you some valuable tips and pointers that will serve you well for years to come.
  1. Have plenty of water ready – Due to the nature of mashing and lautering, all grain brewing requires that you have plenty of water. This will mean that you’ll have to plan ahead in order to boil off chlorine or otherwise treat your brewing water. When doing all grain brewing, a five gallon batch will likely need 8-10 gallons of water. Use a calculator like this one to get a good estimate of your water needs ahead of time.Shop All Grain Brewing System
  1. Try brew in a bag (BIAB) – Of all the all grain brewing tips, this one is my favorite. Brew in a bag is a great way for partial mash brewers to transition to all grain brewing. Instead of a mash tun, all you need is a mesh grain bag. With BIAB, your boil kettle should be big enough for a full-volume boil, so if your kettle is five gallons, maybe try a three-gallon batch of beer.
  1. Take notes – Everyone’s brewing setup is different, so while you can find all kinds of advice for how to brew, it’s important that you become intimately familiar with your own all grain equipment and procedures. Take good homebrewing notes so you can refer to them when troubleshooting or replicating a beer recipe.
  1. Don’t be afraid to use malt extract – Just because you’ve started into the world all grain brewing doesn’t mean you have to stick with it forever. Extract and partial mash will still serve you well if you ever find yourself looking for ways to save some time and effort. Even though I normally brew all grainShop Grain Mills, it’s still nice to brew from a homebrew recipe kit once in a while. Plus, adding malt extract to your all grain batches can also make it easier to make high-gravity beers.
  1. RDWHAH – Relax, don’t worry, have a homebrew. Char lie Papazian’s mantra has guided me through several brews that have bordered on frustration. Keeping a cool head will make the experience much more enjoyable. Remember that as long as you follow some basic principles, like good cleaning and sanitation, it’s actually pretty hard to mess up a batch. It’s no accident that I chose this one to be the last of the all grain brewing tips. Take it to heart, and the hobby will become much more fun and enjoyable.

What tips do you have for someone beginning their first batch of all-grain brew?
—–
David Ackley is a beer writer, homebrewer, and self-described “craft beer crusader.” He holds a General Certificate in Brewing from the Institute of Brewing and Distilling and is founder of the Local Beer Blog.

What Are Hop Oils? Explained!

Showing Hop OilsWhile the resins and alpha-acids found within hops are responsible for making beer bitter, essential oils within the hop cone contribute many of the flavor and aroma characteristics that we know and love in some of our favorite beers. If you drink a pale ale or an IPA with a wonderful citrus or pine aroma, you can thank the hop oils for delivering those delightful sensations.

What are hop oils? How are they used in home brewing?
In the anatomy of the hop flower (or strobile), volatile hop oils account for about 1-3% of the weight of the cone. That may not seem like very much, but when you think about it, it doesn’t take a lot of hop oils to give your homebrew a delicious hop flavor.
Hop oils are more delicate than the bittering compounds found in the resins of the hop. That’s why hops for flavor and aroma are typically added towards the end of the boil. Boiling hops for too long drives the hop oils away through evaporation.
Aside from late-boil hopping, dry-hopping is another technique for imparting hop aroma. The hops are essentially steeped in the fermented beer for a number of days until the desired flavor and aroma is reached. An alternative to dry-hopping (if you’re so inclined), is to build your own hop back device, which circulates beer through the hop material to extract those precious hop oils. Here’s more information about adding hops to beer.
Since hop oils begin to degrade immediately after they’re harvested, it’s important that hops are stored properly, preferably nitrogenShop Hops flushed, air tight, and frozen. In light of the fact that hops degrade so quickly, many people enjoy fresh or wet hopped beer, using the hops as soon as they’re harvested.

What are the types of hop oils and their characteristics?
Within the hop, there are several different types of hop oils. Their proportions vary depending both on the hop variety and on seasonal and local conditions. Learning a little about the characteristics of the different oils can help with understanding the flavor and aroma profiles that different types of hops can contribute to a beer. The four primary hop oils found in hops are listed below:

  • Myrcene – Myrcene is the most prevalent hop oil found in many hop varieties, often comprising 50% or more of the total oils in the hop cone. Myrene is commonly associated with floral or citrus aromas in beer. Citra is an example of a hop variety with very high myrcene content.
  • Humulene – Humulene is the second most common hop oil, though in some cases it may be in greater quantity than myrcene. It contributes woody, spicy, and herbal characteristics, and tends to withstand highShop Wort Aerator temperature better than myrcene. Many of the European and noble hop varieties exhibit higher levels of humulene. Some humulene-dominant examples of hops include Hallertau and Vanguard.
  • Caryophyllene – Though usually lower in quantity than myrcene and humulene, caryophyllene has a distinctive woody and herbal aroma, and often contributes an herbal character to beer. Northern Brewer and Perle hops often have higher levels of caryophyllene hop oil.
  • Farnesene – Farnesene usually represents less than 1% of the oils in the hop, though may be as high as 10% or more of the total oil content. But just because it is lower in quantity, doesn’t make it any less potent than the other hop oils. Farnese usually contributes a woody or herbal character. It is well-represented in Czech Saaz, and Tettnang.

Because hop producers don’t usually label homebrewing hops with individual oil levels, it’s best to consult a resource such as YCH Hops to get a general sense of the oil content in your hops. You can also try the sniff test, rubbing the hops together between your hands, or make a tea from the hops.Shop Steam Freak Kits
This is just a basic overview of what hop oils are. Of course, the best way to learn about the flavor and aroma characteristics of different hop varieties is to brew beer with them. You might consider trying this simple experiment, and do a side-by-side comparison of several different hops.

Interested in learning more about hop oils?
Designing Great Beers is a great resources if you’d like to learn more about the specific types of hop oils.
—–
David Ackley is a beer writer, homebrewer, and self-described “craft beer crusader.” He holds a General Certificate in Brewing from the Institute of Brewing and Distilling and is founder of the Local Beer Blog.

Tasty Belgian Beer Recipes You Should Try

Belgian Beer With Head Being CutBelgian beers have become all the rage in the United States. Some might even credit them as inspiring the American craft beer movement. Belgian-style beers are characterized by the use of Belgian beer yeast, which produces a wide range of fruity and spicy notes that often make Belgian beers wine-like in their complexity. If you’re a fan of Belgian beers, here are the 7 best Belgian beer recipes that you should try right away:
 

  1. Rochefort 8 Clone (All-Grain) – Rochefort is one of the Trappist breweries in Belgium. The monks at Rochefort have been making beer since medieval times and are credited with making some of the best beer in the world. Rochefort 8 is a dark brown, rich with flavors of dark fruit, and 9.2% ABV.
  1. Westmalle Tripel Clone (All-Grain & Extract) – Westmalle is another Belgian Trappist brewery, founded in 1794. Westmalle Tripel is golden in color with a complex fruity, herbal, and floral character.Shop Beer Flavorings
  1. Belgian Saison Beer Recipe (All-Grain & Extract) – This is a classic Belgian saison recipe, brewed with orange peel and coriander. Some flaked oats give the beer body while brown sugar helps give the beer a dry finish. Feel free to switch out the spices with others such as lemongrass or grains of paradise to create your own interpretation of the style!
  1. Blue Moon Clone Recipe (All-Grain & Partial Mash) – OK purists – I know Blue Moon isn’t actually a Belgian beer, but it’s modeled off of Belgian witbier. This Belgian beer recipe is a good option for those just starting to explore Belgian beer styles.
  1. Belgian Abbey Single (Extract) – At 4.5% ABV, this beer might be considered a Belgian table beer. In other words, a beer that’s low enough in alcohol to be served in a big pitcher on the table and consumed throughout the day. But this beer is still packed full of flavor. The Saaz hops play exceptionally well with the Wyeast Belgian Abbey Ale yeast.
  1. Belgian Lambic (Extract) – Belgium is known for a wide range of sour beers, including lambic. Belgian brewers would often ferment their beer with open fermentation, which would expose the beer to wild yeast and bacteria. In the case of lambic, the beer is made sour from aBuy Beer Recipe Kits lactobacillus bacterial culture. Homebrewers don’t have to practice open fermentation; Wyeast offers a lactic blend that eliminates the guesswork of open fermentation.
  1. Cranberry “Lambic” (All-Grain) – One problem with brewing sour beers is that rogue yeast and bacteria can cause problems when brewing non-sour beers. This Belgian beer recipe uses cranberries to create the sour sensations, but a traditional ale yeast that’s much more predictable.

Brew these Belgian beer recipes and soon you’ll be a master of brewing Belgian beer styles!
What styles or Belgian beer recipes would you like to see added to the list?
—–
David Ackley is a beer writer, homebrewer, and self-described “craft beer crusader.” He holds a General Certificate in Brewing from the Institute of Brewing and Distilling and is founder of the Local Beer Blog.

How Long Does Homebrew Keep?

Example Of How Long Homebrew Will KeepThe question: how long does homebrew keep, depends on a number of factors: the style of beer, the alcohol content, storage conditions, whether the beer was bottled with good sanitation.
I think what we really want to know is this – does the beer still taste good? Is it safe to drink? Does the homebrew last in the bottle? Discovering a stash of homebrew at my parent’s house over the holidays brought me to explore these questions.
The short answer is this: it depends. Most commercial brews have a best by date of about three months from the bottling date. Some beers lend themselves to aging more than others, but whatever the case, drinking old bottles of beer is safe, even if it doesn’t taste very good. The beer will last, but sometimes, not the flavor.
So how long does homebrew keep? To guide you through how long you should let your homebrew age, if at all, here are some general guidelines…Shop Bottle Cappers

 
General Rules for Aging Homebrew

  • Once bottles have conditioned for a few weeks, most homebrewed ales are best enjoyed within a few months. That said, sometimes they still taste good after six months or longer. Lagers usually require a cold conditioning period of a few weeks to a few months before consuming.
  • Hoppy beers should be enjoyed fresh – don’t age them! You generally don’t age your pale ales and IPAs so that you can enjoy their lively hop flavors and aromas at their peak. This freshness does not last long in these beers.
  • Some of the best beers for aging are high-gravity beers like barleywine and Russian imperial stout. If brewed and bottled with good sanitation, these beers can keep for a year or longer! This bigger the beer the longer it will last.
  • When aging homebrews, maintain a steady temperature and avoid exposure to UV light. UV light can degrade the hops in beer and “skunk” your homebrew. Try in the corner of a basement, on the floor, to help your homebrew last longer.Shop Beer Bottles


Aging Homebrew: An Experiment

To illustrate, I have a few examples. When I went home for the holidays, I found a stash of homebrew from a year ago.

  • Spiced Cherry Dubbel – This beer, inspired by the book Radical Brewing, came out to 7.7% ABV. It was brewed with tart cherry and black cherry juice added to the fermenter. My notes indicate that the beer was a little strong on the cherry flavors, but still enjoyable, with little cinnamon flavor, if any.
  • Winter Wassail – This is a winter spiced ale made with cranberries and green apples, and it’s become something of an annual brew for me. The recipe can be found in the book the Homebrewer’s Garden. This particular batch came out to 7.4% ABV, with a fairly assertive acidity from the cranberries and green apples. It turned out almost like a sour beer, which in my opinion is a good thing, even though I might dial it down next time around.
  • Braggot”/Brown IPA Experiment – Shop Temp ControllerThis beer was a partigyle from the Winter Wassail above. That means I took the low gravity final runnings from the mash of that beer to make a different beer. To boost the gravity, I added honey, and just for the hell of it, some hops to a gallon of wort just to see what would happen. This was one of those “why not?” experiments. I remember the result being rather cidery and unimpressive.

So how did these beers keep over time?
Surprisingly, the Winter Wassail and Spiced Cherry Dubbel hardly changed at all. They both kept very well. If anything, they became a little more balanced, but for the most part, they were exactly like I remembered them. I was kind of shocked that the fruit flavors lasted at all, but I was pleased to discover no evidence of oxidation or infection.
On the other hand, the “braggot” concoction was unrecognizable. I actually had to go back to my notes to identify what it was. The beer was kind of bland, with a sort of spicy, sort of cheesy hop character, which just wasn’t pleasing at all. I Shop Fridge Monkeysuspect that the low alcohol content didn’t preserve the beer very well, and the hops, being the main flavor feature, degraded quite a bit. This homebrew did not keep at all, so I dumped it.
The conclusion here is when you ask, “how long does homebrew keep?”, you have to know what homebrew you’re talking about. All don’t keep the same. Some homebrews to last long at all, while some keep quite well.
What’s the longest that you’ve ever aged a homebrew? How did it hold up?
—–
David Ackley is a beer writer, homebrewer, and self-described “craft beer crusader.” He holds a General Certificate in Brewing from the Institute of Brewing and Distilling and is founder of the Local Beer Blog.