
 Making the switch to all-grain homebrewing involves making some important decisions around equipment. In particular, what kind of mash tun should you get? Which mash tun design is the best? In this blog post, I’ll walk you through the options, but first, what is a mash tun?
A mash tun is simply a vessel where crushed grains are mixed with hot water. During the mashing process, sugars are extracted from the grains and into the liquid, which is called wort. At the end of the mash, the wort is drawn out of the mash tun and into a boiling kettle. A perforated false bottom holds behind all of the spent grain.
Now let’s cover the options when deciding what kind of mash tun design to buy.
3 Basic Mash Tun Designs from Which to Choose:
1. Brew in a Bag (BIAB)
OK, the first option isn’t exactly a mash tun, but for many homebrewers, it’s the easiest and most economical way to get into all-grain brewing.
The way it works is that a mesh straining bag (grain bag) is fitted into a brew kettle filled with water, then the crushed grains are added to the bag. After the mash (usually 60 minutes), just pull out the bag of grains.
For best results, the water in the brew kettle should be pre-heated before setting up the bag. You want to avoid the possibility of the grain bag coming in direct contact with the heat source, so some bungee cords might come in handy.
The bottom line: Brew in a Bag is an economical mash tun design for homebrewing, but requires some effort to keep the grain bag away from the kettle.
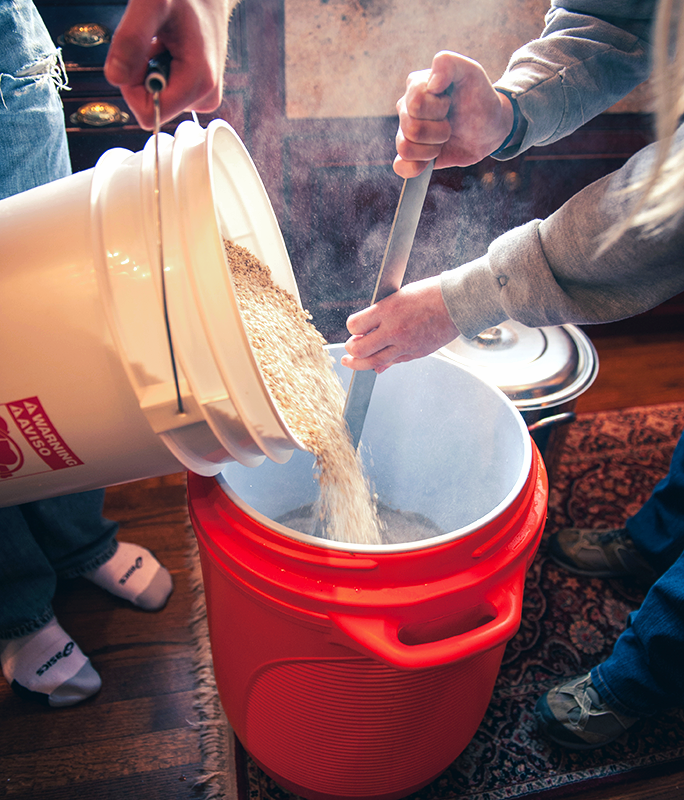
2. The Mash Tun Cooler
The mash tun cooler is a great option for all-grain home brewers. Mash tun design is still affordable, yet offers a setup that closely mimics the multi-vessel system used by professional brewers.
The ability to lauter, or shower the grain bed with hot water as you draw off the wort, can help improve mash efficiency over the BIAB method. The mash tun cooler setup also tends to be very efficient at holding heat.
There are just a couple drawbacks with the mash tun cooler system. For one, they’re easily scratched. As a result, they can be hard to clean. These issues can be remedied by being mindful of what you use to clean the mash tun (something non-abrasive – a cloth or rag is best. The other issue with this mash tun design is that you can’t apply direct heat to the plastic mash tun, making it a challenge to do step mashes. To raise the temperature of the mash, you have to add hot water. Dialing this in can be a challenge, but luckily there are online calculators and brewing software available to help you through the process.
The bottom line: A mash tun cooler system is a great middle-of-the-road option for all-grain homebrewing.
2. Stainless Steel Mash Tun
Not only does the stainless steel mash tun look cool, it’s also extremely durable and easy to clean. Most come with a build in thermometer.
The main advantage of the stainless steel mash tun is that you can apply heat directly to the kettle, making it easier to dial in your mash temperature to the degree.
The main drawback of a stainless steel mash tun is the price. But with that price tag you get quality construction that will last a lifetime. A stainless steel mash tun is an  investment for the long term, and if you ever want to sell it, you can probably get back most of what you paid for it.
The bottom line: A stainless steel mash tun design is the best option for serious brewers – if you can afford it.
So what kind of mash tun design do you use? Is it working for you, or do you plan to upgrade?
—–
David Ackley is a beer writer, homebrewer, and self-described “craft beer crusader.” He holds a General Certificate in Brewing from the Institute of Brewing and Distilling and is founder of the Local Beer Blog.
I started brewing all grain 5 gallon batches in a cooler and switched to a stainless 15 gallon kettle when I went to 10 gallon batches. My best beers were mashed in that igloo cooler. Since those cooler days I’m always looking for a better more efficient way to mash.
The other drawback to the stainless steel is getting up to temp and maintaining temp
You usually have to wrap them with a blanket if your room isn’t hot enough.
I have a 10 gal. Igloo, I also use a sous vide unit in a 3 gal kettle with a 50′ stainless steel double coiled chiller that I run the wort through so I can do a continuous sparge as well as step mashing. I’m moving to a 15 gal. Stainless steel fermentation/boil kettle but plan to still use the sous vide.
I’ve been full mash brewing for over 20 years and for most of the time I have used a home made mash tun. This is made from two3 or 5 gallon fermenting buckets. One acts as the bottom of the tun and has a tap fitted and the other which fits inside the bottom bucket has a series of 3mm holes drilled in the bottom. This acts as the filter to keep the grain in place . I got the design from a book on home brewing here in the UK. Takes about an afternoon to make but lasts for years.