8 Valentine’s Day Gift Ideas for Your Favorite Homebrewer

Valentine's Day Gift For Homebrewing Being Thought OfValentine’s Day is coming up – it’s this Friday, by the way. Need a gift for the brewer or beer geek in your life? Show them how much you love them with the gear that will allow them to take their favorite hobby to the next level! Here are some gift ideas!

  1. A Bag of Grain – For all-grain brewers, you can never have too much malt. A 50 lb. bag of two-row brewer’s malt will be enough to form the base for at least 4-5 recipes. You can be sure that this is a gift that will be put to good use!
  2. Grain Mill – With all that grain, your homebrewer may want their own mill. After all, the grain will have the best flavor and efficiency of it’s milled on brew day. The American-made Barley Crusher can mill up to six pounds of malt a minute when you use an electric drill. The 15 lb. version has a hopper that will hold more than twice as much grain.
  3. Mash-Lauter Tun Set-Up – If your homebrewer is eager to advance to all-grain brewing, they will need a mash tun (a separate vessel for mixing grains with water). Our cooler style mash-lauter tuns offer convenience and affordability. A stainless steel mash tun with false bottom can easily be the centerpiece of a state of the art home brewing system.
  4. A New Fermenter – Allow your homebrewer to make even more beer with an extra fermenter! The 6-Gallon Poly-Fermenter is ideal for primary fermentations and has a spout for easy transfers. You can also choose from a variety of fermentation carboys.
  5. Homebrew Draft System – Give your homebrewer the convenience of serving their homemade beer on draft! A standard draft system makes this possible. Also consider a kegerator conversion kit so your homebrewer can build their own kegerator!
  6. Homebrew Equipment Kit – Maybe your beer lover has yet to begin homebrewing. In that case, get them a Beermaker’s Necessities Box, an equipment kit including all the tools of the trade. You can also choose an ingredient kit for their first batch. The only other thing you will need is a five-gallon brew pot.
  7. A Homebrewing Book – Homebrewing is a constant exploration of techniques and ingredients. Help your homebrewer along on their journey with one of our popular homebrew books or DVDs.
  8. Gift Card – Not sure what to get? Let your homebrewer choose for themselves exactly what they want! Gift cards from E. C. Kraus are a great option. (And they take the guesswork out of gift shopping!)

Are you a homebrewer? What would you like for Valentine’s Day?
————————————————————————————————————
David Ackley is a beer writer, brewer, and self-described “craft beer crusader.” He holds a General Certificate in Brewing from the Institute of Brewing and Distilling and is founder and editor of the Local Beer Blog.

Leigh Erwin: A Beginner's Wine Making Journey: Part 12

Leigh ErwinHi everyone!
I hope everyone is having a great start to 2014 so far!  I think I’m finally caught up from all the holiday madness, and am so ready to get back in the groove of my beginner wine making efforts.
Now that I have time to breathe, I think it’s about time to start a new batch of homemade wine, no?  If you recall from my last entry, I had ordered a bunch of stuff from Homebrewing.org in order to start batch #2 of homebrewed wine!
Everything came in very quickly, and all in one piece!  I’m looking forward to making the “Pinot Chardonnay” that I received, and hope that it tastes better than my first batch of Pinot Grigio.  Don’t get me wrong, batch #1 is totally drinkable, I just don’t think it’s anything to write home about (though I am stoked that it’s still crystal clear and still tastes like a Pinot Grigio).  I think part of my problem was that I started off with a wine that I like in general, but it’s not my favorite.  I love all types and styles of wine, though I also like a variety, so when I’m drinking the same thing over and over again, I tend to tire of it quickly.  I suppose I’ll just intersperse my Pinot Grigio batch #1 consumption with other wines from the wine shop for now!
I’m very excited as I write this to you today because this weekend will be the kick-off for starting batch #2 of Leigh’s homemade wine project!
I figured I’d use this entry today to lay out my goals for batch #2, in hopes that it will give me confidence and strength to get through my first batch without the wine kit unscathed.
Goal 1: Sterilize all equipment I plan to use today!  I still have a bucket of old sterilization fluid sitting around, but it’s been sitting there for quite a long time (and has been used a lot), so I am just going to dump it out and start fresh.  I bought some sodium bisulfite (Campden) from Homebrewing.org this time, so I plan on using that as my sterilization agent instead of the CleanPro SDH that I used last time.
Goal 2: Read through the instructions that are on the side of the Pinot Chardonnay grape juice concentrate and get a solid grasp of what I need to do for today, in the short term future, and longer term future of this beginner wine making project.
Goal 3:  Have fun!  I certainly don’t need to tell myself that twice—fun may as well be my middle name!
These are some pretty simple goals for today, but then again, simple is better, right?  I am just really excited to be making another batch of wine, and am looking forward (albeit, with somewhat baited breath) to allowing myself a little more flexibility in how I create this wine than I did when I used the kit.  Of course, you can do whatever you want with or without a beginner wine making kit, but I’m a sucker for instructions and being my first time last time, I didn’t dare stray from those instructions one bit.  This time, I have very little by way of instructions, so it’s up to me to not screw it up!

——————————————————————————————————–
Leigh ErwinMy name is Leigh Erwin, and I am a brand-spankin’ new home winemaker! E. C. Kraus has asked me to share with you my journey from a first-time dabbler to an accomplished home winemaker. From time to time I’ll be checking in with this blog and reporting my experience with you: the good, bad — and the ugly.

Leigh Erwin: A Beginner's Wine Making Journey: Part 11

Glass Of Pinot GrigioHi guys!  Leigh here!
It’s been 2.5 weeks since I bottled my first batch of Pinot Grigio that I made from the winemaking kit from Homebrewing.org, and I wanted to pop open a bottle with you to share with you how it is developing.  If you remember, I did have half a bottle (the last of the wine at bottling) and of course I had to drink that!  I believe I had made a comment about how I thought I could taste plastic from the fermenters and carboys that the wine had been in, so I definitely wanted to see if that would go away over time.
Taking the bottle out of the fridge, it still looks very clear!  There was a teeny weeny “dusting” of sediment on the bottom of the bottle, but it was so minor that I still do not regret not filtering my wine prior to bottling.
Popping the cork, I really can’t tell if I am still smelling the plastic, or if it’s all in my head.  I’m afraid since I wasn’t tasting this blind that I am really at a disadvantage here.  I should have purchased another bottle of Pinot Grigio and tasted that one against mine in a blind setting to see where I could improve.
Anyway, after tasting the wine, I do think that the “plastic” smell/taste I noted before is starting to go away slowly.  It has a strong mineral character to it, though I don’t think it is completely balanced.  I think the acidity in the wine may be on the higher side, though I couldn’t tell you for sure since I didn’t purchase an acid testing kit (next on the to-buy list?).  After a couple of sips, I think my wine is totally drinkable, though it’s certainly not an award winner (I wasn’t expecting it to be).
I think this particular wine of mine would be better with food in order to help balance it out more, but when it’s all said and done, I’m really happy with the way my first try at making homemade wine came out!
What made me feel really great about my first home winemaking experience and results was when I was chatting with a couple of my friends who happen to be commercial winemakers.  They commended me for doing home winemaking, as they said that home winemaking is much more difficult than commercial winemaking!  Really?  These two guys that make award-winning wines think I’m awesome for making my own small batch homemade wine?  ALL RIGHT!  They basically told me that with small batch, it’s really hard to make a wine that’s “perfect” or in other words, not faulted.  They said that with commercial wine, you’re making it in much larger quantities, so a little spot in a huge tank that happens to be bad will blend away into the rest of the “good” wine, while a little spot in a teeny carboy will basically ruin the entire batch of wine.
Impressing two solid commercial winemakers with my home winemaking endeavors made me so stoked!  Granted, I didn’t actually have them taste my wine, but we’ll leave that for another day when I’m a more seasoned home winemaker!
Cheers!

——————————————————————————————————–
Leigh ErwinMy name is Leigh Erwin, and I am a brand-spankin’ new home winemaker! E. C. Kraus has asked me to share with you my journey from a first-time dabbler to an accomplished home winemaker. From time to time I’ll be checking in with this blog and reporting my experience with you: the good, bad — and the ugly.

The Difference Between Two Row And Six Row Barley

Two Row And Six Row Barley
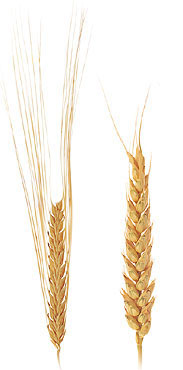
There’s a nearly endless debate among brewers about the merits of two-row barley versus six-row barley. Some homebrewers have a preference for one over the other, but in fact, neither is “better” than the other. Both six-row and two-row malt have their place in craft and home brewing. This post will explain the difference between six-row and two-row barley and will help you make the best decision about which to use.
It’s important to keep in mind that as an agricultural crop, barley varies from season to season, from crop to crop, and from field to field. However, generally speaking…
Six-row barley is:

  • arranged in six rows around the stalk
  • smaller in kernel size than two-row barley
  • higher in protein content
  • higher in husk content

2 Row Barely is:

  • arranged in two rows, on opposite sides of the stalk
  • larger in kernel size
  • lower in protein content
  • lower in husk content

In the early days of colonization, six-row barley grew more readily in North America than two-row, whereas in Europe, six-row was primarily used for feed. Therefore it is more common to find six-row barley in American-style ales and lagers than it is to find it in traditional European styles. That said, modern advancements in agriculture have allowed both two-row and six-row barley to be grown in North America.
So, which should you use in your beer?
Because of the larger kernel, two-row barley provides more extract potential per pound than six-row barley: 37 points per gallon vs. 35. This often makes it more cost effective for larger breweries to use two-row, but for the average homebrewer the cost savings is negligible.
Though two-row barley offers more extract potential, six-row offers more diastatic power than two-row malt. This makes six-row barley ideal for brewing with high quantities of adjuncts and/or specialty grains. Because grains like rice and corn don’t contain the necessary enzymes for conversion, six-row is ideal for brewing adjunct lagers.
Here is a summary of the difference between two row and six row barley:

  • Both two-row and six-row malt make for a great “go-to” base grain for many styles across the board, though you may get more extract per pound using two-row malt.
  • The higher protein content in six-row malt may increase a beer’s body and head potential, but brewers should take care to get a good hot break to avoid haze formation later in the process.
  • Six-row can be helpful when brewing a partial mash recipe. The extra diastatic power can help conversion of the mini-mash if there is a high proportion of adjunct or specialty grains.
  • Six-row barley is most commonly used for American beers. Consider six-row if brewing traditional American styles such as American pilsner, American wheat beer, and American cream ale.
  • Due to six-row’s smaller kernel size, grain mills may need to be set to a slightly smaller grind.

If you’re open to experimentation, try this: Brew two identical batches of beer, one using two-row malt and the other using six-row malt. Keep the hop schedules, yeast selection, and fermentation schedules the same. Can you tell a difference between two row and six row barley? What are the characteristics of each beer? Which do you prefer?
————————————————————————————————————-
David Ackley is a beer writer, brewer, and self-described “craft beer crusader.” He holds a General Certificate in Brewing from the Institute of Brewing and Distilling and is founder and editor of the Local Beer Blog.

Leigh Erwin: A Beginner's Wine Making Journey: Part 10

Ingredients To Make Homemade Wine With SunCal Grape Concentrate
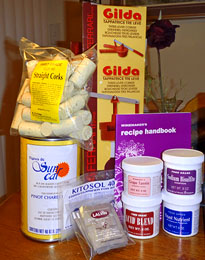
It’s like Christmas all over again at the Erwin residence!
Coming home from work today, I saw a package waiting at my doorstep, and I knew exactly what it was—my new order from ECKraus!  I had such a fun time making my first batch of wine, that I couldn’t wait to get started on the second!
I was trying to figure out what to do next, when I decided that I would try something different than the wine ingredient kit.  Don’t get me wrong—I really loved using the kit!  I just figured ECKraus has so many products that it wouldn’t be fair to the rest of the items to only buy the same thing over and over again :).
Anyway, instead of purchasing the pre-packaged kit, I decided to instead purchase all the wine making ingredients separately and try to make it more “free style”.  This may turn into a bad decision, as it’s only my second time making wine and I’m not sure if I’m ready yet to be “let loose” without the comfort and convenience of the pre-made kit.  Oh well, only time will tell, I suppose!
So, what did I get, you ask?
Well, I still wanted to make grape wine, so I decided to purchase some grape concentrate.  For this, I purchased the Pinot Chardonnay concentration from SunCal brand.  I decided to stick with white wine for now, as I feel like red would be more complicated, and I didn’t want to throw myself under the bus too quickly.  Next time, however, I will likely do a red, and I will do it from a kit to make it a little easier for myself.
One great thing about the Adventures in Homebrewing website is that within the product info for the SunCal concentrate, they included a link to the actual recipe required to make the SunCal!  This way I knew exactly what other wine making ingredients I needed to buy in order to pull this off without a kit.
In addition to the SunCal Pinot Chardonnay grape concentrate, I purchased some Acid Blend, Yeast Nutrient, and Wine Yeasts.  I also purchased Kitosol 40 fining agent , as well as Sodium Bisulfite, as these are items that I felt every home winemaker needs to have on hand.
In terms of the yeast, I made the decision to purchase the Lalvin ICV D-47 yeast strain based on the recommendation on the handy yeast profile chart on the ECKraus website.  It was an incredibly helpful chart, as since I am still so new at the whole home winemaking thing, I had no idea which yeast strains were best for specific types of wine.  So, I choose ICV D-47 since I plan to make a dry white wine, and the yeast strain chart indicated that this strain would likely be the best for this type of wine.
Next, I purchased some First Grade Size #9 Straight Corks, as I wanted something that was more substantial than the press-in, mushroom corks I used previously.  Of course, those corks worked just fine and were fantastic because I didn’t have a corker at the time, but I figured this time I’d put a little more elbow grease into it and purchase the corks that required a little more finagling to get in the wine bottle.  That being said, I also needed a corker!  Due to my current small living space, I decided to go with the simple hand corker from Gilda brand.  One day when I move into a larger house where I have much more space, I’ll get a floor-standing corker, but for now, my arms will be getting a workout.
Finally, I purchased the “Winemaker’s Recipe Handbook”.  At first I thought I didn’t get it, because it is such a thin book (it was hiding in the fantastic packing job!), but I found it and all was right with my world!  While the book may be thin, it is loaded with different wine recipes!  100 recipes to be exact!  Everything from grape wine to rhubarb wine and then to tomato wine!  It’s nuts how much diversity is in this wine making book, and once I move into a “real” house where I have space to process these other fruits or vegetables and I’ll try out some of this more “odd ball” wine recipes!
I’m looking forward to starting this Pinot Chardonnay wine very soon.  I’ll definitely keep you all posted on my progress (good or bad!).
Cheers!

——————————————————————————————————–
Leigh ErwinMy name is Leigh Erwin, and I am a brand-spankin’ new home winemaker! E. C. Kraus has asked me to share with you my journey from a first-time dabbler to an accomplished home winemaker. From time to time I’ll be checking in with this blog and reporting my experience with you: the good, bad — and the ugly.

Top 10 Wine Making Blog Posts Of 2013

Top 10 Wine Making Blog PostsYour votes have been counted, and the results have been tallied. Below are the 10 most popular winemaking blog posts of 2013 from the E. C. Kraus blog. The results are based on a combination of: visits, social sharing and comments from you the reader.
So without any further delay, I give to you The Top 10 Wine Making Blog Posts of 2013!

  1. 3 Tips For Getting More Flavor In Your Wine
    When it comes to making wine, everyone is always looking for that edge that will put their homemade wines over the top. Here’s three things you can do to help get that done… More >>
  2. Bulk Storing Wine In A Carboy
    Learn the pro’s and con’s of storing your wine in a carboy for an extended period of time. It’s something that many home winemakers do, but is it right for you? More >>
  3. What’s The Rules For Topping Up Wine
    Here’s the skinny on what topping up is… the when’s and why’s of topping up are explained so that you’ll know just how to handle every winemaking situation. More >>
  4. What Every Winemaker Ought To Know About Sulfites
    Get a clearer perspective on what sulfites are, what they do, and why they are so important to the production of wine. More >>
  5. How To Handle A Stuck Fermentation
    Learn what a stuck fermentation actually is and what can cause one to happen. Also, learn what you can do if your fermentation becomes stuck and what can be done in the future to prevent it from happening again. More >>
  6. 4 Tips For Losing Less Wine
    Here’s a list of 4 things you can do to make sure you end up with more wine at the end of the winemaking process. Simple things that any home winemaker can do. More >>
  7. Did Using Distilled Water Ruin My Wine?
    Is distilled water what you should be using in your homemade wines? Why do ingredient kits ask for it? Why do we NOT recommend it? This and other info! More >>
  8. How Do I Make More Alcohol In The Wine
    If you’re a home winemaker that wants to make your wines with more alcohol then read this! Higher alcohol is possible, but there’s some things you should know first. More >>
  9. How To Stop A Wine Fermentation
    Stopping a fermentation is not an easy thing to do. Care has to be taken if you don’t want to end up with popping corks. Here are all the particulars for stopping a wine fermentation dead in its tracks. More >>
  10. When To Aerate A Wine
    Providing air to a fermentation is important, but it has to be done at the right time. If not, your wine could be in for a dose of oxidation.  More >>

———————————————————————————————————
Ed Kraus is a 3rd generation home brewer/winemaker and has been an owner of E. C. Kraus since 1999. He has been helping individuals make better wine and beer for over 25 years.

Fermentation Temperature Too Low And Used An Airlock On Primary Fermenter

Carboy With Fermentation Temperature Too Low
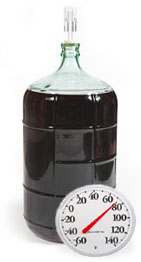
I started out wrong by air-locking my vessel from the start. I have two 5 gallon carboys; one containing Ruby Cabernet and the other French Colombard. The second mistake I made was to allow the juice to get too cold; below 40 degrees. I have since brought the juice home to a warmer atmosphere, where the French Colombard began to produce tiny bubbles, whereby popping at the air gap device; however, the Ruby is lying dormant. How should I proceed from here?
Name: Mark S.
State: PA
—–
Hello Mark,
The first thing that needs to be pointed out is that there is that there is absolutely no way that a wine yeast will ferment at 40°F. The fermentation temperature is too low. This is by far the most critical issue of the two. It will take some time for the carboys to warm up, but by the time you get this message hopefully they will be at a temperature that is more suitable to a fermentation (70°F. – 75°F.). Just realize that this is an absolute. The fermentation will not work at a temperature of 40°F. It’s just too low.
Having an airlock on the primary fermenter can hinder or slow the fermentation, but it is not an absolute. Rarely is using an air-lock during this time the root cause of a stuck fermentation.
Just think of the airlock as the icing-on-the-cake to your stuck fermentation. Both the low fermentation temperature and the airlock are working in concert to keep your fermentation from happening, but the fermentation temperature being too low is the main reason.
At this point you will want to leave the airlocks on both carboys until you do see some fermentation activity as the temperature rises. This is to protect the wine must from spoilage while it is still. Once you see some signs of fermentation, then you can safely take the air-locks off.
Signs of fermentation would be things like seeing bubbles rise along the side wall of the carboys or little patches of foam on the surface of the wine must. Do not rely on the airlock bubbling as an indicator. Bubbling will occur without the fermentation simply because the liquid is expanding from being warmed up. The expansion is causing the air in the head-space to forced out through the airlock.
In the future I would suggest starting the fermentation in a bucket fermenter as opposed to the carboys you are using for your primary fermentation. While taking the airlocks off the carboys is an improvement, the smaller opening restricts the amount of air that can get to the wine must. You can use the carboys with air-locks, later, after your first racking. This is when you want to minimize head-space with the wine, and carboys are great for doing this. Here’s some more information on why you do not what you use an airlock on a primary fermenter.
Once you do these simple things I do not expect you to have any more problems with getting your fermentation started, but if by chance you do not get one or both of them sufficiently going, I would suggest looking over the Top 10 Reasons For Fermentation Failure. See if any of the other 8 reasons ring a bell. Then take the corrective action.
Thank you for the great question and allowing me to share it with other winemakers. Having a fermentation temperature too low and using an airlock on a primary fermenter are both common beginner mistakes that need to be pointed out from time to time.
Happy Winemaking,
Ed Kraus
———————————————————————————————————
Ed Kraus is a 3rd generation home brewer/winemaker and has been an owner of E. C. Kraus since 1999. He has been helping individuals make better wine and beer for over 25 years.

Leigh Erwin: A Beginner's Wine Making Journey: Part 9

Leigh ErwinHello Everyone,
I wish I could report to you how lovely my first batch of homemade wine tastes after going through the process of making it all with you, however, I don’t really know, as I’m trying to be patient and let it sit to get over bottle shock and all that other moving around it’s been doing during the past month!
I did try a little bit of the wine right at bottling time, and I have to say I was a little disappointed with the nose.  Earlier during the winemaking process, I had noted a strong nose of citrus fruits and some floral character (at least that’s what it smelled like to me!), but when I smelled the wine again prior to bottling, the nose had nearly disappeared!  It was very odd—it was almost as though it was all tart citrus, and more muted than it had been previously.  I’m really hoping it’s just in an “immature” stage at this point, and that the more balanced nose I had noted previously comes back.
A couple of days after bottling, I did open up one of the wine bottles to see how it was doing, and not too much had changed yet.  Is this par for the course for this wine?  Or did I do something wrong?  When I tasted the wine, I didn’t really find anything that I could sense as a “fault”.  Then again, I am a newbie, so I’ll admit I might not recognize particular faults if they were there, however, I thought in general the wine tasted fine and that it would be no trouble drinking the other 22 bottles that I have waiting for me.
I remember at one point chatting with the folks at Adventures in Homebrewing, and they said that the wine wouldn’t taste very good so soon after bottling because of bottle shock ailments, so I hope they are right and that my wine will become more balanced as it sits in my house.
What’s next for me now as a home winemaker, now that my first batch of wine is complete?  Well, I think I’m going to stick with white wine for now, just because there are in general fewer steps to mess up than with red wine, though I will challenge myself a little more by making things from a wine recipe and raw ingredients instead of through the kit.  I feel confident that I can follow a recipe without a wine making kit, and since I want to start a stock of raw ingredients going eventually anyway, I may as well do it now!  Also, I plan on making a chardonnay that had been aged in oak chips, to create a completely different style of wine than the Pinot Grigio that I just finished, and to add a little extra complexity to the process before launching into red wine making.
I’ll still use the plastic fermenter and plastic carboy that I have from the wine kit I bought from Adventures in Homebrewing, since I don’t have any space right now for glass equipment, however, that is an upgrade I plan on doing later this year.  So excited!
Overall, I’m really happy with my first experience as a home winemaker, and am looking forward to trying something a little different and challenging myself a little more with a more complicated recipe!
Hope you all are having a fabulous New Year!  Cheers!

——————————————————————————————————–
Leigh ErwinMy name is Leigh Erwin, and I am a brand-spankin’ new home winemaker! E. C. Kraus has asked me to share with you my journey from a first-time dabbler to an accomplished home winemaker. From time to time I’ll be checking in with this blog and reporting my experience with you: the good, bad — and the ugly.

Winemaking Terms You Should Know: Part 7

Bottle TreeIn several earlier posts, we introduced a few home winemaking terms that you may or may not be familiar with.  There are many terms to learn in home winemaking, and this post, like all the previous posts, gives you a short introduction to a few of those terms to help you get started in home winemaking, or perhaps brush up on some of the terms you may not have seen in a while.

  • Bottle Tree:  This is a tree grown in the vineyard that produces bottles instead of fruit.  Well, no, actually a bottle tree is essentially a drying rack for bottles.  After cleaning and sanitizing your bottles, you can hang them on a bottle tree until dry.
  • Campden Tablets: These are basically sodium metabisulfite in the form of a tablet.  Campden tablets are used in home winemaking for killing or otherwise getting rid of undesirable bacteria.  These tablets are also very useful for sanitation purposes, as well as preserving the color and flavor of your wine.
  • Fermentation Inhibitor:  Sometimes you don’t want fermentation to occur, sometimes you do.  For situations where you want to prevent a fermentation re-starting, you can add a fermentation inhibitor such as Potassium Sorbate. You can also use Wine Condition for the purpose and sweeten the finished wine at the same time.
  • Head Space:  The head space refers to the gap between the top of the wine and the walls of the fermentation vessel, aging vessel, or the cork in the case of a wine bottle.  You want to keep the head space at a minimum, as excess head space significantly increases the chances of something going wrong with your wine, particularly oxidation or other undesirable processes.
  • Oenology or Enology:  For all you new home winemakers reading this, you may not be as familiar with this term as established winemakers.  Basically, Oenology or Enology is the term for the study of wine and winemaking.
  • Punt:  The punt is the indentation that is found on the bottom of some wine bottles.  There is no consensus as to the origins of the punt, but they range anywhere from an artifact of glass blowing to allowing for easier stacking of one wine on top of another.
  • Specific Gravity: The specific gravity refers to the sugar content in the wine.  As the amount of sugar in the wine increases, so does the specific gravity.  Using a hydrometer, you can measure exactly how much sugar is in your wine.

— Other Winemaking Terms You Should Know:
Part 6
Part 5
Part 4
Part 3
Part 2
Part 1
———————————————————————————————————
Ed Kraus is a 3rd generation home brewer/winemaker and has been an owner of E. C. Kraus since 1999. He has been helping individuals make better wine and beer for over 25 years.

Homebrewing Terms Worth Knowing: Part 3 (Beer Yeast)

Beer Yeast
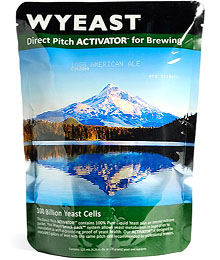
Continuing our exploration of homebrewing terminology, this week we will focus on some characteristics and terms you may hear having to do with beer yeast. A basic understanding of these words will help you produce the beer you want to drink.

  • Attenuation – Attenuation is a percentage that describes that amount of sugar consumed by yeast. If you want a beer that finishes dry, you should consider a highly attenuative beer yeast. Example: Wyeast 1028: London Ale has an attenuation of 73-77%.
  • Flocculation – Flocculation describes the tendency of beer yeast to clump together and fall out of suspension. A well-flocculating beer yeast will be easier to clear. A yeast that doesn’t flocculate very well may cause haze or have an impact on flavor.
  • Lipids – Lipids are a category of molecule that, among other things, include fats. Lipids are a natural component of malt and beer yeast need some lipids in order to reproduce. But any excessive lipids can negatively affect the head stability of your homebrew. Be careful when brewing with nuts…or bacon for that matter.
  • Acetaldehyde – If you’ve ever had a beer that smelled like green apples you’ve probably picked up on acetaldehyde. It’s a natural by-product of fermentation, but excessive amounts smell like Granny Smith apples. Be extra careful with fermentation temperatures when brewing high gravity beers. Acetaldehyde can also indicate bacterial infection.
  • Diacetyl – Another by-product of fermentation, diacetyl is a chemical that gives off a buttery aroma, just like movie theater popcorn. Brewers will sometimes utilize a “diacetyl rest” at the end of fermentation, a slight rise in temperature which encourages yeast to consume diacetyl. Low levels of diacetyl are considered acceptable in some styles of beer.
  • DMS – DMS, or di-methyl sulfide, is yet another chemical compound produced by fermentation. It is also produced while heating wort. In large amounts, DMS smells like canned corn or cooked vegetables. To avoid DMS, seek a vigorous, rolling boil and leave the brew kettle uncovered. During fermentation, keep temperatures in check.
  • Esters – Like phenols (see part 1), esters are an aromatic product of fermentation, usually described as fruity or spicy. Esters tend to be more common at higher fermentation temperatures. For some beer styles, esters are desired. Check the BJCP Guidelines for whatever style you’re brewing to find out if esters are appropriate. Esters can be manipulated by yeast selection and fermentation temperature.
  • Autolysis – Autolysis is yeast death. It can cause off-flavors sometimes described as burned rubber. It isn’t very common, but if beer is left on the yeast in the fermentation vessel for too long and at too high a temperature, autolysis may occur.

Are there any other homebrewing terms you’d like to learn about? Share in the comments below!
————————————————————————————————————-
David Ackley is a beer writer, brewer, and self-described “craft beer crusader.” He holds a General Certificate in Brewing from the Institute of Brewing and Distilling and is founder and editor of the Local Beer Blog.