Leigh Erwin: Bottling My Mead

Bottled WineHi everyone!
Bottling day for the mead is (finally) here!  I’ve been through quite a lot with this wine.  I think I ended up racking it at least 3 times to not much avail, then finally figured out that I might be dealing with a stuck fermentation and added the appropriate ingredients to get that going again (yeast nutrient and yeast energizer).  That seemed to do the trick to clear things up, even though the specific gravity barely changed (if at all).
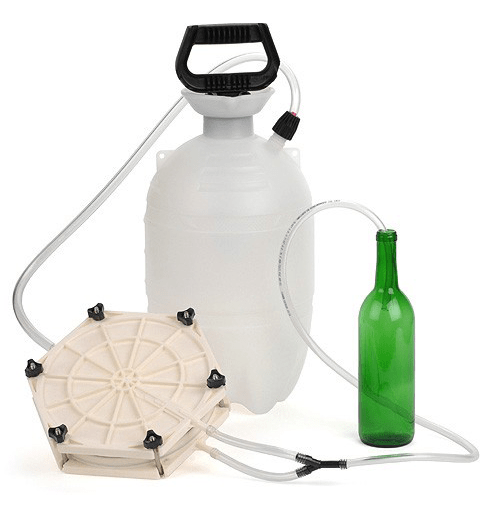
I made the executive decision to move forward and filtered the wine for my first time ever.  As luck would have it, I ran into some troubles there as well, which were 100% human error (how about reading the instructions out loud….that might help).
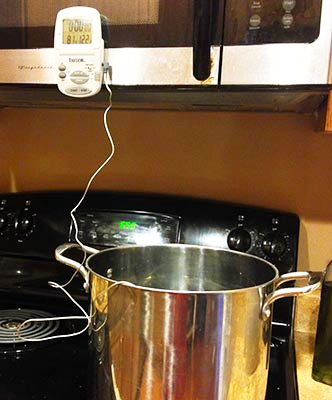
We’re finally at bottling day!  We’re down to the wire—about to get married, go on a honeymoon, then possibly move into a new house somewhere (who knows where at this point).  The time to bottle the wine is now, and there is no other way about it!
Shop Wine Bottle CorkersSo, I rinsed all the bottles I’d been saving in very hot water (I had been sure to rinse them out immediately after emptying them so there wouldn’t be any foreign bodies growing in there), then added a couple turkey baster sized squirts of sanitation liquid to kill anything that might be still living in there.  All went well—no problems there (that I am aware of).
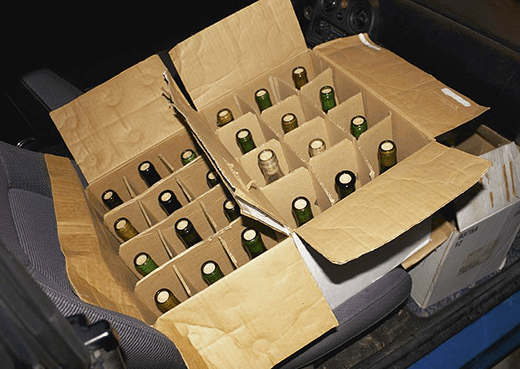
I ended up with exactly 24 bottles of wine, with the last few being dubbed “the dregs”.  I think this entire batch will be consumed by both my fiancé and I, as I’m not proud of it enough to give it to anyone else.
After bottling, I noticed that the wine was still a little hazy.  I’m not surprised, since I only really partially filtered the wine during my first attempt.  I did have enough filter pads to do it again, but I figured I would just learn from my mistake, move on, and save the pads for my next batch of wine that I hopefully won’t mess up so much!
I’m happy that the mead is done.  It’ll probably be a nice “second bottle of the night”.  Perhaps I’ll pair it with some cheese if it’s too awful to have by itself. Ha!  All I have to say now is I am glad that space the carboy was taking up is now clear—any table space is prime real estate these days.

——————————————————————————————————————–
leigh_erwin_bioMy name is Leigh Erwin, and I am a brand-spankin’ new home winemaker! E. C. Kraus has asked me to share with you my journey from a first-time dabbler to an accomplished home winemaker. From time to time I’ll be checking in with this blog and reporting my experience with you: the good, bad — and the ugly.

Mold On Top Of Wine Cork

Man Pouring WineA friend gave me a bottle of homemade wine and the top of the cork is green and fuzzy. Is it still safe to drink?
Name: Lois
State: NY
—–
Hello Lois,
Having mold on top of the wine cork of your friend’s homemade wine has little to do with what’s inside the wine bottle. In other words, the mold did not come from the wine but from the environment outside the wine bottle. It also has nothing to do with the fact that the wine was homemade. It’s not unusual to cut the neck capsule away from a commercially made wine only to find mold underneath.
Mold is everywhere. Invisible to the naked eye, it floats through the air waiting for a place to land and grow. This is why it’s just about impossible to keep fresh strawberries for more than a few days. A single mold spore or two has little effect on anything, but give them nourishment — such as fresh strawberries — and you will see a handful of mold spore grow into a healthy, thriving colony — one that is visible.
This is why your friends homemade wine has mold on top of the wine cork. What little mold that was in the air found its way to the wine bottles and was able to grow on the cork. The nourishment, in this case, is coming from wine slowly seeping through the cork.
Shop Wine CorksWine corks are meant to stay moist. The moisture keeps them expanded and sealed tight against the inside barrel of the bottle’s neck. Most of the time the cork will seal tight enough to stop the wine from seeping all the way through, but there are many times when wine will slowly wick itself through the entire cork. It’s never in great amounts, for no one wants to waste wine, but it does happen.
After the wine makes its way to the end of the cork, it’s only a matter of time before mold will find it and have a feast on it.
I’m sure you’re wondering what you should do at this point. You’ll be happy to know that the only additional step required is that you take a clean, wet rag and wipe the mold clean from the wine bottle. Once you have done this, you can simply decant the wine as you normally would.
So now you know why there is mold on top of the wine cork. It has absolutely nothing to do with what’s inside the bottle. The mold cannot get to it, it can only grow on the outside.
Happy Wine Drinking,
Ed Kraus
—————————————————————————————————————–
Ed Kraus is a 3rd generation home brewer/winemaker and has been an owner of E. C. Kraus since 1999. He has been helping individuals make better wine and beer for over 25 years.

Judging In A Homebrew Competition: English Brown Ales

Scoresheet for judging a homebrew competition
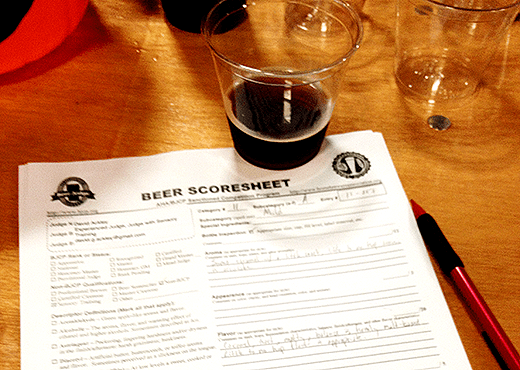
I recently had the opportunity to judge at a local homebrew competition. Judging homebrew in competition is a great way to improve your sensory technique and your abilities to detect subtle differences in ingredients within a certain style. I will share my experiences to shed some light for those who are interested in competing in homebrew competitions.
The competition I judged for was a BJCP-sanctioned homebrew competition. That means all of the beers were submitted in and judged against categories based on the Beer Judge Certification Program Style Guidelines. Though the BJCP has recently announced changes to the style guidelines, this competition was judged using the 2008 Style Guidelines.
What typically happens with these homebrew competitions is that the host homebrew club seeks out volunteer judges and stewards. Judges judge the beer; stewards facilitate distributing the entries to the judges. Judges are assigned to different style categories. There are at least two judges per category. Sometimes categories are combined if there aren’t enough judges to go around.
For this homebrew competition, I was assigned to judge English Brown Ales and Fruit Beers. I’ll start by sharing my experience with the English Brown Ales.
One of the challenges in judging this category was in the diversity of the three sub-styles within the broader category:

  • Mild: “A light-flavored, malt-accented beer that is readily suited to drinking in quantity. Refreshing, yet flavorful. Some versions may seem like lower gravity brown porters.”
  • Southern English Brown Ale: “A luscious, malt-oriented brown ale, with a caramel, dark fruit complexity of malt flavor. May seem somewhat like a smaller version of a sweet stout or a sweet version of a dark mild.”
  • Northern English Brown Ale: “Drier and more hop-oriented that southern English brown ale, with a nutty character rather than caramel.”

If you click the links above, you’ll see that each has fairly specific specifications for the aroma, flavor, appearance, and mouthfeel of each beer. The judge scores each entry on each of the four sensory areas, as well as their overall impression. Scores are given by each judge, which are then averaged out by the steward. The top three beers in each category are awarded prizes, with the top beer in each category moving forward to compete for the Best of Show (the top three best beers out of the whole competition).Shop Beer Ingredient Kits
In this homebrew competition, there were about 5-6 entries each for Mild and Northern English Brown Ale, and a single entry for Southern English Brown Ale. It quickly became apparent how subtle the differences could be between each beer. Though each beer within a subcategory may look identical, some would have more prominent malt flavor than others. Some had more of a toasty character, while others had stronger caramel notes. Most of them were very good, but a few had some fermentation faults and off-flavors, such as diacetyl, in which case the judge is expected to make suggestions for how to fix it.
In judging the English Brown Ales, I found that while color may be similar between the three subcategories, Mild is more nutty, Southern English Brown Ale more fruity, and Northern English Brown Ale more nutty with a more assertive hoppy character. The Southern English Brown is very fruity compared to the Mild and the Northern English Brown. With the Mild being such a delicate style, it was hard to hide subtle faults. The beers with clean fermentation were quite good, and those with fermentation problems stuck out. There just aren’t that many hops to hide behind.
For the best beers, the key was balance, which leads me to believe that to achieve such a balance, it really requires a brewer to brew the beer multiple times to really refine the recipe. If you’re interested in competing in homebrew competitions, you might consider picking a style or two to concentration on in order to really get your recipe dialed in.
Have you done any judging in a homebrew competition? Do you ever submit beers in competition to be judged? What has your experience been like?
—–
David Ackley is a beer writer, brewer, and self-described “craft beer crusader.” He holds a General Certificate in Brewing from the Institute of Brewing and Distilling and is founder and editor of the Local Beer Blog.
—————————————————————————————————————–
Ed Kraus is a 3rd generation home brewer/winemaker and has been an owner of E. C. Kraus since 1999. He has been helping individuals make better wine and beer for over 25 years.

Cloning Ithaca Beer Co.’s Flower Power – Pt. 2: Brewing Water Adjustments

Flower Power BeerLast week I put together a clone recipe for Ithaca Beer Co.’s Flower Power, a deliciously hoppy American IPA. As I prepare to brew the beer, the next thing I will focus on is a water profile and making brewing water adjustments necessary.
I’ve been getting relatively obsessed with water profiles and brewing water chemistry lately. After conducting an experiment with gypsum, I am absolutely convinced that it can have an effect on the perception of hop flavor. I’ve also noticed that including elements like magnesium, which are beneficial to yeast health, my fermentations have appeared stronger and healthier.
To figure out how to adjust the brewing water for this IPA, I need two sets of figures: a source water profile and a target water profile. There are several programs that can help with these water calculations, but in this case I’ll use the water adjustment calculator on Brewer’s Friend. It’s free to use and relatively straightforward. Let’s walk through how to use it.
1. Input water volumes
Here I will stick with the defaults:
Flower Power pt 2 - Water Volumes.jpg
2. Input source water profile
Here’s what my municipal water profile looks like:
Flower Power pt 2 - image 2.jpg
3. Select a target water profile and compare source water to target water
Here I’ll choose the “light colored and hoppy” water profile. Brewer’s Friend also provides target water profiles for many of the major brewing cities of the world.
After clicking on Update Calculations, I can now see the difference between my source water and the target water profile. A number in green is relatively close to the target, a number in red is off. The arrows show whether your water has too much or too little of a given mineral. It’s easy to play around with the Salt Additions (next box down) to see how they will adjust the water profile.
One trouble spot in this example is the alkalinity. Since I can’t add minerals to remove alkalinity, I have to change my source water by using reverse osmosis or distilled water. That’s the only way to get the HCO levels down to 0 (as far as I know).
In this case, I’ve gone back to edit my input water to match distilled water:
Flower Power pt 2 - image 3.jpg
4. Compare source water to target water and determine salt additions
Now I can play around with the mineral salt addition inputs to get the brewing water profile adjusted to as close to the target as possible. Here’s the initial difference between the two waters:
Flower power pt 2 - image 4.jpg
And here’s the mineral salt combination I’ve found that will get me pretty close to the target water profile I need:
Flower Power pt 2 - image 5.jpg
On brew day, I’ll use a small digital scale to weigh out the different mineral salts. This mineral salt combination will be added to the total water used in the beer recipe – all 8 gallons as determined in the original water volume input. For now, I can add the additions to my homebrewing notes so they’ll be ready when I need them.
The Water Calculator goes on to include brewing water adjustments and inputs for adjusting mash pH as well, but I’ll save you the trouble and just say that in this case none are needed. Feel free to play around with the calculator to determine whether you need to add any acids to acidify your mash.
Next, stay tuned for the Flower Power Brew Day!
—————————————————————–
Review the whole Flower Power clone brewing process below:

—————————————————————–
David Ackley is a beer writer, homebrewer, and self-described “craft beer crusader.” He holds a General Certificate in Brewing from the Institute of Brewing and Distilling and is founder of the Local Beer Blog.

Leigh Erwin: Using My Wine Filter System

Wine Filter SystemHi guys!
Just wanted to update you on the filtering of my mead wine.  It’s now to the point where it’s ready to be filtered.  Using my wine filter system went OK, though I have to say the one thing that went “wrong” per se was my own stupid fault and I’m such an idiot.
I’m blaming it completely on the mental fatigue due to all the wedding-related things, and not the fact that I didn’t read the instructions that came with the wine filter system carefully enough.
First thing I did before using my wine filter system is bust out all the parts.  Looks simple enough!  One thing that should have been really obvious to me and taken about 2.5 seconds was hooking up the pump plunger to the unit, but for some reason is stumped me.  I was sitting there all confused trying to figure out how the heck I was supposed to take it apart and attach it to the unit, and then it dawned on me after LOOKING AT A PICTURE how silly I was and how ridiculously easy it was to do it.  Basically, all I had to do was insert the plunger all the way into the unit and screw it in place.  Seriously?  So much confusion for one of the easiest things I’ve ever done.
If that wasn’t embarrassing enough, after I put together the entire wine filtering system, ran some water through the unit to make sure there were no major leaks or anything, AND filtered the entire carboy of wine did I realize that I didn’t put the wine filter pads in the housing correctly.
Shop Wine BottlesWhat I was supposed to do was this according to the instructions:  “The filter unit consists of three parts: Bottom Housing, Top Housing, and Separator. Into this assembly the two filter pads must be inserted. The pads are assembled with the cloth looking flat side outwards. The correct sequence is thus: Bottom Housing, Filter pad, Separator, Filter pad, Top housing.”
So what did I do?  Well, I foolishly kept the two filter pads TOGETHER and placed then between one of the housing pieces and the separator.  I was supposed to take the filter pads apart and place each one separately between one of the housing units and the separator.  I have no idea why my brain decided that I wasn’t going to do it the proper way.  While I didn’t end up with much leaking, I probably ended up leaking more wine out of the unit than if I had set it up properly.
Quite embarrassing that I would do something like that when it was obviously incorrect.  I guess I wasn’t having a very good day!  In the end though, I did end up partially filtering my wine, which is more than I have ever done in the past.  Half filtered wine is probably better than no filtered, right? I won’t be making that silly mistake again when using my wine filter system.  Read the directions.  More than once.  Sigh…

——————————————————————————————————————–
Leigh ErwinMy name is Leigh Erwin, and I am a brand-spankin’ new home winemaker! E. C. Kraus has asked me to share with you my journey from a first-time dabbler to an accomplished home winemaker. From time to time I’ll be checking in with this blog and reporting my experience with you: the good, bad — and the ugly.

You Say Refrigerator, I Say FERMigerator: Converting a Refrigerator into a Fermentation Chamber

Refrigerator ThermostatDave Juliano shares how to convert a refrigerator to a fermentation chamber without losing the freezer function.
Having an extra refrigerator is often a blessing to the home brewer – it can be converted to serve kegged beer, or to provide controlled fermentation temperatures to improve the quality of your beer.  The one thing these two uses have in common is that, with few exceptions, the temperature range of a commercial refrigerator is too cold for the typical “kegerator” or “fermigerator”.
How Most Fermentation Chambers Work
Several companies make plug-in thermostats to solve this problem, and the versions I’ve seen (Ronco and Johnson) all work in a similar fashion: the temp control unit plugs into the wall, the fridge (or freezer) plugs into the unit, and the thermometer probe portion of the unit is placed into the refrigerator compartment. Typically, the internal thermostat of the fridge (or freezer, we’ll just call them fridges for simplicity from here on) is set to its lowest point. When the external thermostat senses that the internal temperature is too warm, it energizes the control unit, which powers on the fridge. This allows the compressor to run, cooling the compartment.
Once the external thermostat senses that the temperature is correct, it de-energizes the control unit, effectively pulling the plug on the appliance. This means that if you open the door in this state, the light will not turn on. It also means that the freezer only runs when cold air is needed. Now is a good time to note that most modern refrigerators that have a freezer only chill the air in the freezer – if the fridge needs to cool down, the computer in the unit opens a damper and activates a fan that blows some of the cold air from the freezer into the fridge compartment.
The FERMigerator
Shop Temperature ControllerAs you can probably see, using an external temp controller like this is easy, but compromises the use of your appliance. My plan to convert a refrigerator to a fermentation chamber enables the fridge to be set at a user-definable temperature while leaving the freezer unchanged. This way, excess food from the house can be kept frozen, hops can be stored, or the fridge can be put into service as an extra food-fridge if the need arises.
To do this, you will need the following supplies (Read through the instructions before going to collect anything, as you’ll need to make some measurements of your existing system before you buy some of the components):

  • A temperature controller – Make sure to buy the model that suits your local power requirements, 110VAC for those of us in North America. These also may be available in Fahrenheit options, mine is in Celsius.
  • A project box – These can be found at Radio Shack or an electronics shop. Get the temperature controller first, and then find a box that is about twice as deep.
  • A regular duplex outlet – necessary if heating is desired (not covered in this article)
  • An extension cord – to power the temperature controller, also not covered here
  • A small piece of perfboard – from your local Radio Shack or electronics shop
  • Two 1/4w resistors, the values of which will be determined below – electronics shop or Radio Shack

You’ll also need the following tools:

  • An electric or cordless drill with a 1/4” bit
  • Soldering iron
  • Wire cutters
  • A digital multimeter and knowledge of how to use it to measure resistance (don’t worry – it’s easy-peasy)
  • Assorted hand tools to access the necessary bits of the fridge controller

The best place to start this project is to look up your particular model of fridge on an online appliance parts website. Look for the controlling circuitry for the fridge – this project will replace the factory thermistor with the new temperature controller. Be sure you’re looking at the right one! The freezer compartment will have the exact same device, but we want to leave that alone. The photos I’ve included are from a 2002 Amana French-door bottom freezer. When looking online, I could tell that the part I was after was housed in the control assembly at the top of the fridge compartment where the two doors meet. Once you’ve identified its location, unplug the fridge and begin carefully disassembling the trim around it to get to it, and then we’ll begin.
Steps To Convert A Refrigerator To A Fermentation Chamber

  1. Make sure the appliance is unplugged!
  2. Using wire cutters (if required — some thermistors are replaceable and may just have spade connectors holding them in) cut out the thermistor. Mine looked like a large white cylinder.
  3. Multimeter for checking sensor resistance.
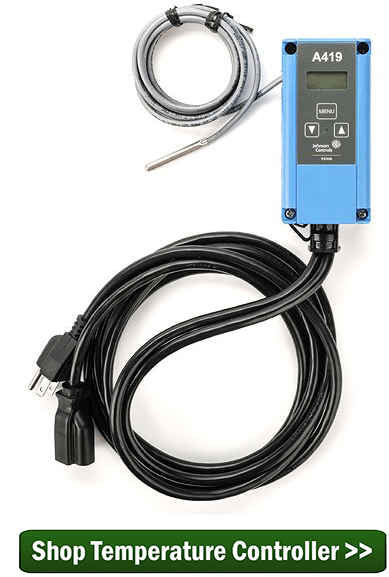
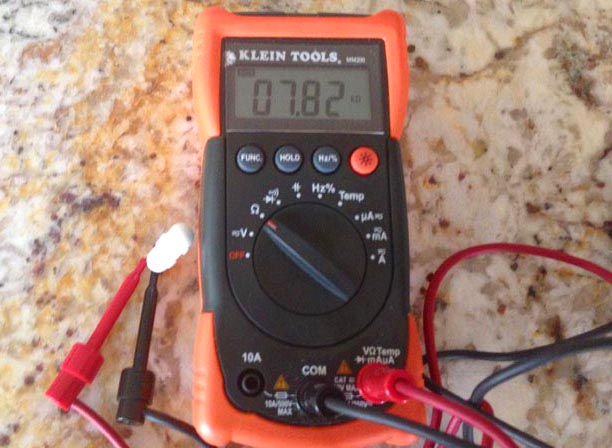
Using the multimeter set to read resistance (Ohms), connect the leads to each wire from the thermistor at room temperature.Here, mine is reading 7.82K Ohms at about 78°F. The temperature isn’t important – we just want to know that what the fridge computer reads from the thermistor is two states – hot and cold. Hot is any temperature above where we want to be. I brew ales and plan to lager, and saw no reason to ferment higher than this. If you’re doing something different, adjust the ambient temperature of this step accordingly!From this information, I know that when the fridge computer reads 7.82K Ohms, it will want to turn on to cool the fridge down.
  4. Keeping the multimeter set and the thermistor connected, now place the thermistor in a glass of ice water. This is 32°F, and represents the “cold” side of my needs. When the fridge computer reads 24.54K ohms, I know it will turn off.
  5. Now comes some math and a little knowledge of electronics.  If 7.82K ohms equals “ON” and 24.54K ohms equals “OFF”, how do I trick the fridge computer into reading those?This is where the temperature controller comes into play. Unlike some other external temp controllers, this one is a relay (electronic switch).  When it says to turn on, it closes a switch, which completes contacts. If those contacts happen to be wired to a 120VAC outlet, it will deliver 120VAC, just like the Ronco and Johnson units we discussed previously. If, however, we wire the relay to a couple of resistors, we can electrically trick the fridge computer into reading one of the two previously determined values, allowing the existing fridge computer and electronics to do the actual work of cooling the fridge down. Resistors, when wired in series, increase their resistance by the sum of the parts.  In other words, if R1 and R2 are put end to end, R1+R2=Rtot.  If they’re wired in parallel, however, we get the inverse: Rtot=(R1xR2)/(R1+R2).  This is important because we need the fridge computer to read a higher resistance to turn off, and a lower resistance to turn on.Schematic for resistors when coverting refrigerator.
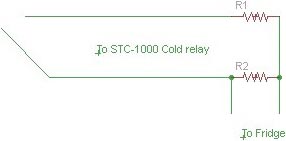
The STC-1000 will close the relay when the external probe reads a temperature above the set point, so when that relay closes, we want the fridge computer to read <8K ohms.  When the temperature falls below the set point, the relay opens, so we want the fridge computer to read >24K ohmsI designed this simple schematic so that the fridge computer was reading R2 directly, and when the relay closed, R1 would be added to R2 in parallel, dropping the resistance read by the fridge, telling it to start to cool.
  6. Here’s that math bit – how do we determine which values of resistor to use for this? Here’s how I did it.  The values I measured weren’t standard resistor sizes, so I rounded.R2 must be 27K, since that’s the “Off” state, so to determine what value resistor I needed to give us 8K in the “On” state, I did math. There are websites that help with this, like this one. Type in the two known values (R2 and Rtot), and it tells us the value of R1 is 11.37K
    _________________________________________________________
    NOTES:
    11.37K isn’t a standard size either, so I found 12K in my parts bin.
    8000=(27000*X)/(27000+X)
    Solve for X
    X=11368,Or: (MATH+BEER+GOOGLE=RESULT)X=11.37K
    Keep in mind the following things:
    Always use the same units- 1k ohm = 1000ohms
    Remember that the lower resistance is the “On” state, and the higher resistance is the “Off” state.
    ________________________________________________________
  7. Armed with these numbers, go to Radio Shack and buy some 12K and 27K resistors, and a small piece of Perfboard, wire, an enclosure, solder, iron, whatever you don’t have. The project from here is simple.
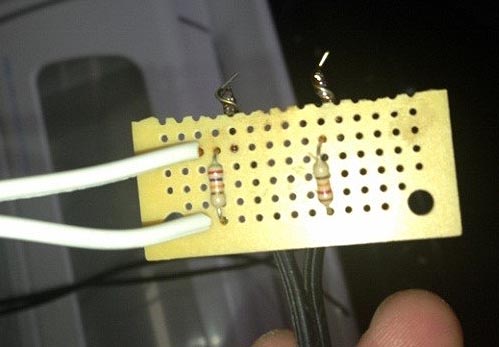
  8. Assemble the perfboard. I soldered the two resistors to the perfboard, using their leads to make the connections, and also two pigtails of braided wire. The white wire was cut off of the end of the old thermistor, and the black is just some speaker wire I had that will connect to the temperature controller relay.  Follow the schematic from above to ensure you have it wired correctly.
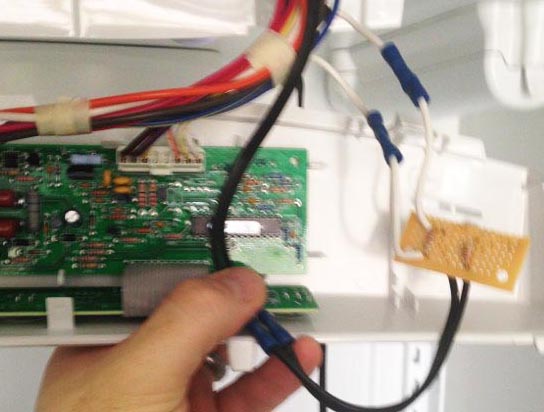
  9. Wire it in: the white wires got crimped back in to where the thermistor was removed. The black wires got crimped onto the wires coming from the “Cold” relay on the STC-1000. Neither of these connections has a polarity to worry about. I had previously drilled a hole in the top of my fridge case by first making sure no refrigerant lines were in the way (check YouTube for lots of great videos on how to do this!).
  10. Thermostat panel for used when you conver a refrigerator to a fermentation chamber.
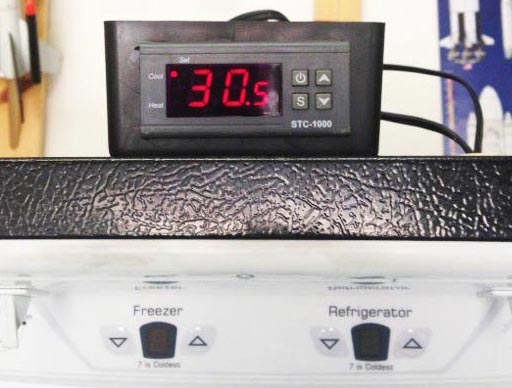
I tucked the bit of board and the wire into the shroud that holds the fridge electronics, and reinstalled the panels and covers. I did have to drill a small hole in the plastic shroud to allow the black wire from the temp controller out.
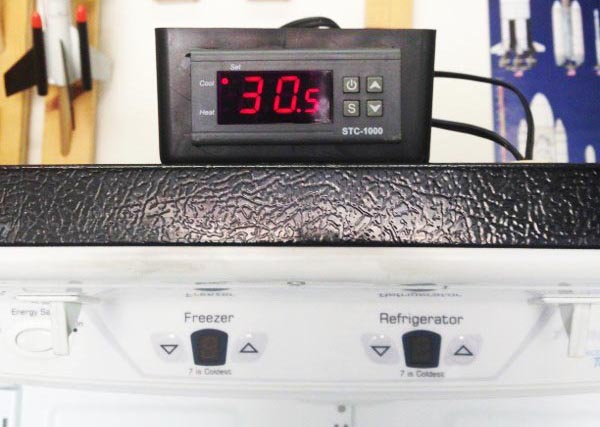
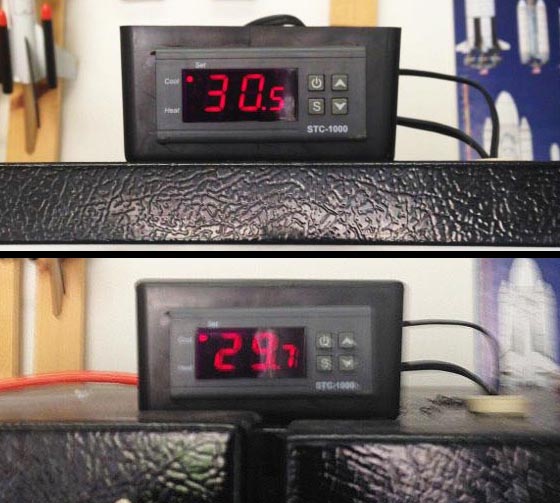
  11. With everything plugged in and cooling, the STC-1000 is now in control of the fridge, while the factory-provided temperature circuitry was still in control of the freezer, and I could watch the temperature drop in the fridge!  (Remember, this is Celsius, and in my garage in Tucson)

And that’s how you convert a refrigerator to a fermentation chamber or kegerator, and still use the freezer portion for storing hops or whatever else you need cold.
——————————————————————————————————————-
Dave Juliano is a DIY homebrewer and maintains a homebrew website detailing many of his projects.

Cloning Ithaca Beer Co.’s Flower Power – Pt. 1: Developing a Recipe

Glass Of Flower Power IPAThere’s nothing quite as exciting as receiving the gift of beer. When a friend visited from up north with a case of one of his favorite local beers, I knew was in for a treat. For the first time, I was introduced to Ithaca Beer Co.’s Flower Power. It is likely their most popular beer, available all over Ithaca and worthy of very good ratings on Beer Advocate. It’s bright golden in color, with a wonderful aroma of honey and hops. The delicious American hop flavor – piles of that citrus, tropical fruit, spice, and pine – is something I’d love to have on tap at home.
The first step in developing a clone beer recipe is the research. Usually a brewery’s site will give some information as to the ingredients:

  • Two-row pale and honey malt
  • Simcoe, Chinook, Citra, Ahtanum, and Centennial hops
  • Dry hops: Simcoe, Amarillo, Centennial
  • Yeast – we’ll assume American ale yeast

As far as the specs go, I’m always surprised how different states and breweries label their beers. Some have ABV and IBU information, some don’t. The website tells us that the beer has five hop additions, including dry hops, but they don’t tell us anything about IBUs. All we get is:

  • ABV 7.5%

With that information, I feel comfortable putting together a grain bill. The hop schedule takes a little guesswork. To achieve a balance, I will go for roughly a 1:1 BU:GU ratio. The next step for developing a clone beer recipe will be to brew the beer and see how it turns out!
Shop Brewing HopsFlower Power Clone Recipe – Attempt 1
Specs
OG: 1.076
FG: 1.019
ABV: 7.5%
IBUs: 77
SRM: 9
Ingredients
14.5 lbs. Weyermann pale ale malt
1 lb. Gambrinus honey malt
.5 oz. Simcoe hops at :60
Shop Malted Grains1 oz. Chinook hops at :20
1 oz. Citra hops at :10
1 oz. Ahtanum hops at :0
1 oz. Centennial hops at :0
1 oz. Centennial hops dry hopped for 7 days
1 oz. Simcoe hops dry hopped for 7 days
1 oz. Amarillo hops dry hopped for 7 days
1 packet Wyeast 1056: American Ale Yeast
Directions
The night before brewing, prepare a 2L yeast starter. On brew day, mash crushed grains at 152˚F for 60 minutes. Sparge with enough water to collect about 6.5 gallons of wort. Bring to a boil and boil for 60 minutes, adding hops according to schedule above. At end of boil, chill wort, steeping the Ahtanum and Centennial hops during the whirlpool. Transfer wort to clean, sanitized fermenter. Pitch yeast and ferment at 68˚F until complete. Transfer to a secondary fermenter and add dry hops. After 7-10 days, bottle or keg, aiming for about 2.4 vols CO2.
The next step is to brew it! Stay tuned to hear how it turns out! Do you have any tips for developing a clone beer recipe? Please share them below.
—————————————————————–
Review the whole Flower Power clone brewing process below:

—————————————————————–
David Ackley is a beer writer, homebrewer, and self-described “craft beer crusader.” He holds a General Certificate in Brewing from the Institute of Brewing and Distilling and is founder of the Local Beer Blog.

Did A Malolactic Fermentation Ruin My Wine?

Wine Going Through Malolactic FermentationEd, I was looking for answers for when a malo-lactic fermentation is completed and came across your [malolactic fermentation] article. This is the first time I have used fresh grapes for making wine. I have 15 gallons in 3 five gallon carboys right now. I bought the malo- lactic culture at my local supply shop, they knew what kind of wine I was making. You stated in your article that malo-lactic fermentation should not be done to zinfandel wine….that’s what I am making. Did I screw up?
John F. — OH
—–
Hello John,
To say a malolactic fermentation ruined your wine is a bit of an over-statement. As I recall, the point I was trying to get across in the article about malolactic fermentation is that not all wines will benefit from a MLF, and in fact, some wines will not improve because of it, but may even become worse.
This does not mean that the wine will taste bad or be undrinkable. Barring any other faults in the wine, my guess is it will still be quite nice… it’s just that it probably could have been better.
I have never tasted a Zinfandel that has gone through a malolactic fermentation, so I do not know the potential results with any certainty. I am only going by what I see in the market, traditionally, and my imagination as to what it might taste like.
One of the stronger characters of any Zinfandel is its jammy/berry qualities. It’s what has made the Zinfandel grape so popular. This quality is much more prevalent in this grape than any other grape I can think of. It is what a Zinfandel drinker has come to expect from this type of wine. A malolactic fermentation will reduce this particular character of the Zinfandel. It will reduce the assertiveness of the berry flavors and bring it more towards earthy and rich. This would be OK if you are looking for the rich, earthy tones of a Burgundy, but with a Zinfandel you’re not. You are looking to showcase the perceived opposite — fruity and assertive..
Shop Potassium MetabisulfiteIf you have just introduced the wine with the malolactic culture, you still have a choice. Malolactic bacteria is very sensitive to sulfites. That is to say, you can treat your wine with a single dose of either: Campden tablets, potassium metabisulfite or sodium metabisulfite to stop the malolactic fermentation. No harm, no foul.
Another thought is since you have three carboys going, maybe you could stop the malolactic fermentation in two of them and let the third one go. This would only be if you were interested in having better understanding of what a malolactic fermentation does to a wine. If you really don’t care and do not want to give up 5 gallons “to science”, then add sulfite to all three.
I hope this information helps you out and help you to understand why the malolactic fermentation did exactly ruin your wine. I know that everything I’ve said is not 100% definitive. This is because we are talking about wine. Everyone’s perception of it is different. For example, it is possible that you will like the Zinfandel that has gone malolactic fermentation better than that which has not — not likely, but possible. I can only go by what my personal taste are and what I have learned to be the tastes of most others. For this reason, don’t take my words as gospel. Take them as some practical advice.
Happy Wine Making,
Ed Kraus
—————————————————————————————————————–
Ed Kraus is a 3rd generation home brewer/winemaker and has been an owner of E. C. Kraus since 1999. He has been helping individuals make better wine and beer for over 25 years.

ExBeeriment: Water Boil Test

Water BoilingThere are all sorts of different ways to start homebrewing – various setups, recipes and equipment to use.
When I first began brewing extract kits at home, I used my stovetop and a soup pot for my batches, but have since upgraded to brewing outside with a gas burner and a proper, five-gallon pot. Moving outside also helps mitigate any potential mess – a boil over looks much less daunting on a concrete slab in the backyard than all over a stove and kitchen floor.
I haven’t brewed on my stovetop since my first batches years ago, mostly to avoid any mess, but also because I figured using my 55,000 BTU gas cooker made my brew day shorter and more efficient.
It wasn’t until now that I wanted to (unscientifically) put that to the test.
Using only water, I wanted to see how quickly I could reach brew-day temperature thresholds using my electric range stovetop and a Bayou Classic propane burner. My goal was specific to extract brewing, so I wanted to see how quickly I could reach 155 degrees when I’d normally steep grains for 25 minutes, then how long it would take to boil the water.
I decided to only use water since it offered an easy control – no matter where you’re brewing, water will still heat at the same rate. It’s just a matter of what the heat source is providing. I decided to also use the same three-gallon soup pot I previously used for my extract batches before investing in a five-gallon pot to accommodate occasional partial mash brew days.
First, I went outside to test my propane cooker with two gallons of 81-degree (F) water. I wanted to track how fast the water would hit 100 degrees for the sake of posterity, then mark at 155 degrees and hold the temperature for 25 minutes before raising it to a boiling temperature of 212 degrees.
I figured it would be a quick experience and here’s how it broke down:Water Boil Test - 5 Gallons

Propane Burner Boil Time

Minutes Degrees (F)
1:40 100
6:55 155
32:00 156
34:38 212 (boil)

Seems reasonable enough. Then I took another two gallons of 81 degree (F) water and set up the cooled soup pot on my General Electric stovetop. Here’s the time breakdown for this portion:
Water Boiling - 2 Gallons

Electric Stove Boil Time

Minutes Degrees (F)
4:15 100
12:30 155
37:35 157
39:03 212 (boil)
In comparison to my propane cooker, I certainly didn’t expect this. In all, using the stovetop only took me 4:25 more than my gas cooker. Knowing that, it would make me rethink the necessity of brewing outside with my cooker, especially during winter months.
Shop Brew KettlesOf course, there are all sorts of variables to consider, however, from the age of your stove (mine is less than a year old) to how much grain you’re using to steep. These kinds of results in time might not be universal, but do give a peek into what you might generally expect from a brew day.

If you’re thinking of making the plunge into a gas cooker, check out these two options and don’t forget a big enough pot, too.
————————————————————————————————————————-
Bryan Roth is a beer nerd and homebrewer living in Durham, North Carolina. You can read his thoughts on beer and the beer industry on his blog, This Is Why I’m Drunk, and send him suggestions on how to get his wife to drink craft beer via Twitter at @bryandroth.

Leigh Erwin: Finishing My Mead

Mead Is Not BubblingWell I have some good news to report in that my mead finally cleared up!  Actually, it was rather amazing how quickly it cleared up after I added yeast nutrient and yeast energizer.  I swear, I noticed a difference the very next day, and within a few days it was looking very clear.  I take this to mean that the yeast energizer and nutrient worked to get the remaining yeasts off their little butts and to finish fermentation and fall down to the bottom after death. Now we can move on to finishing my mead up and getting it bottled.
One concerning thing, however, is that when I checked the specific gravity with my hydrometer, it was still at 1.002.  It looks very clear now at this point, and tastes fine, and since I have too much going on in the next couple weeks to worry about that 0.004 specific gravity “points”, I’m going to press forward with the filtering and then bottling process and finishing my mead.
I also decided that due to time constraints, I am not going to sweeten my wine.  I’m just going to leave it as a dry mead and be satisfied with that.  I tasted it; my fiancé tasted it, and we both decided to just go for it and call this one just about done.
Now that I’m not going to sweeten my wine, there is really only a couple of steps left.
First, is to filter the wine.  I recently purchased a wine filter system from ECKraus and am looking forward to trying it out.  Hopefully all will go well there!
Second, and finally, I’ll need to bottle the wine.  I’ve done this a few times already now at this point, so I’m not concerned about this step at all. Granted, I’m still going to perform the task with care, as really nothing is “safe” until everything is all bottled and put to bed.
Shop Wine FiltersI’m actually very relieved I’m going to be finishing my mead soon.  As you know if you’ve followed any of my posts the past couple of months, I have had some struggles with this wine, from stuck fermentation to me just not really having a lot of time and energy to focus on the task.  In fact, I’m getting married in 10 days and starting in the next couple days will have no time for anything but wedding-related tasks!  That being said, I better just go ahead and bottle this mead now as is and put it in the past.
I am really looking forward to making a new batch of wine where I can really focus on that and not all the other thousands of things going on in my life right now!

——————————————————————————————————————–
Leigh ErwinMy name is Leigh Erwin, and I am a brand-spankin’ new home winemaker! E. C. Kraus has asked me to share with you my journey from a first-time dabbler to an accomplished home winemaker. From time to time I’ll be checking in with this blog and reporting my experience with you: the good, bad — and the ugly.