How To Make Spent Grain Dog Treats!

Spent Grain Dog TreatsHome brewers and commercial brewers alike generate a fair amount of waste products that have to be processed in one way or another. One of the most significant of these is the mountain of malted grains left over after the mashing process. When the sweet, sugary wort is drawn out of the mash tun, brewers need something to do with those spent grains. Of course, we could just throw them away, but in many cases this grain can still be put to good use, for livestock feed, compost, or other purposes.
One use that has become very popular is turning the grains into spent grain dog treats. Even Dogfish Head sells dog treats made from their leftover grains. The recipe is pretty simple, and just right for using up nearly all of the grains generated from a five-gallon partial mash brew. (Please note: Hops are toxic to dogs. If making dog treats with your leftover grains, please be sure that they haven’t had any contact with hops.)
Let’s get cooking!
Ingredients (for about 30 dog treats):

  • 2 cups spent grain
  • 1 cup flour
  • 1/2 cup peanut butter
  • 1 egg

Directions:

  1. Use your spent grains as soon as possible after brew day. If making the treats after brew day, collect the leftover grains and either refrigerate or freeze them to avoid mold.
  2. When you’re ready to cook, preheat the oven to 350F.
  3. Meanwhile, combine the ingredients in a bowl and mix thoroughly.
  4. Use a rolling pin and a cookie cutter to form the treats, or just shape them by hand. Be sure to make the treats a size that’s appropriate for your dog.
  5. Bake the treats at 350F for 30 minutes.
  6. Turn the heat down to 200F and bake for an additional 3 hours to dry them out. Once cool, store them in an airtight container.
  7. Reward your pup for being a good brew mate with a yummy dog treat! Don’t forget to store the treats out of reach. Fido is bound to love ‘em!

What other uses do you have for spent grains?
Til next time…cheers!
——————————————————————————————————-
David Ackley is a beer writer, brewer, and self-described “craft beer crusader.” He holds a General Certificate in Brewing from the Institute of Brewing and Distilling and is founder of the Local Beer Blog.

3 FREE Online Resources To Make Homebrewing Easier

calculatorFor some, making beer at home is an art. For others, it’s a science. Most of us, however, fall somewhere in the middle and just want to make good beer. These three, free, online tools and resources will help you do just that:
1. Brewer’s Friend
While there are a number of great homebrewing apps out there, Brewer’s Friend offers several online tools designed to help with recipe building, calculations, and other brew day activities. I frequently head over to the site to get help with hydrometer corrections, IBU calculations, and the like.
In addition to the calculators, Brewer’s Friend offers a number of other free resources, including:

  • Free printable brew day sheets
  • A free Android brewing app
  • A free iOS brewing app (premium version $8.99)

I know I’m only skimming the surface of the tools offered by this handy website, so stay tuned for a guest blog post from Larry over at Brewer’s Friend!
2. Kettle Volume Calculator
If you’re lucky enough to have a sight glass on your brew kettle, that’s great, but if you don’t, this nifty tool from the Merry Cuss Brew Club allows you to calculate the volume of wort in your kettle based on the depth of the wort and the width of the kettle. (I’ll sometimes use a clean, sanitized, plastic or metal ruler to take a measurement.)
Why would we want to know the volume of wort in the kettle?
Knowing the volume in the kettle makes it easier to measure how much wort you’ve run off from the mash, as well as to calculate IBUs, boil-off rates, dilution volumes, and things of that nature. You could even use the tool to calibrate a dipstick for your kettle so you don’t have to use the calculator every time you need to figure out your kettle volume.
3. Hop Variety Handbook
When creating a home brewed beer recipe, it’s important to consider the characteristics of different hop varieties. The HopUnion Handbook will help you answer questions like:

  • Would I rather have woody, earthy hops, or something more bright and citrusy?
  • What is the typical alpha acid content of Cascade?
  • What beer styles are typically brewed with Magnum?
  • What is a good substitute for Columbus hops?

The virtual Hop Variety Handbook from HopUnion provides a wealth of information so you can pick the best hops for your brew.
These are just a few of the many great home brewing resources online. What are some of your favorites?
———————————————————————————————————
David Ackley is a beer writer, brewer, and self-described “craft beer crusader.” He holds a General Certificate in Brewing from the IBD and is founder of the Local Beer Blog.

Cooking With Homebrew – 3 Delicious Summer Recipes!

Cooking With HomebrewNothing goes together quite like beer and food. In fact, many Americans are starting to come around to the idea that beer can pair with food at least as well as wine does.
In addition to being served with your food, beer can also be used in it, often as a substitute for other liquid ingredients. Beer adds layers of complexity and a malty sweetness that you don’t get from water, broth, or milk.
Cooking with homebrew offers yet another way for homebrewers to experiment and share their passion with friends and family. Besides, it’s always fun to serve the beer alongside the food you make with it — and of course to drink it while cooking, too!
Here are three delectable summer recipes that use beer as a main ingredient:
Smoked Porter Beer Brine
Sean Z. Paxton, also known as the Homebrew Chef, suggests the Alaskan Smoked Porter for this recipe, but feel free to use your own homebrewed smoked porter to give added flavor to your pork, chicken, salmon, or whatever else you want to throw on the grill.
Makes: just over a gallon of brine
Ingredients:

  • ½ gallon water, filtered and cold
  • 1 cup kosher salt
  • ¼ cup brown sugar
  • ¼ cup honey, local variety
  • 2 tbsp mixed peppercorns, ground
  • 2 each onions, yellow, large, peeled and sliced
  • 1 each garlic head, peeled and chopped
  • 18 each bay leaves
  • 2 each oranges, halved
  • 66 ounce Alaskan Smoked Porter ale [or smoked porter homebrew]

Directions:
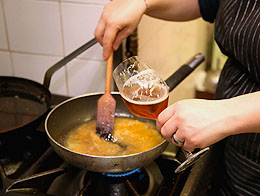
In a large pot, add the water, salt, sugar, honey, peppercorns, onion, garlic, bay leaves, and citrus. Turn heat to medium, stir occasionally until the mixture comes to a boil. Turn off heat and let sit, to infuse the flavors, and cool to room temp. Add cold Alaskan Smoked Porter [or smoked porter homebrew] and mix well. Make sure the brine temperature is below 40°F, as you want to keep the item to be brined cold.
The general rule of thumb is to brine 12 hours per 1 pound of meat. If you brine longer than that, you can risk having an over salty piece of protein. Place the cooled brine in a sealable container that is large enough to hold the brine and the displacement of what is to be brined (the meat). The new extra large 2 gallon Ziplock® bags work well or a cleaned ice cooler (with sealed bags of ice to keep the cooler cold over time). Add the pork (butt, shoulder, loin or belly), chicken (whole or cut up), or filet of salmon to the container and let brine. For pork, I usually brine for 36-48 hours, chicken 24
hours and a filet of salmon 12 hours.
Remove the meat at least 12 – 24 hours before cooking. This will help the meat dry, continue to distribute the added flavor and not over brine the meat. To cook the meat, one can roast, grill, smoke or bake the pork, chicken or fish.
(view the full recipe here)
IPA-Battered Shrimp Tacos
Ashley Routson, the Beer Wench, is a regular contributor to the Whole Foods blog. In this recipe, she recommends a bitter American IPA for the fried shrimp batter.
Ingredients:

  • 1 1/2 pound medium shrimp
  • 1 1/2 cups [American IPA]
  • 1 cup unbleached all-purpose flour
  • 1 tablespoon cornstarch
  • 1 teaspoon salt
  • 3/4 teaspoon garlic powder
  • 1/4 teaspoon cayenne pepper
  • 1 1/4 cup panko breadcrumbs
  • Vegetable oil for frying
  • A few soft tortillas
  • Taco toppings, like cilantro, tomato, shredded cabbage, avocado

Method:

  1. Remove the tails from the shrimp, devein and clean.
  2. In a medium mixing bowl, whisk together the beer or seltzer, flour, cornstarch, salt, garlic powder and cayenne pepper. Pour the panko breadcrumbs into another bowl.
  3. Dip each shrimp into the batter, then gently roll in panko to coat. Place battered shrimp on a clean plate.
  4. Heat 1/2 inch of cooking oil in a skillet over medium heat. Add the shrimp in small batches – I recommend six at a time.
  5. Fry shrimp on each side about 2 minutes, until golden brown. Place fried shrimp pieces on a wire rack or paper towels to drain off excess oil.
  6. Prepare soft shell tacos with shrimp and toppings of your choice and pair with a [American] IPA! Cheers!

(view the original recipe here)
Chocolate Stout Cupcakes
Don’t forget the dessert! In one of my all-time favorite recipes made with beer, Dave Lieberman’s chocolate stout cupcakes are some of the best cupcakes I’ve ever had. Chocolatey, roasty stout makes them incredibly moist. The homemade icing is well worth the effort, though I’ve found that using just 3/4 cup of confectioner’s sugar is plenty sweet.
Ingredients:

  • 3/4 cup unsweetened cocoa, plus more for dusting finished cupcakes
  • 2 cups sugar
  • 2 cups all-purpose flour
  • 1 teaspoon baking soda
  • Pinch fine salt
  • 1 bottle stout beer
  • 1 stick butter, melted
  • 1 tablespoon vanilla extract
  • 3 large eggs
  • 3/4 cup sour cream
  • 1 (8-ounce) package cream cheese, softened at room temperature
  • 3/4 to 1 cup heavy cream
  • 1 (1-pound) box confectioners’ sugar

Directions:

  1. Preheat oven to 350 degrees F.
  2. In a large mixing bowl, whisk together the cocoa, sugar, flour, baking soda, and salt.
  3. In another medium mixing bowl, combine the stout, melted butter, and vanilla. Beat in eggs, 1 at time. Mix in sour cream until thoroughly combined and smooth. Gradually mix the dry ingredients into the wet mixture.
  4. Lightly grease 24 muffin tins. Divide the batter equally between muffin tins, filling each 3/4 full. Bake for about 12 minutes and then rotate the pans. Bake another 12 to 13 minutes until risen, nicely domed, and set in the middle but still soft and tender. Cool before turning out.

To make the icing:
In a medium bowl with a hand mixer, beat the cream cheese on medium speed until light and fluffy. Gradually beat in the heavy cream. On low speed, slowly mix in the confectioners’ sugar until incorporated and smooth. Cover with plastic wrap and refrigerate until ready to use. Icing can be made several hours ahead and kept covered and chilled.
Top each cupcake with a heap of frosting and dust with cocoa.
(view the original recipe here)
Bon appétit!
———————————————————————————————————-
David Ackley is a beer writer, brewer, and self-described “craft beer crusader.” He is a graduate of the Oskar Blues Brew School in Brevard, NC, and founder of the Local Beer Blog.

5 Ways To Celebrate IPA Day

IPA Day - August 1, 2013IPA Day is August 1st, a celebration of hops and quite possibly America’s favorite craft beer style.
As many hopheads have heard, India Pale Ales were invented during the colonial days of the British Empire. In order for the beer to survive the journey to their troops in India, British brewers would add extra hops, a natural preservative, and increase the alcohol content. Americans, as we always like to do things bigger and better, have added our own American ingredients and adopted the style as our own. It’s not uncommon to see “Imperial” and “Double” IPAs, amped up versions of the original, as well as “Belgian”, “white”, and “farmhouse” IPAs on the shelves.
Here are five ways to celebrate the big, bold flavors of the India Pale Ale:

  1. Host an IPA Day Beer Tasting
    Collect a swath of your favorite local, regional, and homebrewed IPAs for an epic beer tasting. Create bracket to decide who wins the “Top of the Hops.” Dig cheese? Try your IPAs alongside a lineup of gorgonzola, blue, and other funky cheeses.
  2. Brew an IPA
    Make your own IPA at home and celebrate for weeks to come. We have several kits to choose from:
    Brewers Best: India Pale Ale
    Brewers Best Bold Series: Belgian India Pale Ale
    Brewers Best Bold Series: Double IPA
    Brewcraft Premium Series: New Zealand IPA
    Brewcraft Ultimate Series: Oak Barrel Imperial IPA
    Brewcraft Ultimate Series: Dry Hopped West Coast IPA
    Muntons Connoisseur Kit: India Pale Ale Why not brew more than one to compare them against each other? (Don’t forget that we have free shipping on all orders over $50!)Also, feel free to create your own recipe using our Simple Style Guide: How to Brew an American IPA.
  3. Cook with an IPA
    Throw some India Pale Ale into some of your favorite recipes. The beer’s rich, malty sweetness and strong hop notes will add layers of complexity to any dish. Here are just a few recipes to provide a little inspiration:Jalapeno IPA Hummus
    Hawaiian IPA Pineapple Pulled Pork Sliders
    Roasted Garlic IPA Mashed Potatoes
    Hophead IPA Peanut Brittle Make them all for a four-course, IPA-infused feast!
  4. Visit your local brewery
    Take a trip out to your favorite local brewery to see what IPA they have on tap.
  5. IPA Pub Crawl
    Pick a few of your favorite craft beer bars and breweries and sample IPAs all along your route. Just remember, don’t drink and drive!

Are you planning an IPA Day event? Register the event through CraftBeer.com so others beer enthusiasts can join in the fun as well.
Til next time…cheers!
—————————————————————————————————-
David Ackley is a beer writer, brewer, and self-described “craft beer crusader.” He holds a General Certificate in Brewing from the IBD and is founder of the Local Beer Blog.

The Top 4 Reasons You Should Join A Home Brew Club

Beer Club MeetingBeer blogger Heather Erickson shares why you should join a home brew club ASAP:
—————————————-
If craft beer were a rock band touring the country, home brewers would be its groupies. When groupies get together, well, you have a fan club. Enter the Home Brew Club: a place where home brewers can meet to collaborate, drink, and compete.
So why should you look up your local home brew club as soon as you finish that beer? Well, home brew clubs are great opportunities to…
1. Drink Together
At the very least, being a part of a home brew club gives you license to do just that: drink. Monthly meetings centered around learning about different beer styles or sharing your own home brew will need to be enjoyed. You will need to drink together in order to compare beers, identify tastes, and figure out beers that you might want to brew as a club. It’s also fun picking up several bottles of the same type of beer, including a home brew version, to see how yours stacks up against the pro’s.
2. Collaborate and Brew Together
Nothing is more fun than creating a beer recipe with friends – well, except maybe drinking the end result. Working on a group recipe, using the expertise of all members, is not only a team building activity, it gives you something to brew and ultimately drink together.
A home brew club in my area makes a plan to brew as a group once a month. Sometimes it is a clone recipe. Sometimes it is a favorite beer recipe from a member. Other times it is a group created recipe. No matter what they choose, brewing with others that love to brew makes the time fly by.
3. Compete Together
Let’s be honest. Home brew competitions can be a bit scary. Filling out the paperwork, dropping off the brew, and waiting for the results can just about put anybody into a frenzy. Why not compete with friends? Make a plan to enter either individual beers or club created beers with fellow members. That way, no matter what the outcome, you will have your own cheering section.
4. Learn Together
One of my favorite home brew learning experiences was at the National Homebrewers Conference last summer. It was unlike anything I had ever been to before. Filling conference rooms with fellow home brewers learning about new techniques, the science of beer yeast, and individual styles was so fun. Instant friendships were made based on the passion to learn more about our common language of beer. While it might not be feasible for your club to travel to such a conference, check out the AHA website to see what kind of online courses or web seminars are available. Local home brew shops might also offer some classes that your club could attend.
At the end of the day, nobody can deny that beer is social. Shouldn’t your home brewing adventures be, too?
———————————————————————————————————–
Heather Erickson is a homebrewer with three years experience and has competed in the GABF Pro-Am Competition. She writes the blog This Girl Brews and is a regular contributor to homebrewing.com and kegerators.com. Find her on Twitter at @thisgirlbrews.

Shandy Is Dandy: A Look At A Summer Time Favorite

Soda Pop For Making Shandy With Beer
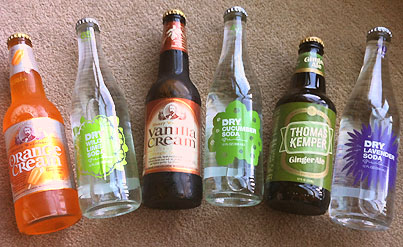
Traditionally, a Shandy is a lager beer mixed with lemonade or citrus soda. You will find quite a few examples on the supermarket shelves this time of year. However, with beer making it’s way into the craft cocktail circuit, a Shandy could really include any type of beer (especially a homebrew!) mixed with any kind of soda. Remember how you squeezed those extra lemons in a barely drinkable beer? Now, you can do that on purpose for new, palatable flavor combinations. Below are a few of my Shandy creations that will surely become your summer favorites:
The Margarita Mixer
Take one part Raspberry Ale and one part lime soda. I chose Granville Island’s False Creek Raspberry Ale with Dry Wild Lime Soda. The result? A tangy fruity beer beverage that tasted nothing like a traditional beer. In fact, it tasted exactly like a berry margarita. I could see this being a great entry-level beer experience for some of my margarita loving friends. Sunny afternoons with this in my pint would make me a happy lady!
Sweet Tea
Pour one part Pale Ale and one part Ginger Ale and voila…you have adult Sweet Tea! I used Deschutes Brewery’s Red Chair NWPA with Thomas Kemper Ginger Ale for my mix. Identical to that thirst quenching southern drink, this Sweet Tea was a delight. Dare I suggest pouring it over ice?
Black Russian
Use one part Chocolate Stout and one part Vanilla Cream soda and well, you have the first cousin of one of my favorite wells, a Black Russian. For me, this would be a great after dinner sipper. The vanilla and chocolate/coffee essence of this combo lends itself to being a great candidate for a beer float, too!
DryPA
Use one part American IPA and one part cucumber soda….wait does that sound a bit questionable? Trust me, that cucumber flavor pairs well with a piney hopped IPA. I dug deep into my beer collection and poured a Presidential IPA from Diamond Bear and used local soda maker’s Dry Cucumber Soda. While I used to mix that particular soda with vodka, I think I might love it even more with an IPA.
LavenDouble
Alright, seriously trust me here. If you tried my DryPA mix and liked it, you will LOVE this one. First, find a good Double IPA. I used Myrcenary from Odell, and once again used local soda favorite Dry Lavender Soda. With a strong backbone of a malty and hoppy DIPA, the lavender soda softened up with back of the palette. It almost cut out some of the overly bitterness and replaced it with a gentle floral note.
The key to any craft Shandy is being able to adjust the ratio to your specific taste. Try to keep citrus flavors with Wheats and Pales, savory flavors with Porters and Stouts, and herbal flavors with IPAs. So, grab some sodas, raid your beer fridge and see what new combinations you can come up with!
Care to brew some of your own sodas at home? E. C. Kraus has gear to make your own soda pop! ———————————————————————————————————
Heather Erickson is a homebrewer with three years experience and has competed in the GABF Pro-Am Competition. She writes the blog This Girl Brews and is a regular contributor to homebrewing.com and kegerators.com. Find her on Twitter at @thisgirlbrews.

You Think You Know Beer? Become A Beer Judge!

Becoming A Beer JudgeReady to take your homebrewing to the next level? Consider being a certified beer judge! Guest blogger Jason McLaughlin gives us the run down:
——————————————-
Many homebrewers have tried entering a homebrew competition at some point to see either how their beer stacks up against others, or to just get feedback on where one may have gone wrong. The job of a beer judge is a big one, and qualified BJCP (Beer Judge Certification Program) judges have gone through extensive training to become proficient and calibrated on knowing when a beer fits a particular beer style (Is this a Baltic Porter or a Robust Porter?), or perhaps has any off-flavors or aromas.
The Role of a Beer Judge
Judges need to know when a brewer has nailed a style, or what action they could take in the future to enhance their beer. They also need to understand and detect beer faults, and inform the brewer where in the process it may have stemmed, and how to correct it in the future. It’s truly a huge job because entrants are paying hard earned money in entry fees and often shipping expenses for their beer to evaluated and scored. Judges need to be educated and have sharp palates, and therefore the process of becoming a judge is not set up to be obtainable without extensive studying and… well… drinking beer.
About the BJCP
At the core, the purpose of the BJCP is to promote beer literacy and the appreciation of real beer, and to recognize beer tasting and evaluation skills. One becomes a BJCP ranked judge by taking a series of exams that test potential judges on their brewing knowledge, as well as their tasting and communication skills. The first step, called the BJCP Beer Judge Entrance Examination, is an online exam that is made up of questions dealing with the BJCP Style Guidelines, technical processes of brewing, knowledge of ingredients, recipe formulation, and beer faults. Examinees with passing scores are then qualified to take the BJCP Beer Judging Examination, which is a practical tasting examination administered at a registered exam site.
Studying for the Exam
To cover all the topics that can be included in taking the exams, a firm understanding of brewing practice is required. Books such as Designing Great Beers and Complete Joy of Homebrewing are fantastic resources. Many potential judges also form study groups to go over the materials they are required to know. A study group is a great way to learn with others and gain perspective of all the facets of brewing and evaluation. Class time is often comprised of covering the technical information and science behind the brewing processes and ingredients, studying of the BJCP Style Guidelines and the history of styles, and in depth beer style evaluation of classic as well as flawed examples. The knowledge one learns going through a well planned study group is vast, and becoming a BJCP judge may quite possibly be the single best thing a homebrewer can do to better their beer. Judges have all the tools they need to evaluate their own beers, and that is a huge advantage when creating the perfect brew.
Interested in Becoming a Judge?
A lot of information is available on the BJCP website, including test dates and locations. Due to the high interest in becoming involved with the program, scheduling the tasting portion of the exam can be booked out for quite a while. The exam is individually graded by volunteers, which puts a limit on how many exams can be administered in a month. With that being said, there is no better time than present to round up your brewing friends or local brew club members to start the planning now.
In the meantime, a great way to see first hand what goes into a BJCP sanctioned competition is to volunteer as a steward at a homebrew competition. Competition organizers are almost always in need of extra help, and what better way to see behind the scenes of judging is all about!
——————————————————————————————————
Jason McLaughlin is a homebrewer, National Level BJCP certified beer judge, and one of the admins of the Nebraska Beer Blog. Additionally, he is a columnist for Omaha Food & Spirits and President of the Lincoln Lagers Homebrew Club.

How To Brew A Chipotle Smoked Porter

Chipotle BeerAre you ready for some fire?
If you’re a fan of spicy foods, you might want to try to brew a spicy beer made with hot chile peppers. It’s definitely a specialty item, but sometimes that extra kick can give your tastes buds a much needed wake-up call.
Not sure if spicy beer is for you? Try some commercial examples before brewing your own hot chile pepper beer. Twisted Pine’s Ghost Face Killah, Rogue Brewery’s Chipotle Ale, and Dogfish Head’s Theobroma are all made with hot peppers and are pretty well regarded among craft beer fans. Levels of spice will vary from beer to beer, but if you can stand the heat, keep reading.
Brewing beers with unusual ingredients may sound intimidating, but it’s actually pretty easy. Here are some instructions for brewing your own Chipotle Smoked Porter, inspired by Stone Brewing Company’s Chipotle Smoked Porter. Feel free to substitute the base beer or switch type of pepper to come up with your own variation!

  1. First, consider whether you really want several gallons of spicy beer. Maybe a friend will join in and split the experiment with you?
  2. Once you’ve decided that you’re willing to give it a try, start out with a Robust Porter recipe kit, a Smoked Porter recipe kit, or an all-grain porter recipe. To add smoked flavor, just add 1/4 to 1 lb. of smoked malt to your grain bill, depending on the intensity of smoked flavor you’re going for. (By the way, it is possible to smoke your own malt, if you’re so inclined.)
  3. Buy a small can of chipotle peppers. Chipotle is just a fancy word for smoked jalepeños. It won’t take much to add significant heat to your brew, so a 3-6 oz. can will be plenty!
  4. Chipotles peppers are often packed in adobo sauce. On brew day, rinse the chipotles to get most of the sauce off of them. Whatever you do, don’t rub your eyes after handling the peppers!
  5. Add the peppers about halfway through the boil. Don’t feel like you have to use the whole can — just a few peppers will definitely be noticeable! Want to go nuts? Brew at your own risk!
  6. Proceed with your brew as you would otherwise.
  7. After 2-3 weeks of bottle conditioning (or after carbonating your keg) sample some of your spicy beer. If it’s too hot, allow the beer to age a bit. The spice will mellow out over time.

Spicy beer is definitely an acquired taste — be prepared because not everyone will like it. I for one love these chipotle smoked porters, so I think it’s worth a shot.
Have you brewed chile beers before? What peppers did you use? What base style?
——————————————————————————————————-
David Ackley is a beer writer, brewer, and self-described “craft beer crusader.” He holds a General Certificate in Brewing from the Institute of Brewing and Distilling and is founder of the Local Beer Blog.

Do You Have A Malt Liquor Recipe?

Malt Liquor Can
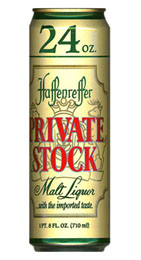
I would like to try brewing Haffenreffer Private Stock malt liquor. Do you have a recipe for this American malt liquor 6.90% ABV? Whole grain or extract would be OK. I can go either way. I have been brewing about ten years and would like to try to make an old favorite from back in the 50s. Not available in Arkansas. Hoping you can help with a workable recipe.
Name: Roger B.
State: Arkansas
—–
Hi Roger,
Thanks so much for your question! This sounds like a fun experiment!
As you probably know, malt liquor is a basically a high-gravity lager brewed with high levels of adjuncts, usually corn, sugar, or a combination of both. Malt liquors tend to be around 6-8% alcohol by volume and are lightly hopped.
While I’ve never had the particular malt liquor you mentioned, I’ve had my fair share of Olde English, so I have a general idea what you’re going for. You may want to do some experimentation to find what works best for you, but here’s what I recommend:

  1. Crack open a 40 of your favorite malt liquor.
  2. Get a Brewers Best Cream Ale or American Light recipe kit.
  3. Supplement the recipe with an extra can of Briess Pilsen Light liquid malt extract plus a combination of flaked corn and corn sugar to bring your estimated original gravity to about 1.070.
  4. Use a clean fermenting lager yeast, such as Wyeast 2035.
  5. Lager the beer, fermenting it at cold temperatures to make the beer as smooth as possible.
  6. Drink a number of 40s over the following weeks so you can reuse them to bottle your own malt liquor.

You could also try an all-grain recipe like this one (for a 5-gallon batch):

Or, you may want to try Charlie Papazian’s recipe for an “Olde English 800”, found in the Complete Joy of Homebrewing:

Olde English 800
5 Gallons

OG: 1.055
FG: 1.004
ABV: 7%
Color: 4.5 SRM
Bittering Units: 14

3.5 lbs. American 2-row pale malt
3.75 lbs. American 6-row malt
3 lbs. flaked corn
2 HBU (56 MBU) American Cluster hops (pellets) – 105 minutes (bittering)
1.5 HBU (43 MBU) American Nugget hops (pellets) – 105 minutes (bittering)
1/4 tsp. Irish moss
Wyeast 2007 Pilsen Lager yeast

Instructions: A step infusion mash is employed to mash the grains. Add 10 quarts (9.5L) of 130-degree F (54.5 C) water to the crushed grain and flaked corn, stir, stabilize and hold the temperature at 122 degrees F (50 C) for 30 minutes. Add 5 quarts (1.9 L) of boiling water. Add heat to bring temperature up to 150 degrees F (65.5 C). Hold for about 60 minutes.

After conversion, raise temperature to 167 degrees F (75 C) water, lauter and sparge with 4 gallons (15 L) of 170 degree F (77 C) water. Collect about 6.5 gallons (25 L) of of runoff, add bittering hops and bring to a full and vigorous boil.

The total boil time will be 105 minutes. When 10 minutes remain, add Irish moss. After total wort boil of 105 minutes (reducing wort volume to just over 5 gallons), turn off the heat, then separate or strain out and sparge hops. Chill the wort to 65 degrees F (18 C) and direct into a sanitized fermenter. Aerate the cooled wort well. Add an active yeast culture and ferment for 4 to 6 days in the primary at 55 degrees F (15 C). Then transfer into a secondary fermenter, chill to 50 degrees F (10 C) to age for two more weeks, then lager for two to four more weeks at 40 degrees F (4.5 C).

When secondary aging is complete, prime with sugar, bottle or keg. Let condition at temperatures above 60 degrees F (15.5 C) until clear and carbonated, then store chilled.

It may take a couple tries to get the flavor just right, but I’m sure you can do it! Good luck and let us know how it turns out!
——————————————————————————————————-
David Ackley is a beer writer, brewer, and self-described “craft beer crusader.” He holds a General Certificate in Brewing from the Institute of Brewing and Distilling and is founder of the Local Beer Blog.

How To Be A More Eco-Friendly Brewer

Eco-Friendly Brewing SymbolLet’s face it: brewing isn’t the most eco-friendly hobby. For every bottle of beer brewed, it takes a gallon of water or more to make it. Even on a commercial scale, brewers have had to figure out ways to conserve water and process their waste.
Luckily, there are several steps homebrewers can take to conserve raw materials and make their hobby more eco-friendly. You might even save a few bucks along the way!

  • Compost – This is one of the easiest ways to make brewing more eco-friendly. Spent grain, trub, and yeast can all be added to the compost heap. After decomposing, these materials can be mixed into your garden soil or used as mulch. That’s money saved on both fertilizer and bed dressings! Plus, what goes in the compost heap stays out of the landfill.
  • Buy organic ingredients – Ingredients that are grown organically are free from pesticides and aren’t genetically modified. This means that fewer pesticides are washed into the water system and biodiversity is ensured. The jury’s out on whether organic beers taste better, but you can rest assured that beers made with organic ingredients will have a much less negative impact on our environment. Besides, good karma tastes great in an IPA.
  • Use an eco-friendly cleanerOne-Step No-Rinse Cleanser uses no chemicals, just oxygen to clean your homebrewing equipment. Keeping those chemicals out of your drains and off your equipment means everyone wins.
  • Grown your own – If your region is suited for growing hops or grains, go for it! You can also grow some of your own herbs spices, or fruits for added homegrown flavor. The more you grow, the less is spent transporting ingredients. Check out the Homebrewer’s Garden for some great tips on how to get started sustaining your homebrewing self-reliance.
  • Conserve water– Brewing requires a lot of water, both for the beer itself and for cleaning before and after brewing. There are several ways to minimize water use:
    • Use a bottle and carboy washer for a high-pressure/low-volume rinse.
    • Reuse cleaning/sanitizing water as much as possible. For example, if I’m soaking my mash tun or bottling bucket in One Step, I put everything else that will fit in there too: beer bottles, brushes, hydrometer. I’ll then run the cleaner water out through the racking cane and siphoning hose. Save the water for cleaning at the end of brew day. If there’s any left over, use it to do the dishes!
  • Heating – Natural gas is more efficient than coal-fired electricity, so using a burner rather than an electric stovetop will save you kilowatts on your electric bill and time in the boiling process. Another way to get more efficient with your water hearing is to insulate your mash tun. You can build your own jacket using materials from the hardware store, but be careful around the flame! Solar hot water is another option prior to firing up the burner. If you can get the water halfway there, that’s less energy needed for heating water.
  • Buy in bulk – Bulk purchases, such as this 50 lb. bag of Briess 2-Row, mean less packaging, and it saves you money! Plus, you have a built-in excuse to brew more beer. Win, win!

Homebrewing is an art, one to be constantly improved upon. In an excellent blog post, Deena Shanker writes that “Environmentalism … goes hand in hand with the art of beer making.”  Adopt even a few of these eco-friendly ideas, put a delicious home brew in your hand, and cheers to Mother Earth!
——————————————————————————————————-
David Ackley is a beer writer, brewer, and self-described “craft beer crusader.” He holds a General Certificate in Brewing from the Institute of Brewing and Distilling and is founder of the Local Beer Blog.