Cloning Ithaca Beer Co.'s Flower Power–Pt. 6: A Conditioning Taste Test

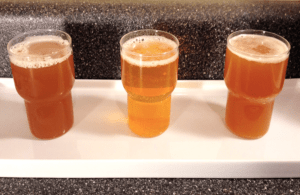
kegged, original, and bottled samples of Ithaca Brewing Co. Flower Power IPAOne of the hardest parts of homebrewing is the waiting – especially after the beer has been bottled or kegged. But this is an important time for the beer. You could call it a “self discovery” phase. Brewers call it conditioning.

About Conditioning
Conditioning is an important phase of the brewing process. Commercial breweries typically employ both a warm and a cold conditioning period. This can be compared to homebrewers doing both a secondary fermentation (warm, at normal fermenting temperatures), followed by a cold conditioning phase (“cold crashing” or lagering). These two phases can be applied to both ales and lagers.
So what happens during the conditioning phase?

A few things:

  • The final stages of fermentation, where the last remaining sugars are converted to alcohol and CO2
  • Yeast “cleans up” the beer by reducing certain flavor compounds (see diacetyl), and continues to do so after bottling/kegging (less so if the beer has been filtered)
  • Settling of various compounds (proteins, yeast, etc.) to aid in beer clarity.

While the beer is still conditioning, it is often referred to as “green beer”.

So back to the Flower Power clone and my struggle with patience…
I was curious to see how the beer is progressing, so I did a taste test with the kegged beer, the bottled beer, and the original Flower Power. I was especially antsy because people always says that IPAs be enjoyed fresh (e.g. Stone’s “Enjoy By” IPA). But how fresh is too fresh? At what point does an IPA reach its peak?
The trouble with this line of thinking is that there are just too many variables at play to develop a hard and fast rule. Among the many variations that can affect flavor perception include:

  • hop varieties
  • hop quantities
  • shop beer recipe kitsmalt variety
  • original gravity
  • final gravity
  • water source
  • yeast selection
  • yeast pitch rate
  • fermentation temperature
  • yeast flocculation
  • kegged or bottle conditioned
  • age

Not to mention variations in the brewing process. So with the knowledge that this experiment is inherently flawed, let’s see what we have.

Appearance
The most remarkable difference between the three beers is the clarity. Not surprisingly, the original Flower Power is much clearer than the clones. That’s a commercial beer and it’s probably filtered. Interestingly, the kegged beer is much murkier than the bottled beer, making it appear quite a bit darker than the original Flower Power. This makes sense because when beer is served from the keg, it’s served from the bottom, where all the yeast and whatnot settles. Bottles, on the other hand, are served from the top, away from all the sediment. Given enough time, I suspect that the kegged beer should meet or surpass the bottled beer in clarity, and when that happens, the color should more closely resemble the original Flower Power.

Aroma
The Flower Power exhibits more sweet orange hop aroma, while the clone has more of a grapefruit and pine character. Interestingly, the bottled clone seems to offer slightly more malt aroma.

Flavor
Because the original Flower Power has had significantly more time to age (bottles were purchased four months ago) it’s hard to make comparisons. Still, the weeks and months that go by don’t seem to diminish the hop character in the Flower Power. With the clones, the flavor profile is remarkably similar to the original, but it’s obvious that they need more time to condition. The bitterness is slightly harsh and I detect a slight solvent/alcoholic character. While it’s tempting to overthink the situation and try to identify potential faults, I’m going to do my best to “Relax, don’t worry, have a homebrew,” just like Charlie Papazian likes to say, and give the beer more time to condition.
So, we’ll give the Flower Power clone another week or two and then do another side-by-side. Until then, I’ll be enjoying my Captain Cogsworth Coffee Stout!
—————————————————————–
Review the whole Flower Power clone brewing process below:

—————————————————————–
David Ackley is a beer writer, homebrewer, and self-described “craft beer crusader.” He holds a General Certificate in Brewing from the Institute of Brewing and Distilling and is founder of the Local Beer Blog.

Cloning Ithaca Beer Co.’s Flower Power – Pt. 3: Brew Day

Brewing Flower Power Clone Beer RecipeAfter developing a recipe and experimented with brewing water adjustments for this beer, the actual brewing of the Ithaca Beer Co. Flower Power clone beer recipe was put on hold for a couple weeks while I was out of town. I finally got around to brewing the IPA last weekend and boy am I excited about this beer! Brew day didn’t exactly go off without a hitch, but there weren’t any major issues that should cause major problems down the line. Here’s how brew day went last weekend.

Preparing the Yeast Starter

The night before brewing I made a yeast starter with light DME and one pack of California ale yeast. I don’t have a stir plate or flask yet (they’re on the list!), so I just used a growler and gave the starter a swirl every few hours or so.

The Set Up

I usually try to get all my ingredients and gear together before I actually start brewing. This helps eliminate the multitasking that can often result in a mistake.
First I assembled the ingredients: malt, hops, yeast starter, and water amendments. Then I get all the equipment set up, plus a stack of towels at the ready. I’ll usually turn on some music and have a snack on hand just in case. At least a few days in advance, I’ll check the propane tank to make sure there’s enough fuel for the brew. Did you know you can weigh the tank to estimate how much fuel you have left? I’ll share how to do that in a separate post.

Clean and Sanitize 

The next step before brewing the Flower Power clone recipe– and in many ways the most important – is to clean and sanitize the brewing equipment. I won’t go over this in detail, but if you need a refresher you can check out this post for tips.

The Mash

I mashed my crushed grains in about 4.75 gallons of water. One thing I’ve been trying to dial in over the past few brews in my strike temperature – that is, the temperature of the water before it goes into the mash. Since the grain and the mash tun are often room temperature, you have to compensate by adding water that’s at least 10-15˚F hotter than your target mash temperature. Given that things are even colder in the winter, I aimed high. With a strike temperature of 180˚F, I was able to get the mash temperature right where I wanted it, in the mid-150s. You can use a calculator such as this one to estimate your strike temperature.
Here’s where I ran into a little problem – despite my efforts to get organized before brewing, after 60 minutes I realized I’d forgotten to add the honey malt! Doh! Luckily it’s not a big mistake. The honey malt is in the clone recipe mostly for flavor and color, and in theory the sugars should only take 30 minutes to convert. So I just mixed in the honey malt and added 30 minutes to the mash time. With the extra time added to the mash, I probably ended up with even better efficiency than I would have otherwise!

The Sparge  Shop Barley Crusher

I find I’m consistently low on the amount of sparge water I need. My calculations said 4-4.5 gallons would do the trick, but between grain absorption and volume loss in the mash tun, I was about a gallon short of my pre-boil volume. I just quickly heated up another gallon of water and made a note to adjust my calculations for next time.
At the end of the sparge I found I had six gallons of wort with a preboil gravity of 1.068 – right on target!

The Boil 

I think of the boil as the start of the home stretch. All it takes is watching the clock to make sure the hops get in on time. The four hop additions for this Flower Power clone beer recipe smelled amazing – Simcoe at :60, Chinook at :20, Citra at :10, and Ahtanum and Centennial at :0. And we haven’t even touched the dry hops yet!
My post-boil gravity was 1.075 – just a point shy of the estimated OG – but well within the margin of error. This beer should easily surpass 7% ABV.

The Chill & the Pitch

The colder ground water temperatures this time of year really help with cooling the wort quickly. My immersion wort chiller got the wort to pitching temperature in about 20 minutes. I pitched the yeast starter and now the beer is fermenting happily in the fermentation chamber!
Stay tuned to see how this Flower Power clone beer recipe turns out!
—————————————————————–
Review the whole Flower Power clone brewing process below:

—————————————————————–
David Ackley is a beer writer, homebrewer, and self-described “craft beer crusader.” He holds a General Certificate in Brewing from the Institute of Brewing and Distilling and is founder of the Local Beer Blog.

3 Clone Lager Beer Recipes

pouring_a_lagerThe colder months of winter and their lower temperatures lend themselves to lagering, the long cellaring process in which bottom-fermenting beer yeast work slowly but surely to create smooth and crisp traditional beer styles. Before the days of refrigeration, lagers were placed in cool caves for their fermentation, aging, and maturation. If you have a room or garage that stays a consistent 40-50 degrees Fahrenheit in the winter, you can lager your beer without any expensive refrigeration equipment.
Here are three clone beer recipes of popular lagers that are fun to brew, but beware…you may find that you prefer your clone over the original!
—–
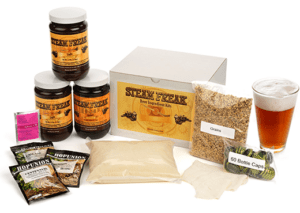
Steam Freak Buddy Light
(Bud Light Clone Beer Recipe Kit)
There’s a time and a place for every beer. If you’re planning for a long day of drinking, be it during tailgating, at a cookout, or post-yardwork refreshment, this American light lager is a great mid-afternoon relaxer.
Our Steam Freak Buddy Light Beer Recipe Kit contains:
3.3 lbs. Light Liquid Malt Extract
1.0 lbs. Light Dried Malt Extract
8 oz. Carapils Malt
1 oz. Hallertau hops
1 packet Fermentis Safale US-05 Beer Yeast
Grain Bag
Bottle Caps
Priming Sugar
Directions: Heat three gallons of clean water in your brew kettle. Put the Carapils in the grain bag and steep at 150°F. for 30 minutes. Discard grain bag. Remove the kettle from heat and stir in the malt extracts. Bring to a boil. Boil the Hallertau hops for 60 minutes. Ferment for one week at 60F. Transfer to secondary for a two-week fermentation at 50F.
On bottling day, mix priming sugar with two cups of pre-boiled water and mix into the beer. Fill bottles and cap, then age beer for two weeks.
—–
Sam Adams Winter Lager Clone
(5 Gallon Recipe)
This partial mash recipe comes from Brew Your Own Magazine. A grain bill comprised of crystal malt, malted wheat, and Munich malt brings some body, color, and caramel flavor to the beer, while the orange peel, ginger, and cinnamon contribute some intriguing holiday flavors.
6.6 lbs. Briess wheat malt extract syrup
1.5 lbs. crystal malt (60° Lovibond)
1 lb. wheat malt
1.5 lbs. Munich malt
1 teaspoon Irish moss
1 oz. Curacáo orange peel (bitter orange peel)
0.5 oz. ginger root (freshly grated)
0.5 tsp. cinnamon (powdered)
9.5 AAU East Kent Goldings hops (2 oz. of 4.75% alpha acid)
4.5 AAU Tettnanger hops (1 oz. of 4.5% alpha acid)
4.7 AAU Hallertau hops (1 oz. of 4.7% alpha acid)
3/4 cup corn sugar to prime
Bavarian Lager yeast (Wyeast 2206)
Directions: Perform a “mini-mash” with the crushed grains. Strain and sparge into your brewpot, then mix in malt extract. Bring to a boil. Add the East Kent Golding hops and Irish moss and start the 60-minute boil. In the last 15 minutes, add the spices. With two minutes remaining, add the Tettnager and Hallertau hops.
Remove kettle from heat, cool, transfer wort to a fermenter. Use clean water to bring volume up to 5.5 gallons. Pitch yeast and ferment at 50-55F for 3 to 4 weeks. Prime, then bottle or keg. Lager for about 4 weeks prior to serving.
—–
Pilsner Urkel
(Pilsner Urquel Clone Beer Recipe Kit)
This Steam Freak beer recipe kit recreates the classic Bohemian lager. A touch of caramel and Munich malts contribute color and grainy flavor, while a solid dose of Czech Saaz hops provide the distinctive, noble hop bitterness of Pilsner Urquel.
6.6 lbs. Light Liquid Malt Extract
8 oz. Caramel 10°L malt
2 oz. Munich malt
4 oz. Czech Saaz hops
1 packet Fermentis Saflager S-23 beer yeast
Grain Bag
Bottle Caps
Priming Sugar
———————————–
David Ackley is a beer writer, brewer, and self-described “craft beer crusader.” He holds a General Certificate in Brewing from the Institute of Brewing and Distilling and is founder and editor of the Local Beer Blog.

Why is Sugar Necessary in My Home Brew Process?

Quick – name something intriguing and sweet that also produces beer and liquor. No, not your favorite bartender – it’s sugar. This complex ingredient is not only a vital component in the creation of home brew products, it’s also a large part of the taste profile that gives various liquids their drinkable personalities. While some sugars are simply added during the initial brewing process, others contribute simply by existing in ingredients such as fruits for wines. Sugar isn’t simply a one-note contributor, either; while the overall level of sugar used in a home brew needs to be monitored, blends of different types of sugars can produce a full-bodied and delicious spirit.
Feeding The Yeast
For something so small, yeast packs a big punch. This one-celled organism is responsible for the fermentation, otherwise known as breaking down sugars to turn them into alcohol, process of home brewing. According to popular how-to site HowStuffWorks, “yeasts obtain food from fructose, glucose, and other monosaccharaides (simple sugars), which are found in most fruits.” This means that without the addition of some sort of sugar in sufficient quantities during the brewing process, you’ll end up with an old bottle of yeast-filled grape juice instead of a smooth wine. Feeding yeast sugar also produces carbonation, a necessary component to satisfying home-brewed beers.
Adjusting To Your Taste
When it comes to sugar, these sweet powerhouses aren’t just workhorses. Beyond the fermentation process, sugar also makes a finished spirit palatable, helping to balance stronger flavors like hops or slightly bitter flavors like herbal additives. Sugar can also be a final flourish during bottling, as well. A recent article from the San Antonio Current follows home brewer Jerry Lockey as he adds extra sugar prior to siphoning his latest project into bottles. In the article, Lockey explains to the Current that this last dash of sugar helps further ferment the new beer as it ages.
Sugar comes in several different varieties for home brewing projects, such as corn sugar and light and dark candied sugar for brewing various types of ales. Stumped for what sugars will work best with your brew? With a full range of articles, advice, and helpful customer service agents, the Adventures in Homebrewing website has all the “sweet” knowledge you’ll need to bottle a sensational spirit. Once you find the right sugars for your project, ferment something fantastic and you’ll discover just how impressive a single home brewing ingredient can be.

Beer or Cocktail? Yes, Please. The Maturation of Beer Cocktails

Late summer is in full swing and you may find yourself in quite a dilemma as Happy Hour rolls around and you are again stuck deciding between a refreshing beer and a tasty cocktail.
Not to worry my friend, a new era has dawned and it is now acceptable to have both – at the same time! That’s right, beer cocktails have burst onto the bar scene with their vibrant creativity, diverse flavors, and serious ability to pack an alcoholic punch.
The surge in popularity stems from the nostalgia of shandygaffs, which is a mixture of beer and soda popularized by old Englishmen and the more recently nostalgic car bombs, sake bombs, and Jäger bombs popularized by college students across the nation.
These beer cocktails are not the fist pounding, unceremoniously plunged together, and gulped down drinks of the past. The creators of alcoholic bombs have graduated and matured into adulthood and so have their palates.
Recipes that have hit mainstream include:

  • Black Velvet: a mix of stout and champagne
  • The Boilermaker: a combo of quality beer and a shot of whiskey
  • The Groundskeeper: a medley of ale and single-malt scotch
  • Michelada: a beer, lime juice, and hot sauce mixture served margarita style with a salt rim

Quality ingredients and flavor seems to be the main criteria of beer cocktail mixology. Aficionados and novices alike are ordering beer brewing kits, hoping to create the perfect blend of hops, barley, and other accompaniments to produce the perfect base for their savory beer cocktails.
Beer brewing at home has become a pastime for these beer cocktail diehards who are never satisfied with the status quo.  Some opt for brewing with flavor profiles such as chocolate and orange, coriander and rosemary or lemon pepper. Effectively producing the perfect craft beer requires marrying together of spirits and shaping the next bar room staples.
Texture, complexity, and flavored beer cocktails are now the sophisticated choice. So next time you find yourself stumped on what to order at your local bar, get the best of both worlds and indulge in a craft beer cocktail.

Top Five Facts You May Not Know About Beer Brewing

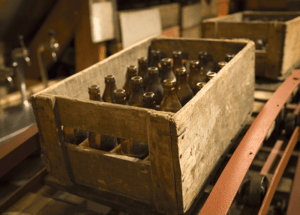
Old wooden case of beer bottles
  1. Beer brewing dates back to 6,000 BC. The oldest beer brewing recipe was found on a Sumerian tablet. It contains a prayer to Ninkasi, who is the goddess of brewing. In fact, this is the world’s oldest known recipe! For those curious about what the first beer may taste like, Anchor Brewing Company produced a limited time replica based off the original recipe. (We wonder what their beer brewing kits looked like!)
  2. The Mayflower landed at Plymouth Rock because it ran low on beer. The Mayflower was originally destined for the Hudson River, but ran low on certain resources, including beer.
  3. Home beer brewing was made legal in the United States on February 1, 1979.  This ruling was made possible by California senator, Alan Cranston. Homebrewing kits are now perfectly legal, and found in many homes across the country. Hats off to Mr. Cranston!
  4. There are approximately 750,000 home brewers in the United States. This number is growing rapidly each year!
  5. Beer is the second most popular beverage in the world, coming in right behind tea!

How To Pair Beer With Food

Image courtesy of https://www.scientificamerican.com/

For a beverage consisting of so few ingredients, beer makes a huge statement.  Its rich diversity of flavors, aromas and textures make it the ideal partner for almost any meal.  As a homebrewing citizen, one of the greatest challenges you might face is finding the right grub to compliment your brew.  With so many possibilities, it can be a challenge to know where to begin.
The best place to start is with the profile of your beer since this will govern its interactivity with food.  This is determined by three main ingredients: malt, hops, and yeast.  Malt is sweet and often adds hints of chocolate or coffee to malt-heavy beers such as stouts and porters.  Hops are considerably more dynamic and will add bitter, spicy, floral and/or fruity flavors to beers, most pronouncedly in India Pale Ales.  Then there are the more yeasty beers, such as American wheat beers and German hefeweizens, which are generally lighter with heavy yeasty flavors.  Together, these ingredients bring out the sweet, bitter, spicy and rich features in the product of your beer brewing experience.
The next step is determining how you want your food to relate to your beer.  Oftentimes, the best partnerships arise from shared flavors and aromas.  The key is finding the correct balance in the harmonies you wish to create through complementary or contrasting flavors.  As a general rule of thumb you should keep the strength of your food and beer consistent, but there are otherwise no wrong answers. With homebrewing kits, the flavor creation possibilities are endless.  In the end, the way in which you consume your brew is the final step in getting the most out of your beer brewing kits.

Five Stages of Homebrewing

Beer brewing kitsHomebrewing – a rapidly growing hobby, yet still a time-honored tradition. Brewing your own ales, lagers and stouts allows you total control in your beer’s taste, strength, crispness, etc. By having creative control over your bottle of brew – beer lovers can enjoy beers to their exact taste. Not to mention the sense of accomplishment, knowing that your efforts produced something of value to you.
Beer brewing kits help make this happen – but what goes into the brewing process? Beer brewing comes in five stages, which means you’re just five stages away from enjoying a delicious cold one.
What’s in wort? – Pale malt extract and hops are boiled together with water for about an hour to sterilize the extract and release the bittering qualities of the hops.  Frequently grains are steeped in the mixture prior to the boil to add additional color and flavor complexity. This hot mixture is called a wort.
Chill Out and Ferment for a While – The hot wort is cooled to room temperature and siphoned to a fermenter where it is combined with more water to achieve the desired batch size.  Once the mixture drops to room temperature, brewing yeast is added to start the fermentation process.  Cleanliness and sanitation are very important since bacteria in this state can easily infect the wort.  An airlock is used to keep the fermenter sealed during fermentation.  Your beer will ferment for 1-2 weeks.
All Bottled Up – Once the beer is fully fermented, it is siphoned once again, this time to a container for bottling.  This begins the priming process, when priming sugars such as corn sugar are mixed with the beer.  The beer is siphoned into bottles and each bottle is capped with beer bottling equipment.
Age is more than a number – Once the beer has been bottled it needs to age for 2-6 weeks.  During aging the yeast will ferment the remaining sugar you added and create carbon dioxide.  This carbon dioxide will naturally carbonate your beer so it is nice and bubbly.  In addition, undesirable sediments such as excess yeast and proteins will drop out of the beer during aging and this will enhance the flavor of your beer.  In may take several months to reach peak flavor, though homemade beer usually drinkable after a month.
Enjoy – Once the brew is properly aged, pop them in the fridge to cool once last time. Then, lay back, crack one open and enjoy!

Homebrewing by the Seasons

Ever wonder why you have a subconscious thirst for a full bodied beer when there’s snow on the ground? Or how about a beer that offers a certain level of refreshing crispness when you’re at the picnic table for a 4th of July party?  Perhaps you’re at a renaissance fair on a cool fall day and you have your palate is craving a brew that’s malty instead of hoppy.  Beer Brewing kits can quell these cravings and provide a fun, rewarding way to put your own stamp on brewing beer at home.
Most seasonal home brewing recipes offer obvious generic names to stand out amongst other recipes.  Names such as “Winter Lager” and “Summer Ale” come to mind.  While these recipes are, in their own rite, still very satisfying beers, there are many more recipes for home brews that coincide with the seasons.  To enjoy these beers during the season in which they are designed for it is recommended that you give ample time for preparation and fermentation.  Starting the process during the prior month of its consumption is the typical practice. (For example, to enjoy a summer beer in the summer, start the process during spring.)

Winter Style Beers

Winter style beers are typically brewed to yield high percentages of alcohol to get you through the cold winter months.  The colors usually range between light brown and black.
Scotch Ale– Scotch Ales are considered a fairly strong beer with colors ranging from amber to light brown. They tend to be sweet and full bodied with a pronounced malty caramel and roasted malt flavor. They can typically yield an ABV% ranging between 6-11.
Winter Warmers– Winter Warmers are the typical winter beers.  Most commercial winter lagers are modeled in the Winter Warmer fashion.  They tend to rely heavily on a malty sweet presence rather than a hoppy bitterness.  Winter warmers can typically yield an ABV% ranging between 6 and 9 and their colors range from reddish-brown to pitch black.

Spring Style Beers

Spring style beers begin to transition from the heavier, darker beers into beers that emphasize wheat flavoring.  They offer a myriad of characteristics including beers that are citrusy, cloudy, crisp and refreshing.
Bocks– Bocks are common spring beers that offer medium to full bodied profiles, but no roast flavor.  They tend to favor more of a malty influence with low levels of hop bitterness.  They are generally brown to dark red in color, but bock variants such as Maibock can come in a golden color.  Transitioning from the stronger winter beers, the Bock’s ABV% ranges between 5.5 and 7.5.
American Blond Ales– Blond Ales offer pale yellow to deep gold colors. It is an all malt brew, with most showing a level of subdued fruitiness. Hop character is of the noble variety, or similar, leaving a light to medium bitterness. A balanced beer, light bodied and sometimes lager like.  Blonde Ales generally hold a ABV% between 4-7.

Summer Style Beers

Summer style beers are brewed to be relatively pale, light, crisp and relying heavily on wheat elements and citrus nodes that are smooth and pleasing to the palate.
Saison– Saisons are traditionally brewed in the winter, to be enjoyed throughout summer. It is a French beer in origin but has a strong following in the United States.  Saisons typically are fruity in aroma and flavor resembling a wheat beer and brewed with heavy amounts of spice to build a mild tartness.  The typical “summer ale” is modeled off of Saison Variants.  They tend to be semi-dry with many only having touch of sweetness.  The ABV% of Saison beers range between 5 and 8.
Kolsch– Light to medium in body with a very pale to clear color, hop bitterness is medium to slightly assertive. Some versions of Kolsch are considered to be very similar to pilsners.  ABV% ranges from 4-6.

Fall Style Beers

Fall style beers, typically varieties of ales, are brewed to transition back into the cooler fall months.  They generally rely on malty, spicy elements to provide a beer that is sweeter than it is bitter.
Pumpkin Ale– The Pumpkin Ale is quite varied and can sometimes be referred to as a variant of Harvest Ales.  Flavorings can come from actual hand cut pumpkins to pumpkin purees.   These beers also tend to contain ground ginger, nutmeg, cloves, cinnamon, and allspice. Pumpkin Ales are typically malty, with a spicy aftertaste due to the combination of the “pumpkin pie spices.”  The ABV% of Pumpkin Ales range between 4 and 7.
Marzen/Oktoberfest– The prototypical fall beer, Marzenbier is full-bodied, rich, toasty, typically dark copper in color with a medium to high alcohol content.  The common Marzenbier contains roughly 5-6% ABV and has a mild hop profile relying mostly on a malty influence to blend its robust flavor.

Beer Brewing Supplies, in a One-Stop Shop

Whether you are new at home wine making or an old pro at home brewing your own beers, you have likely faced the challenge of finding the best supplier for all of your current and prospective future growth needs.
Basic Needs
The list of basic needs for brewing is quite long.

  • Steel Boiling Pot. The boiling pot you purchase must comfortably hold at least three gallons. Bigger is better in this case. Use only high-quality boiling pots that are made of ceramic-coated steel, stainless steel or aluminum.
  • Two Fermenters with Airlocks. It is best to have two fermenters so that one can act as a bottling bucket. A six-gallon food-grade plastic type is recommended for early beginners. Also available are glass carboys that commonly come in three, five and six and a half-gallon sizes.
  • Siphon with Bottle Filler. Siphons are available in many different configurations. However, they commonly consist of clear plastic tubing with a racking cane. They can also have bottle fillers. A bottle filler is most often made of plastic or metal tubing with a spring-loaded valve for filling your beer or wine bottles.
  • Bottle Capper. There are different styles of bottle cappers available. You will need to decide between a bench-style or hand capper. Although bench cappers are more flexible and will be required to create champagne bottle caps, they are definitely more expensive.
  • Bottle Caps. Oxygen and standard absorbing crown caps are the choices in bottle caps.
  • Large Stirring Spoon. You will need a food-grade plastic paddle or stirring spoon for the wort during the boiling process.
  • Bottle Brush. Used bottles should be thoroughly cleaned with a long-handled nylon bottle brush.
  • Thermometer. Make sure the thermometer you select can be safely immersed during the boiling and wort process. It should have a range of approximately 40°F to 180°F.
  • Hydrometer. The hydrometer can measure the specific gravity between pure water and water that has had sugar dissolved in it. A hydrometer is definitely required when creating beers from scratch.

Cost to Start Making Wine or Beer at Home
Considering all the above requirements, it is still not as expensive as you may believe to begin making your own wine or beer at home. Expect to spend anywhere from $100 to $200 at Adventures in Homebrewing for the first shot that includes buying the equipment. Subsequent brewings for five to six gallons of wine should cost anywhere from $50 to $200 depending on the quality and rarity of ingredients used.
Most home brewers have found that the experience, as well as the options for customization in their beer or wine, is sufficient reward for the brewing process. Home brewers also commonly market their own products locally with unexpectedly good results since even smaller grocers now cater to microbreweries and other open market opportunities. The affordable investment into a home brewing kit for wine or beer may even pay for itself in your very first batch as long as you are sure to purchase the most affordable brewing equipment for your needs at a reputable supplier such as Adventures in Homebrewing.