 Beer brewing is not just a crude process of fermenting grains, it is an art and even minor changes in the brewing process can bring surprising results in the taste of the beer. The wort, for example, can be prepared using three different methods, each one becoming a little more involved than the one before.
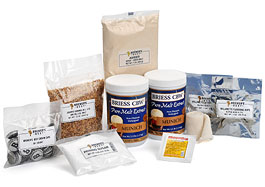
Method #1: Wort From Malt Extract:
Making a wort from a prepare malt extract kit is the simplest processes for creating a beer wort. Boil at least two gallons of water and add flavored malt extract to it. That’s it! You have your wort and you can use this to make beer. The hops have already been incorporated into the malt extract as an oil. Each type of syrup is made from a specific blend of grains that produces the intended style of beer.
Method #2: Wort From Partial Mash:
This method is a little more involved but fun. Both malted barley and malt syrup are used. Fill a pot with at least two gallons of water and add the grains. Allow this mixture to steep. Usually at around 155° F. to 165° F. You can enclose the grains in a specially prepared steeping bag but this depends on your equipment. How long you steep the grains varies with the beer style. Now remove the grains from the liquid and add the malt syrup. What you have now is a wort.
Method #3: Wort From All-Grain:
This process is a bit different from the steeping grain one as it does not make use of malt extract. This method requires specialized equipment like mash tun, lauter tun, hot liquor tank, and a grain mill. You need to start by milling the grain. You want the grains to be cracked not ground. Now, add this grain to hot water and heat it to a temperature as required by your beer recipe. This process is known as mashing. Now separate the sweet wort from fine grain by using the lauter tun. This sweet wort is sparged to produce the required wort.
As you move on from beginner to expert levels in homebrewing, you will appreciate that this process, though time consuming, is one of the best to produce great wort and even finer beer. Plus you get to experiment and create your own beer according to your preferences.
Wine Glass Selection 101
Wine glasses don’t have to be expensive, but choosing the right shape for the right wine is essential. In fact, the glass you choose for serving your wine can enhance your enjoyment of it tremendously. If you only have one set of all-purpose wine glasses, you’re likely missing many of the nuances of the wines you drink.
For optimum wine enjoyment, opt for clear wine glasses. While tinted glasses make for a stylish table setting, they rob you of the ability to view the true color of the liquid.
As far as style and shape, wine glasses fall into three main categories:
Red Wines. The best glasses for red wines, like Cabernets, Merlots, and Malbecs, are those glasses with a wide rim and a generous bowl. The large, open area at the rim of the glass allows the wine to breathe and open up to its full flavor. It also allows wine drinkers to savor the full bouquet of the wine, an essential part of wine tasting.
White Wines. In contrast, white wines, such as Chardonnays, Rieslings, and Sauvignon Blancs, are best when served in a glass that has a slightly closed rim. Since most white wines are best when slightly chilled, the limited area at the top of the glass keeps the wine from being warmed by the air. This wine glass is considered the “typical” wine glass that you usually see in stores and at homes.
Sparkling Wines. Sparkling wines, including Champagne and California Sparklers, need to be served in a flute. This long-stemmed glass with a long, narrow bowl allows the bubbles in the wine to last longer. Like a white wine glass, the ideal Champagne flute has a narrow rim to help prevent the wine from being warmed by the room’s air.
Saucer-shaped Champagne glasses should be avoided. Though they were once in vogue, they actually cause the bubbles to dissipate and the wine to go flat sooner.
Other Tips
In addition to choosing the right glass, it’s important not to fill the glass right up to the brim. Allowing room at the top of the glass gives the wine room to breathe and room for the drinker to savor the wine’s bouquet. It’s also important to hold white and sparkling wine glasses by the stem, so as not to warm the wine.
Choosing the right glass for the right wine doesn’t have to be complicated. However, having three types of wine glasses on hand is sure to enhance your guests’ enjoyment of the wines you serve.
Why Does My Wine Taste Like Vinegar?
 I have made several attempts at making wine. I have used grape juice (Welch’s), rhubarb, blackberry, and have even purchased a kit to make some Merlot. My problem is that they all taste nearly the same with a hint of vinegar. I have been careful to wash and sanitize everything. I am going to try again soon but don’t know what to do different. I even purchased new siphon hose for the Merlot kit and it still had the same off taste.
Name: Keith H.
State: KS
Hello Keith,
Sorry to hear about the trouble you are having. I can feel the frustration in your writing. There are four ways in which a wine can be taken over by vinegar to some degree, regardless of how much you clean your equipment:
1. Fermentation Is Too Warm: A fermentation should never get over 75° F. When it does it is making life more comfortable to unwanted things like mold, bacteria — vinegar growth is primarily caused by a bacteria know as acetobacter. They like the warmer temperatures and can grow quite comfortably in it. If your fermentation has been getting in the 80’s then this could be the issue.
2. Fermentation Is Too Slow: If you do not have a vigorous fermentation this can leave room for a unwanted microbes to flourish. As a bit of analogy, think of your fermentation as your lawn. The grass is the wine yeast and the weeds are the mold, bacteria, germs… everything you don’t want. One of the best ways to keep the weeds down is to make sure that you have a good stand of grass. The grass takes up everything leaving less for the weeds. It’s no different with a fermentation. By having a good stand of wine yeast you keep these threatening elements at bay.
3. To Much Air Exposure After Fermentation: If you have an active fermentation, exposure to air is not an issue. It’s after the fermentation is over that care needs to be taken. The number one source of air is having too much head-space in the fermenter. Once the fermentation is over you need to eliminate the head-space to keep the wine fresh. Move the wine to another container(s) that it can completely fill. Air allows the vinegar bacteria, acetobacter, to grow.
4. Fermenting With Yeast Under Stress: What I mean by stress is that the wine yeast is not happy. It is not in an environment that is agreeable. This is related to both #1 and #2 above. If the fermentation is too warm the yeast is not happy, and if the fermentation is slow, this is a symptom of an unhappy yeast. The reason behind this is because yeast produces vinegar just like a bacteria does. Just not very much. A healthy fermentation will produce somewhere around .04% of vinegar, but routinely goes as high as .08%. This is a very subtle amount. But if the yeast gets put under stress it can go as high as .15%. An amount that is noticeable.
What can put a yeast under stress? We already covered one of them: the fermentation being too warm. But beyond this, the wine yeast can be over-worked. This can happen when too little yeast is trying to do too much fermentation, or if you use the wrong type of yeast…say a beer yeast or baking yeast instead of using an actual wine yeast. An over-worked yeast can also result from lack of nutrients. This is common issue when water is called for in the wine recipe instead of straight juice. In these situations it is imperative that you also add either a yeast nutrient or yeast energizer to the wine must. There are others. Just realize that keeping the yeast happy will help to keep the vinegar down. You might want to take a look at the “Top Ten Reasons For Fermentation Failure“. This will go over the others in more detail.
Having said all this, please realize that keeping everything sanitary is the #1 reason for getting vinegar in a wine. What I have written above is with this assumption. Keeping things sanitary is first!
In addition, another blog post that may be helpful is “Will My Wine Turn To Vinegar By Racking It?” It approaches this issue from a slightly broader perspective.
Best Wishes,
Ed Kraus
———————————————————————————————————
Ed Kraus is a 3rd generation home brewer/winemaker and has been an owner of E. C. Kraus since 1999. He has been helping individuals make better wine and beer for over 25 years.
5 Simple Steps To Making Beer
 Dave Barry once said, “Not all chemicals are bad. Without chemicals such as hydrogen and oxygen, for example, there would be no way to make water, a vital ingredient in beer.” Indeed the four main ingredients of beer include barley, beer hops, beer yeast, and of course, water. The journey of making beer is made up of five basic steps:
1. Malting: The process of brewing begins with the grains – by far the most common being barley. This barley is first harvested then malted. This is a process where the grains are allowed to sprout or germinate. The barely is then heated to stop the sprouting at the optimal time. Then it is further dried under varying heat. Malting isolates the enzymes that are required for brewing. The temperature and length of time it is heated alters the character the malt will bring to the beer. Some malts are even roasted or toasted to bring out unique flavor and color. These are known as specialty malts.
2. Mashing: The next step is mashing. The malted barley is cracked through a grain mill. Then it is steeped in hot water. This mixture is call a wort. As long as you know how to make tea, you’ll be able to do this without any major disasters. Both processes are very similar. This helps to activate the enzymes in the barley so that they start breaking down and releasing the sugars.
3. Boiling: The wort is now boiled and at the same time hops are added at several points. Hops are responsible for adding distinctive flavors to the beer. They also act as natural preservatives. The variety of the hop and how long it is in the boiled controls how its flavor and aroma will contribute to the beer.
4. Fermentation: After boiling, the wort is cooled and removed from the grains. Beer yeast is then added to the wort. The brewing process is now over and it is time for the microbes to play their part. For a period of about 5 days the beer yeast will consume the natural sugars in the wort and metabolize them into both alcohol and carbon dioxide.
5. Bottling and Aging: Once the beer is fermented it will be mostly flat or un-carbonated. At this point the beer is either bottled or kegged and CO2 is forced into it. While many home brewers keg their beer and force-carbonate it, most still bottle. They add a small, specific amount of sugar just before bottling the beer. This facilitates a small fermentation under pressure which creates the carbonization the beer needs.
Another similar blog post that may be of interests is “The Basics Of All-Grain Brewing“. This adds greater detail to the mashing process and how it applies to the home brewer.
________________________________________________________
Read More About Making Beer And Other Brewing Topics,
FREE EMAIL NEWSLETTER:

________________________________________________________
How to Add Hops to Home Beer Kits
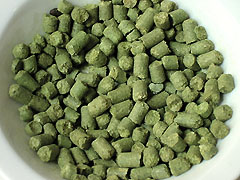 There are several ways to add hops to your beer. When you buy home beer kits, you can add hops using cones, whole flowers, or pellets. Hops are basically used for three purposes: bitterness (by boiling), flavor (by steeping), and aroma (by dry hopping).
Boiling
If you need a little extra bitterness in the brew, follow the boiling method. Add malt extract to the water, and let it boil gently. Add some beer hops and boil the mixture for a few minutes. Let it rest for some time and then strain it into the fermenter. This process is followed if you want to add hops for their bitterness.
Steeping
If you seek a little flavor in your beer, follow the steeping method. Heat some water in a pan until it boils. Add some hops and take the water off the stove. Let the hops steep for some time and then you can add the mix to your brew with cold water.
Dry Hopping
Dry hopping is the ideal method to add aroma to the beer. Throw the hops directly into the fermenter. You can throw them in hop bags or loose. This way you can add a different aroma to the beer. The best time for dry hopping is three days after fermentation has started. It can be done while you mix the brew, but if you add the hops too early, you’ll lose some aroma. If you follow this method, you’ll get not just aroma, but also fresh flavor.
All three methods produce different results. Generally 10g -20g hops are enough for your home brewing kit, and you’ll get better flavor and aroma with balanced beer malt. But it all depends on personal taste. Different brewers will tell you different methods of adding hops. You can try all methods and see which method suits you the best.
If you want to learn more about hops and what it con do for you homebrew, you may want to take a peek at the blog post, “Some Interesting Facts About Beer Hops“. It covers some of the in-and-outs of homebrewing with hops.
Basic Homebrew Tips For Kegging Beer
 Kegging homebrew is a simple task if you keep in mind the basic principles of kegging and follow precautionary measures. For the amateur brewer, a comprehensive list of precautions that should be observed while kegging beer is given below:
• Keep the beer kegs clean: sanitation is of prime importance when it comes to brewing. Lack of sanitation may lead to the growth of micro organisms which can result in health hazards. Cleaning the kegging equipment at periodic intervals with soapy water and a brush is recommended so that all the keg parts, especially the poppet valves, are free from any residue or dirt. Also, clean the inside of the beverage and gas tubes every now and then.
• Always remember to inspect and sanitize kegs before each use. One great product for this is Star San Sanitizer. Its a great sanitizer for the outside of the keg. For the inside, BLC Beverage System Cleaner works well as a strong sanitizer.
• It is always recommended that you go for lower carbonation levels initially and then escalate it to your desired levels. Removing excess carbonation is far harder.
• Protect your seals: lubricate your O-rings at regular intervals because without lubrication they tend to wear out and get torn easily. As petroleum based lubricants are unsuitable for most rubber materials, using a keg lube would be a great idea. It is safe for O-rings and food contact surfaces.
• For avoiding any gas leaks from keg lids while kegging homebrew, change your O-rings. Purchase softer and fatter O-rings as they have comparatively better sealing effect. They are a better choice because in order to keep the keg lids tight, these soft and fat O-rings are not dependent on keg pressure. To stop gas leaks immediately, increase the keg pressure. Then slowly decrease the pressure.
• Corney kegs are also well suited for a secondary fermentation, but the use them for a primary fermentation. This is because the excessive sediment and activity can create a big clean up job. You can take a look at the blog post, “Some Interesting Facts About The Corney Keg“, to learn more about them.
This are some basic tips for kegging homebrew. The overall arching message here is: take care of your kegging equipment; always keep it sanitary and never neglect to fix or replace parts as needed. Take proper care while kegging your beer.
The 3 Different Levels Of Brewing Beer At Home
 The 3 different methods of making home brewed beer are: malt extract kit brewing, ingredient kit brewing and all-grain brewing. You can employ any one of them to make exceptional, quality beer at home. The main features of each one are outlined below:
Malt Extract Kit Brewing: In this method, you can buy malt extract and that already has the hop oils in the syrup, itself. The malt is pre-blended to produce a particular style of beer. Brewing with a malt extract kit has its own distinct advantages:
- It’s very easy to do. The steps required are few and leave little room for you to make an error.
- Saves time: The amount of time involved to make these beers is minimal.
- Low investment when it comes to purchasing equipment.
Ingredient Kit Brewing: You can use these partial-mash, beer ingredient kits that are readily available on the market. These are especially designed for people who want to make a tasty beer with only a moderate effort. The kits contain malt extract syrup, specialty grains, hops and a packet of beer yeast. The benefits of using a beer ingredient kit are:
- The need for special equipment is minimal.
- It is a quicker and easier method of making beer than all-grain brewing.
- These kits have the specific ingredients needed to produce a particular style of beer — pre-measured and ready to go.
All-grain brewing: In this method you need to extract the sugars from brewing grains instead of purchasing the malt extract. This is called a full-mash. This type of brewing is ideal for people who are on a quest to make the ultimate beer. The beer is made completely from-scratch, so to speak. But you need some time and patience. All-grain brewing also requires more brewing equipment than the other two methods. You can find more information on this type of brewingn at our blog post: “The Basics Of All-Grain Brewing“. Home brewers like this type of brewing because:
- It is a personally satisfying and challenging way to brew beer.
- Quality of the brew is exceptional and fresh.
There you have it, the 3 different levels of home brewing beer. Without question you do not want to start out brewing an all-grain beer, but by all means take the adventure and dive in with a kit brew of some kind.
What is a Winter Beer?
You’ve heard the term “winter beer” but do you really know what a winter beer is? Would you be able to name one or two? More than just a beer that’s brewed during the colder months, so-called winter brews are crafted to be hearty and satisfying when the temperature drops, similar to a good meatloaf or a savory beef stew. Beer enthusiasts say the tradition of brewing winter beers originated in the British Isles and Germany where creating special winter brews to banish the chill had been going on for centuries.
Characteristics of a Winter Beer
- Thicker and more full-bodied than ordinary beer
- Generous malt presence, both in flavor and body
- Some are spiced or flavored with pumpkin, cloves or nutmeg; others stand alone on the artful combination of malt and hops
- Generally made with less water (thus having a higher alcohol content than ordinary beers)
- Color of a winter beer can range from a light red to a dark, inky black.
Serving Winter Beers
Most winter beers are best served just slightly below room temperature, at about 50 degrees. Serving malty brews that are fully chilled tends to mask their flavor. Unlike lighter, “summer” beers, winter beers are designed to be consumed slowly, not chugged.
Brew your own winter beer today with our homebrew beer making kits and visit us on Facebook to let us know your favorite winter brew.
A Simple Guide to Sour Flavors In Your Homebrew
 Sour flavors can sometimes creep up in a homemade beer. There are only a few beers that taste good with sour flavor.
Sour flavor can arise due to various reasons. The most common reason is bacterial infection. Lactic acid is a souring agent that adds a typical sourness to the beer. If you do not pay close attention to sanitization, your beer might get infected by microbes and become sour. So if your beer ends up tasting sour, you need to check your sanitization processes and make sure you do not allow air to be in abundant contact with the beer once fermentation has started.
Another common reason for sourness in beer is yeast infection. We’re not talking about beer yeast here, but rather Brett (Brettanomyces), a type of yeast that causes a sour flavor in beer. It is sometimes added to certain beer styles for its fruitiness. Available as liquid yeast culture, it can be used to make sour and fruity beers. But you must make sure that its quantity is limited otherwise the homebrew will become too sour. Yeast infection can also happen due to unsanitary conditions, so make sure that you properly sanitize all equipment before using it.
If you are getting bitter, grainy, or astringent flavors in your home brew beer, it might be called a sour-off flavor. Again, these might be the result of poor sanitization. You need to make sure of the hygiene while cooling your wort, during fermentation, while adding ingredients, sampling/measuring, and bottling the beer.
How do you prevent sour flavors? Just keep everything sanitized. You need to clean your home brewing equipment thoroughly before using it. Purchase a strong sanitizer and clean everything that is going to touch your beer. A couple of sanitizers on the market for this purpose are: Easy Clean and Iodophor. Even if you intentionally want to add sour flavor, you need to use clean home brew stuff. It is best to stick to special bacteria/yeast, and follow proper sanitization methods because lack of hygiene can result in really low quality beer.
Another blog post that may be of interest is “The Import Role Yeast Play In Brewing Beer“. This post goes over the critical part beer yeast play in brewing a beer.
________________________________________________________
Read More About Beer Yeast And Other Home Brewing Topics,
FREE EMAIL NEWSLETTER:
________________________________________________________
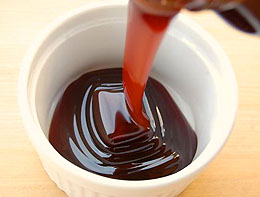
Some Interesting Facts About Brewing Grains And Malt
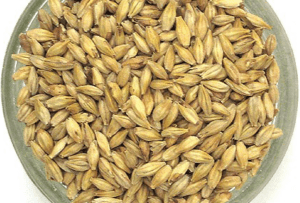 Malt is one of the most vital ingredients in beer and serves as a major source of fermentable sugars in a beer recipe. Malt is barely grain that has gone through a malting process. In the malting process, many organic changes take place, and the enzymatic activity converts the insoluble starch into soluble sugars. Malted barley is the most common starch source. Rice, wheat, rye, and oat are some of the other brewing grains used in making beer. Some interesting facts about brewing grains and malting are given below:
- The process of malting is completed in several steps. At first the grain is soaked in water, this allows germination of the barley to take place. Once the grain has partially germinated, it is dried in a kiln to prepare beer malt.
- A wide array of malts are prepared by varying the temperature and roasting time. As a result, we can have many different malts with many different colors and flavors made from the exact same barley grain.
- Malt contributes to both the color and flavor of a beer. For making dark beers such as stouts and porters, one would want to use dark malts such as Chocolate or Black malt. For lighter colored homebrews, Carapils or some Crystal malts can be used to add body and flavor without adding color.
- To make light-colored specialty malts, one needs malted barley that has gone through higher kiln temperatures than a base malts. These higher-roasted malts give off a tempting aroma and fuller malt flavor to the beer. Munich and Vienna malts are good examples of such malts.
An alternative to using malted barley in your beer recipes is use malt extracts instead. For example a blend of dark colored beer malt syrup and light colored beer malt syrup can be used to create any colored beer imaginable. These malt syrups make brew easier for the beginner and reasonably priced.
________________________________________________________
Read More About Malted Barley And Other Home Brewing Topics,
FREE EMAIL NEWSLETTER: