Making Fortified Wine By Adding Brandy!

Making Fortified WineHave you ever thought about fortifying homemade wine. It’s an interesting style that’s made through a relatively simple process. You might want to see if it’s something you’re interested in…

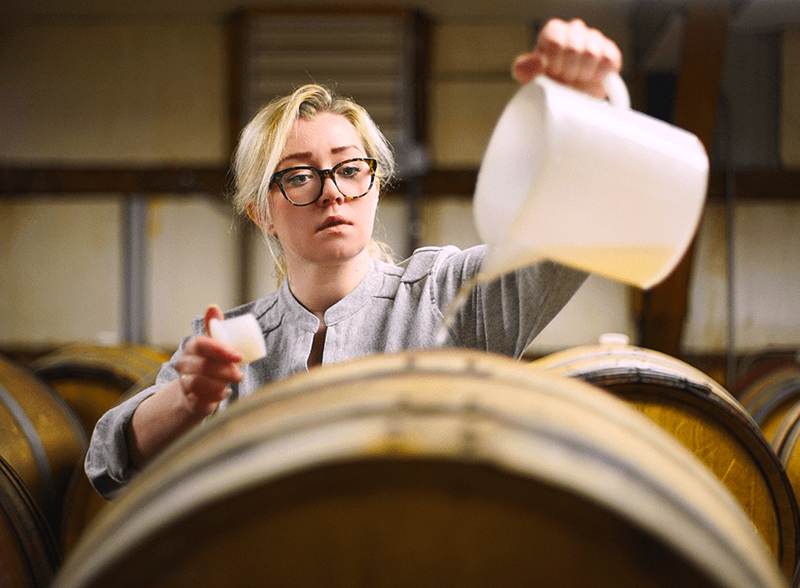
If you don’t know what a fortified wine is, it’s a wine to which brandy or some other spirit has been added. Since brandy and other distilled products are high in alcohol – typically around 40% or 80 proof – this will raise the finished alcohol level of the wine. The home winemaker can do the very same thing by adding brandy to homemade wine.

From a traditional standpoint, fortification was done to make a wine more stable during long trips by ship or by cart. The wine’s alcohol level was raised to around 17% to 22% with the addition of brandy. The higher alcohol level acted as a preservative, diminishing the chance of spoilage during the long journey.

The big three fortified wines that most people have heard of are: Sherry, Madeira and Port. All three are Old World wines: Sherry originating from Spain, Madeira and Port from Portugal.

Shop Wine BottlesThe first thing the home winemaker needs to understand before making fortified wine with their homemade wine is that this process can be somewhat costly. For a five gallon batch of wine it takes five fifths (750ml) of brandy to raise the batch by 6-2/3 percent alcohol. With a typical fortified wine being about 20% alcohol and the cheapest bottle of brandy being about $10 to $13 a bottle, making fortified wine can be somewhat cost prohibitive.

With this in mind, the best strategy for the home winemaker is to get as much alcohol as they can from the fermentation, itself. To learn how to get the most alcohol out of a fermentation you might want to go over the article, Making High Alcohol Wines listed on our website.

Here is a calculator listing that shows how much the alcohol is raised in a 5 gallon batch with each additional 750ml bottle of brandy or other distilled spirit. This is assuming that they are 40% alcohol by volume (80 proof).

1 Bottle adds 1.5%
2 Bottles add 3.0%
3 Bottles add 4.3%
4 Bottles add 5.5%
5 Bottles add 6.7%
6 Bottles add 7.7%
7 Bottles add 8.8%

shop_liqueur_flavoringsYou will want to shoot for a total alcohol level of 17 to 22 percent. So if you have a batch of wine that has fermented to 14 percent alcohol, you might add 4 bottles to raise the total alcohol level to 19.5% (14.0 + 5.5).

When fortifying wine, you can use a regular brandy made from grape wine such as E&J and add it to a red wine you have made. This would be the most straightforward way of adding brand to a homemade wine. But there are also some other, more imaginative, things you can do.

For example, you could take a blackberry brandy and add it to a blackberry wine, or use a peach brandy to fortify a peach wine. You could also take a Merlot wine and add to it a raspberry brandy to accent its flavors. With all the different types of brandys that are available, the combinations are endless.

It is important that you make sure the fermentation is done before fortifying the wine with brandy. Once the wine has been fortified you will have great difficulty getting the wine to ferment, ever again. Not only does fortifying wine help to stop spoilage, it helps to stop fermentation.

Shop Wine Ingredient KitsAfter fortifying the wine, continue on as you would with making any other wine. If you are using a wine ingredient kit continue following the directions. If you are making wine from fresh fruit, give the wine plenty of time to clear and bottle as you normally would.

As you can see fortifying wine is not all that complicated. It is mostly a matter of adding brandy to a homemade wine. And, it makes a wonderful after-dinner wine. The brandy’s intensity combined with the original wine’s character, creates a powerfully, pleasant drink.
—–
Ed Kraus is a 3rd generation home brewer/winemaker and has been an owner of E. C. Kraus since 1999. He has been helping individuals make better wine and beer for over 25 years.

Wine Oxidation Prevention – Keeping This Destructive Process Under Control

Reason For Wine Oxidation PreventionYou don’t have to have a commercial winery to create excellent wines.  In fact, many home winemakers produce fantastic wines that are better than the wines you buy at your local wine shop.  However, as we’ve seen many times before on this blog, making top notch wine isn’t something that magically happens.  You need to take great care during the winemaking process, follow all instructions, and carefully guide the process through to the very end.

One of the more common faults plaguing home winemakers is wine oxidation.  At certain times during the winemaking process, particularly after the primary fermentation, it is important to be careful about the exposure of the wine to the air. Excessive air exposure is a catalyst for wine oxidation.

One way to prevent too much oxygen exposure is to top up the wine to ensure very little space is available for oxygen to set up camp and cause wine oxidation. Topping up is one of the most important things you can do in the way of wine oxidation prevention.Shop Carboys

In addition to topping up the wine, you should also be using air lock during the secondary fermentation.  There are many different types of air locks, though the most common type uses water as a way to minimize oxygen exposure and maximize ease of set-up and use. The water in the air lock basically acts to allow carbon dioxide from the fermentation to escape out of the vessel while keeping oxygen from entering inside and oxidizing your wine.

Another stage where you can inadvertently cause problems with wine oxidation in your wine is during the racking/siphoning and bottling processes.  Use can add fining agents to your wine to help minimize the effects oxidation, as well as use specific techniques such as positioning the exit end of the siphon hose down into the wine to reduce splashing. Minimizing splashing is another wine oxidation prevention technique.

Of course, if you exclude too much oxygen, you run into problems with reduction, which is a whole other topic on its own.  If you smell Shop Wine Clarifiershydrogen sulfide (H2S) or “rotten eggs”, you may have excluded too much oxygen and you should aerate your wine right away to get rid of the smell.

Just remember that for the wine oxidation process to take place you need air. The best way to manage your wine oxidation prevention efforts is to manage the air that comes into contact with the wine.
—–
Ed Kraus is a 3rd generation home brewer/winemaker and has been an owner of E. C. Kraus since 1999. He has been helping individuals make better wine and beer for over 25 years.

Why Rack Wine Into A Secondary Fermenter?

Why Rack WineI’m making a batch of wine from one of your wine making kits. I have the wine brewing in a plastic fermenter and it should be reaching a specific gravity of 1.010 tomorrow according to my wine hydrometer. It’s still bubbling actively after 7 days. According to the directions that came with the wine kit I should be racking the wine into a secondary fermenter at this point. Why rack wine into a secondary for the rest of the fermentation? Can’t I just leave it fermenting for another 12 days in the same container….don’t understand why the transfer is necessary at this point.

Thanks,
Tony F.
———-
Dear Tony,

This is a question we get from time to time, and you’re right, it doesn’t seem to make sense, particularly when you are dealing with concentrated homemade wine kits. Why rack wine to a secondary fermenter when is seems to be fermenting perfectly fine?

When you make wine from fresh fruits, the juice is fermented with the skins and pulp for the first few days so that the juice can extract body, flavor and color. This is a process call maceration. Siphoning the wine after a few days seems logical in that situation. You need to get the skins and pulp out of the way; racking the juice to a clean fermenter seems like a good way to do it.Shop Auto Siphon

But there’s another reason why we rack wine into a secondary fermenter besides just getting skins and pulp out of the way, and it’s why you need to rack the wine now, even though it’s from concentrate with no skins or pulp involved. It’s called sediment or lees.

Whether or not there’s skin or pulp, a heavy layer of sediment will develop in the bottom of your wine fermenter. It’s primarily made up of yeast cells that were produced during the fermentation. Having excessive amounts of this sediment in contact with the wine over extended periods of time can cause off-flavors to become noticeable in the resulting wine.

Most of the off-flavors stem from the fact that some of the active yeast cells will try to consume the dead yeast cells that lie at the bottom as the sugar starts to run out. This is a process known as autolysis. So for a clean tasting wine you need to get the wine off the bulk of this sediment. And, this is why you need to rack a wine into a secondary fermenter.Shop Carboys

Just as the wine instructions that came with your wine kit imply, it’s usually around the 7th day that almost all of the fermentation has completed, and the activity begins to slow down. This makes it an opportune time to get the bulk of the sediment out of the way. There will be more sediment to follow as the wine clears up, but not nearly as much as the fermentation will have at this point in the process.

Happy Winemaking,
Ed Kraus
—–
Ed Kraus is a 3rd generation home brewer/winemaker and has been an owner of E. C. Kraus since 1999. He has been helping individuals make better wine and beer for over 25 years.

Do You Have An Ice Wine Recipe?

Grapes Used In Ice Wine RecipeMy friend came from Canada and would like me to make ice wine. Is there a particular grape to use. I make scuppernong wine quite well in NC. Do you have an ice wine recipe you could provide me with.

Sue – NC
—–
Hello Sue,

I’m not sure if I can answer your question directly. That’s because making ice wine is more of a process. It’s really not made using an ice wine recipe, per se.

Ice wine is traditionally made from grapes that have been kept on the vine on into the colder winter months. The grapes are crushed and presses while they are frozen. Since it is only the water in the grapes, not the sugar and flavors, that are frozen, what releases during pressing is a concentrated juice with plenty of sugar and flavor. A majority of the water in the grapes is left behind in the wine press along with the pulp and skins. The result is a wine with lots of flavor and aroma.

As you might expect, ice wines normally come from the cooler regions of the world: Germany, British Columbia, etc. where this freezing occurs early and readily, but in North Carolina you can simulate this to some degree by freezing grape in a freezer and then crushing and pressing them very quickly, before the water in them has time to thaw and incorporate back into the juice. For example, you could try doing this outside on one of your coldest days. Pull the grapes out of the freezer and work quickly. This is what is at the heart of this wine, not an ice wine recipe.

Ice wine is made from a variety of different wine grapes such as: Riesling, Chardonnay, Gewürztraminer, Chenin Blanc, even Cabernet Sauvignon, etc. All these grapes are wine varietals where 100% of the juice is used with no sugar or water added, regardless if it is made as an ice wine or not. That is one of there reasons there’s really not an ice wine recipe.Shop Ice Wine Kit

In the case of Scuppernong grapes where sugar and water is often added to cut the tartness of the grape, coming up with an ice wine recipe using them can be a little tricky.

If I were to approach a Scuppernong ice wine for the first time, I would freeze, crush and press as discussed before. Then I would add a sugar/water mixture to the wine must until I knew the acidity was diluted to a decent range. This can be done with an Acid Test Kit. Take an acid reading of your freshly pressed ice juice. The directions that come with the Acid Test Kit will give you the optimal acid level for your wine.

The water/sugar mixture should be made up of 2.5 pounds of sugar (5 cups) for every gallon of water. Hopefully, you do not need to add too much, since this is counterproductive to having the grapes frozen in the first place.

Once you have the wine must set up, the process is just as you have done in the past when you’ve made your grape wine. Add wine yeast, yeast nutrient and let the fermenting begin. No acid blend or wine tannin are need since plenty of both are coming from the ice-ed grape juice.

Realize that if you have some other grapes available to you besides Scupernong Shop Wine Making Kits– some grape varietals, the icing process would be a lot more effect since no water would need to be added back to cut the acidity of the juice. This is as close as I can get for you to an ice wine recipe.

You may also want to consider making wine from an ice wine ingredient kit. These kits have already had the freezing, crushing and pressing all taken care of for you. You do not need to worry about adjusting the acidity, or anything like that, either. Just follow the directions that comes with the ingredient kit, add the additional packets when called for, and you will have an ice wine with plenty of flavor and a big bouquet.

Happy Winemaking,
Ed Kraus
—–
Ed Kraus is a 3rd generation home brewer/winemaker and has been an owner of E. C. Kraus since 1999. He has been helping individuals make better wine and beer for over 25 years.

The Power of Blending Homemade Wines

Person Blending WinesI have been following your blog for some time and find it very helpful. I have a question about blending wines. I am an amateur winemaker starting with grapes and moving on to fruit wines. I recently made about 3 gallons of semi-dry red raspberry wine from frozen raspberries that came out very nice but intensely full of flavor. My wife describes it as “almost wanting to pick the seeds out of your teeth”. Although it has a very nice finished wine I am thinking of blending a portion with other wines. I have a young peach that I will experiment with in a small batch but not sure about peaches and raspberry. What I am wondering is if you have any suggestions in blending this with a commercial wine such as a Riesling or a chardonnay.

Name: Ray S.
State: Connecticut
—–
Hello Ray,

Blending homemade wines is a very subjective endeavor, but one that can improve a wine that is out of balance in some way. In a nutshell, you need to find a wine that is on the opposite end of the scale of the fault you are trying to fix, and then figure out how much of that wine you need to add to fix your wine’s fault. This is what blending wine at home is all about. It’s a technique for making 1 + 1 = 3.

In the case of your raspberry wine, it sounds like the flavor is too intense in some way. This usually means that the wine is too acidic. That would be my guess, but don’t let me tell you what is at issue. Think it through.

Citric acid is the primary acid in raspberries and would make the wine too sharp or tart tasting, particularly if the fruit used to make the wine happened to be too tart, or if too much raspberry was used.

If the wine is too puckering or has a dry bitterness or astringency as opposed to sharp or tart flavor, this is usually from too much tannin in the wine. This can happen when the fruit is over processed or left in the fermentation too long. The tannin is in the fibers of the fruit. When the fruit is over macerated – like when using a blender – too much tannin releases causing the wine to be puckering or bitter.

When blending homemade wines it’s up to you to make the determination of what really is the fault, and then after doing so, choosing a wine to blend that has the opposite characteristics.

Shop FermenterFrom what you have said, I would venture a guess that you should blend your wine with something along the lines of an apple or pear wine. These wines do not have a lot of flavor and are not all that tart or astringent. This is because the primary acid in these wines is malic as opposed to citric. This is a fruit acid that is not nearly as sharp on the tongue. These wine’s also tend to have lower levels of tannin than most. The resulting effect would be that the intensity of the raspberry flavor would be knocked down and and tartness or puckering taste would be marginally neutralized, as well. But having said this you could try any wine that has a light flavor profile.

Regardless of the wine you choose to try, when blending homemade wines the one thing I strongly urge you to do is to do test blends first. Don’t pour a whole bottle of wine into your 3 gallons of raspberry and see what you think, but rather, take a measured sample of the raspberry wine and added to it a measured sample of the wine you have chosen to blend. You can even go so far as to have a series of different blending ratios and have someone else do a blind tasting to determine which on is best.

The point here is to be methodical and not whimsical when blending homemade wine. By doing so you increase you chances considerably of ending up with a wine that you can’t wait to drink instead of a wine that you can just tolerate.

Happy Winemaking,
Ed Kraus
—–
Ed Kraus is a 3rd generation home brewer/winemaker and has been an owner of E. C. Kraus since 1999. He has been helping individuals make better wine and beer for over 25 years.

What You Should Know About Storing Wine Barrels

Time to start storing wine barrelsWe have a two 50 gal. oak wine barrel we have been making wine with for several years. We are planning to skip a year because of over supply. How should we be storing wine barrels when we’re not using them? Enjoy your emails read them all.

Mike M. — IL
—–
Hello Mike,

I’m glad you asked this question about storing wine barrels. Wine barrel maintenance is something that is often overlooked or ignored by the home winemaker — particularly when storing wine barrels between uses. Here’s how to store wine barrels…

The last thing you want to do when storing wine barrels is to let them dry out. You never want the barrel empty. Once a barrel has been brought into service you want the wood to stay soaked and expanded for the rest of its working life. This keeps the barrel’s staves tight against one another and free from leaks. Allowing the wood to dry-out and re-expand randomly with each batch of wine will eventually cause the wine barrel to start leaking if done too many times.

When storing wine barrels between uses you will want to fill it with a water/sulfite solution. You can use either potassium metabisulfite or sodium metabisulfite. This will keep the barrel nice and tight as well as free from spoilage. You will also want to add citric acid to the water. Lowering the water’s pH with citric acid will allow the sulfite in the water to be stronger and more protective. We offer a barrel sterilizing kit that has both sodium metabisulfite and citric acid along with wine barrel maintenance directions.Shop Wine Barrels

For a 50 gallon wine barrel we recommend using 1 lb. (16 ounces) of sodium metabisulfite and 1/2 lb. (8 ounces) of citric acid. The same two-to-one proportions can be used for smaller barrels. Here’s what to do:

  1. Fill the barrel half way with water — cold water is fine.
  2. Add the sulfite and citric acid.
  3. Agitate the solution to dissolve the sodium metabisulfite and citric acid.
  4. Fill the barrel the rest of the way with water.
  5. Slap in the bung.

You do not want to pre-dissolve the ingredients in another container. The solution will produce fumes that you want to trapped inside the barrel. When you dissolve the ingredients outside the barrel you are loosing some of the fumes.

The sulfite in the barrel will need to be replenished every 6 months. You will not need to add more citric acid, but every 6 months you will need to add another full dose of sodium metabisulfite. This is the basics of how to store wine barrels.

You will want to treat the wine barrel immediately after the wine has been emptied. Allowing the wine barrel to sit even a day or two will give time for it to sour. Once the wine is emptied, rinse and drain the barrel as many times as necessary for clear water to run out. When it’s time to use the wine barrel again, simply drain and give the barrel a light rinsing.Shop Sodium Metabisulfite

Knowing how to store a wine barrel is not only important because they are costly, but because wine barrels can never be brought back into use once they have spoiled. Once they’ve soured, they’re done. But don’t let this scare you. Take care when storing wine barrels; follow the steps above; and there will never be any question as to their dependability.

Happy Winemaking,
Ed Kraus
—–
Ed Kraus is a 3rd generation home brewer/winemaker and has been an owner of E. C. Kraus since 1999. He has been helping individuals make better wine and beer for over 25 years.

What Does Potassium Sorbate Do To Wine?

Wine With Potassium SorbateI have an issue with your description of potassium sorbate that uses the word “inhibit”. I have looked this word up in the Merriam-Webster dictionary. The first listing says that ‘inhibit’ means to stop. The second says that ‘inhibit’ means to hold in check. Holding in check in my mind is not a guarantee of much. Does anyone really know the story? What does potassium sorbate do to wine?

Tom
_____
Hi Tom,

Potassium sorbate is not used to stop a fermentation. In fact, it is not very effective at stopping a fermentation, if effective at all. Your second definition of inhibit is the most accurate, to hold in check, but let’s forget about the definitions for now and let me try to explain what potassium sorbate is actually doing to a wine.

When it becomes time to bottle your wine, no matter how may times the wine has been racked or how crystal clear the wine may look, there are still some yeast cells in the wine. It’s not the billions of cells that are associated with a full-fledged fermentation – almost all of the yeast cells are now gone through racking – but none the less, there are a few cells, just too few to see with the naked-eye.

Shop Potassium SorbateUsually, these wine yeast cells just lay dormant, but if there are sugars available in the wine, it is very possible that the yeast can start to become active and begin to reproduce themselves. Over time, they can rebuild the yeast colony to a size that can become problematic for a bottled wine. The wine will become sparkled and worse yet, the bottles could start popping corks or popping bottles from the pressure built up from a fermentation! But, this is all based on the premise that the yeast are able to grow in numbers and have sugar available to ferment.

This is where potassium sorbate comes into play. It stops the yeast cells from reproducing themselves so that a fermentation does not occur within the wine bottles. It does this by putting a coating the individual yeast cells. This coating interrupts the budding or reproduction process, keeping the yeast cell count at bay.

The only problem is that the yeast that are currently living in your wine will continue to do so until they decide to die of natural causes – old age. The colony will slowly die. How long it takes varies. It is dependent on the size of the remaining colony, the type of wine yeast, and the conditions they are in – temperature, etc. In most cases it takes days, but it can take weeks and sometimes months.Shop Potassium Bisulfite

It is not until the current generation dies that the chance of re-fermentation can be completely gone. This is why it is good to get your wine as clear as conveniently possible. Using fining agents such as bentonite is not a bad idea to help drop out the wine yeast. And most importantly use sulfites. This is one of the reasons sulfites are recommended at bottling time – to speed up the death of the wine yeast.

So what does potassium sorbate do to wine? It keeps the yeast from growing out of control. It keeps what little, insignificant yeast cell count at bay, and stops them from reproducing and growing into problematic numbers.

Happy Winemaking,
Ed Kraus

—–
Ed Kraus is a 3rd generation home brewer/winemaker and has been an owner of E. C. Kraus since 1999. He has been helping individuals make better wine and beer for over 25 years.

The Benefits Of Wine Kits vs Fresh Grapes

Wine Kits vs Fresh GrapesWhat is the going opinion of making wine with fresh grapes and crushing them, as opposed to using a wine kit? Is one better than the other by default, or would you say either method can produce excellent or horrible results?

Phil B. – TN
_____

Hello Phil,

Thanks for bringing up this great question about wine kits vs fresh grapes. It’s a question we get from time to time, so I’ll be more than happy to answer it here…

Whether you are making wine from grapes or making wine from kits the quality of the wine starts with the quality of the grapes. There is an adage in the wine making industry that says:

“You can never make a wine that is
better than the grapes used to make it.”

What this means is that you’ll never make great wine out of poor wine grapes. The quality of the wine always starts with the quality of the grapes.

When making wine from fresh grapes the individual winemaker usually has a limited selection of grapes to choose from. Quality can suffer when dealing in the take-it-or-leave-it type of market that often arises for the home winemaker.

The quality of grapes that you will find in wine kits varies from good to outstanding. It is not in the interest of these kit producers to spend their time preparing and packaging poor wine grapes. It doesn’t make economic sense, so great care is taken to locate and acquire grapes that are above average quality.

This is one of the major advantages to using a wine kit vs fresh grapes. You are able to rely on the wine kit producer’s expertise in selecting quality grapes. So on the whole you’ll be starting with a better quality grape when using a wine kit than when obtaining grapes on your own. Of coarse, there are always exceptions. Living near a grape growing mecca such as Napa can turn this point on its head, but for most home winemakers, this is a consideration that should be given some weight.

We offer an array of different brands of wine kits. As you go up the ladder in price, the finer your selection of grape. How much you spend depends on the level of taste. Some people are completely happy with the On The House wine kits and could not tell a difference even if they did choose a more expensive kit. For others, the On The House simply would not do. How far up the ladder one goes is very much a personal choice.

Shop FermenterUnfortunately, quality grapes do not guarantee a stellar wine, it’s just the first requirement necessary to get there. Between the grapes and the wine bottle is a whole host of other factors such as: acidity, alcohol, sweetness, etc.

Making wine from a wine kit alleviates you from these variables. This is because all these factors have already been taken care of for you by the wine kit producers. They balance the acidity, sugar content and many other features such as clarification and oak treatment to match the typical character of the wine you are making. By eliminating as many variables as possible they are helping to insure that you will make a remarkable wine every time. This is a very valuable benefit of using wine kits vs fresh grapes – especially for the beginner.

Now having said this, I understand completely that we are talking about a hobby, and for some, part of the hobby is the passion that goes into the picking, the crushing, the pressing, and so forth. I get that. And if this is you, I completely support your efforts to make wine from the dirt to the wine bottle. I’m just trying to bring total objectivity to the consideration of using wine kits vs fresh grapes.

Shop Wine Making KitsSo while both wine kits and fresh grapes holds their own rewards, by starting with a wine you are virtually eliminating any chance of producing a bad wine. Add to that the incredible selection that is now available to the home winemaker and it starts to become apparent that a wine kit is the way to go for the beginner.

I hope this covers all your questions and curiosities about wine kits vs fresh grapes. Please realize that regardless of which path you decide to take, we will be more than happy to help you in any way you need.

Best Wishes,
Ed Kraus
—–
Ed Kraus is a 3rd generation home brewer/winemaker and has been an owner of E. C. Kraus since 1999. He has been helping individuals make better wine and beer for over 25 years.

The Art Of Fining And Filtering Wine

Fining And Filtering WineYour article on fining agents was superb. It informed as to what other benefits (other than clarity in a wine) that fining agents can produce. My question regards the connection (or benefits) of fining and filtering wine. 1) If you filter a wine, should you also use a fining agent? 2) Conversely, if you’re fining a wine, is filtering no longer suggested? 3) Do you recommend both fining and filtering wine? 4) What would be the benefits of using both ?

Thank you
Steve
—–
Dear Steve,

How you handle the combination of fining and filtering wine is partially an art. I say this because there are really no hard-fast rules to be followed. Both processes are tools that the winemaker has at their disposal to help shape a wine with the characteristics they desire. Experience will help the winemaker to use these tools more effectively.

The difference between fining and filtering wine is subtle.

Certain wine fining agents will settle out certain particles more readily the others. For example, gelatin is not very good at settling out large volumes of yeast and other proteins, while bentonite on the other hand is. However, gelatin is good Shop Wine Filtersat settling out that last, little bit of particles, while bentonite isn’t. Some wine fining agents are better at removing bitterness, or harsh aromas than other. And, so-on and so-forth… How you decide to treat the wine with fining agents will shapes the wine to some degree, as well as clear it.

When you filter a wine, you are mostly concerned with clarity. While the finest filter pads can reduce color and body to a minor degree, adding a beautiful polish can be done with the coarsest of wine filter pads – 6 microns, for example.

A recommendation I do make is that if you do decide to filter a wine, always treat it with bentonite, first. This will help to drop out any excess proteins that is in the wine, including the yeast. As a fining agent bentonite is great at clearing out large volumes of particles. This will allow your filter pads to last longer and not clog up with every gallon or two of wine being filtered. But beyond this, whether you decide to filter, or not, or what type of other wine fining agents you decide to use, if any, is completely up to you.

Shop Mini Jet Wine FilterAgain, it is important for you to know that just like some fining agents, filtering a wine can effect its body and color as well as its clarity. Depending on the fineness of the filter pad you choose, some body and color can be taken out of the wine. The finer the filter pad the more likely body and color will be reduced.

For the heaviest of wines this is usually an improvement in the sense that reduction in color will rarely be noticeable, and the amount of aging (maturation) needed will be brought down to a more reasonable time-frame through the removal of excessive body elements. For example, two years instead of five.

For lighter white wines, a fine filter pad (.5 microns or less) may be selected to reduce color and body as much as possible, making the wine look a faint-yellow instead of a straw colored and adding to the wine’s light, crisp character that it often looked for with such wines.Shop Super Jet Wine Filter

There is also the issue of the wine’s stability. Both fining and filtering a wine will help to make it more stable. By reducing the amount of tannins and other proteins there is less chance of the wine forming deposits while aging in the wine bottle.

As a novice winemaker, I would suggest that you take a middle-of-the-road approach when it comes to filtering and fining wines. Treat the wine with bentonite a few days after the fermentation has completed and then filter the wine right before bottling with a medium (1 micron) or coarse (6 micron) filter pad. This is a good starting place if you are not sure how you would like to proceed.

Happy Wine Making,
Ed Kraus
—–
Ed Kraus is a 3rd generation home brewer/winemaker and has been an owner of E. C. Kraus since 1999. He has been helping individuals make better wine and beer for over 25 years.

Easy Spiced Pumpkin Wine Recipe For The Holidays

Made From Pumpkin Wine RecipeI cannot find anything on how to make pumpkin wine. Can it even be done? If it can how do you have a pumpkin wine recipe you could send me?

Bryant T. — KS
—–
Hello Bryant,

Yes, it is pumpkin time and time for using a pumpkin wine recipe. I thank you for such an appropriate question for this time of the year.

I do not have a pumpkin wine recipe on our website, but I do have one that has been in our archives for years. It’s the best pumpkin wine recipe we’ve ever used. It’s a spiced recipe that is pretty darn easy. I remember making this many years ago. As I recall, it was pretty darn good.

This is a 5 gallon pumpkin wine recipe. If you want to make less, just cut all the ingredient proportionately, except for the wine yeast. You always want to use a whole packet of wine yeast – more if you’re making more than 5 gallons.

Spiced Pumpkin Wine Recipe
(5 Gallons)

To start this wine recipe off you will want to prepare 16 lbs of pumpkin flesh. Scraping it away from the pumpkin’s outer shell should be enough to break it up sufficiently, but if you do have any hunks, you will want to chop them up. The raisins should be coarsely chopped, as well.

Add all the ingredients to 5 gallons of water EXCEPT for the wine yeast. Only add 5 crushed Campden tablets at this point. The other 5 will be added later, when you are bottling the wine. This should be done in an open fermenter. Leave the fermenter open. Only cover with a thin towel, nothing more, for 24 hours. This is to give time for the Campden tablets to sterilize the wine must, then dissipate into the air. After 24 hours, sprinkle on the packet of wine yeast, and you are on your way to making some great tasting pumpkin wine.Shop Wine Making Kits

Here’s where you can find all the wine making directions you will need to complete this pumpkin wine recipe. Just follow through, step-by-step, and in time you will have a clear pumpkin wine that will be clear and ready to bottle. If you do not have any equipment, you might want to consider the “Your Fruit!” Wine Making Kit.

Bryant, thanks again for the timely question. Let us know how this pumpkin wine recipe turns out for you. As I remember it was very enjoyable and perfect for the holidays.

Happy Winemaking,
Ed Kraus
—–
Ed Kraus is a 3rd generation home brewer/winemaker and has been an owner of E. C. Kraus since 1999. He has been helping individuals make better wine and beer for over 25 years.