How To Use Bottle Sealing Wax

Man Using Sealing WaxDear Mr. Kraus,

Did not receive any instructions on how to use the bottle sealing wax beads I ordered . What is the best method to melt the wax beads. Have never used this wax before. Do you sell some type of melter. If you would please let me know how to use.

Thanks,
Sammy L.
—–
Hello Sammy,

How you use the bottle sealing wax can vary somewhat. There is not a specific way it has to be used.

We recommend melting the sealing wax in a tin of the appropriate size. This can be something as small as a soup can if you are only doing 5 bottles. If you are doing 50 bottles you may want to use something as large as an old 2 pound coffee can tin. Sit the tin in a pan of water to make a double boiler on the stove. This will help the wax to heat more evenly over a period of time.

Once the sealing wax is melted you will want it to stay in that tin, permanently. The wax if very hard to remove once in a container, so don’t actually put the bottle sealing wax in any good pots or pans, themselves.

How to use the bottle sealing wax is something that can be approached from a couple of different angles:Shop Sealing Wax

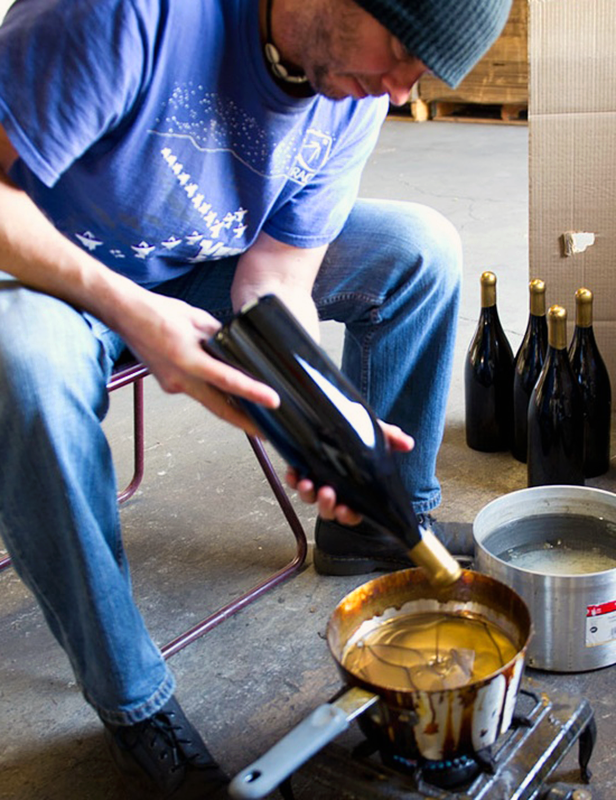
  • Dip the whole neck of the wine bottle into the sealing wax.
    Not only will the wax be sealing the wine bottle air-tight, but it will also become part of the wine bottle’s decorative decor. The colors look incredible against the glass and can work together with the wine label to a bottle of wine worth sharing.The downside is that this method can use up quite a bit of bottle sealing wax. One pound of wax will do about 40 to 80 bottles depending on how far you dip the neck into the wax. You may also need more sealing wax than this to create a reservoir deep enough to coat the amount of the bottle neck you want. This is dependent on the profile of the tin you select.
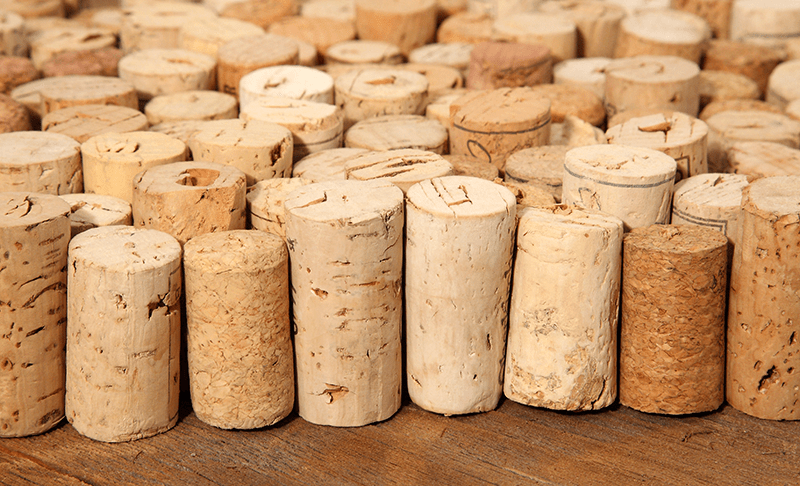
  • Pour the sealing wax directly onto the cork itself.
    The second way to use the sealing wax is more efficient but not as decorative. Inset the cork by an eighth to a quarter of an inch into the neck of the wine bottle. Then pour a disk of wax into the inset. You will want to pinch a spout onto the tin you are using. Heat protective gloves will be needed for this method, as well. Just like dipping the bottle into the wax, the cork is sealed air-tight, but will use much less sealing wax per wine bottle. You will usually get about 150 bottles per pound done with this method.Shop Heat Shrink Capsules

As you can see, how to use bottle sealing wax beads is open to some interpretation. If you are looking for full decorative value, dip the bottle neck into the sealing wax. If you are only wanting to make a better seal then use the second method and add a layer of sealing wax on top of the cork, itself.

Happy Wine Making,
Ed Kraus
—–
Ed Kraus is a 3rd generation home brewer/winemaker and has been an owner of E. C. Kraus since 1999. He has been helping individuals make better wine and beer for over 25 years.

Aging Your Homemade Wine In A Refrigerator

Aging Wine Under RefrigerationI hope this finds you well and prospering. Is aging homemade wine in a refrigerator OK, say for several months? Also, what temperatures would be best for storing the wines long term? Would long, cool storage affect the aging of the wine? Thanks, and keep up the good work, we sure appreciate your help in many areas.

Name: N. Gerchak
State: Oregon
—–
Hello Mr. Gerchak,

Thanks for the kind words. We try very hard to answer your questions to the best of our ability.

It is perfectly fine, and preferable, that you age your wines for a few months. The need for aging your homemade wine is a given. I have found that with white wines 6 months will get the majority of the aging done. The typical white you find on the store shelf has been aged for about 18 months. Red wines could be aged anywhere from 2 to 5 years before they are sold.

Of coarse, the type of wine grape we are talking about enters into this equation, as well. For example, a Gamay will need much less aging than a Cabernet even though both are red grapes. This is because the make-up of each of these grapes are very different. Most notably, their tannin structure are on opposite ends of the scale – Gamay being low tannin, Cabernet being high tannin. This plays into how much aging is required for a wine to fully maturate and exude the maximum pleasantries that it can.

Just as the type of grape can affect the aging life of a wine, so can temperature, and this leads us back to answering your question about aging homemade wine in a refrigerator. Very simply: the cooler the storage temperature, the slower the wine will age. Although this is the general relationship between temperature and aging wines, there is still a optimal temperature range at which you would like to store your wines. This would be somewhere between 45°F. and 65°F. If you can’t store your homemade wine in this temperature range, then you want to get as close as you can.

Shop Wine Bottle CorkersSlow, cold aging can be either a good thing or a bad thing depending on your perspective. As home winemakers we tend to want our wines to age quickly. We want the time between bottling and consumption to be very short. We want them to be at their best in a matter of weeks, not months or years, for no other reason than we are impatient. On the other hand, aging the wine too quickly could leave you with a rack of wine that has all passed its prime. Wines do not continue to improve indefinitely with more aging.

With that being said, the temperature at which you age your homemade wine should be taken into consideration. partially based on your consumption habits. Your adjustment could be something as simple as storing the wine upstairs instead of downstairs, in the cooler basement or vise versa. Or as you have mentioned, moving the wine from the basement into a refrigerator.

As you may have gathered by now, aging homemade wine in a refrigerator is okay to do, just expect it to take longer to fully mature. If you do not have a problem with this, no worries, however if you are wanting you wines to age as quickly as possible, this may not be the route you want to go.

There are a couple of suggestions I could make that would help improve upon your desire to refrigerate your wine. One is to age the wine at more-convenient, warmer temperatures for a few month – say, 3 to 6 months. Then store the wine in the refrigerator at its maximum setting (usually around 45°F). This will suspend the life of the wine for many years.

You could also go a whole different route. You could purchase a external, power interrupt temperature controller thermostat. This would allow you to set the refrigerator at any cooler temperature you would like, even 55°F. You do this by setting the refrigerator to its coldest setting. Then use the temperature controller to run the refrigerator as needed. It acts as an external thermostat that turns the power to the refrigerator on and off as need to maintain the temperature you select.

Happy Winemaking,
Ed Kraus
—–
Ed Kraus is a 3rd generation home brewer/winemaker and has been an owner of E. C. Kraus since 1999. He has been helping individuals make better wine and beer for over 25 years.

Cotton Candy Wine

Glass of Cotton Candy WineWhat’s pink, sugary and fluffy all over?…

You guessed it. Cotton candy!

This classic carnival sweet-treat is now available in WINE (yes, you read that right). And while it sounds too sweet to be true, we’re sharing some of our favorite cotton candy wines in this post.

What is Cotton Candy Wine? 

Turns out, cotton candy wine isn’t actually made from cotton candy. (WHAT?)

Yep, it’s all in the grapes.

This wine comes from Italian grapes called “Schiava” – an extremely sweet grape with a flavor usually associated with cotton candy.

Best Cotton Candy Wines

We’ve put together a list of cotton candy wines, using a sweetness scale of 1-6.

Purple Toad Winery – Cotton Candy

Sweetness Level: 4

This cotton candy wine has a bit more sweetness than you might be used to, but we recommend pairing with a creamy pasta dinner for the full effect.

St. Julian – Cotton Candy Wine

Sweetness Level: 5

St. Julian Cotton Candy Wine is like a carnival in a bottle, filled with aromas and flavors of bubble gum and strawberry. 

Schiava

Sweetness Level: 6

Try out the original cotton candy wine. This wine carries the aroma of roses and hints of strawberry shortcake. 

Urban Vines – Carnival Candy 

Sweetness Level: 5

This wine is made from grapes grown in the Great Lakes region. Vintners slowly ferment the wine to capture the cotton candy taste. 

We hope you enjoy these whimsical drinks! 

And check out other trends on our blog

Cheers!

10 Random Wine Making Tips And Tricks

Learning Wine Making TipsHere is a collection of wine making tips and tricks for beginners and more-seasoned home winemakers. This is advice that has been published throughout our various newsletters over the years. They are just bits and pieces of information that have proven to be useful to home winemakers and help keep them from making mistakes.

  1. I’ll put the most important of wine making tips, first. Control your fermentation temperatures. The number one reason for a failed fermentation is temperature. The ideal temperatures for a healthy fermentation is between 70° and 75°F. If the fermentation is cooler than this, the wine yeast will start to go dormant and become inactive. If the fermentation becomes warmer than this, you will be increasing the ability of mold and bacteria to take over the wine.
  1. It is possible to temporarily cut back the amount of water called for in a wine recipe in order to accommodate a fermenter that’s not quite large enough. For example, if you have a wine making kit that makes 6 gallons, Shop Wine Kit Tips Bookbut your primary fermenter will only hold 6 gallons to the brim, you can cut back on the water called for by 1/2 gallon to allow for the foaming until it is time to transfer it to your secondary fermenter. At that time the shorted water can be added to the batch. The water should be distilled water when added at this point. The maximum amount I recommend shorting the water in a given batch is 1 gallon to every 5 or 6 gallons. This is assuming that the shortage will be promptly made up when the wine is transferred to a secondary container.
  1. Don’t have time to make wine when your fruits are ready? That’s okay. Just put your wine making fruits in the freezer. Fruits that have been frozen tend to break down more readily when fermented anyway. This will allow more of the fruits character to be release into your wine must. Of all the wine making tips, I particularly like this one the best. It has afforded me ability to have time to make more wine throughout the year.
  1. If you have ever picked elderberries before you know that it can be a very time consuming task. Not only are the number of berries required to make a batch of homemade wine quite high, the amount of stems that are involve are just as bad. You can categorize this one under time saving wine making tips… Shop Wine YeastWhen collecting the elderberries simply cut them off in clusters, stems and all. A tile knife works great for this. Put them all in a plastic trash bag or similar and freeze them for at least 2 days. Once the elderberry clusters have been frozen, inflate the trash bag with air, tie off its opening. Then violently shake or beat the bag against the ground. This will break most of the elderberries lose from the stems. Once this has been done sufficiently, clip a bottom corner of the plastic bag and the elderberries will come rolling out. You won’t get 100% of the berries out, so there will be some waste in the process. But, it is well worth the time that you will save.
  1. By storing your packets of fresh wine yeast in the refrigerator, you can double their shelf-life. Yeast stored in this way will always be good for at least two years after purchasing. If yeast is just stored at room temperature it is usually only good for about a year. It is important to note here that you never want to freeze yeast. Freezing yeast damages their cell walls making budding or reproducing very difficult during the fermentation.
  1. One easy way to warm up your fermenters during the cooler months is to use an old lamp with an old style 100 watt light bulb. If you place the bulb 12 inches off to the side of a 5 gallon batch, it will warm the liquid’s temperature by about 8 to 10 degrees. Wrap the vessel in a dark trash bag to protect the wine from the excessive light the bulb causes. If 8 or 10 degrees is too much of an increase, just back off the bulb another 1 or 2 inches away from your fermentation vessel. Use a stick-on thermometer on the opposite side the the fermenter to track the temperature.
  1. When taking a hydrometer reading, give the hydrometer a quick spin in the liquid to be tested, first. This is to dislodge any air bubbles that may be clinging to the side of the wine hydrometer. These bubbles can slightly throw off your reading.
  1. To increase the body of a finished wine without making it sweeter, add 2 to 4 ounces of glycerine to each 5 gallon batch. Glycerine is a natural byproduct of a fermentation. It increases the viscosity or mouth-feel of a wine. Heavier red wines such as Cabernet Sauvignon and Pinot Noir are known for their body. With these wines the fuller body helps their flavor to linger on the taste buds a bit longer while also helping to reduce the wines rough edges.
  1. Of all the wine making tips I’ve seen or heard of, I believe this one has saved more wine than any other: When doing your first one or two rackings, Shop Potassium Sorbatedon’t leave any wine behind – get it all. Even if it comes along with some of the sediment. With the earlier rackings all you need to be concerned about is getting rid of “most” of the sediment, not “all” of it. And particularly, not at the expense of loosing your precious wine. It is when you get down to the final racking, that it becomes important to leave all of the sediment behind – even at the expense of loosing a little wine. The last racking is the one that really counts. Heeding this wine making tip has saved me more wine than you’ll ever know.
  1. Instead of using cane sugar to sweeten your wines, try sweetening your wine with honey. Honey will enhance the complexity of the wine’s finish (aftertaste) and sweeten it at the same time. Remember to always add a wine stabilizer such as potassium sorbate when sweetening your wine with any type of sugar.

There you have it: 10 wine making tips to help your wine making efforts go a little smoother. I’ll go through the files and see if I can come up with any more. When I do, I’ll be sure to post them here.

—–
Ed Kraus is a 3rd generation home brewer/winemaker and has been an owner of E. C. Kraus since 1999. He has been helping individuals make better wine and beer for over 25 years.

photo credit: MTSOfan wine making 01 via photopin.com (license)

What Size Corks Should I Get For Bottling My Wine?

Different Size Corks For Bottling WineIf you’re getting ready to buy corks to bottle your wine you may be wondering which size corks you should get. We offer four different sizes of wine cork stopper. They are sizes: #7, #8, #9 and #10. These numbers refer to the diameter of the cork. The higher the number, the larger the diameter of the cork.

The opening of a standard, 750 ml wine bottle is 3/4 of an inch. If you have a wine bottle corker you will want to purchase either the size #8 or size #9 corks. The diameter of these corks are 7/8″ and 15/16″, respectively. Size #9 corks is what the commercial wineries use. Either will require a wine bottle corker to press them into the bottle.

Which size cork you get depends on the type of wine bottle corker you have. Any wine bottle corker on the market can put in the size #8 wine cork, however some wine bottle corkers have trouble putting in a full-size #9 cork.Shop Wine Corks

If the corker was purchased from E. C. Kraus, you will be able to put in a size #9 or #8 cork just fine. If your corker was purchased from somewhere else then some caution will be required.

Some wine bottle corks on the market use a funnel-design to compress the cork. The wine cork is shoved through a funnel into the opening of the wine bottle. For the most part, this design of corker will work okay for a size #8 cork, but if you want to put in a full-size #9 wine cork and get a tighter seal, using a funnel-style corker can be a problem. The larger cork can get pinched and frayed as it goes through the funnel.

All the wine bottle corkers we offer compresses the cork evenly, from Shop Wine Bottle Corkersall sides then plunges the cork into the barrel opening of the wine bottle. With this method of corking no damage will come to the cork, as it is not be contorted through a funnel opening.

We do not recommend using size #7 cork, but we do offer them for individuals who want to put their corks in by hand. This size wine cork is small enough in diameter to be put in without a wine bottle corker. The downside is that they do not seal the wine bottle very well. In fact, if you lay the wine bottle on its side, there is a fair change that the #7 wine cork will seep some wine. For this reason you should store wine bottle upright if using this size of wine cork.

Size #10 corks are for larger size bottles. While many larger bottle still have the same 3/4 inch opening that the 750 ml have, some larger size wine bottles have larger openings that will require this larger size cork.
—–
Ed Kraus is a 3rd generation home brewer/winemaker and has been an owner of E. C. Kraus since 1999. He has been helping individuals make better wine and beer for over 25 years.

Making Sulfite-Free Wine To Reduce Headaches

Making Sulfite Free WineThis is a subject I get about at least once a week. People are desperately interested in making sulfite free wine.  Usually it is because they are suffering from headaches that they are attributing to sulfite allergies. For this reason they want to make their homemade wine without sulfites.

The major foil to making sulfite free wine is that sulfites are a natural byproduct of fermentation. In winemaking we talk about sulfites in terms of ppm (parts per million). Wine fermentations will naturally produce sulfites somewhere on the order of 10 to 20 ppm.

This amount may seem small, but compare it against the fact that the average bottle of wine on the market only contains about 65 ppm or the fact that any wine in the U.S. that has more than 10 ppm must have on its label, “Contains Sulfites,” then it starts to become clear that the amount of sulfites made by a fermentation is, in fact, significant to the wine’s total content.Shop Campden Tablets

So the answer is, “no.” You can not make sulfite free wine. There will always be some sulfite in your homemade wine. Now lets move on to the next logical question…

Can I make wines without adding sulfites?

The answer is: certainly you can. But, you should also be asking the question: do you want too? Sulfites such as Campden tablets or potassium metabisulfite are added to a wine for a reason: to keep the color and flavor fresh over time, and to keep it from outright spoiling. If the level of sulfites are too low, then it is susceptible to being overcome with bacteria, mold and other detrimental spoilers. Making sulfite free wine does not come without its own risk.

Because wine has alcohol, and alcohol is a preservative, the amount of sulfites needed to keep it from spoiling is very small as compared to amounts we find in the foods we eat everyday. Fruit juices, for example, can have on the order of 200 to 300 ppm; dehydrated fruits, conservatively around 1,000 ppm; and salsa around 1,000 to 2,000 ppm. These amounts are much higher than the 45 to 85 ppm you will typically find in wine.

With this in mind, to me it doesn’t make sense to short your wine the minuscule amount of sulfites it needs to help protect it from spoilage. And, it doesn’t make sense to blame such small amounts of sulfites on headaches when so much of it is in the foods we consume everyday. That brings us to the next logical question…

So Why Do Some People Get Headaches From Wine?

There are a certain number of people who do get headaches from drinking wine – even as little as one glass – but as explained above, automatically blaming this on sulfites is not reasonable.

Besides the fact that there is not that much sulfite in wine to begin with, there are a couple of other reasons why this doesn’t add up, as well:Shop Wine Filters

  • Sulfite allergies are much more rare than there are people having headaches from wine. According to medical industry reports, there are somewhere between 500 thousand to 1 million sulfite allergy sufferers in the U.S. This equals only about 1 in 300 to 600 people.
  • A headache is not the primary symptom of a sulfite allergy. Asthma or having trouble breathing is the very first problem to show up.

So, What Should I do?

If you are still not convinced that sulfites are completely innocent of all charges, then you might want to consider taking better control of the sulfites. Don’t completely eliminate additions of sulfite to the wine, but lower the level of sulfites. Don’t worry about making sulfite free wine but maybe try adding less sulfites, instead.

For example, right before bottling the wine, instead of targeting a sulfite level of 55 ppm for red and 70 ppm for whites, maybe shoot for 35 ppm in reds and 50 ppm for whites. Reduce the amount of sulfites in your homemade wines. Don’t necessarily eliminate additions to your wine.

You can take readings with a Titrettor Hand Tool and Titret Test Vials. By taking control of your sulfite levels in this way, you can be certain that no more sulfites are in the wine than absolutely necessary to keep it fresh.
—–
Ed Kraus is a 3rd generation home brewer/winemaker and has been an owner of E. C. Kraus since 1999. He has been helping individuals make better wine and beer for over 25 years.

Making Your Own Toasted Oak For Wine

Toasted Oak For WineI have tried oaking wine to my satisfaction with oak chips. Now I want to make my own toasted oak strips. I purchased some white oak that I sawed into yard stick width and thickness.  I noticed in the wine supplies different types of flavors for oaking. I was told it was like flavored coffee. What should I do to the oak strips so as I can oak wine?

Thanks,
Marvin F.
—–
Hello Marvin,

First, I want to commend you on your DIY spirit. It’s fun hearing about people tryin’ to get it done on their own.

This is a project that is a little more involved than one might first suspect. Toasting oak to be used in wine is a very delicate process. I for one would suggest that you are probably better off by leaving this one to the experts. But I understand your drive to try doing this yourself.

Shop Toasted Oak ChipsFirst, it is important that you use a white oak as opposed to red oak. You seem to be okay in that department based on you question, above. Red oak is a completely different family of wood. The only thing they have in common is the word “oak”.

The oak then needs to be dried to what cooperages refer to as sap clear. They typically do this by letting the slats or staves of wood dry cross-stacked in the sun for 1 to 3 years. The oak strips are rotated and rearranged periodically to allow for even drying. Someone trying this at home could get around this if they happen to have a kiln of some sort to dry the slats out, or maybe they have a source of white oak that has already been sitting around for a few years.

Once the white oak is sap clear it then needs to be toasted. This is typically done over a flame of burning white oak wood. Oak is used for the fire for toasting as opposed to another wood or fuel to keep foreign residues to a minimum. Try not to let the smoke from the fire directly hit the wood. Rely more on the fire’s radiating heat by keeping the wood adjacent to the fire instead of over the fire.

There is some art and some science to toasting oak for wine. Not only do you need to be concerned about how toasted the oak wood is becoming, you also need to be concerned about the temperature being used to do the toasting. Both how much you toast the oak and how fast it toasts plays into the flavor the wood will contribute to the wine.

If the wood is toasted too fast there is not enough time for all the caramelized sugars in the wood to raise to the surface. The heat doesn’t penetrate the wood deep enough. Toast the wood too long and you will raise too much tannin with the sugar which will bring too much bitterness to the wine. The right temperature a length of time is beyond my experience and most cooperages keep this info as a trade secret, but you can get a sense of what to do by seeing how a wine barrel (not whiskey barrel) is toasted.

Because of the complexity involved, I would suggest that you do not try this yourself and purchase some oak that has been professionally prepared. It is not something I would try, especially when an entire batch of wine may be on the line, and the toasted oak is relatively inexpensive.

Happy Wine Making,
Ed Kraus
—–
Ed Kraus is a 3rd generation home brewer/winemaker and has been an owner of E. C. Kraus since 1999. He has been helping individuals make better wine and beer for over 25 years.

There’s A Yeasty Smell In My Wine. Should I Dump It!?

Noticing Yeasty Smell In WineI’m still learning this process but haven’t had this happen. Got 3 gallons of Muscadine wine I was gonna bottle up. When opened up it has a very strong “yeasty” smell in the wine. Made this a couple times and never had this happen. Only thing I did different was use a different wine yeast. (Montrachet instead of lavlin 71b 1122.) I may have forgotten to rack the wine after it had been placed in the secondary fermenter. Either forgot to write it in log or didn’t do it. Seems I read somewhere that could cause this issue. Anyway, should I bottle this or dump it and start a new batch when the Muscadines ripen this summer. Thanks for the advice……..

Name: Bill B
State: SC
—–
Hello Bill,

There is absolutely no reason to dump any wine because it has a yeasty smell. This is an issue that comes about from time to time that is easily overcome.Shop Wine Yeast

It is true that different wine yeast have different amounts of yeast odors, but the yeast smell also increases the more the yeast become stressed. If the fermentation is done in an environment that does not make the wine yeast happy, you will get more of this odor.

Examples causing stress are:

  • Fermenting at too warm of a temperature
  • Fermenting with not enough nutrients in the wine must
  • Fermenting with too little yeast to perform the job at hand

The last one typically happens with old wine yeast is used, or a significant portion of the yeast cells are killed in the rehydration process.

Most of the time this odor will go away on it’s own throughout the natural course of the winemaking process. Racking the wine is one of the times that this odor is able to release from the wine and dissipate. You stated that you are not sure if you racked the wine, so this could be all that’s wrong with the wine.

Shop Potassium BisulfiteAnother normal activity in the winemaking process that releases this odor is adding sulfites. This would either be Campden tablets, potassium metabisulfite or sodium metabisulfite. If you do not ever add any of these then this can contribute to the yeasty smell in the wine.

A sulfite should always be added to a wine anyway to protect it from spoilage and oxidation, but doing so also drives out unwanted volatile gases that are in the wine from the fermentation – such as the ones you are smelling. If you haven’t done so already, the simple task of adding a standard dose of sulfites and waiting a few days may be all that is needed.

Since you are not sure if you racked your wine or not, I’m guess that all you need to do is rack the wine and add sulfites. Hope this should get rid of the yeasty smell in your wine. In not, repeat the process. Rack the wine in a splashing manner and then add sulfites again.

If you find that the yeast smell in the wine is not leaving that you may want to take a look at what to do about treating wine with a hydrogen sulfite issue.Shop Mini Jet Wine Filter

Just remember next time to keep your wine yeast happy, regardless of the type used; rack your wine sufficiently; and always use sulfites in your wine. Do these things and you should not have this problem again.

Happy Winemaking,
Ed Kraus
—–
Ed Kraus is a 3rd generation home brewer/winemaker and has been an owner of E. C. Kraus since 1999. He has been helping individuals make better wine and beer for over 25 years.

Making Wine In Cold Weather

Making Wine In Cold WeatherI live in Louisiana in the south. Is it too late to make wine? Is there a problem making wine in cold weather? I have a lot of fruit left from the summer.

Mildred M. — LA
—–
Hello Mildred,

You can make wine all throughout the year without any problems. The only real issue is that you need to control your fermentation temperature. For a wine fermentation to go as it should, the temperature range needs to be between 70° and 75°F. If you get out of this temperature range, issues can arise, but beyond this, there is nothing wrong with making wine in cold weather.

If the temperature gets below 70° the wine yeast will start to go dormant. They can slow down to the point of not being active at all. This is known as a stuck fermentation. Or, the wine yeast may not start up at all. Warm the fermentation up to 70°F., and you will start to see activity.

This temperature range is true for most wine yeast except for a few exceptions like Red Star Pasteur Blanc wine yeast which can ferment at cooler temperatures without stopping completely. However, it will ferment very slowly.Shop Thermometers

If the fermentation temperature starts to get over 75°F., then the wine yeast can start to produce funny off-flavors and aromas. The resulting wine will not have a clean taste.

Beyond these concerns, there is absolutely no reason why you shouldn’t be making wine in cold weather, even in the middle of winter. Just have a means of controlling the fermentation temperature.

If you are not sure that you can keep the fermentation in this range, you may want to look into tying an artificial source of heat. It needs to be a very gentle source of heat. Most items you find around the house such as heating blankets are too warm and will put the fermentation well over the 75°F. This is just as bad, if not worse, as having the fermentation too cool.

If a fermentation is too cool there is no permanent damage done to the wine. It’s just not fermenting. Warm it up and the fermentation will start up again. But, if the fermentation becomes overly heated, youShop Heating Belt can encourage bacteria growth and the production of unwanted enzymes in the wine. Nothing harmful, but it will make the wine taste off or fowl, and it will be irreversible.

You may want to consider getting a thermometer for monitoring temperature when making wine in cold weather. Putting your hands on the side of the fermenter and guessing is not good enough. If you are making temperature adjustments you should have a fermentation thermometer of some type.

A heating belt is one way to warm up your fermentation a few degrees. This works good for cold basement situations or when fermenting in some cold corner of the house. It’s basically a strap that goes around the fermenter and plugs into an outlet. The only downfall is that there is no way to adjust its temperature of this belt.

Something else you can do when making wine in cold weather is to get a thermostat power switch. This is a power-interrupt thermostat with a temperature sensor. It plugs into an outlet and controls the power to a heating source – such as a heating blanket or the heating belt – base on the temperature to which it has been set.

Mildred, I say if you got the fruit, then go ahead and make the wine. The month doesn’t matter. Making wine in cold weather is easy to do. It’s simply a matter of taking control of the fermentation’s temperature.

Happy Wine Making,
Ed Kraus
—–
Ed Kraus is a 3rd generation home brewer/winemaker and has been an owner of E. C. Kraus since 1999. He has been helping individuals make better wine and beer for over 25 years.

What Is Cold Stabilization?

Wine Going Through Cold StabilizationWe look forward to and enjoy your email newsletter and have learned a lot from your subscribers’ questions. Now one of our own…

On a stop on a recent Missouri winery tour was an area for cold aging, where wine coming off secondary fermentation was chilled in the fermenter to around 28 degrees to help dissolved chemicals and remaining suspended yeast cells to fall out of solution before the wine was siphoned off into oak barrels. We don’t see this step in home wine recipes. Is cold aging beneficial to small-batch wines? If so, should it be done in the secondary fermenter after yeast action has stopped, or can it be done after bottling?

Thanks as always.
Ed
_____
Hello Ed,

What you are referring to is something called cold stabilization in wine making. The wine is chilled down directly after fermentation to speed up the settling of wine yeast cells and other suspended proteins. The yeast cells will become inactive or dormant at lower temperatures allowing them to go to sleep, so to speak, and settle out.Shop Bentonite

Chilling a wine after fermentation also causes any excess acids in the wine to form into crystals and fall out. This is known as acid precipitation. If the grape harvest that year was too high in acid, or to tart, bringing the wines temperature down will cause this excess acids to crystallize and then drop out as sediment.

Cold stabilization is only done in wine making after the fermentation has completed and the wine has been given a day or two for the heavier particles to fall out on their own through gravity. It’s a way of making the wine temperature stable so that bad things don’t happen after the wine has been bottled.

If the wine was too high in acid the cold stabilization process were skipped, acid crystals could start to precipitate out later on in the bottle, even while sitting in someone’s wine rack. Acid precipitation would be an absolute disaster for a winery, but not so much for the home winemaker.

Cold stabilization is beneficial if you are making wine from fresh fruits, and most beneficial when making wine from fresh grapes. If you are a home winemaker who is making wine from grapes every year, then yes, you might consider putting your wine through cold stabilization and chilling it down to for a few days before bottling or bulk-aging.

For most home winemakers though, this is not a process that can be practically accomplished. And that’s okay. Realize that there are many commercial wineries that never ever chill there wines. There are other ways of controlling excess acidity. And there are other ways to drop proteins out of a wine – time being one of them.

If you are making wine from wine concentrates or wine ingredient kits, then cold stabilization is pointless. This is because the acids have already been adjusted by the producer to make sure acid precipitation does not occur.Shop Wine Filters There are no protein solids from any fruit to deal with either. When dealing with these packaged wine juices the only thing to be concerned about are the yeast cells, and these will easily drop out fine on their own or with a little help from a fining agent such a bentonite.

Chilling a wine down, aka cold stabilization, does have a place in winemaking, however as I think you can see, it’s a far cry from being an absolute must-have. Great wines can – and are – being made without such treatment.  But with that being said, if you have a spare refrigerator and a bucket of wine, go for it!

Happy Wine Making,
Ed Kraus
—–
Ed Kraus is a 3rd generation home brewer/winemaker and has been an owner of E. C. Kraus since 1999. He has been helping individuals make better wine and beer for over 25 years.