Should I Bottle My Wine? My Carboys Are Popping Corks

Wine Carboys
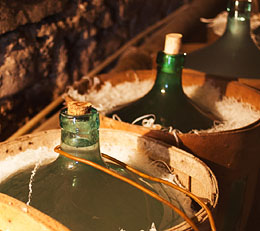
Our wine is still blowing the corks off the carboys. The SG has stopped going down-the wine tastes GREAT-the clarity is great-but, I am a little iffy on going ahead and bottling the wine. Do I need to keep racking our wine to get all the sediment out?  What else can we do, to make our wine safe to bottle? These are all really GREAT tasting wines! Some of the wine jugs still have the air-locks in place. Sharyl Name: Sharyl R.
State: KANSAS
—–
Hello Sharyl,
You want to do everything you can to get the hydrometer’s specific gravity reading down to .998 or less. If your wine is currently at a higher hydrometer reading than this, you may want to take a look at The Top 10 Reasons For Fermentation Failure. By going over these reasons you my discover something you can do differently to get the fermentation to complete all the way to an S.G. of .998. If you are already at a reading of .998 or less, then your wine is safe to bottle.
One reason corks can pop off a carboy after the fermentation has completed is because of temperature change. If the wine in the carboy warms up a few degrees it can cause the wine to expand just enough to push an air-tight cork out of the carboy’s opening.
As always, you should rack the wine off the sediment before bottling. You should also add sulfites to the wine just right before bottling. This could either be in the form of: Campden tablets, potassium metabisulfite or sodium metabisulfite.
Also, if the fermentation did not get below a specific gravity reading of .998 and you still insist on bottling it anyway, I would strongly recommend adding potassium sorbate (wine stabilizer). This will help to eliminate the chance of a refermentation while in the wine bottles. Potassium sorbate will not destroy the wine yeast, but it will keep it from multiplying and regenerating the size of its colony.
Hope this information helps you out.
Happy Winemaking,
Ed Kraus
———————————————————————————————————
Ed Kraus is a 3rd generation home brewer/winemaker and has been an owner of E. C. Kraus since 1999. He has been helping individuals make better wine and beer for over 25 years.

Bottling Wine Before The Fermentation Is Complete

Orange WineHi Ed,
I made my first batch of orange wine from scratch on March 2nd, 2013. My first SG reading was 1.155 for the must. The wine yeast that I had ordered ended up on back order (of course after I started) I went to a local brew shop to get yeast and they only had beer yeast. I tried Cry Havoc. He told me to give it a week. Nothing happened. On the 9th, I added London Ale yeast because it still hadn’t come. The SG was 1.170. I called the supply place and found out the wine yeast wouldn’t be here until the 14th. I was afraid it was spoiling with out the proper yeast, so they told me to add 1/4 teaspoon of potassium metabisulfite (to 5 gal) so I did. On the 14th I strained the fruit out and added Montrachet yeast. It did work! I racked it into a car boy on the 21st. On April 25 the SG was 1.018. On May 5 it was 1.016. On July 13th it was still 1.016. It is very clear and clingy, and it tastes like port. It’s really good! Is it finished, or is the SG too high?
Name: Lori H.
State: CA
Hello Lori,
With the readings you gave, that would mean that your wine now has 22% alcohol. This is beyond the capabilities of the Montrachet wine yeast. With that being said, I do not do doubt that your wine is high in alcohol, but probably closer to 16% to 18%. This is the absolute upward limits of the Montrachet yeast, and is seldom reached with a typical fermentation.
Regardless, you would like to have your final gravity reading be down to .998 or lower. A reading of 1.016 is still quite high for an ending reading. Bottling at this point would give you a strong likelihood of a re-fermentation in the wine bottles. This will cause pressure to build in the bottles and a result of either one of two things: corks popping or wine bottles exploding.
Sometimes all it takes is a little patients. If you see the wine hydrometer reading continuing to go down a little every week, just wait it out. If a couple of weeks go by with no change in the hydrometer reading, then you may want to add some yeast nutrient to the wine must. Whatever you do, do not add more wine yeast or sugar. This will only make matters worse.
If you are determined to bottle your wine at the current reading, then you need to get all the wine yeast out of the wine. Then get the wine stabilized. For this I would take the following steps:
  1. Rack the wine off of any sediment that currently lies at the bottom.
  2. Add a standard dose of bentonite as directed on our container.
  3. Cool the wine down to at least 45°F or cooler for one week, but do not freeze.
  4. Rack the wine off any sediment, again.
  5. Allow the wine to warm up. (This could take a day or so for 5 gallons)
  6. As soon as the wine makes it to room temperature add potassium sorbate at the rate of 1/2 teaspoon per gallon.
  7. Add 1/16 teaspoon per gallon of wine of either sodium metabisulfite or potassium metabisulfte.
  8. Bottle right away.
The idea with these steps are to get every last bit of wine yeast out of the wine — even the wine that you can not see with the naked eye. Realize that wine yeast is finer than flour. After that, render any wine yeast you missed as harmless with the stabilizers. Here’s another blog post with more on this subject, How To Stop A Wine Fermentation .
Happy Winemaking,
Ed Kraus
———————————————————————————————————
Ed Kraus is a 3rd generation home brewer/winemaker and has been an owner of E. C. Kraus since 1999. He has been helping individuals make better wine and beer for over 25 years.

5 Ways To Celebrate IPA Day

IPA Day - August 1, 2013IPA Day is August 1st, a celebration of hops and quite possibly America’s favorite craft beer style.
As many hopheads have heard, India Pale Ales were invented during the colonial days of the British Empire. In order for the beer to survive the journey to their troops in India, British brewers would add extra hops, a natural preservative, and increase the alcohol content. Americans, as we always like to do things bigger and better, have added our own American ingredients and adopted the style as our own. It’s not uncommon to see “Imperial” and “Double” IPAs, amped up versions of the original, as well as “Belgian”, “white”, and “farmhouse” IPAs on the shelves.
Here are five ways to celebrate the big, bold flavors of the India Pale Ale:

  1. Host an IPA Day Beer Tasting
    Collect a swath of your favorite local, regional, and homebrewed IPAs for an epic beer tasting. Create bracket to decide who wins the “Top of the Hops.” Dig cheese? Try your IPAs alongside a lineup of gorgonzola, blue, and other funky cheeses.
  2. Brew an IPA
    Make your own IPA at home and celebrate for weeks to come. We have several kits to choose from:
    Brewers Best: India Pale Ale
    Brewers Best Bold Series: Belgian India Pale Ale
    Brewers Best Bold Series: Double IPA
    Brewcraft Premium Series: New Zealand IPA
    Brewcraft Ultimate Series: Oak Barrel Imperial IPA
    Brewcraft Ultimate Series: Dry Hopped West Coast IPA
    Muntons Connoisseur Kit: India Pale Ale Why not brew more than one to compare them against each other? (Don’t forget that we have free shipping on all orders over $50!)Also, feel free to create your own recipe using our Simple Style Guide: How to Brew an American IPA.
  3. Cook with an IPA
    Throw some India Pale Ale into some of your favorite recipes. The beer’s rich, malty sweetness and strong hop notes will add layers of complexity to any dish. Here are just a few recipes to provide a little inspiration:Jalapeno IPA Hummus
    Hawaiian IPA Pineapple Pulled Pork Sliders
    Roasted Garlic IPA Mashed Potatoes
    Hophead IPA Peanut Brittle Make them all for a four-course, IPA-infused feast!
  4. Visit your local brewery
    Take a trip out to your favorite local brewery to see what IPA they have on tap.
  5. IPA Pub Crawl
    Pick a few of your favorite craft beer bars and breweries and sample IPAs all along your route. Just remember, don’t drink and drive!

Are you planning an IPA Day event? Register the event through CraftBeer.com so others beer enthusiasts can join in the fun as well.
Til next time…cheers!
—————————————————————————————————-
David Ackley is a beer writer, brewer, and self-described “craft beer crusader.” He holds a General Certificate in Brewing from the IBD and is founder of the Local Beer Blog.

The Top 4 Reasons You Should Join A Home Brew Club

Beer Club MeetingBeer blogger Heather Erickson shares why you should join a home brew club ASAP:
—————————————-
If craft beer were a rock band touring the country, home brewers would be its groupies. When groupies get together, well, you have a fan club. Enter the Home Brew Club: a place where home brewers can meet to collaborate, drink, and compete.
So why should you look up your local home brew club as soon as you finish that beer? Well, home brew clubs are great opportunities to…
1. Drink Together
At the very least, being a part of a home brew club gives you license to do just that: drink. Monthly meetings centered around learning about different beer styles or sharing your own home brew will need to be enjoyed. You will need to drink together in order to compare beers, identify tastes, and figure out beers that you might want to brew as a club. It’s also fun picking up several bottles of the same type of beer, including a home brew version, to see how yours stacks up against the pro’s.
2. Collaborate and Brew Together
Nothing is more fun than creating a beer recipe with friends – well, except maybe drinking the end result. Working on a group recipe, using the expertise of all members, is not only a team building activity, it gives you something to brew and ultimately drink together.
A home brew club in my area makes a plan to brew as a group once a month. Sometimes it is a clone recipe. Sometimes it is a favorite beer recipe from a member. Other times it is a group created recipe. No matter what they choose, brewing with others that love to brew makes the time fly by.
3. Compete Together
Let’s be honest. Home brew competitions can be a bit scary. Filling out the paperwork, dropping off the brew, and waiting for the results can just about put anybody into a frenzy. Why not compete with friends? Make a plan to enter either individual beers or club created beers with fellow members. That way, no matter what the outcome, you will have your own cheering section.
4. Learn Together
One of my favorite home brew learning experiences was at the National Homebrewers Conference last summer. It was unlike anything I had ever been to before. Filling conference rooms with fellow home brewers learning about new techniques, the science of beer yeast, and individual styles was so fun. Instant friendships were made based on the passion to learn more about our common language of beer. While it might not be feasible for your club to travel to such a conference, check out the AHA website to see what kind of online courses or web seminars are available. Local home brew shops might also offer some classes that your club could attend.
At the end of the day, nobody can deny that beer is social. Shouldn’t your home brewing adventures be, too?
———————————————————————————————————–
Heather Erickson is a homebrewer with three years experience and has competed in the GABF Pro-Am Competition. She writes the blog This Girl Brews and is a regular contributor to homebrewing.com and kegerators.com. Find her on Twitter at @thisgirlbrews.

Crush Grapes Better Than The Big Boys!

Fruit/Grape CrusherCommercial wineries spend thousands of dollars or more in order to produce high quality wines.  If it costs that much for commercial wineries to produce a stellar wine, is there any hope for the home winemaker?  Can the home winemaker produce a similar high quality wine?  The answer is yes!  Of course!  Making great wine isn’t just for those that can afford to produce thousands of cases of wine.  With the right technique, you can produce some stellar wines that could rival the “big boys”!
What are some ways that the home winemaker can do to produce a wine that rivals in quality to the big commercial wineries?  There are many things you can do, however, today we will focus on the crushing stage.
Commercial wineries often use very large and expensive pieces of equipment to crush their grapes.  Technology has come a long way and there are a lot of crushers out there that delicately crush the grapes and allow commercial wineries to process large amounts of grapes in a relatively short period of time.  You can sometimes rent this equipment, so if you have a custom-crush winery or another winery that rents out their equipment, you might want to check with them about costs.
The key to crushing grapes is to be gentle!  It doesn’t actually matter what type of equipment you end up using, as long as you are gentle and approach the crushing process in a very delicate manner.  Commercial wineries have their equipment set up so that it is gentle enough to remove a certain amount of juice without extracting all the more harsh flavors and aromas by crushing the seeds and stems.  A gentle pressing to extract the free flow juice from the grapes will put you on the right track toward making a high-quality wine that is just as delicious as the commercial wines you see at the wine shop.
If you don’t have access to any fancy crushers, what can you do?  Well, being a home winemaker, you’re probably better apt to gently crush the grapes than a commercial winery using large mechanized equipment, so don’t give up just yet!  You can purchase small-scale crushers and destemmers.
Make sure you thoroughly wash and sterilize the equipment so you don’t introduce any contaminants into your grapes that could ruin your wine.  Just be gentle with your crush and you’ll be off on a great start toward making a high quality wine!
———————————————————————————————————
Ed Kraus is a 3rd generation home brewer/winemaker and has been an owner of E. C. Kraus since 1999. He has been helping individuals make better wine and beer for over 25 years.

4 Tips For Adding Flavorings To Your Wine

LIqueur FlavoringsWe have been purchasing a peach flavored wine. Is there a way to take a white wine and add a peach flavoring to it to replicate a peach wine?Name: Mack T.
State: TN
Hello Mack,
Glad you asked! It just so happens we have liqueur flavorings that many home winemakers have been using with some success. I say some because you do need to play around with it to get it tasting its best — no differently than coming up with a brand-new wine recipe on your own.
These liqueur flavors were originally intended for making different flavored alcoholic mixers… everything from Frangelico/Hazelnut to Grand Marnier/Orange Brandy. But, by adding them to a wine you can enhance it’s flavor. In your case you would play around with the Peach Schnapps liqueur flavoring.
Here’s what I’ve learned over the years of toying with them:
  1. Don’t go overboard. One bottle to 5 or 6 gallons of wine is plenty. These little bottles have a lot of flavor packed in them. You can experiment with using a second bottle, but be very cautious. I would never add more than two bottles. The result can be a wine with a lightly bitter finish.
  2. Give the wine some time. Once you have added a bottle, let the wine sit for a day or more before tasting it. These flavorings seem to take time to mingle with wine. With a little time given, you will notice more fruity aroma and cleaner finish. 
  3. Get sweet with your wine. When adding an actual fruit flavor, such as the case with your peach, you will usually need to sweeten up the wine slightly to get the effect you want. Extremely dry wines are not capable of giving strong fruity impressions. Take the dry edge off with some sweetening, and you should experience the fruitiness start to open up. If you are dealing with a 5 or 6 gallons batch, maybe start by adding one or two cups of a sugar syrup mixture and go from there.
  4. Work with a sample. If you are just not sure about how much flavoring or sweetening to add, you may experiment on a gallon of the wine first. Add measured amounts to the gallon to establish a dosage for the rest of the batch. If you do take the gallon sample too far, you can add it to the rest of the batch and start all over. If you really messed it up, you can dump it and start all over.
Additional Notes:
  • The sugar syrup mixture can be made by adding 2 parts sugar and 1 part water in a sauce pan and gently heating until it becomes clear. Allow to cool before adding to the wine.
  • Remember: always add potassium sorbate when sweetening a wine to eliminate the chance of a re-fermentation.
Hope this helps you out,
Ed Kraus
———————————————————————————————————
Ed Kraus is a 3rd generation home brewer/winemaker and has been an owner of E. C. Kraus since 1999. He has been helping individuals make better wine and beer for over 25 years.

How To Fix A Sour Wine

Sour FaceHello,
I’m a beginner wine maker, and my last batch (2012) grapes were picked late. As the result the Brix level was high (27), and based on others recommendation I added some water to lower the Brix level. But this also lowered the TA to about .40%, which is lower that recommended. So the same expert friend also recommended adding some Tartaric acid to increase the TA. I used half the recommended amount, and ended up with .75%, which is too high. My Red wine is now aging in an Oak barrel, and the TA has been naturally lowered. But it is still a bit too sour for my taste. What do you recommend, not touching it, or to make further adjustment?
Name: Massoud V.
State: Washington
—–
Hello Massoud,
Sorry you are having such a problem with your wine’ s acidity. Fortunately, there is something you can do to correct the wine.
Add potassium bicarbonate to the wine, also referred to as Acid Reducing Crystals. This works fairly well when you only need to adjust the total acidity (TA) just a little bit — say 10 or 20 basis points. The potassium bicarbonate will cause some of the tartaric acid in the wine to solidify as potassium bitartrate crystals and settle to the bottom.
Potassium bicarbonate is very simple to use. You stir in the appropriate amount needed and then let the wine set for anywhere from 1 week to 1 month. Take weekly readings with an Acid Test Kit. When you no longer see any change in the reading and the potassium bitartrate crystals have had time to clear, then you are free to bottle the wine at your leisure.
It’s good to be patient with this step. If you bottling the wine before all the crystals have formed or have had time to settle out, then you will end up with crystal deposits in your bottles of wine. Also, the cooler you can keep the wine during this step, the faster it will go. So store the wine in as cold of place as possible, but do not freeze.
Knowing how much potassium bicarbonate to add is simply a math problem. For every teaspoon of potassium bicarbonate you add to a gallon of wine, you will reduce the total acidity of that wine by .18%.
Let’s assume that you have a 5 gallon barrel of wine, and the TA has settled in a .70% tartaric — but you want it to be .60% tartaric. That means you want to lower the total acidity by .10%. If one teaspoon will lower a gallon by .18%, then one teaspoon will lower 5 gallons by .036% (.18 / 5 = .036). With this information you can determine that you need to add 2.78 teaspoons to the 5 gallons to lower the total acidity by .10% (.10 / .036 = 2.78).
Before using the Acid Reducing Crystals you may want to give the wine more time to age. You say that the total acidity of the wine is naturally lowering. What this means is some of the tartaric acid is dropping out on its own. As eluded to before, if you cool the wine down it may increase this natural dropping-out of tartaric acid to an extent that is acceptable.
But if you done waiting, then by all means use the potassium bicarbonate. If is a very accurate way to predictably lower your wine’s acidity and is fairly simple to do.
One other subject we won’t get into here but is something you may want to investigate, is using a malolactic fermentation to reduce your wine’s acidity . It’s not the right thing to do to all wines, but may be an option for the wine you have.
Happy Winemaking,
Ed Kraus
———————————————————————————————————
Ed Kraus is a 3rd generation home brewer/winemaker and has been an owner of E. C. Kraus since 1999. He has been helping individuals make better wine and beer for over 25 years.

What to Know Before Entering Your First Homebrew Competition

As a result of homebrewing gaining popularity across the country, homebrewing competitions are cropping up more often. These contests are a great way to meet other local homebrewers, develop bonds and perhaps, most importantly, sample some high-quality beers. When an experienced homebrewer invests in the high quality ingredients for a homebrew, the results can surpass anything you’ll find in a grocery store.
Although the sense of community is one of the greatest draws of a homebrewing competition, everyone is there for the same reason: to have their beer sampled and judged by professionals, as well as by fellow brewers. Everyone wants to do his or her best, but a homebrewer’s first foray into competitive homebrewing can be intimidating, and there are some traps that you’re likely to fall into if you aren’t properly prepared.
Fortunately, you can improve your initial performance at a homebrewing contest by embracing a few tips and tricks.

Make entries based on the end result, not the intention.

Not every homebrew turns out according to plan. Some might be pleasant surprises while others fall short of your mark. While you might appreciate the craftsmanship and artistry employed in a specific homebrew, it’s irrelevant if that work doesn’t come through in the finished product. Ultimately, you want to choose the beer that will perform best in a blind taste test among judges who know nothing about how the beer was produced.
You should also be mindful of the flexibility in how you enter a beer. If you attempted to make an IPA but failed to reach the desired original gravity during production, you could always enter the beer as a pale ale – since it won’t have those distinctive IPA characteristics, it might score better as a result.

Respect the qualities of your beer’s category.

You might be attracted to the idea of making a stout that defies the characteristics of a traditional stout, but that’s likely to not go over well at a homebrew competition. When judges sample flights, they’re not only looking for good beer; they also want brews that embody the characteristics of their category. Rather than defy these qualities, make sure they’re present in your homebrew and then use additional flavors, aromas and techniques to make the beer stand out.

Start out small and work your way up.

A big competition may be tempting, but smaller homebrew contests might be a better place to start. Many smaller homebrew competitions are better about providing comments attached to scores. These insights can help guide your future brewing and ultimately make you a better craftsman.
Of course, if you’re eager to test your brew on the biggest stage, there’s the National Homebrew Competition, which takes place annually in April. You could also submit your brew to the Great American Brew Festival Pro-Am — this competition requires that each entry be based on past award-winning homebrew recipes. Otherwise, check with your local clubs and breweries to learn more about options in your area.
You might not experience overnight success at your first homebrew competition, but you’re sure to gain valuable experience while meeting other passionate practitioners. Once you’re comfortable with the homebrewing process, find a contest and put you and your brews in the spotlight.

There's White Stuff On My Wine!

Sampling WineI have an overrun one gallon jug of Merlot on its 2nd racking and its got some white moldy looking stuff on top of the wine between the wine and the stopper . Which is a 1 inch gap. What’s up with that? And should I rack it and see what happens or what?Name: Dennis D.
State: PA.
—–
Hello Dennis,
It could be a mold beginning to forming, but most likely it is a bacterial infection. This can happen if the wine has completed its fermentation and has become still. When an air-lock goes dry or is taken off the glass jug, fresh air can encourage bacteria to grow. Winemaker’s refer to this as flowers.
It sounds like you have a very small amount in the neck of the glass jug. This is not too serious and can easily be overcome. I would go ahead and rack the wine into another sanitized jug.
If the fermentation has already completed, I would not hesitate to add sulfites to the wine: add either a Campden tablet or 1/16 teaspoon of either potassium metabisulfite or sodium metabisulfite. This will easily destroy the bacteria. The wine should be perfectly fine after that, but you will only be able to find out by smelling and tasting the wine.
If the wine is still fermenting then you’ll just have to wait it out. You can siphon the wine into another sanitized gallon glass jug. Siphon from the middle so as to leave both the surface scum and the sediment behind. Once the fermentation does complete, be sure to get the sulfites on the gallon of wine as soon as the fermentation completes.
A blog post you may want to take a look at is There’s White Scum On My Wine. What Should I Do? This goes over in a little more detail what you can do to fix the problem. Another one that my glean some insight is Can You Have Head-Space In Your Secondary Fermenters?
Again, you situation does not sound too serious. My instincts tell me the wine will be just fine, but you’ll have to depend on your own smell and taste to really know.
Happy Winemaking,
Ed Kraus
———————————————————————————————————
Ed Kraus is a 3rd generation home brewer/winemaker and has been an owner of E. C. Kraus since 1999. He has been helping individuals make better wine and beer for over 25 years.

Shandy Is Dandy: A Look At A Summer Time Favorite

Soda Pop For Making Shandy With Beer
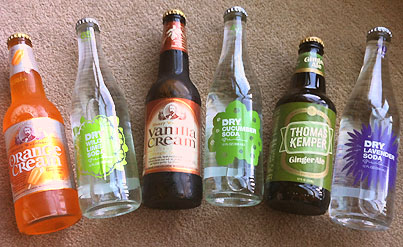
Traditionally, a Shandy is a lager beer mixed with lemonade or citrus soda. You will find quite a few examples on the supermarket shelves this time of year. However, with beer making it’s way into the craft cocktail circuit, a Shandy could really include any type of beer (especially a homebrew!) mixed with any kind of soda. Remember how you squeezed those extra lemons in a barely drinkable beer? Now, you can do that on purpose for new, palatable flavor combinations. Below are a few of my Shandy creations that will surely become your summer favorites:
The Margarita Mixer
Take one part Raspberry Ale and one part lime soda. I chose Granville Island’s False Creek Raspberry Ale with Dry Wild Lime Soda. The result? A tangy fruity beer beverage that tasted nothing like a traditional beer. In fact, it tasted exactly like a berry margarita. I could see this being a great entry-level beer experience for some of my margarita loving friends. Sunny afternoons with this in my pint would make me a happy lady!
Sweet Tea
Pour one part Pale Ale and one part Ginger Ale and voila…you have adult Sweet Tea! I used Deschutes Brewery’s Red Chair NWPA with Thomas Kemper Ginger Ale for my mix. Identical to that thirst quenching southern drink, this Sweet Tea was a delight. Dare I suggest pouring it over ice?
Black Russian
Use one part Chocolate Stout and one part Vanilla Cream soda and well, you have the first cousin of one of my favorite wells, a Black Russian. For me, this would be a great after dinner sipper. The vanilla and chocolate/coffee essence of this combo lends itself to being a great candidate for a beer float, too!
DryPA
Use one part American IPA and one part cucumber soda….wait does that sound a bit questionable? Trust me, that cucumber flavor pairs well with a piney hopped IPA. I dug deep into my beer collection and poured a Presidential IPA from Diamond Bear and used local soda maker’s Dry Cucumber Soda. While I used to mix that particular soda with vodka, I think I might love it even more with an IPA.
LavenDouble
Alright, seriously trust me here. If you tried my DryPA mix and liked it, you will LOVE this one. First, find a good Double IPA. I used Myrcenary from Odell, and once again used local soda favorite Dry Lavender Soda. With a strong backbone of a malty and hoppy DIPA, the lavender soda softened up with back of the palette. It almost cut out some of the overly bitterness and replaced it with a gentle floral note.
The key to any craft Shandy is being able to adjust the ratio to your specific taste. Try to keep citrus flavors with Wheats and Pales, savory flavors with Porters and Stouts, and herbal flavors with IPAs. So, grab some sodas, raid your beer fridge and see what new combinations you can come up with!
Care to brew some of your own sodas at home? E. C. Kraus has gear to make your own soda pop! ———————————————————————————————————
Heather Erickson is a homebrewer with three years experience and has competed in the GABF Pro-Am Competition. She writes the blog This Girl Brews and is a regular contributor to homebrewing.com and kegerators.com. Find her on Twitter at @thisgirlbrews.