Is Wine Yeast And Baking Yeast The Same?

Wine Yeast Not Baking YeastI need you to help me settle a bet with a friend who also makes wine.  He says that wine yeast is no different than what you can get in the store to make bread with.  His quote “yeast is yeast”.  I say that it is different, although I can’t explain how.  Please help settle this and let us know who has to pay up, plus if there is a difference between wine yeast and baking yeast can you explain it to me.

Thanks,
Jamie
———-
Hello Jamie,

I’m going to be brutally honest, here. I hope this doesn’t break-up a good friendship.

To say that yeast is yeast is like saying a dog is a dog. Over the centuries dogs have been bred for various, specific tasks: hunting, herding, personal protection, attacking, protecting herds, companionship, etc. The same can be said for yeast. They have been bred over the decades to perform specific tasks: rising bread, making alcohol, bio-degrading oils, pharmaceutical production, etc.

So to bring this analogy full circle, when you’re making wine with a baking yeast, you’re hunting grizzlies with a chihuahua. Sorry friend, but wine yeast and baking yeast are not the same. In fact, they are very different. I would never recommend making wine with bread or baking yeast.Shop Yeast Nutrient

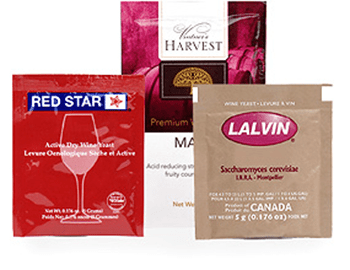
Wine yeast in particular is bred to obtain higher alcohol levels than baking yeast. On average, bread yeast will get you 9 or 10%. Anything higher than that is possible, but the baking yeast will have to struggle considerably.

Wine yeast are bred to thrive very well with the set of nutrients fruits naturally provide. Baking yeast, on the other hand, prefers the balance of nutrients found in grains or bread doughs.

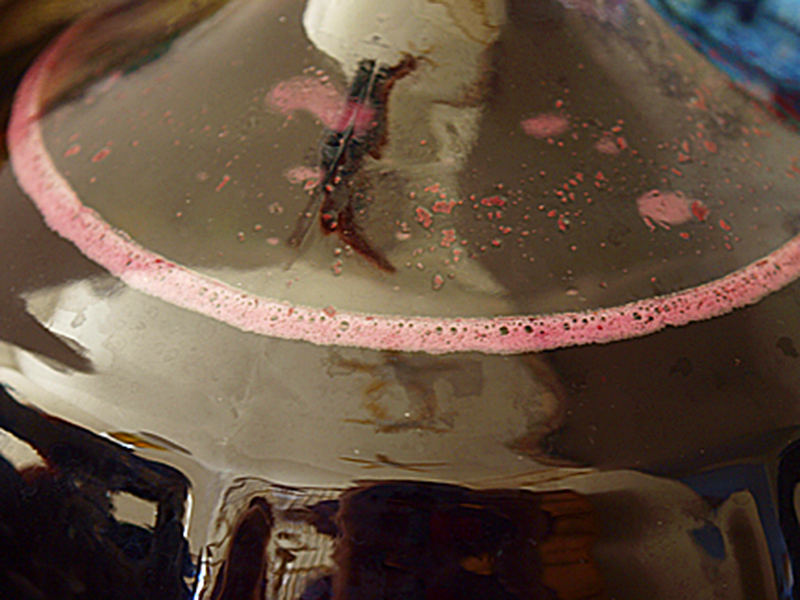
Wine yeast clears more quickly from the wine than baking yeast. Wine yeast is bred to clump together as the fermentation activity slows – a process known as flocculation. The clumping allows the wine yeast to drop out and settle to the bottom more quickly. Baking yeast does not clump or flocculate. Instead, it slowly settles to the bottle as a fine haze. This process can take weeks instead of days.

Wine yeast foams less than baking yeast. This is because wine yeast are bred to produce less surface tension in the liquid than baking yeast.

Wine yeast is also more tolerant to sulfites than baking yeast. The wine yeast has actually been acclimated to coexist with some residual sulfites such as Campden tablets in the wine. This means that wine yeast can ferment just fine with some sulfites in the wine must. Baking yeast is not as fortunate. Even small amounts of sulfites can stop a wine fermentation dead in its tracks.

Another issue is that bread yeast is only packaged under food-grade conditions. This is certainly suitable for baking. The yeast is only being utilized for a few hours, not days, so the perpetuation of any contaminating organisms do not have enough time to do any damage.

On the other hand, with wine yeast we are talking days if not weeks that the yeast is in play. This is plenty of time for stray organisms riding on the yeast to potentially breed into a full-fledged infestation spoiling the wine. For this reason, wine yeast is package under sterile conditions. This is far more stringent than food-grade packaging.Shop Wine Yeast

To sum all this up, you can certainly make wine with a baking yeast, but you will be sacrificing flavor and potentially alcohol. You are also increasing the likelihood of having a stuck fermentation. This is because of issues with nutrients and the use of sodium metabisulfite.

So, as I think you can see, wine yeast and baking yeast are not the same. In fact, there are many differences between the two. That combined with the fact that wine yeast is not all that expensive to buy, why wouldn’t you use it in your winemaking?

Happy Wine Making
Ed Kraus
—–
Ed Kraus is a 3rd generation home brewer/winemaker and has been an owner of E. C. Kraus since 1999. He has been helping individuals make better wine and beer for over 25 years.

The Relationship Between Oxygen And Wine Aging

Oxygen And Wine AgingYou can’t read very long on the subject of wine making without running across the warnings of excessive air exposure and how oxygen can turn a great wine into a brown, caramelized mess through a process of oxidation. Books, websites and even this blog have expressed these cautions.

The reality is without some oxygen being available, the progression of a wine’s aging process can be brought to a near standstill. Wine needs oxygen to age. Without it a wine will not fully reach its aging potential. There is a solid relationship between oxygen and wine aging, it’s just a matter of finely controlling how much dissolved oxygen is in the wine.

Once the wine is bottled, it begins a series of changes. Tannins become less harsh, aromas tend to develop a richness, etc., but all of this can not take place without a slow – very slow – infusion of oxygen. Oxygen is the catalyst for all these changes during the wine’s maturation process.

But this oxygen needs to be given slowly. If too much oxygen is made available to the wine too quickly, it will develop symptoms of bottle shock. This basically means the aging process is out of balance. More oxygen is being dissolved into the wine than it can process for aging. The wine will taste flabby and lifeless with little bouquet, and worse yet, it could start to show signs of oxidation such a browning. So, while the wine need oxygen to age, it needs it in very small doses of long periods of time. This is the most important thing to understand about oxygen and wine aging.Shop Wine Corks

A wine bottle and its cork can be considered a wine preservation system. It’s job is to preserve the wine and allow it to develop steadily and evenly as time passes. How well the cork seals or how well it allows air to permeate, controls the rate of aging.

While it may be your instinct to try to age the wine as quickly as the wine will bare, you don’t want the wine to age-out too fast. This is because the wine will begin to slowly start to degrade after doing so. A bottle of wine has a beginning and an end – an aging life-cycle. There is a peak in flavor along this life-cycle. You don’t want the wine to take too long because you’ll end up drinking your wine when it has not yet reached its best.

For example, our Superior Grade Straight Corks work well for wines that you intend to consume in about 3 years time. Our Extra-First Grade Straight Corks are for wines you intend to consume over a 4 or 6 year period. Extra-First Grade is denser than the Superior Grade so less air gets through, slowing the aging process.

Then there’s Synthetic Corks. These corks are designed to allow the optimal amount of air to pass over time. They are ideal for wines that you intend to age for for than 18 month. They also work well for early aging wines such as Zinfandel where little oxygen is needed for the wine to come into fruition.

Shop Wine BarrelsFor these reasons, when you buy corks their density should be taken into consideration. By selecting the right grade of cork you can control the wine’s rate of aging to one that is appropriate for the needs of that particular style and to the needs of your consumption.

Wine needs oxygen to age. Oxygen and wine aging go hand-in-hand, but it’s all about controlling how much. The key is to not let the wine get too much too fast. Keep it slow any steady.
—–
Ed Kraus is a 3rd generation home brewer/winemaker and has been an owner of E. C. Kraus since 1999. He has been helping individuals make better wine and beer for over 25 years.

My Malolactic Fermentation Won’t Start

Malolactic FermentationI added malolactic culture to two carboys of wine approximately 30 days ago. One of them showed sign of good fermentation, but in the second one the malolactic fermentation won’t start. What can I do with the carboy that is not fermenting?

Thank James
———-
Hello James,

There are a few reasons why a malolactic fermentation won’t start or complete in a wine. Before adding the malolactic culture to the wine it is best to make sure that you have some things in order. The environment that the wine is providing for the culture needs to one that promotes a malolactic fermentation. Here or some thing to consider:

  • Temperature: Make sure the malolactic fermentation temperature is between 70°F. – 75°F. If the temperature is too cool the malolactic culture will not ferment as hardily as it should, if at all. Also, beware of malolactic fermentation temperatures above this range. These temperatures could promote the growth of unwanted organisms that may produce off-flavors in the wine. If you are currently experiencing MLF temperatures that are cooler than this, we have a heating belt that is designed specifically for such a situation. I doubt that this is the reason why your malolactic fermentation won’t start since both carboys are side-by-side, but I’ve included here for completeness, just the same.
  • Acidity: Just like temperature, the wine’s acidity level needs to be tested to make sure it is in a decent range. If the acidity is too high, it will inhibit the malolactic culture’s activity. You also need to be concerned about having too low of an acid level. This will promote the growth of unwanted bacteria. A simple pH reading will do. You can use pH Strips (litmus papers) or a digital pH meter. YouShop Digital pH Meter would like to have the pH be between 3.2 and 3.6. Remember, the scale works backwards. The lower the number the higher the acid. If your acidity is too high, then treat the wine with acid reducing crystals. This will drop out some if the acid as crystals. If the acidity is too low then add some acid blend.
  • Alcohol: If the wine’s alcohol level is too high this can by why your malolactic fermentation won’t start. This type of problem can be experienced with wines that are 13% or higher. It may be necessary to dilute the wine with water to bring the alcohol concentration down. Always use distilled water for this purpose.
  • Sulfite (SO2): A malolactic fermentation is very sensitive to sulfite. It is much more sensitive than a yeast fermentation. Sulfite is the main ingredient you are adding when you use Campden tablets, potassium metabisulfite or sodium metabisulfite. It is also produced naturally by the yeast during a fermentation. You would like the amount of free SO2 in the wine to be no higher than 10 ppm. You can get away with 15 ppm, but it is not preferable. You can use a Titret test kit to determine how much sulfite is in your wine. If there is too much, you can lower it by racking the wine into another vessel. Do so in a splashing manner. This activity will cause some of the SO2 to dissipate as a gas.

Ironically, if you cannot get the malolactic fermentation to start in your wine after making these adjustments, it is in the wine’s best interest to pull-the-plug on the project and bring the sulfite level up to a normal level – somewhere around 35 ppm to 55 ppm – and bottle the wine. This reason for this is that if the SO2 level is low in preparation for a malolactic fermentation, you don’t want the wine to stay still too long in this situation. You want to either bring the SO2 level up to a protective level, or have an active MLF. Having neither for a stretch of time is jeopardizing the wine.Shop Heating Belt

That’s how to get a malolactic fermentation going in your wine. Get the temperature and these other things set and your MLF starter should take off just fine. There may be other reasons why a malolactic fermentation won’t start, but I’m confident that the above covers 99% of the issues.

If you’d like to read more about this we have another blog post about the reasons for doing a malolactic fermentation.

Best Wishes,
Ed Kraus

—–
Ed Kraus is a 3rd generation home brewer/winemaker and has been an owner of E. C. Kraus since 1999. He has been helping individuals make better wine and beer for over 25 years.

There’s A Sulfur Smell In My Wine!

Wine With A Sulfur SmellI’m making a Sauvignon Blanc from a 6 gallon bucket of refrigerated fresh juice that was inoculated with a wine yeast by the producer. Instructions on bucket: bring must to 76 degrees stir 2x daily, recover with bucket lid and rack to secondary fermenter at 1.020. My starting SG 1.090 and I racked last night after two weeks to secondary at 1.020 and noticed the must smells like a hard boiled egg. Any suggestions, or will this smell work its way out during future rackings?

Name: Michael N.
State: Pennsylvania
—–
Hello Michael,

So sorry you are having such an issue with this batch.

The hard-boiled egg smell you are referring to is obviously a sulfur odor. This sulfur smell in your homemade wine comes from hydrogen sulfide.

Hydrogen sulfide is a compound that is naturally produced during a wine fermentation. All wine fermentations will produce some hydrogen sulfide, however there are some scenarios that can cause more of it to be produced than others. Apparently, your wine falls into one or more of these situations:

  • It could be that your wine is fermenting with a wild yeast strain. Some wild yeast are not that good at fermenting a wine must. They have to work harder causing an over-production of hydrogen sulfide. However, if the wine must was sulfited before your received it, this situation is not very likely. Wild yeast are very sensitive to sulfites. They would have easily been destroyed by it.
  • A nutrient deficient wine must can cause a sulfur smell in a fermenting wine. Whether the yeast is wild or domesticated, it will have to work harder to get the job done when they are malnourished, again, causing excessive hydrogen sulfide production. Your wine must does not fit this scenario very well. If you are using 100% grape juice, there is a significant amount of nutrients available. Only on a rare occasion will a grape juice fermentation produce an abundance of sulfur odor because of a lack of nutrients.Shop Yeast Nutrients
  • Having a fermentation that is too warm can cause a sulfur smell in fermenting wine. If the fermentation was over 80°F., this can put the wine yeast under additional strain and increase the likelihood of too much hydrogen sulfide being produced.
  • Having too little yeast trying to do too much work can cause a sulfur smell in a fermenting wine. If for some reason the wine yeast added did not have enough viable cells (old yeast), or if some of the wine yeast was destroyed during storage or shipping of the wine must, this can cause an over-production of hydrogen sulfide.
  • Using a domesticated wine yeast that naturally has a higher likelihood of producing hydrogen sulfide could be why you have a sulfur smell in your fermenting wine. Not all wine yeast are the same. Each one has it’s own unique set of qualities. Some wine yeast have a higher propensity towards producing higher levels of hydrogen sulfide. These wine yeast are more sensitive to the above situations.

Finally, it could be any combination of the above. Quite often things are not so cut-and-dry in wine making. It could be an orchestration of two or three of the above situations coming together to put your wine in the mess it is currently in.

The good news is that almost all of the time this particular fault in a wine is correctable. Quite often, time is all that is needed. Doing a racking after the fermentation can significantly help to release the sulfur odor. So does adding sulfites such as: Campden tablets, potassium metabisulfite and sodium metabisulfite. Any of these will help to drive the hydrogen sulfide out of the wine.

Shop Potassium BisulfiteMichael, my suggestion to you is to do nothing right now. In fact there is nothing that you can do at this stage that would help the situation. Continue on as you normally would with any wine. When you get the wine to a point that it is ready to bottle, that is when an evaluation needs to be done. Simply smell and make a determination: is there still a sulfur smell in the wine? If so, there are additional steps that can be taken.

Removing Sulfur Smell In Wine

Most of the time the sulfur smell of hydrogen sulfide will go away with normal rackings of the wine. The addition of Campden tablets or potassium metabisulfite as normally prescribed in a wine recipe will help to drive out the sulfur smell, as well. So, it is very likely that the sulfur-y smell will go away in due time.

But, there are times when racking the wine is not enough. In these situations, removing the sulfur smell from the wine may require you to treat the wine in a splashing manner. Let the wine run down the side-wall of the fermenter as it comes out of the siphon hose when racking. Or, you can try pouring the wine from one open fermenter to the next. In many instances I’ve seen this work successfully.

Be sure to treat the wine with potassium metabisulfite after doing this to drive the oxygen out of the wine, reducing the risk of oxidation, in your wine and, as mentioned before, it will help to drive out some of the hydrogen sulfide.

In almost all cases, removing the sulfur smell from the wine will be accomplished with the above treatments, but there are some rare instances when the above treatments just are not enough. In these more drastic situations you will want to treat the wine with copper. Yes, I said copper! When the wine comes into contact with copper, a reaction will occur that causes the hydrogen sulfide to release more freely, removing the sulfur smell from the wine.

Shop Wine KitsThe easiest way I have found to do this is to purchase copper brillo pads. Place a brillo pad in a funnel and pour the wine through it. You will notice that the brillo pad will start to corrode very quickly. This is from the reaction we are seeking. If the brillo pad starts to look spent, then feel free to put another one in its place. Again, you will want to treat the wine with potassium metabisulfite after performing the treatment to drive out oxygen that was introduced into the wine.

Michael, I am confident that removing the sulfur smell from your wine will be no problem at all for you. Be patient. Do your rackings and potassium metabisulfite additions as you normally would. When it comes time to bottle the wine, if still have a sulfur smell in the wine, then you can consider treating the wine with splashing, and so forth, but I would not do anything before then.

Happy Winemaking,
Ed Kraus
—–
Ed Kraus is a 3rd generation home brewer/winemaker and has been an owner of E. C. Kraus since 1999. He has been helping individuals make better wine and beer for over 25 years.

Oaking Wine With Oak Chips

Man Oaking Wine With Oak ChipsHow do you go about oaking wine with oak chips? What type of oak chip would you recommend using on muscadine wine? I’d like to do a little experimenting. My wine is a combination of red and white muscadine grapes yielding a blush/rose type wine. What type of oak chip, quantity per 6 gallon carboy and length of time to soak would you recommend? Thanks much!

Name: Ed P.
State: Illinois
—–
Hello Ed,

Nothing wrong with a little experimenting. For me that’s part of what makes wine making so enormously fun.

One thing about oaking wine with oak chips, not all wines will benefit from it. Normally, the wines you would like to add oak chips to are wines with a lot of body. The tannins in the oak will help any excessive proteins in these full-bodied wines to clear out. This will give your wine a little more brilliant color.

The oak chips will also add their own smoothing affect to the wine’s character. A rounding-off of the rough corners, so to speak. Heavier wines tend to be harsher than lighter wine. Oak chips will also add some wood flavors to the wine. Some regard this as giving the wine more complexity. These heavy wines are the ones that you should be thinking about considering what wines to oak.

Looking at this from an experimental standpoint, your best option would be to take off a gallon of the wine and strongly oak it. This could be done by adding about 4 to 8 ounces of oak chips to the gallon for a two or three months. Once this is done you can blend a little/some/or all back into the other 5 gallons based on taste.Shop Toasted Oak Chips

Using this method for oaking your wine with oak chips would give you the most control over the final outcome. The downfall is that you would not want to store 5 gallons of wine in a 6 gallon carboy, so you would need to move the 5 gallons of wine to a 5 gallon carboy during this time. The same holds true for the one gallon sample you will be oaking. Also, you are risking loosing whatever portion of the gallon you do not wish to add back to the wine.

The other method for oaking a wine with oak chips would be add it to the entire 6 gallons of wine, and then taste it along the way to see how it’s doing. Usually, once every 3 or 4 weeks. While this is an easier method, you do run a better risk of ending up with a wine you might not care too much for.

How much of the oak chips you would want to add to the wine can vary. I personally like to use 2 ounces to 5 gallons and let it age out for many months. But others like adding 4 or 6 ounces and age the wine for a shorter period of time.

Without question, I would recommend using toasted oak ships. Plain oak chips are rarely used but still have their place. Whether you use Toasted French oak chips or Toasted American oak chips would not make an incredible difference. Either can produce great results. The main difference between the two is that American oak will add sort of a coconut smoothness to the wine, whereas French oak chips will add more of a vanilla richness. One is not better than the other, it’s more of a matter of which one will work best with the wine at hand. Without tasting your wine, I would suspect you would want to use the American oak chips–just a guess.

Ed, I hope this information about oaking wine with oak chips is what you were looking for. Just realize that oaking a homemade wine with oak chips is something that does not happen overnight, so you will have time to sample the wine and make careful judgments as to when enough is enough.

Happy Winemaking,
Ed Kraus
—–
Ed Kraus is a 3rd generation home brewer/winemaker and has been an owner of E. C. Kraus since 1999. He has been helping individuals make better wine and beer for over 25 years.

My Homemade Wine Has No Alcohol

My Homemade Wine Has No AlcoholWhen I check the alcohol level of my wine before bottling, it is less than 1%. What am I doing wrong? Is there a reason why my homemade wine has no alcohol?…

Name: Larry J.
State: Iowa
—–
Hello Larry,

I am assuming that you are coming up with this info by taking a reading with your wine hydrometer.

The 1% you are seeing on the wine hydrometer is not telling you how much alcohol is in the wine. It is telling you how much more alcohol can be made with the sugars that are still left in the wine. It is a potential alcohol scale, not an alcohol scale. In other words, there is still enough sugar left in your wine to ferment one more percent of alcohol.

So when you say my homemade wine has no alcohol, this is not so much an issue of no alcohol being in the wine as it is knowing how to use the wine hydrometer or following any wine hydrometer instructions that might have came with it.Shop Hydrometers

To tell how much alcohol is currently in the wine, you have to know what the potential alcohol reading was on the hydrometer at the beginning of fermentation – how much potential for alcohol was there at the beginning… 10%, 11%, 12%? By knowing how much potential alcohol could be made at the beginning of fermentation, and knowing how much alcohol can potentially be made now, currently, you can determine how much alcohol is in the wine.

Here’s an example. Let’s assume your wine started with a hydrometer reading of 13%, and you now have a reading of 1% on the potential alcohol scale. This would mean that your wine currently has an alcohol percentage of 12%. This is the 13% less the 1%.

There is no way that any wine hydrometer can tell you how much alcohol you have with a single reading. You have to know what the wine hydrometer reading was before the wine started fermenting and compare that to an ending reading. If you did not take a beginning reading with your wine hydrometer, there is no way for you to determine the alcohol level of that wine with any hydrometer.

I hope this information helps you out. You are not the first person to say, my homemade wine has no alcohol, because of misinterpretations with the hydrometer. For that reason I’m glad you brought it up so I can share some clarity with other home winemakers.

Happy Winemaking,
Ed Kraus
—–
Ed Kraus is a 3rd generation home brewer/winemaker and has been an owner of E. C. Kraus since 1999. He has been helping individuals make better wine and beer for over 25 years.

How to Make Homemade Pear Wine

Pears For Making WineI have tried several times making wine from pears and always end up with a wine that tastes like weak moonshine. It has a smooth taste but not much flavor. I had a friend make some homemade pear wine as well and his turned out the same way. We have come to the conclusion that there is probably sugar locked into the fruit that is being released during the fermentation. My question is do you think our conclusion is correct and if so how can I go about figuring how much sugar to add to the fermentation. I think these pears will make a very fine wine if I can just figure out the recipe.

Jeff L — PA
—–
Hello Jeff,

In general, pears do not have a lot of flavor relative to other fruits. Think of the raspberries used to make a raspberry wine. When you taste a raspberry you know it. They are bursting with flavor.

Pears on the other hand are not bursting with flavor. When you bite into a pear you can tell it’s a pear. You can taste its character, but it’s nothing explosive like a strawberry, blueberry or even peach. Put the pear flavor up against the tongue-numbing effects of alcohol – such as the situation of a homemade pear wine – and you have something that tastes just like you described, weak moonshine.

Here are some tips for making homemade pear wine at home. These are some ideas for getting more pear flavor into the wine when using fresh pears.

Tip #1 For Making Homemade Pear Wine
One trick I have found to work well when making pear wine is to let the pears get as ripe as possible. Let the pears get as soft as you can without letting them turn to rot. If some pears are turning quicker than others, you can put them in a bath of sulfite solution, whole, until the other pears are ready. This will stop the pears from rotting any further.

Allowing the pears to become as ripe as possible will go a long way towards getting you a homemade pear wine with more pear character. When pears are early they taste closer to an apple. As they develop, the flavor that makes a pear, a pear, starts to become more pronounced.

Shop Hydrometers

Tip #2 For Making Homemade Pear Wine
Don’t drive the alcohol level of your pear wine up too high. Try to keep it around 10% to 12%. This can be done with the aid of a hydrometer. Use the potential alcohol scale on the hydrometer. As you add more sugar, the wine must will rise on the potential alcohol scale. Having the alcohol too high will give the pear wine a watery impression. This is because the high alcohol level is numbing your tongue to the flavors that are actually there.

Tip #3 For Making Homemade Pear Wine
Going back directly to your question, if you are using chopped fresh pears for making wine, the sugars in the pears should be release during the fermentation. The enzymes produced by the wine yeast will break down the pear pulp, releasing the sugars and the flavors. If you are not using an actual wine yeast, the correct enzymes are not being produced to break the pear pulp down.

Use wine yeast only. For pear wine we recommend Lalvin EC-1118 wine yeast. In addition, also be sure to add pectic enzyme. This will help to break down the fruit fiber, as well. Pectic enzyme is important in helping to get more flavor from the fruit.

Try mashing up the pears a bit. Once they have been cubed, you can use something like a cleaned and sanitized 2 x 4 stud to crush them. You are not looking for apple sauce consistency. You just want the fiber structure of the pulp to be disrupted some. This will allow the enzymes to break down the fruit fiber more quickly. By getting to the fruit fiber more quickly, you are getting both more flavor and more sugar from the pears.

By employing these tips you will be able to make a better homemade pear wine, one that actually tastes like pear. If you are still not sure what to go from here, you may want to take a look our pear wine recipe. This recipe makes 5 gallons of pear wine. It’s an easy recipe, straight-forward recipe that should help you out.

Happy Winemaking,
Ed Kraus
—–
Ed Kraus is a 3rd generation home brewer/winemaker and has been an owner of E. C. Kraus since 1999. He has been helping individuals make better wine and beer for over 25 years.

What’s The Difference Between A Whiskey Barrel And A Wine Barrel?

Toasting Oak BarrelsI was shopping the other day and found some oak chips, made from Jack Daniels Whiskey Barrels. They were being sold as flavor enhancers for barbecues. Could I use these to age my wine? Would they have to be toasted first, or would the fact that they had been used for whiskey aging offset that requirement?

Don — PA
—–
Hello Don,

It is important to know that there are some differences between a whiskey barrel and a wine barrel. Whiskey barrels are process differently that wine barrels. The critical difference being that whiskey barrels are charred on the inside, whereas wine barrels are toasted. Doesn’t sound like much of a difference – I know – but the effects on the flavor are very different.

The reason a whiskey barrel is charred is so that the inside of the barrel staves turn into a charcoal. This charcoal’s purpose is to help take out the harshness of a raw whiskey. In a loose sense, the char acts in the same way a carbon filter works on water. It helps to remove the impurities. This char is also what adds the amber color to the whiskey.

Wine barrels are toasted. The reason they are toasted is so that when the wine is aged in the barrel, flavor is added, not taken out. Shop Wine BarrelsWhen the oak staves are toasted at the correct temperature for the right amount of time, various phenols, sugars and other compounds rise to the surface of the wood to interact with the wine while it ages. Flavors ranging from vanilla, to coconut, to caramel can be coaxed from the wood and into the wine by the degree of toasting the oak wood goes under.

Tannins from the wood also react with the tannins is the wine so as to precipitate them out of the wine as a sediment. This helps to mellow the wine, make it more stable and more clear.

There are some other differences between a whiskey barrel and a wine barrel that are not as critical, but we’ll save them for another time.

Don, going back to your question, you could use these whiskey barrel pieces in your wine, but the effects will be vary different from using actual toasted oak chips that are prepared specifically to be used in a wine.

One thing I would urge you to do is make a serious effort to sanitize these oak barrel pieces. There is no reason to assume they were stored in sanitary conditions if they are to be used for smoking.

shop_toasted_oak_chipsIf I where doing the sanitizing I would soak them in a very strong sulfite solution. I would find a container that could be sealed air-tight and kept full of the sulfite solution, so as to keep the floating pieces of wood submerged by the lid. I would use 2 teaspoons of sodium metabisulfite and 1/2 teaspoon of either citric acid or acid blend to every gallon of water. Let the wood soak for several days. The longer the better.

In short, I see not reason why you couldn’t play around with this wood. Just remember that there are differences between a whiskey barrel and a wine barrel that will result in a very different out come in your wine.

Happy Winemaking,
Customer Service at E. C. Kraus
—–
Ed Kraus is a 3rd generation home brewer/winemaker and has been an owner of E. C. Kraus since 1999. He has been helping individuals make better wine and beer for over 25 years.

How Do I Make More Alcohol In The Wine?

I make wine at home, I do want the wine with more alcohol. But I don’t know how to get this done.

Name: Ketherina D.
State: NY

When it comes to controlling the alcohol level of your wines — regardless of how high or how low — it’s all about the sugar.

Alcohol is made when wine yeast ferments the sugars that are in the wine must. The sugars are converted into both alcohol and carbon dioxide or CO2 gas. (That’s the stuff that makes your soda pop fizzy.) The more sugar the wine yeast has available, the more alcohol it can potentially make.

This concept is all pretty simple up to this point — more sugar, more alcohol — but there are some limits. Wine yeast can only ferment so much alcohol before is slows down and stops completely. Once the alcohol level gets so high, it starts to act as a preservative, inhibiting the fermentation.

Some wine yeast can generally ferment to higher levels of alcohol than others, and vice versa. They are more tolerant of the alcohol, but just as important is the environment that the yeast is thrown into. Things like: temperature, nutrients, oxygen availability, or lack of, all act as variables to the equation of how much alcohol you can end up with with that yeast. It would be safe to say that these variables tend to be more important than the strain of wine yeast you are using.

The reason I’m telling you this is that it is important to understand that when you are trying to drive your alcohol up with more sugar, you can never accurately predict how far the yeast will be able to go. This is a result of all these variables. Usually, you can safely obtain 12% or maybe 13%, but anything beyond this is always in question.

This leads us to your question: how do I make more alcohol? The short answer is, very carefully.

Buy HydrometersYou can start off your fermentation with enough sugars to ferment your customary 12%. The amount of sugar needed for this can be easily determined by a hydrometer. (see: Hydrometer Scales And What They Mean) But the sugars need to get the alcohol level beyond this need to be feed in a little at a time. This is done towards the end of fermentation.

As you see the original sugars begin to run out, you add a little more sugar. As you see that deplete you add more sugar, again. You keep doing it over and over until the fermentation can go no more. Knowing how much sugar is left in the wine must is something that can be done with a hydrometer, so you will need to make sure you have a handle on its use.

I would suggest taking a look at the article, Making High Alcohol Wines. It goes over this process in greater detail. Another article that may be helpful is How Much Alcohol Do You Really Want. I goes into how alcohol effects the character of a wine. So does the blog post, Keeping Fruit Wines In Fruity Balance.

Happy Winemaking,
Ed Kraus
—–
Ed Kraus is a 3rd generation home brewer/winemaker and has been an owner of E. C. Kraus since 1999. He has been helping individuals make better wine and beer for over 25 years.

Low Calorie Beer: Light and Refreshing for the Summer

Low calorie beer for the summerAs summer is nearing an end and we reflect on the last few months, it’s hard to believe we’re closer to the end of 2020 than the beginning.

I don’t know about you, but I couldn’t have made it this far without the help of my tried-and-true friends, Beer and Wine. And though these delightful libations have been great company, the “Quarantine 15” has definitely made its debut. 

For those looking to cut back on the LBs while enjoying the remainder of summertime fun, low-calorie beer (AKA light beer) could be for you!

What is Light Beer?

Light beer has nothing to do with the color of the beer, and everything to do with the calories. 

The main difference between light beer and “regular” beer is the alcohol content. Light beer contains less alcohol, putting the calorie count at less than 100. Average beers normally have more than 100 calories per serving. 

Low calorie beer became prominent in the 70s and was originally marketed to people who enjoy beer, but also enjoy maintaining a healthy lifestyle.

The jury’s still out on whether light beer is truly healthier, but there’s no doubt it contains less calories.

Best Low Calorie Beers:

Here are some of the best low calorie beers and our favorite ways to enjoy them!

Kona Light Bond Ale

  • ABV: 4.2%
  • Calories: 99 per 12oz
  • Style: American Pale Ale

Originating from Hawaii, the packaging gives off a tropical vibe and tropical flavors.

This American Pale Ale pairs well with a spicy dish. We recommend an ahi poke rice bowl to keep with the theme.

Yuengling Light Lager

  • ABV: 3.8%
  • Calories: 99 per 12oz
  • Style: Lager

At 99 calories, Yuengling Light Lager is made from a combination of Cluster and Cascade hops. 

Lager style beer is best served with food made on a grill, such as a classic American burger. Yum!

Dogfish Head Slightly Mighty

  • ABV: 4%
  • Calories: 95 per 12oz
  • Style: IPA

This beer maintains its low calories by using monk fruit instead of regular sugars that creates immense flavoring in the beer. 

IPA’s intense flavor profile is best paired with other strong flavors. Taco Tuesday anybody?

Gen!us

  • ABV: 3%
  • Calories: 79 per 330ml
  • Style: Lager

Gen!us created this 79 calorie beer specifically for those who want to drink “smarter”. It’s available in select UK bars, but you can order this beer online and have it shipped to you. 

Since this is another lager style beer, it’s best paired with a juicy steak.

Tennents Light

  • ABV: 3.5%
  • Calories: 66 per 330ml
  • Style: Lager

Coming in at a shocking 66 calories (!!!)is Tennents Light. This beer originates from Scotland, and is mostly found in European countries. 

If you’re able to get your hands on one of these, try pairing it with a shrimp fettuccine alfredo! 

Whether you believe it’s healthier or not, these brands above are definitely tasty. Give these low calorie beers a try and let us know your thoughts.

Cheers!