Leigh Erwin: A Beginner's Wine Making Journey: Part 8

Wine Bottles Ready For Bottling Homemade WineBottling day is here!  1 month of waiting is finally over!  As excited as I was to bottle my wine, I still wanted to make sure I followed the winemaking instructions and get through everything as thoroughly and correctly as possible.
The first thing I did was I siphoned the wine into my primary fermenter.  Now, the instructions had said to siphon into a carboy, but just like last time, I only had a primary fermenter available and not a second carboy.  I also liked the idea of using the primary fermenter for the bottling the wine instead of a carboy, as getting the wine out through the spigot seemed a lot cleaner and easier to me than attempting to siphon the wine into each wine bottle.
One thing I did not do, which was recommended in the winemaking instructions, was that I did not filter my wine prior to bottling.  First of all, I didn’t have a wine filter, nor did I have any of the proper equipment to do such filtering.  Second and lastly, my wine had become very clear after the stabilization and clarification process, so I didn’t feel like it even needed to be filtered prior to bottling.
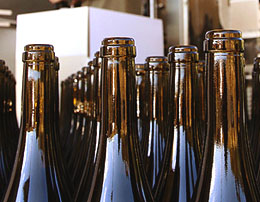
Cleaning and sterilizing the wine bottles was actually pretty easy for me this first time, as I had purchased brand new wine bottles from E. C. Kraus, therefore other than a little cardboard dust, they were very clean already.  I just rinsed them several times in very hot water, then immersed them in the cleaning solution for a few minutes.  Afterwards, I rinsed them again several times, this time with cold water, and then lay them upside down in the dish rack in the kitchen (on some paper towels).  After this, I realized a bottle tree would be a great investment.   Put that on the list!
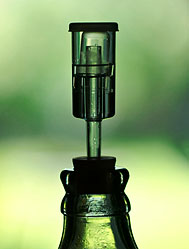
Once the wine bottles were dry, I set myself up underneath the primary fermenter and slowly opened the spigot to fill up one wine bottle at a time.  As far as the corks were concerned, I read some mixed reviews about soaking them versus not soaking them prior to use, and ultimately I decided not to soak them.  It sounds like the soaking of the corks is an old technique that was carried over from home winemaking past, and that it’s really not necessary anymore with all the advances the field has made.  In fact, commercial wineries don’t soak their corks, so why should I?  What I did instead was I quickly rinsed the corks in water to get any dust off of them, and then just pushed them into the wine bottles by hand once the bottle was filled with wine.  I was able to push in the corks by hand, since these corks were the kind that were attached to a little plastic cap on the top, thus making hand corking very easy.
Here is a short clip of me filling my first bottle from the fermenter—you’ll notice a lot of bubbles in there….I did get better at not having it so agitated as the bottling process wore on:

After the bottling process was complete, I ended up with 23 and 1/3 bottles of wine.  If you recall, I did end up losing some wine earlier on in the process due to human error (i.e. I forgot to make sure the spigot in the primary fermenter was in the off position!), but still, I was very happy with the yield that I got.  Every single bottle appeared to me to be as clear as the bottle before, so I’m pretty certain I did things correctly during the clarification and stabilization phase!
After two days, I placed the wine bottles on their sides in a more long term storage position, and then left town for two weeks.  The corks seemed to be holding tight when I left, so hopefully when I come home, I do not come home to a pool of Pinot Grigio all over the floor!
All in all, I have to say this first time making homemade wine was a success!  Only time will tell how it actually tastes, however, just looking at it, it appears as though I did most things correctly.  I’m looking forward to making my next batch of homemade wine!

——————————————————————————————————–
Leigh ErwinMy name is Leigh Erwin, and I am a brand-spankin’ new home winemaker! E. C. Kraus has asked me to share with you my journey from a first-time dabbler to an accomplished home winemaker. From time to time I’ll be checking in with this blog and reporting my experience with you: the good, bad — and the ugly.

My Air-Lock Stops Bubbling!

Wine Air Lock BubblingDuring the 2nd racking of the juice. I have had my Senior Air-Lock sometimes just stop working. What cause’s this? I use water in my Air-Lock’s.
Name: Linda H.
State: Nevada
—–
Hello Linda,
I believe what you are saying is that your wine air-lock stops bubbling, then starts up again. There could be a number of reasons for this, but by far the most likely reason is a temperature change of the wine must.
In order for a wine yeast to ferment it needs to be in a particular temperature range. Most wine yeast feel comfortable at 70° to 75° F. Fermentations that are cooler than this become slow and will even stop completely if too cold. For some wine yeast they can even completely stop bubbling at temperatures of 67° or 68° F.
The difference of the rate of fermentation between 70° and 75° can even be quite dramatic. It can mean the difference of an air-lock that bubbles once a minute or once a second.
So what I believe is happening to your fermentation is that the temperature is fluctuating. When the weather gets cooler and the ambient room temperature gets a little cooler, the fermentation slows down, crawls and then stops. When a spot of warmth comes along, the fermentation temperature rises and the fermentation takes off again.
This begs the question of what you are to do when your air-lock stops bubbling. Obviously, you need to stabilize the temperature of the fermentation, but how? The simplest solution is to provide a heat source to the fermenter. This can be done in a number of ways. The important thing to remember is to make it a mild heat source. It is easy to overdo it, which can be just as bad. Having a fermentation too warm could lead to even worse problems such as mold or bacterial growth.

  • I have found that over the years that if an older-style, 100 watt light bulb is place 1 foot off to the side of a 5 or 6 gallon batch of wine, it will warm it up 8° to 10° F. depending on how cold the room is. You can place if farther away or closer for varying effect. What you do have to watch out for with this method is exposing the fermenting wine to the direct light from the light bulb. Excessive light exposure can oxidize the wine over time, so make sure that it is an opaque fermenter or block the light in some fashion.
  • I have not done this, but I have heard of people using an electric blanket to warm up the fermentation. The problem with electric blankets is that they are way, way too hot. But you could conceivably take a corner of one, on a low setting, and stick it under part of the fermenter. The big issue here is that you don’t know how much of the electric blanket to use, so the risk of getting the fermentation too warm is very real. I definitely would not try this without having a thermometer directly tracking the wine must’s temperature.
  • Fermentation Heating Pad MatFortunately, these days there is a product designed specifically for this purpose. It’s called the Copper Tun Heating Pad. Just like the name sounds, it is a pad that you sit the fermenter on to keep it from getting cold. The heating pad will raise the temperature of the wine must between 10° and 20° F. Since this item has came out, I do not use anything else. It is simple to use and effective.

Beyond these methods remember that you always have the option of moving the fermenter to a warmer room or corner of your home. This is often the simplest action to take when your air-lock stops bubbling.
Happy Winemaking,
Ed Kraus
———————————————————————————————————
Ed Kraus is a 3rd generation home brewer/winemaker and has been an owner of E. C. Kraus since 1999. He has been helping individuals make better wine and beer for over 25 years.

Leigh Erwin: A Beginner's Wine Making Journey: Part 7

Clearing Wine Ingredient KitDay 22!  Otherwise known in the wine making instructions as Stage 4: Stabilizing & Clarification.  Throughout secondary fermentation, I had noticed the wine clearing up quite a bit as the yeast and yeast byproducts slowly sank down to the bottom of the carboy.  I was definitely excited to see just how much more clear the stabilization process actually made the wine!  Would it even work?  One of the first things the instructions said was if the wine wasn’t completely degassed, then the fining agents would not be effective.  How the heck do I know if all the gas is removed?  Whenever I shake or stir the wine, I always see bubbles on the top.  Is that due to bubbles coming out of solution still?  Or just new bubbles from me agitating the beast?  Of course, being the internet sleuth that I am, I looked it up and was assured that the wine will actually never stop bubbling when you stir/shake it, so get over it already and move on!  If I followed the instructions and stirred the wine at least 8 times (which I did!), it should be just fine.  I ended up stirring/shaking the wine a couple extra times anyway, just for good measure.
In the beginning of the stabilization process, I was instructed to add Potassium Sorbate to ½ cup of warm water.  Well, I didn’t know if room temperature would be warm enough, as was the temperature that my bottled water was sitting at, so I washed and sterilized a glass measuring cup, poured in ½ a cup of bottled water into it, and popped it in the microwave for about 45 seconds to a minute.  Then, I added the Potassium Sorbate and mixed it in the water with a sterilized spoon.  Seemed to work perfectly, as the solid Potassium Sorbate almost immediately dissolved into the water at this temperature.
Cloudy Homemade Wine Ingredient Kit
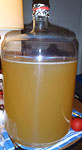
Next, I shook up and added the pouch of Kieselsol to my wine, which came in liquid form.  Basically, it poured in a little thicker than water, and was really easy to work with.  After a nice, solid stir, I closed the carboy back up and left it on a table where it will hopefully remain undisturbed for the next few days!
One other tiny piece of equipment I didn’t have that the instructions recommended was a solid bung to seal up the carboy during this waiting period.  I have a bung, however, it is the kind with the hole in the middle for an airlock.  Hmmmm, what to do about this….should I just go ahead and leave the airlock in?  Or find some other way to close up that hole?  It’s too late for me to buy another bung at this point, so I needed to come up with some solution quickly.  I ended up not feeling totally comfortable leaving the airlock in place, for reasons unbeknownst to me, so what I ended up doing was securing a piece of tin foil over the top of the bung and locking it in place with a rubber band to insure an air-tight seal.  Let’s hope it does the trick!
Close Up Of Wine Ingredient Kit Clearing
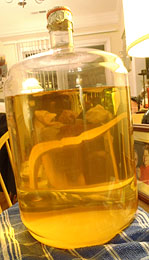
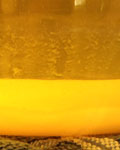
By the end of the night, I was starting to notice the wine clearing up quick a bit already.  I wasn’t expecting it to work its magic this fast, but apparently it does!  One thing I found really cool was that the Kieselsol interacting with the proteins in the wine formed a white precipitate, which then settled down to the bottom of the carboy.  I knew the clarification step had to be working properly, as the wine was starting to get much clearer than it had been at any other stage, and the proteins that had been clouding up the joint were obviously now laying at the bottom of the carboy.  I believe my exact words to my fiancé were: “Look, honey!  It’s science!  Tasty, tasty science!”.  Both of us being scientists, with strong chemistry backgrounds, it was really fun talking to each other about the chemistry behind what we were witnessing in the carboy.
Now, I just let my wine sit for the next 6 days, and then…….BOTTLING DAY!  I’m so excited, and a little nervous, about bottling day.  It has come down to the final step.  Best not screw up now!

——————————————————————————————————–
Leigh ErwinMy name is Leigh Erwin, and I am a brand-spankin’ new home winemaker! E. C. Kraus has asked me to share with you my journey from a first-time dabbler to an accomplished home winemaker. From time to time I’ll be checking in with this blog and reporting my experience with you: the good, bad — and the ugly.

Why Does My Homemade Wine Have A Woody Taste And Woody Smell?

Glass Of Wine That Has A Woody Taste And Woody SmellWhy do some of my wines turn out with a woody smell or taste?
Name: Dina T.
State: Ohio
—–
Dina,
The obvious reason your homemade wines would have a woody taste and woody smell is because it is either being aged in wood, or wood was added during the making of the wine, for example, our French Oak Chips. If you are not doing either of these, then we have to start looking at the not so obvious.
Here are three things to look out for to make sure your homemade wine does not end up with a woody taste or smell:

  • Over Processing the Fruit: When I say over process I am referring to doing things like chopping up the fruit in a blender or food processor of sorts, or even by over chopping them by hand. When thing like these are done too much tannin and other compounds are released from the fruit, giving the homemade wine a dry, toothpick to earthy aftertaste. The fruit only needs to be very coarsely chopped or the skins bursted. Anything more than this is overkill.
  • Not De-stemming the Fruit Completely: The fruit should also be cleared of stems and remnant foliage. For example, in the case of strawberries, core the tops; in the case of grapes, remove away all the stems, etc. These parts have high amounts of tannin that can contribute to the woody flavor and woody smell you are perceiving in your homemade wine.
  • Leaving the Fruit in the Fermentation too Long: The longer the fruit is left in the fermentation, the more the fruit is broken down by the fermentation. In a sense, this is similar to over processing the fruit. More tannin is being allowed to release into the wine with the additional time in the fermenter. The optimal amount of time can vary from one fruit to the next, but the general consensus would b about 5 days. If you want your wine to have a lighter body and be drinkable sooner, then 3 days. If you are looking for a more robust, fuller wine that will take a year or two to age out, then 7 days. But, never longer than this.

I would not dump any of your homemade wines out that have a woody wine taste or woody smell. It is very possible that these wines will improve remarkably with aging. I would suggest giving them some time before making any such decision.
Happy Winemaking,
Ed Kraus
———————————————————————————————————
Ed Kraus is a 3rd generation home brewer/winemaker and has been an owner of E. C. Kraus since 1999. He has been helping individuals make better wine and beer for over 25 years.

Homebrewing Terms Worth Knowing: Part 2

Looking At Homebrewing Terms With A BeerPicking up where we left off in Part 1, here are some more homebrewing terms that might cause some of us to scratch our heads and say, “huh?” Just remember not to let the jargon slow you down. Even without a firm grasp on the terms, you can still make good beer!

  • Grist – Grist refers to the crushed grain that goes into your homebrew. Sometimes you’ll hear someone refer to the percentage of their grist, as in “the grist was made up of 80% Pilsner malt.”
  • Gravity – Gravity is used to describe the amount of sugar in the wort or beer. The original gravity (OG) is the amount of sugar in the wort before fermentation; the final gravity (FG) is the amount of sugar left over in the beer after fermentation. Gravity is measured with a hydrometer and notated in specific gravity (eg. 1.048) or degrees Plato (12). When beers on a menu show their gravity, it usually refers to the OG.
  • Racking – Racking is simply the process of siphoning the beer from one vessel to another, as when moving from primary fermentation to secondary. The goal is to take the beer off of the trub at the bottom of the fermenter.
  • Trub – Trub (pronounced troob) refers to the hops, protein, and other material at the bottom of the kettle or fermenter. In the case of the fermenter, the trub will be made up of mostly dead and inactive yeast cells, but may have some other particulate in there as well. Brewers try to leave behind the trub when moving the wort into a fermenter or racking the beer from fermenter to fermenter.
  • Whirlpool – After the boil, a whirlpool helps to cool the wort more quickly and causes the trub to collect in a nice pile at the bottom of the kettle.
  • Infusion Mash – An infusion mash is the simplest form of mashing, in which the crushed grains are soaked in hot water at a steady temperature. (The other mashing methods are described here.)
  • Saccharification – Saccharification is the process in when starches are converted into sugars. This takes places during mashing. (The root saccharo- means sugar. Yeast, or saccharomyces cervisiae, is the organism which consumes sugar to make beer or wine.)
  • Tannins – Like wine, beer has tannins, too. Tannins can be found in grain and hops and can contribute a dry, astringent mouthfeel. The may or may not be desirable depending on the beer style.

Are there any homebrewing terms you’d like to learn more about? Leave a comment below!
———————————————————————————————————-
David Ackley is a beer writer, brewer, and self-described “craft beer crusader.” He holds a General Certificate in Brewing from the Institute of Brewing and Distilling and is founder and editor of the Local Beer Blog.

Results: Using Fruit Juice In Beer

Glass Of Cherry With Bowl Of CherriesIn October, I brewed a Belgian Cherry Dubbel and experimented with using fruit juice in the beer. To refresh your memory, the beer recipe called for adding one to two pounds of fruit per gallon of beer to the secondary fermenter. The recipe’s author, Randy Mosher, recommended going on the heavy side with the fruit. Since finding 10 pounds of black and tart cherries would have been a challenge (not to mention quite expensive), I opted to use cherry fruit juice instead.
For the black cherries I added one 12 oz. bottle of R. W. Knudsen’s Organic Black Cherry Juice Concentrate. According to the label, this was equivalent to about 4 lbs. of fruit. For the tart cherries, I used a 32 oz. bottle of Whole Foods brand tart cherry juice. I figured this equaled about 3 lbs. of fruit. I mixed a small sample with about two-ounces of the beer and decided the ratio would work.
After about four weeks in secondary, I bottled it up. Two weeks later, I served it at a homebrew festival.
So how did it turn out?
As is often the case, the beer got mixed reviews. (That’s ok — everyone has different tastes!)
Some people loved it. Several people commented on the wonderful cherry aroma. There were a couple guys in particular who were reminded about a certain cherry beer from their home state in New York. They came back again and again for more samples.
On the other end of the spectrum, one gentleman made a nasty face and said, “I’d rather keep fruit OUT of my beer!” And of course there were dozens of people who fell between the two extremes.
For my tastes, I found the beer to be very full-flavored, but a bit fruit forward — probably just young. It had a good balance between sweet and tart cherry flavor, but the beer came off as a little heavy on the caramel malt. I believe this made the black cherry flavor seem more pronounced than it really was. It’s also likely that the fruit juice contributes a more powerful flavor than the whole fruit would have. If I were to brew it again, I would cut back on the caramel malt (limit to ~1 lb. in a five-gallon batch) and reduce the fruit juice by about 25%.
Still, it’s an enjoyable beer to drink (despite a 7.7% ABV) and I expect it to age well. I will stash some bottles and try it again later in the winter. Based on my experience, the fruit flavors will balance out with time. I’d also like to try cooking with some of it. The beer could be reduced into a very tasty cherry syrup, which I imagine would be delicious drizzled over vanilla ice cream and chocolate cake…
In the end, it was a successful experiment that I can take into future batches of beer. As is often the case, this batch will inform every batch from here on out.
Have you ever tried using fruit juice in beer? What did you learn? Share in the comments below!
———————————————————————————————————
David Ackley is a beer writer, brewer, and self-described “craft beer crusader.” He holds a General Certificate in Brewing from the Institute of Brewing and Distilling and is founder and editor of the Local Beer Blog.

Leigh Erwin: A Beginner's Wine Making Journey: Part 6

Racking Wine
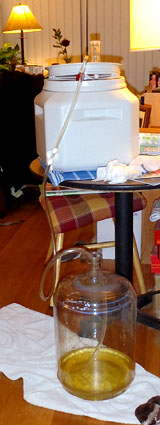
I’ve made it to Stage 3 in the home winemaking process without any problems (that I am aware of as yet anyway! Ha!).  It’s been nearly 3 whole weeks since I got started with the Connoisseur wine making kit from E. C. Kraus, and I am just as excited now as I was then!
As I looked at the directions for the wine making kit, the first thing I had to do for Stage 3, the degassing phase, was to check to see that the specific gravity was below 0.995 with my hydrometer.  Well, if you recall from the end of my secondary fermentation, the wine was already at 0.9945, so I wasn’t too worried about hitting the mark 12 days later!  As expected, the specific gravity at the degassing stage was 0.994, so it looks like fermentation is definitely complete at this point, since the specific gravity value has barely moved in 12 days!
When I first looked at the instructions for the degassing stage, I noticed that it was telling me to siphon my wine into a sterilized carboy.  Uh, wait a second, I only received one sterilized carboy in my kit, and the wine is already sitting in it!  Eek!  Slightly panicked, I asked the good folks at Homebrewing.org what they thought I should do.
Basically, since I did have a primary fermenter that was currently unoccupied, the team at Homebrewing.org advised me to first siphon the wine into the primary fermenter, then clean and sanitize my lone carboy and siphon the wine back into that vessel once that was done.  This way, I still am following the instructions and continuing the home winemaking process in the carboy, AND I got an extra step of agitation in there to help with the degassing!  Sweet!  One day, I will get another carboy, but I don’t really have the space at the moment for much extra!
Now, up until the siphoning of the wine into the primary fermenter as a temporary storage vessel prior to moving it back into the sterilized carboy, everything had gone very smoothly.  Of course, one is bound to make a mistake at some point, and that mistake may very well be a stupid and careless one that could have easily been avoided.  What did I do, you ask?  Well, let me just say, if you ever need to siphon your wine into a vessel that has a spigot, please oh please make sure that spigot is in the OFF position.  Yes, the dummy that I was, I had started siphoning a wine into my primary fermenter with the spigot in the ON position.  A few expletives were spat, but in the end, I don’t believe I lost more than a single bottle.  Really not much in the grand scheme of things, but man, did I feel like an idiot!  I learned my lesson though—double and maybe triple check that everything is secure before pouring precious wine into it!
Well, after the accidentally spilling about a bottle of wine fiasco, everything else seemed to go very smoothly.  I siphoned the wine back into my cleaned and sterilized carboy, then added Potassium Metabisulphite and later Kiesol, all per the instructions I received with my homemade wine kit.  The instructions for this stage ended by having me stir or shake the wine at least 6-8 times over the next two days.  No problem!  I just made sure I thoroughly rinsed the spoon in extremely hot water in between each stirring.  I did not put it in the sterilization solution each time, so hopefully the scalding hot water would be enough at this point.  Nothing funky seems to be growing in the wine anyway, so I think I’m OK for now!
Just two more days until I stabilize and clarify the wine!  It’s getting so close to the end!

——————————————————————————————————–
Leigh ErwinMy name is Leigh Erwin, and I am a brand-spankin’ new home winemaker! E. C. Kraus has asked me to share with you my journey from a first-time dabbler to an accomplished home winemaker. From time to time I’ll be checking in with this blog and reporting my experience with you: the good, bad — and the ugly.

Cooking With Homebrew Beer – 3 Winter Recipes

Chicken With Homebrew Beer Marmalade
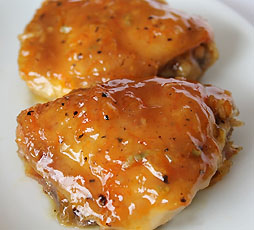
The only thing that might be better than a good homebrewed beer is good food made with homebrewed beer. Put them together this winter for the ultimate homebrew creation!
Here are three recipes for cooking with homebrew beer that will keep you nice and warm this winter – don’t forget to serve with a tasty brew!
Homebrew Beer Marinade
This recipe comes out of my favorite all-around cookbook, The Joy of Cooking. It works great for beef and pork, helping to tenderize the meat and improve flavor. Use it before stir-frying meat or for a standalone meat dish. Keep in mind that hops will come through in the dish if you use a hoppy beer. I suggest a brown ale or porter for the beef or pork. Feel free to tweak the recipe to suit your tastes!
Makes: 1 2/3 cups marinade (good for 3-4 lbs. meat)
Ingredients:

  • 1 1/2 cups (12 oz.) flat homebrew beer
  • 1 tbsp. dry mustard
  • 1 tsp. ground ginger
  • 1/2 tsp. salt
  • 3 tbsp. soy sauce
  • 1/8 tsp. hot pepper sauce
  • 1/4 cup orange marmalade
  • 2 garlic cloves, minced

Directions:
Open a homebrew beer several hours before and allow it to go flat. (You can speed up the process by pouring the beer several times between two glasses.) Combine all ingredients in a bowl and whisk together. Marinate meat for 2-12 hours. Have a homebrew!
25-Minute Bacon Beer Cheese Soup with Chicken
I recently stumbled across this recipe on the Slow Roasted Italian. Beer, cheese, bacon…who could ask for more? The author, Donna Elick, calls for witbier, which should contribute a subtle complexity from the coriander. You might also try a rye pale ale, bitter, or porter.
Makes: 6-8 servings
Ingredients:

  • 6 slices thick cut bacon
  • 1 lb. boneless skinless chicken breast
  • 1/4 cup butter
  • 1/4 cup flour
  • 2 tsp. garlic powder
  • 2 tsp. ground chile de arbol (or cayenne pepper; to taste)
  • 1 tsp. smoked paprika
  • 1 tsp. kosher salt
  • 1 tsp. pepper
  • 1 cup beer, Belgian style wheat beer
  • 1 cup chicken broth
  • 2 cups half and half
  • 8 ounces mild cheddar cheese, shredded
  • 1 teaspoon Worcestershire sauce
  • chives
  • croutons

Directions:
Roughly chop bacon and cook in a large pot until lightly crisp. Cut chicken in 1-inch cubes or smaller. Remove bacon from the pot and reserve, and then cook the chicken in the bacon fat. Remove chicken and reserve. Add the butter to the drippings then whisk in the flour and seasonings. Add the liquid ingredients. Whisk to combine and bring to a gentle simmer. Add cheese and mix until smooth. Add Worcestershire, bacon, and chicken and stir. Garnish with chives and crouton and enjoy with a homebrew!
Alaskan Stout Dessert Glaze
It recently occurred to me that my cherry dubbel would make an excellent sauce for chocolate cake or vanilla ice cream. Although this recipe calls specifically for Alaskan Stout, don’t be afraid to try it with a chocolate stout or other dark beer. Being creative is one of the great rewards of cooking with homebrew beer.
Makes: 12 servings
Ingredients:

  • 1 cup sugar
  • 1/2 cup Alaskan Stout (or any homebrewed stout)
  • 1/2 tsp. crushed coriander
  • 1/8 tsp. cinnamon

Directions:
Mix together ingredients in a medium saucepan over medium heat. Bring mixture to a boil, stirring constantly. As soon as it starts to bubble, turn down heat to low. Simmer for 10 minutes, skimming off any foam that appears. Allow to cool before serving. Serve over ice cream or cake.
Do you have any favorite recipes that involve cooking with homebrew beer? Share in the comments below!
——————————————————————————————————–
David Ackley is a beer writer, brewer, and self-described “craft beer crusader.” He is a graduate of the Oskar Blues Brew School in Brevard, NC, and founder of the Local Beer Blog.

Leigh Erwin: A Beginner's Wine Making Journey: Part 5

Homemade Wine
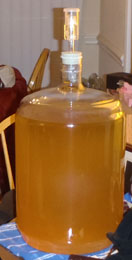
Man oh man, for someone who is used to nearly instant gratification, waiting 12 days for a wine to go through secondary fermentation is killer!  Actually, it’s not that bad, but man, am I really looking forward to the next step or what!
I have about 4 days left to go before I move on to stage 3, the degassing stage.  At this stage, I am supposed to take a reading of the specific gravity with a wine hydrometer and make sure that it is below 0.995.  Well, since the specific gravity after primary fermentation of my wine was hovering right at (or just slightly below) 0.995, I’m confident that it will certainly be below this value after 12 days!
If you saw my video the last time I updated you all on the progress of my wine, you would have seen my secondary fermentation in full force.  Well, 8 days later, the fermentation has slowed down to a turtle’s pace, if not slower!  There were some tiny bubbles at the top of the wine that at first I thought might be flowers of wine, but thankfully these were just bubbles of carbon dioxide and they have all since disappeared.  It’s also been really neat to see the wine yeast slowly but surely settle down to the bottom of the carboy, and the wine on the top slowly clearing up.  I can’t quite see all the way through it yet, however, it’s a lot clearer than it was at the beginning of secondary fermentation, so I’m hoping that after stage 4 (stabilization and clarification), the wine will be really nice and translucent.
As I’ve been waiting for my wine to go through secondary fermentation, I’ve been reading ahead in the instructions to prepare myself for the next few steps, and to be sure I have all the equipment I’ll need to do so.  If not, I’ll have to put in a quick order and get the items shipped to me ASAP!  In a few days from now, I’ll move on to step 3, the degassing stage.  Reading through the instructions, I noticed that I’m supposed to siphon my wine into another sterilized carboy.  Wait, what?  The wine kit only came with one carboy and one primary fermenter.  What am I supposed to do here?  Can I just siphon it into the primary fermenter?  Does it have to be a carboy?
Well, not wanting to leave things up to chance, I went ahead and sent a message to the lovely folks at Adventures in Homebrewing and got a quick and very helpful reply.  Basically, I could do two things: 1) I could purchase another carboy; or 2) I could siphon the wine temporarily into the primary fermenter, wash and sterilize the carboy that I had just used for secondary fermentation, and the siphon the wine again from the primary fermenter back to the carboy.  Not only will I finish the step as instructed (i.e. in a carboy), but I will have also added an extra gassing step that will help to further remove any carbon dioxide that may be floating about.  Nice!
Now, eventually I do plan on purchasing more carboys and expanding my hobby of home winemaking, however, due to my current living situation (i.e. living in a tiny 2 bedroom condo with two dogs, one cat, and one human), I really don’t have the space for another sizeable piece of equipment.  So, this time around, I will heed the second piece of advice from the folks at Adventures in Homebrewing and will do an extra siphoning step to get my original carboy cleaned and sterilized and ready for use again.  We are anticipating a big move next fall (into a “real” house!), so at that point is when I will begin expanding my home winemaking equipment and will start to invest in some more carboys and whatnot.
If any of you are following along with me and trying out home winemaking for the first time, I hope you’re batches are going just fine and dandy!  Please feel free to reach out and ask for help if you need it—you don’t want to risk ruining an entire batch of wine, throwing away time, money, and effort, just because you were too afraid to ask questions.  As I’m continuing to learn, the home winemaker crowd is very kind and extremely helpful, and so far as a newbie, I’m having a blast and have been made to feel like I am one of the group already!
Next time I talk to you I will have completed the degassing phase!  Wish me luck!
Cheers!

——————————————————————————————————–
Leigh ErwinMy name is Leigh Erwin, and I am a brand-spankin’ new home winemaker! E. C. Kraus has asked me to share with you my journey from a first-time dabbler to an accomplished home winemaker. From time to time I’ll be checking in with this blog and reporting my experience with you: the good, bad — and the ugly.

Winemaking Terms You Should Know: Part 6

Man Reading Winemaking TermsIn several earlier posts, we introduced a few home winemaking terms that you may or may not be familiar with.  There are many terms to learn in home winemaking, and this post, like all the previous posts, gives you a short introduction to a few of those terms to help you get started in home winemaking, or perhaps brush up on some of the terms you may not have seen in a while. Today we’ll explore some of the lesser known terms used throughout the winemaking world.

  • Doble Pasta – Doble Pasta?  Is that some sort of newfangled recipe that the foodies are making these days?  Actually, Doble Pasta is a Spanish term used in winemaking to refer to the process of macerating a wine with 2 times the ratio of skins to juice as normally would occur during the maceration process.  Basically, you start off the maceration process normally, then bleed off some of the juice in order to increase the skin to juice ratio in the tank.  The process of Doble Pasta effectively increases the polyphenolic content of the finished wine.
  • En Tirage – No, not entourage; en tirage. En Tirage is a French term used in sparkling winemaking to refer to the period of time when the sparkling wine is in contact with the lees while in the bottle during the secondary fermentation process.  The term “en tirage” translates to “in pulling”, which you can think of in terms of the pulling or extracting of flavors, aromas, and complexities from the lees into the developing sparkling wine.
  • Estufagem – Moving over to Portugal now, “estufagem” is a Portuguese term used in the process of making Madeira wines where the Madeira is heated in ovens (“estufas”) and subsequently cooled to produce unique flavors, aromas, and complexities in the finished wine.
  • Dopplestück, Stück, Fuder, Halbstück, Halbfüder, Viertelstück – These are all German terms for oak barrels with the capacity of 635, 317, 265, 159, 132, and 80 liters, respectively (that’s 2400, 1200, 1000, 600, 500, and 300).  All you really have to know is that a Stück barrel holds 317 gallons (1200 liters) and a Fuder barrel holds 265 gallons (1000 liters), then all you need is a basic math skills.  Think of “Dopplestück” as “double stuck”, and just multiple the capacity of a Stück barrel by 2 (317 x 2) = 634 (close enough). Think of “Halbstück” as “half stuck”, and divide the capacity of a Stück barrel by 2 (317 ÷ 2 = 158.5).  Similarly, think of “Halbfüder” as “half fuder”, and divide the capacity of a Fuder barrel by 2 (265 ÷ 2 = 132.5). You don’t even have to speak German to figure this out!

— Other Winemaking Terms You Should Know:
Part 5
Part 4
Part 3
Part 2
Part 1
———————————————————————————————————
Ed Kraus is a 3rd generation home brewer/winemaker and has been an owner of E. C. Kraus since 1999. He has been helping individuals make better wine and beer for over 25 years.