
 There are many debates in the home brewing world: extract vs. all-grain, fly vs. batch sparge, one- vs. two-stage fermentation. Today, let’s consider a topic that doesn’t get talked about very much – the impact of your home brewing equipment on beer quality and the home brewing experience.
Among some of the reasons people quit homebrewing are the various challenges, the time commitment, and the quality (or lack thereof) of the beer they make. A brewer’s choice in equipment can go a long way towards alleviating these problems.
In this three part series, I will review some of the home brewing equipment upgrades that will make your brewing hobby easier, less time consuming, and better suited for producing high-quality beer on a consistent basis. We’ll even find that some items help out in more than one area.
For starters, here’s a home brewing equipment list we’ll review that makes brewing your own beer a little easier…
Home Brewing Equipment That Makes Brewing Easier
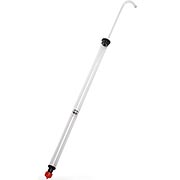 Auto-siphon – The auto-siphon was one of those common-sense upgrades that after I got one, I couldn’t believe I hadn’t done it sooner. It eliminates having to suck on the end of your racking hose or try other tricks to get the flow started. Just a pump or two on the auto-siphon and you’re transferring from one fermenter to another! We carry a 3/8” auto-siphon, a 1/2” auto-siphon, and a mini auto-siphon for one-gallon jugs.
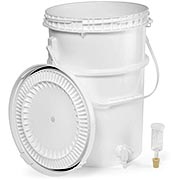
Fermenter with spigot – Eliminate the need for siphoning all together with a fermenter with a spigot at the bottom. Just hook up your clean, sanitized racking hose and open the spigot to start racking.
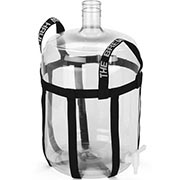
Carboy carrier – A carboy full of beer or wort weighs upwards of 40 pounds, more if it’s made of glass. Save your back and reduce the chance of dropping the carboy with a Brew hauler carboy carrier. The glass carboy handle is a nice piece of home brewing equipment for moving empty carboys.
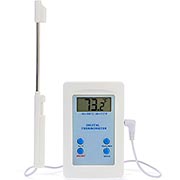
Digital thermometer – No more squinting at the little dial, no more guessing whether your meat thermometer is accurate or not. A good digital thermometer gives readout in a matter of seconds and is accurate within one degree Fahrenheit.
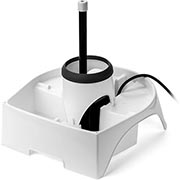
Keg/carboy washer – Cleaning the inside of a keg or carboy can be tricky. Eliminate the hassle and get a better clean with Mark’s Keg and Carboy Washer – it saves water too! Another good option is the carboy and bottle washer.
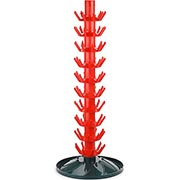
Bottle tree – Easily dry your homebrew beer bottles with a bottle tree. It saves space and it’s effective. We carry 45-count bottle trees. Home brewing equipment like this is a must, when space is an issue.

Homebrew calculators – Though not equipment per se, you can build recipes and figure out the stats on your beer with homebrew calculators. Plus they’ll help with calculating how much priming sugar to use, correcting hydrometer readings for temperature, and a number of other homebrew calculations.
So there it is, a home brewing equipment list for your review. What kinds of equipment make your brew day easier?
————————————————————————————————————————–
David Ackley is a beer writer, brewer, and self-described “craft beer crusader.” He holds a General Certificate in Brewing from the Institute of Brewing and Distilling and is founder and editor of the Local Beer Blog.
Leigh Erwin: A Beginner's Wine Making Journey: Part 22
 Just when I thought I was having all the good luck in the world….
….my first “disaster” in winemaking!
Well, I suppose I can’t call it a disaster yet, as I still think the wine might end up being OK in the end, but alas, only time will tell.
What went wrong, you ask? Well, in two words: structural failure.
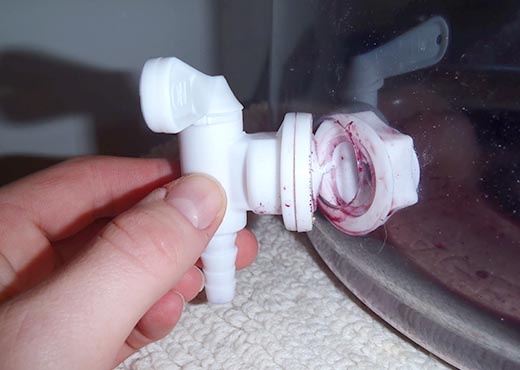
OK OK, so I was checking on my Carmenere wine as I was getting ready for my day job, as I knew that evening I wanted to move forward with the next step and rack it into a new carboy (and by new carboy I mean same carboy, just cleaned and sterilized). Everything was looking great, until I noticed a teeny tiny little drip drip drip behind the spigot. Recall: earlier I purchased a plastic carboy with a hole drilled out for a spigot, which I subsequently placed in the hole myself.
The drip was very curious, particularly since it JUST started and the wine had been sitting in there for 10 days or so by that point. Odd. I figured I could just place a towel under the spigot, go to work, and then immediately rack the wine into the primary fermenter to give me a chance to attempt a fix at the leak and get the wine racked back into the carboy.
So, I fiddled with the spigot a little bit thinking that it was not tight enough and it started leaking a bit faster. Very concerned that I would be gone too long to allow a leak that fast, I decided to quickly rack the wine into the primary fermenter right then and there. I hooked up the hose and started racking away. All was going well until I decided to fiddle with the spigot a little more. That was a BIG mistake. Turns out, it was plenty tight enough. Actually, it was TOO tight and my fiddling with it BROKE the spigot. Wine spilled all over! A few expletives were shouted but “fight or flight” kicked in and I stopped the massive leak and managed to get the rest of the wine racked into the primary fermenter.
In the end, I estimate I only lost about a bottle or so worth of wine, so it actually was not as big of a loss as I originally thought it would be based on the “carnage” I saw. My main concern has to do with potential contamination. In the heat of the moment, I wasn’t able to do as thorough a sterilization of the equipment as I would have done normally. Thankfully, after the last time I used the stuff, I thoroughly cleaned and rinsed the equipment with scalding hot water, so hopefully I had that working in my favor. I did manage to “toss in” a little bit of the sanitization solution (sulfites) into the primary fermenter before the fast transfer, so hopefully I did enough to prevent any contamination.
So, since I didn’t have another carboy, the Carmenere is now chilling out in the primary fermenter with the oak cubes, and other ingredients that were listed on the next steps after racking. As a result of this, there is a ton more head space than there would have been if it were in a carboy, so I’m trying real hard to keep the lid closed and not open it again until bottling day.
Lessons learned: DON’T install plastic spigots onto plastic carboys too tightly. Also, always be prepared for an emergency and pre-clean/sterilize all equipment even if you don’t think you’ll be using it any time soon.
Next steps: secure either a new spigot or a new carboy. Or both.
Hopefully no more drama for a while!
————————————————————————————————————-
 My name is Leigh Erwin, and I am a brand-spankin’ new home winemaker! E. C. Kraus has asked me to share with you my journey from a first-time dabbler to an accomplished home winemaker. From time to time I’ll be checking in with this blog and reporting my experience with you: the good, bad — and the ugly.
Leigh Erwin: A Beginner's Wine Making Journey: Part 21
 Hi everyone!
Just checking in with you regarding the progress of my CellarCraft Carmenere wine kit! On day 10 after starting primary fermentation, I checked the specific gravity and it was 0.998. The instructions said that the specific gravity should be less than 1.000 in order to move onto the next step (secondary fermentation), and since the specific gravity of my wine was 0.998, then I decided I was all set to move forward!
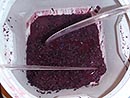
I have to say the longest part of the whole process of setting up secondary fermentation was definitely removing the grape skins and oak chips that had been stewing in the must over the past 10 days. As I mentioned in a previous post, I decided to not use the mesh bag to hold all the skins, since some home winemakers feel as though having the skins loose in the must will result in greater flavor/phenolic extraction. Though I have no basis to compare, I agreed with these folks and decided to let my “skins run free” so to speak.
The down side to letting the grape skins be loose in the must is that it takes forever to fish it all out! I basically just sterilized a very large spoon and scooped away! Per the instructions, I tried to be gentle so that I wouldn’t stir up any of the “stuff” on the bottom of the carboy, so it took longer than if I just went to town on those grapes haphazardly. Even though I was careful, I definitely splashed a little bit—really only enough to get little purple dots on my clothes. Good thing I have a lab coat to get messes on!
 After siphoning the de-skinned wine into a sterilized carboy, I was pleased to see that the level of the wine was in exactly the same place as the level of the wine in my second batch of wine (which is still chillin’ out in its carboy, by the way). It made me feel as though I did a good job of sealing the first carboy, as it doesn’t look like I have lost any wine to evaporation (at least not enough for me to tell the difference).
Speaking of that second batch of wine, in case you haven’t read any of my previous posts, it is the Pinot Chardonnay that I made using individual ingredients. It’s been hanging out in its carboy for nearly two months now (per the instructions) and has cleared up a bit. It’s still not as clear as my first batch of wine was after I added clarifying agents, when it comes time to rack again, I might go ahead and add some clarifying agents to this batch to get it to clear up even more. I still don’t have a wine filter, so I’ll want to at least add some clarifying agents to avoid having a cloudy wine.
Next on my schedule is to clear the Carmenere wine, add wood chips, and let hang out for a couple more weeks. Then a few days later, I’m scheduled to rack the Pinot Chardonnay wine, and will likely add some clearing/clarifying agents to that as well for a couple days prior to bottling.
Hope all your homemade wines are carrying on nicely!
————————————————————————————————————-
My name is Leigh Erwin, and I am a brand-spankin’ new home winemaker! E. C. Kraus has asked me to share with you my journey from a first-time dabbler to an accomplished home winemaker. From time to time I’ll be checking in with this blog and reporting my experience with you: the good, bad — and the ugly.
Winemaking Terms You Should Know: Part 9
 In several earlier posts, we introduced a few home winemaking terms that you may or may not be familiar with. There are many terms to learn in home winemaking, and this post, like all the previous posts, gives you a short introduction to a few of those terms to help you get started in home winemaking, or perhaps brush up on some of the terms you may not have seen in a while.
- Acid: Acid is one of the key components of wine, and it is very important to maintain balance between the acid and other components of the wine (i.e. sugar, alcohol, etc). The acid in wines comes from the natural acid present in the grapes, and sometimes from various fruit acids added to the wine throughout the winemaking process. If there is not enough acid in your wine, it’s going to taste flat. You’ll want to remedy this by adding an acid such as tartaric acid. Alternatively, if there is too much acid in your wine, it will taste rather tart and tangy, and overall an undesirable experience for most.
- Geranium: The plant? Well, sort of…if you smell geranium in your wine, you may have a problem. The distinct geranium odor is a result of spoilage caused by potassium sorbate. Sorbic acid is often used in concert with potassium metabisulfite to protect against fungal infection. It is important to note that you should never add potassium sorbate to a wine that has gone through malolactic fermentation, as the sorbate will react with the lactic acid produced from malolactic fermentation, creating a rancid odor reminiscent of geranium plants. You don’t want this to happen, as there isn’t a real fix for the fault. Be careful!
- Browning: What does it mean if your wine turns a shade of brown? Browning basically indicates that some of the phenolic compounds in your wine have been oxidized. Take care to prevent this by using the proper fermentation and storage techniques, and consider adding some sulfites such as Campden tablets or potassium metabisulfite into your wine for protection against this undesirable reaction.
- Clarity: No, this isn’t that time when you finally figured out what you were doing wrong and have a moment of clarity, this is a term used to describe the absence of cloudiness or sediment in wine.
- Flocculation: Gesundheit! Oh, sorry, I though you sneezed. Flocculation is defined as the process where some yeasts stick to one another, particularly during the shift between the exponential growth phase to the stationary growth phase. The more the yeast flocculate, the quicker they will settle out of the wine after a fermentation.
- Hot: We’re not talking about hot spiced wine here, but instead “hot” is a term to describe the taste or sensation noticed when a wine is too high in alcohol. Yes, there is such a thing as too much alcohol. Not only wines that are too hot, burn, but they also take the wine out of flavor balance.
———————————————————————————————————
Ed Kraus is a 3rd generation home brewer/winemaker and has been an owner of E. C. Kraus since 1999. He has been helping individuals make better wine and beer for over 25 years.
Leigh Erwin: A Beginner's Wine Making Journey: Part 20
 Hi everyone! Leigh here!
I’m so excited to report to you all today as I’ve finally started batch #3 of my very own homemade wine! In case you didn’t read previous entries of mine, I’ll just remind you that several weeks ago I purchased a new home winemaking kit from ECKraus. Specifically, I purchased the Cellar Craft Showcase Red Wine – Chilean Carmenere. This is my first red wine I’ve tried to make in my new home winemaking practice! I’m glad I decided to go with a kit on this one and not try to figure out how to do it myself—there are a lot more steps needed during red winemaking, and since I have never made a red wine before, I wanted to make things as easy for me as possible. Having all the necessary wine making ingredients all in one place and detailed point-by-point instructions sounds pretty easy to me!
One thing I did a little differently this time compared to my previous two batches of wine was that instead of using bottled water, I used previously boiled tap water. I checked the water quality report of my city’s water, and it appeared as though chlorine levels were within the acceptable range. Even though these levels were “normal” and I could not smell any chlorine in the water, I decided to boil it just to be extra certain. Before I used the water, I let it cool down to an appropriate temperature so as to not kill the yeasts, so hopefully that’ll all work out for me.
Another thing I did differently in terms of what was recommended in the wine making instructions for the winemaking kit, was that I used my 6 gallon primary fermenter instead of the recommended 8 gallon fermenter. Based on the final level of the must after adding the crushed grape packet, my wine was still technically below the top of the fermenter, and in fact was only slightly higher than it had been for my previous batches of wine. I only hope that fermentation doesn’t go completely crazy and overflow with foam in the tight quarters, but I was willing to take that risk instead of buying another fermenter. Recall, I plan to purchase glass fermenters in the future, but space is extremely limited in my place right now, so I want to avoid purchasing new (large) items until that situation changes.
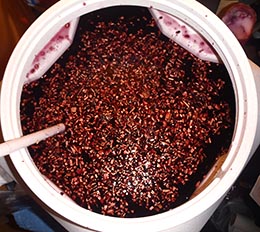
In regards to the crushed grape pack, the instructions said to put the pack into the supplied mesh bag, though a side note mentioned that some customers liked to put the pack directly into the fermenter without the protection of the bag. Putting the pack directly into the fermenter instead of into a mesh bag first may improve the color and flavor extraction of the grapes into the must and ultimately the finished wine. I decided to take this approach, and I did NOT put the grape pack in a mesh bag but instead squeezed it all in loosely. Side note: does this crushed grape pack remind anyone else of jelly? Because that’s all I could think about when squeezing out the contents into the fermenter!
Finally, I measured the specific gravity when it was instructed, and it turned out to be 1.098 (without temperature correction). I also measured the specific gravity 24 hours later, as the instructions mentioned this may be a more accurate reading, and it turned out to be 1.100 (without temperature correction). Looks like I’m off to a good start! Now I just need to stir the must at least once per day until Day 10 (secondary fermentation) and I should be good to go!
————————————————————————————————————-
 My name is Leigh Erwin, and I am a brand-spankin’ new home winemaker! E. C. Kraus has asked me to share with you my journey from a first-time dabbler to an accomplished home winemaker. From time to time I’ll be checking in with this blog and reporting my experience with you: the good, bad — and the ugly.
3 Easy Homebrew Beer Chicken Marinades!
 Before you fire up that grill this summer, consider using one of your homemade beers for a homebrew chicken marinade. Marinating chicken and meats in beer go a long way towards making them extra tender, juicy, and flavorful. Many different beer styles will work, but I’ve had the best results from brown ale, porter, pale ale, and witbier. Here are three homebrew beer chicken marinade recipes to try!
Grilled Beer Marinated Chicken Recipe with Spices and Lime
(via PicturetheRecipe.com)
Ingredients:
- 8-10 chicken drumsticks
- 1/4 cup olive oil
- 1 tsp onion salt
- 1 tsp paprika
- 1/2 tsp ground cumin
- 1/4 tsp cayenne pepper
- 1/2 tsp ground black pepper
- 3/4 cloves garlic
- juice from 1/2 a lime
- 1 cup beer (use a homebrew!)
- handful of chopped fresh parsley
- salt to taste
Directions:
- Mix together all ingredients except the chicken in a large bowl.
- Add the chicken to a baking dish or plastic bag and pour the marinade over the chicken.
- Marinate in your refrigerator for at least two hours, or overnight.
- If needed, turn the chicken periodically to make sure it all gets some time to marinate!
- Grill the chicken for 25-30 minutes or until done. Discard the marinade.
- Enjoy with a homebrew!
Italian Garlic and Herb Beer Marinade for Grilled Chicken
(via theslowroastedItalian.com)
 Ingredients:
- 1 12-oz bottle dark ale (try a porter or stout)
- 1/4 cup olive oil
- 6 large cloves of garlic, smashed
- 1/4 cup lemon juice
- 3 tbsp fresh lemon basil (or 3 teaspoons dried)
- 1 tbsp fresh oregano (or 2 teaspoons dried)
- 1 tbsp fresh thyme (or 1 teaspoon dried)
- 2 tsp kosher salt
- 1 tsp freshly ground black pepper
- 4-5 lbs boneless skinless chicken breasts, trimmed and washed
Directions:
- Place the chicken in a zip-lock plastic bag or large baking dish.
- Mix together all the remaining ingredients (except the beer) in a blender or food processor. Set aside 1/2 cup of the marinade.
- Pour the larger portion of the marinade plus eight ounces of beer over the chicken and marinate in your refrigerator for up to 24 hours. If needed, turn the chicken periodically to make sure it all comes in contact with the marinade.
- Before grilling, allow the chicken to come to room temperature by removing it from the fridge 30-60 minutes before grill time.
- Grill the chicken for 25-30 minutes or until done, using the reserved 1/2 cup of marinade for basting.
- Enjoy with a homebrew!
Beer Marinated Chicken Thighs with Garlic, Spices, and Cilantro
(via SimplyScratch.com)
 Ingredients:
- 2 lbs. boneless, skinless chicken thighs
- 2-3 cloves of garlic, pressed through a garlic press
- 1 tsp ancho chile pepper
- 1 tsp cumin
- 1/2 tsp cayenne pepper
- 1/2 tsp cinnamon
- 1 tsp kosher salt
- 1/2 tsp fresh cracked pepper
- 2 tbsp fresh cilantro, chopped
- 1 cup homebrewed beer (try a brown ale or witbier)
- 2 tbsp sesame seed oil
- Juice from half a large lime
Directions:
- Mix together all the ingredients except the chicken in a large bowl.
- Add the chicken to a baking dish or plastic bag and pour the marinade over the chicken. Marinate in your refrigerator for at least two hours, or overnight.
- If needed, turn the chicken periodically to make sure it all gets some time to marinate!
- Grill the chicken thighs for 4-6 minutes per side until done. Discard the marinade.
- Enjoy with a homebrew!
Here’s another blog post for homebrewers who like to cook: How to Make Spent Grain Bread
Do you enjoy cooking with homebrew? What are some of your favorite recipes?
————————————————————————————————————-
David Ackley is a beer writer, brewer, and self-described “craft beer crusader.” He holds a General Certificate in Brewing from the Institute of Brewing and Distilling and is founder and editor of the Local Beer Blog.
All My Homemade Wines Are Too Dark And Taste Awful
 Ed, I have made approximately 15 batches of wine from wine kits (mainly California Connoisseur, but also Cheeky Monkey, and KenRidge Showcase). The majority has been Sauvignon Blanc.
Only 2 batches turned out well. One in particular was outstanding. Both were CA Conn. For all of the others, I have had to struggle to drink the wine, and have thrown the majority out. I have no idea why the 2 turned out well and why the others didn’t. I am encouraged by many to give it up, so I want to reach out to you for a solution before further considering that unfortunate option.
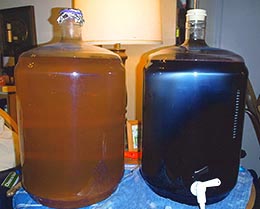
Here is the outcome. Firstly, the white wine is a bit dark in color, but I can live with that, although it may help to diagnose the real problem, which I think is acidity. The balance is awful!
I have tried using my city water. I used my pool testing equipment and believe the PH is approx. 8.2, way too high.
I have used bottled Sparkletts purified water and the PH is approx. 6.8, a little low. I later discovered that this may be the same as reverse osmosis, which I know you do not recommend, even though the wine maker recommends it.
In both cases the Specific Gravity gets down to approx. 0.94, so it appears that the yeast is healthy and doing its job. But in both cases, the acidity, taste, and balance is terrible.
Here are some additional facts:
1. I clean and sterilize everything.
2. The fermentation temp is 68-74.
3. I follow the kit instructions.
Do you have any solutions? My only other thought is to mix the city water and purified water to get the PH closer to 7.0. but if this is the problem and such a sensitive issue, I would think that many wine makers would share this experience and there would be warnings on all of the kits advising people to make SURE that the starting PH is neutral. Would it help if I sent you a bottle to test and taste to diagnose the problem?
Many thanks in advance. Regards
Name: Mike M.
State: AZ
—–
Hello Mike,
So sorry to hear that you are experiencing such results with so many wines. I would love to get to the bottom of this to see what is going on. The results are unusual in the sense that most customers rarely have a batch they don’t like, much less, dump down the drain, so I fear there may be some fundamental issues at the core of all of this.
While there are certain situations where water can be the problem, this is highly unlikely to be the case. Not only because of the pH’s you have mentioned, but also because of the fact that have used two different sources of water with the same results. Most of the time when water is the problem it is because of some extreme issue, such as the water coming from a private well and such. As you mentioned, if the pH’s you used were problematic there would be much more noise on the internet and elsewhere about it. That’s just not the case.
I do not know if there is any truth behind what I’m going to say, but I have a gut-feeling as to what is going on. What I’m about to say is all based on what I’ve seen before while helping thousands of other home winemakers, so I’m going to go out on a limb a little bit.
I believe that your wines are becoming contaminated with a bacteria.
There are two reason why I think this:
- You stated that your wine’s are a little darker than normal. This is not a indication that you have a bacterial contamination, in of itself, but it is an indication that there has been too much air exposure to the wine. Oxygen is catalyst that promotes the growth of bacteria.
- You also feel that the acidity of the wine is out of balance. Nothing from the water pH’s you mentioned indicates that acidity would be a problem, and the wine kits, themselves, are carefully balanced for acidity. This is true regardless of whose brand of kit you buy. But, having a bacterial contamination would raise the acidity level of the wine. This is a natural byproduct of a bacterial fermentation — a rise in acidity.
Both oxidation and bacteria growth fit together nicely into the information you have described above.
Having said all of this, I do not believe this is going on because you are not clean or do not use sanitary measures. It is more likely that some piece of equipment you are using has a nook or cranny, or hidden place where the bacteria is hiding between uses. This is evident by the fact the you are have such consistently bad results. The bacteria could be hiding behind a backing-nut of a fermentation faucet, or a piece of hose you have been using that hasn’t been getting completely sanitized all the way through.
I have also seen situations where pickling or vinegar making has been made near the wine making area. The bacteria used to make vinegar is called acetobacter. It can go airborne and land on different surfaces, including walls and ceilings, only later to fall directly into the wine.
Once some of the bacteria gets into the wine, the oxygen combined with the available nutrients provide the perfect storm of bacterial growth.
If your wines are experiencing a vinegar contamination, you will notice an off-odor in the wine. It may not be that strong, but will have a whaff of nail polish or paint thinner. If it is a bacterial contamination other than vinegar — a more wild bacteria — it could have odors ranging from barnyard, to sour milk, to sauerkraut. There are many, many different kinds of wild bacteria.
What I would do before starting another batch is to take all your wine making equipment completely apart and sanitize it with something like Cleanpro SDH or Basic A. Take all the faucets off the fermenters. Take the rubber stoppers off the air-locks.
If you are making your wine in a basement with exposed floor joists and such, I would spray it down with a bleach solution consisting of 1/4 cup of bleach to 1 gallon of water. Just one light spray is sufficient.
When making your next wine, reduce the air exposure — particularly after the fermentation has completed. When bulk storing the wine, keep the head-space to a minimum. When racking the wine, don’t splash it around. Fill the container from the bottom up, with the hose all the way down to the bottom of the container.
Mike, I hope this helps you out. Just realize that there is something fundamentally wrong that probably has a simple solution. It’s just a matter of identifying what’s happening and correct it.
If you do not smell any off-odors or smell something different than what was described above, please let us know, so that we can hone in on the root cause.
Best Wishes,
Ed Kraus
———————————————————————————————————
Ed Kraus is a 3rd generation home brewer/winemaker and has been an owner of E. C. Kraus since 1999. He has been helping individuals make better wine and beer for over 25 years.
Why Does My Fermented Wine Have A Sulfur Taste And Smell?
 I recently made a Pinot Noir and all was great until just prior to bottling. I tasted throughout the fermenting process and was pleased with the taste, but a sulfur smell/taste developed just prior to bottling! What did I do wrong?
Name: Scott
State: California
—–
Hello Scott,
Sorry you are having such a problem with your wine. I know it can be upsetting when all seemed to be doing so well.
There are a several common issues that can cause your wine to have a sulfur taste and smell after it has fermented. Here are the 3 most common reasons that match up with your situation:
- Adding too much sulfite to the wine. This would either be in the form of potassium metabisulfite, sodium metabisulfite or Campden tablets. If normal sulfite dosages are used this is not likely to be the cause, but if too much sulfite is accidentally added, it could be why you are experiencing this taste and smell in your wine. You can use a Titrets and the Titrettor Hand Tool to determine how much free sulfur dioxide is in the wine, but this will not tell you how much bound sulfur dioxide is in the wine. The permanently bound sulfite can build up over the winemaking process if to many doses of sulfites are added to the wine, whereas the free sulfite can leave as a gas if given the opportunity. Here’s some more information free and bound sulfites in your wine. If you used no more than 3 or 4 sulfite doses throughout the winemaking process your wine will not be suffering from this. Most of the time, simply aging the wine will completely rid the wine of this fault, but in some extreme cases aging may not be enough. If you still experience a sulfur taste or smell upon decanting the wine, then pour the wine in a carafe and let is set for an hour or so before drinking. This will greatly help to reduce this wine fault.
- Putting the yeast under stress. If the fermentation did not completely ferment all the carbohydrates, it could be a situation where the fermentation started up again due a change in the wine’s environment. This would be something like: new oxygen exposure through racking; warmer liquid temperature —something that made the wine yeast want to come out of their dormant state and start fermenting again with less than optimal conditions. If the fermentation starts up again under stress then excessive amounts of hydrogen sulfide can be the result. There are other stressful situation the wine yeast could have been in during the original fermentation, but if that were the case, you would have noticed the sulfur taste and smell before now.
- Wine sat on the sediment to long. The sediment is made up mostly of yeast cells, both dead and dormant. If the sediment stays in the wine too long you can start to experience the effects of autolysis. This is where yeast cell start to consume other yeast cells — a cannibalization of sorts. In advanced cases of autolysis you will experience a sulfide odor and off-taste. This is somewhat related to number 2, above, in the sense that you can have a stressful reawakening of the wine yeast while it lays at the bottom as sediment. If both of these scenarios happen, you are much more likely to have a hydrogen sulfide issue.
If you feel that your wine has experienced either stress or autolysis, then the first step would be to rack the wine into another container in a splashing manner. This will give opportunity for the hydrogen sulfide to the leave the wine as a gas. You can also use a De-gassing/Mixing Paddle to help speed up the process.
If the effects still exist after racking or de-gassing the wine a couple of times, then you may want to rack the wine over some sanitized copper. The copper contact will cause the hydrogen sulfide to leave more readily.
Scott, I hope this information helps you out. Just realize that having a sulfur taste and smell in your wine is a fault from which your fermented homemade wine can recover.
Best Wishes,
Ed Kraus
———————————————————————————————————
Ed Kraus is a 3rd generation home brewer/winemaker and has been an owner of E. C. Kraus since 1999. He has been helping individuals make better wine and beer for over 25 years.
Leigh Erwin: A Beginner's Wine Making Journey: Part 19
 Hi everyone! Is winter over yet? I don’t know how it is where you are, but Mother Nature sure seems confused this winter! I’m ready for spring, for sure!
Lately I’ve been pondering the idea of water. Specifically, when it comes to home winemaking, what’s the best kind of water to use?
The first two batches of wine I made (the Pinot Grigio and also the Pinot Chardonnay), I utilized bottled spring water. I really didn’t want to keep buying gallons upon gallons of water from the store for many different reasons, including 1) extra costs and 2) adding to the pile of plastic in our landfills. While I try to control what gets recycled in my house and what doesn’t, I really can’t control where the plastic actually goes once it leaves my hands. But I digress…
For my next batch of wine, I want to see if I can just use my tap water. Doing a search on the ECKraus blog, I found question that was posed from a beginning winemaker regarding using tap water in winemaking. Specifically, the reader asked: “Is it OK to use tap water to make this wine kit?”. The folks at ECKraus responded that for most urban areas, the tap water is fine to use. Basically, the biggest issue with using tap water in winemaking is the chlorine that is added during the treatment process in order to control for bacterial growth. If there is too much chlorine in the water, that is bad news bears for your wine.
How am I supposed to know how much is too much? Another resource I stumbled upon said that if you can smell chlorine, there is too much. If you can’t smell it, it’s probably fine. I wasn’t sure how accurate this actually was, so I decided to dig a little deeper and look into the water quality reports for the water in my city. You can do this for your own city/town as well, as I believe water quality reports are in the public domain and anyone can have free access to this information. For my town, last year’s water quality report was just a click away online. According to these data, chlorine levels in my tap water are within the recommended limits put in place by the EPA. Just because the chlorine levels in the water are safe to drink, are they low enough to be OK to use in my wine?
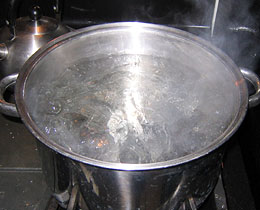
Since I’m not 100% convinced that it’s OK to use tap water in winemaking, even though I can’t smell chlorine and water quality reports suggest levels are within the acceptable range, I decided I’m going to boil the water first, just to be extra sure. The ECKraus blog post that I mentioned previously mentioned that leaving the water out overnight would get rid of any excess chlorine, though I am too lazy to wait that long and I worry about other things getting into the water as it sits there (the pets may get curious….). So, since the instructions for my next batch of wine indicate that I need to add warm water anyway, I’m going to sterilize a big pan, boil a bunch of water, then once it’s cool enough to be at the appropriate temperature listed in the instructions, I’ll knock out Day 1 and get this new batch of wine started!
Wish me luck!
————————————————————————————————————-
My name is Leigh Erwin, and I am a brand-spankin’ new home winemaker! E. C. Kraus has asked me to share with you my journey from a first-time dabbler to an accomplished home winemaker. From time to time I’ll be checking in with this blog and reporting my experience with you: the good, bad — and the ugly.
How To Make Sweet Sparkling Wine
 …I decided to try a sparkling wine and to make it sweet. The 5 gallon batch of strawberry from a concentrate was made to about 8-9% PA, and allowed to finish, then I added a syrup of 2-1/4 ounces/gallon and bottled it in the proper bottles. The sparkling part turned out very well, but the taste is anything but sweet. My question is how to make it sparkling and yet to preserve the sweetness? I’m not really equipped to do it the proper way with reopening the bottles and preserving and sweetening at that time. I followed an “easy way” recipe. Is this possible?
Name: Lee C.
State: OH
—–
Hello Lee,
Making a sweet, sparking wine is something that the home winemaker can not do in a practical manner, and in fact, can be dangerous, if attempted and done incorrectly!
The real issue is that the amount of sparkle or CO2 gas in the wine is controlled by how much sugar it has at bottling time. Once bottled, sugars are fermented into more alcohol and CO2 gas. The CO2 gas provides the carbonation — the sparkle. This is why your sparkling wine ended up dry. The sweetness was spent on the sparkle.
If you try to compensate for the sparkle by adding even more sugar, then you’ve entered the danger zone. The yeast can create much more pressure than any Champagne bottle can hold, if given the opportunity. The result can easily be exploding Champagne bottles — something you do not want to be anywhere near when they go off. This is not how to make sweet sparking wine.
This brings up the question then: “Well then, how do the commercial wineries make sweet sparkling wines?” The answer is simple. They start by making a sweet wine. Then they stabilize it through both preservatives and very fine filtration to remove the wine yeast. Then they force-carbonate the wine with CO2 gas under pressure.
Force-carbonating the wine with CO2 gas is done by chilling the wine down to just above freezing. This causes the wine to be able to absorb CO2 gas more readily. Then the CO2 gas is charged or forced into the sweet wine.
The process of how to make a sweet sparkling wine is really no different than how commercial soda or beer is carbonated. They do it the same way, only with these beverages the resulting pressure they are under is about 35 PSI (pounds per square inch) of CO2, whereas a sparkling wine is around 65 to 75 PSI.
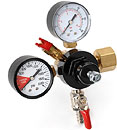 Force-carbonating a sweet wine with CO2 gas is something that can be done by the home winemaker but not without making a sizable investment. First you will need a tank to put the wine in for charging the CO2. A soda canister or corny keg works good for this purpose. Then you will need a CO2 tank and a CO2 regulator. The tank provides the CO2. The regulator allows you to control how much pressure comes out of the tank.
You will need to force-carbonate the sweet wine at 45 PSI on the regulator. Keep the wine under this pressure for a few days, but 2 or 3 weeks would be even better. This will allow time for the CO2 gas to come completely into solution with the wine, making it harder for the gas to escape upon depressurization. The wine will need to be around 30°F. during this time.
Once force-carbonated the sweet wine will need to be filled into Champagne bottles with a counter pressure bottling filling system. This is an apparatus the will fill the Champagne while keeping the bottle under pressure.
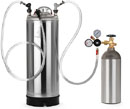 It is important to note here that if you are investing in such equipment you may want to forget all about the bottling part and simply serve your sparkling wine on tap. Here is a kegging kit that would allow you to do that. You could also hook it up to a bar with the commercial faucet tap system.
So that’s how to make a sweet sparkling wine. While it is a little bit of an investment it is a lot of fun and does a good job.
Best Wishes,
Ed Kraus
———————————————————————————————————
Ed Kraus is a 3rd generation home brewer/winemaker and has been an owner of E. C. Kraus since 1999. He has been helping individuals make better wine and beer for over 25 years.