Leigh Erwin: A Beginner's Wine Making Journey: Part 6

Racking WineI’ve made it to Stage 3 in the home winemaking process without any problems (that I am aware of as yet anyway! Ha!).  It’s been nearly 3 whole weeks since I got started with the Connoisseur wine making kit from E. C. Kraus, and I am just as excited now as I was then!
As I looked at the directions for the wine making kit, the first thing I had to do for Stage 3, the degassing phase, was to check to see that the specific gravity was below 0.995 with my hydrometer.  Well, if you recall from the end of my secondary fermentation, the wine was already at 0.9945, so I wasn’t too worried about hitting the mark 12 days later!  As expected, the specific gravity at the degassing stage was 0.994, so it looks like fermentation is definitely complete at this point, since the specific gravity value has barely moved in 12 days!
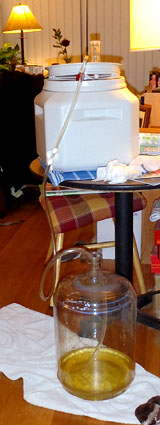
When I first looked at the instructions for the degassing stage, I noticed that it was telling me to siphon my wine into a sterilized carboy.  Uh, wait a second, I only received one sterilized carboy in my kit, and the wine is already sitting in it!  Eek!  Slightly panicked, I asked the good folks at Homebrewing.org what they thought I should do.
Basically, since I did have a primary fermenter that was currently unoccupied, the team at Homebrewing.org advised me to first siphon the wine into the primary fermenter, then clean and sanitize my lone carboy and siphon the wine back into that vessel once that was done.  This way, I still am following the instructions and continuing the home winemaking process in the carboy, AND I got an extra step of agitation in there to help with the degassing!  Sweet!  One day, I will get another carboy, but I don’t really have the space at the moment for much extra!
Now, up until the siphoning of the wine into the primary fermenter as a temporary storage vessel prior to moving it back into the sterilized carboy, everything had gone very smoothly.  Of course, one is bound to make a mistake at some point, and that mistake may very well be a stupid and careless one that could have easily been avoided.  What did I do, you ask?  Well, let me just say, if you ever need to siphon your wine into a vessel that has a spigot, please oh please make sure that spigot is in the OFF position.  Yes, the dummy that I was, I had started siphoning a wine into my primary fermenter with the spigot in the ON position.  A few expletives were spat, but in the end, I don’t believe I lost more than a single bottle.  Really not much in the grand scheme of things, but man, did I feel like an idiot!  I learned my lesson though—double and maybe triple check that everything is secure before pouring precious wine into it!
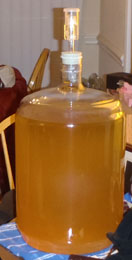
Well, after the accidentally spilling about a bottle of wine fiasco, everything else seemed to go very smoothly.  I siphoned the wine back into my cleaned and sterilized carboy, then added Potassium Metabisulphite and later Kiesol, all per the instructions I received with my homemade wine kit.  The instructions for this stage ended by having me stir or shake the wine at least 6-8 times over the next two days.  No problem!  I just made sure I thoroughly rinsed the spoon in extremely hot water in between each stirring.  I did not put it in the sterilization solution each time, so hopefully the scalding hot water would be enough at this point.  Nothing funky seems to be growing in the wine anyway, so I think I’m OK for now!
Just two more days until I stabilize and clarify the wine!  It’s getting so close to the end!

——————————————————————————————————–
Leigh ErwinMy name is Leigh Erwin, and I am a brand-spankin’ new home winemaker! E. C. Kraus has asked me to share with you my journey from a first-time dabbler to an accomplished home winemaker. From time to time I’ll be checking in with this blog and reporting my experience with you: the good, bad — and the ugly.

Leigh Erwin: A Beginner's Wine Making Journey: Part 5

Homemade WineMan oh man, for someone who is used to nearly instant gratification, waiting 12 days for a wine to go through secondary fermentation is killer!  Actually, it’s not that bad, but man, am I really looking forward to the next step or what!
I have about 4 days left to go before I move on to stage 3, the degassing stage.  At this stage, I am supposed to take a reading of the specific gravity with a wine hydrometer and make sure that it is below 0.995.  Well, since the specific gravity after primary fermentation of my wine was hovering right at (or just slightly below) 0.995, I’m confident that it will certainly be below this value after 12 days!
If you saw my video the last time I updated you all on the progress of my wine, you would have seen my secondary fermentation in full force.  Well, 8 days later, the fermentation has slowed down to a turtle’s pace, if not slower!  There were some tiny bubbles at the top of the wine that at first I thought might be flowers of wine, but thankfully these were just bubbles of carbon dioxide and they have all since disappeared.  It’s also been really neat to see the wine yeast slowly but surely settle down to the bottom of the carboy, and the wine on the top slowly clearing up.  I can’t quite see all the way through it yet, however, it’s a lot clearer than it was at the beginning of secondary fermentation, so I’m hoping that after stage 4 (stabilization and clarification), the wine will be really nice and translucent.
As I’ve been waiting for my wine to go through secondary fermentation, I’ve been reading ahead in the instructions to prepare myself for the next few steps, and to be sure I have all the equipment I’ll need to do so.  If not, I’ll have to put in a quick order and get the items shipped to me ASAP!  In a few days from now, I’ll move on to step 3, the degassing stage.  Reading through the instructions, I noticed that I’m supposed to siphon my wine into another sterilized carboy.  Wait, what?  The wine kit only came with one carboy and one primary fermenter.  What am I supposed to do here?  Can I just siphon it into the primary fermenter?  Does it have to be a carboy?
Well, not wanting to leave things up to chance, I went ahead and sent a message to the lovely folks at Adventures in Homebrewing and got a quick and very helpful reply.  Basically, I could do two things: 1) I could purchase another carboy; or 2) I could siphon the wine temporarily into the primary fermenter, wash and sterilize the carboy that I had just used for secondary fermentation, and the siphon the wine again from the primary fermenter back to the carboy.  Not only will I finish the step as instructed (i.e. in a carboy), but I will have also added an extra gassing step that will help to further remove any carbon dioxide that may be floating about.  Nice!
Now, eventually I do plan on purchasing more carboys and expanding my hobby of home winemaking, however, due to my current living situation (i.e. living in a tiny 2 bedroom condo with two dogs, one cat, and one human), I really don’t have the space for another sizeable piece of equipment.  So, this time around, I will heed the second piece of advice from the folks at Adventures in Homebrewing and will do an extra siphoning step to get my original carboy cleaned and sterilized and ready for use again.  We are anticipating a big move next fall (into a “real” house!), so at that point is when I will begin expanding my home winemaking equipment and will start to invest in some more carboys and whatnot.
If any of you are following along with me and trying out home winemaking for the first time, I hope you’re batches are going just fine and dandy!  Please feel free to reach out and ask for help if you need it—you don’t want to risk ruining an entire batch of wine, throwing away time, money, and effort, just because you were too afraid to ask questions.  As I’m continuing to learn, the home winemaker crowd is very kind and extremely helpful, and so far as a newbie, I’m having a blast and have been made to feel like I am one of the group already!
Next time I talk to you I will have completed the degassing phase!  Wish me luck!
Cheers!

——————————————————————————————————–
Leigh ErwinMy name is Leigh Erwin, and I am a brand-spankin’ new home winemaker! E. C. Kraus has asked me to share with you my journey from a first-time dabbler to an accomplished home winemaker. From time to time I’ll be checking in with this blog and reporting my experience with you: the good, bad — and the ugly.

Winemaking Terms You Should Know: Part 6

Man Reading Winemaking TermsIn several earlier posts, we introduced a few home winemaking terms that you may or may not be familiar with.  There are many terms to learn in home winemaking, and this post, like all the previous posts, gives you a short introduction to a few of those terms to help you get started in home winemaking, or perhaps brush up on some of the terms you may not have seen in a while. Today we’ll explore some of the lesser known terms used throughout the winemaking world.

  • Doble Pasta – Doble Pasta?  Is that some sort of newfangled recipe that the foodies are making these days?  Actually, Doble Pasta is a Spanish term used in winemaking to refer to the process of macerating a wine with 2 times the ratio of skins to juice as normally would occur during the maceration process.  Basically, you start off the maceration process normally, then bleed off some of the juice in order to increase the skin to juice ratio in the tank.  The process of Doble Pasta effectively increases the polyphenolic content of the finished wine.
  • En Tirage – No, not entourage; en tirage. En Tirage is a French term used in sparkling winemaking to refer to the period of time when the sparkling wine is in contact with the lees while in the bottle during the secondary fermentation process.  The term “en tirage” translates to “in pulling”, which you can think of in terms of the pulling or extracting of flavors, aromas, and complexities from the lees into the developing sparkling wine.
  • Estufagem – Moving over to Portugal now, “estufagem” is a Portuguese term used in the process of making Madeira wines where the Madeira is heated in ovens (“estufas”) and subsequently cooled to produce unique flavors, aromas, and complexities in the finished wine.
  • Dopplestück, Stück, Fuder, Halbstück, Halbfüder, Viertelstück – These are all German terms for oak barrels with the capacity of 635, 317, 265, 159, 132, and 80 liters, respectively (that’s 2400, 1200, 1000, 600, 500, and 300).  All you really have to know is that a Stück barrel holds 317 gallons (1200 liters) and a Fuder barrel holds 265 gallons (1000 liters), then all you need is a basic math skills.  Think of “Dopplestück” as “double stuck”, and just multiple the capacity of a Stück barrel by 2 (317 x 2) = 634 (close enough). Think of “Halbstück” as “half stuck”, and divide the capacity of a Stück barrel by 2 (317 ÷ 2 = 158.5).  Similarly, think of “Halbfüder” as “half fuder”, and divide the capacity of a Fuder barrel by 2 (265 ÷ 2 = 132.5). You don’t even have to speak German to figure this out!

— Other Winemaking Terms You Should Know:
Part 5
Part 4
Part 3
Part 2
Part 1
———————————————————————————————————
Ed Kraus is a 3rd generation home brewer/winemaker and has been an owner of E. C. Kraus since 1999. He has been helping individuals make better wine and beer for over 25 years.

Leigh Erwin: A Beginner's Wine Making Journey: Part 4

wine in secondary fermenterI get so excited when it’s time to do the next step!  Eeek!  Well, primary fermentation is supposedly complete, and so the next step is for me to siphon the wine from the primary fermentation vessel to the plastic carboy that came with my home winemaking kit.  According to the instructions, I first had to measure the specific gravity using the hydrometer in order to determine if primary fermentation was, in fact, complete, and if I could actually move onto the next step, or if I had to let it sit for a couple more days.
The specific gravity at this stage, according to the instructions, is supposed to be less than 1.010.  So, I sterilized my hydrometer, the cylinder in which to put my wine sample for reading, and also a turkey baster for removing some of the wine sample (I need to buy a wine thief—one that’s not going to spill have the wine like the turkey baster, anyway).  The moment of truth came when I read the specific gravity reading on the hydrometer and it was……..  0.09945!  That’s definitely less than 1.010!
I’m slightly concerned (or just wondering) about that low number, as that’s what it’s supposed to be after secondary fermentation is complete.  Is it OK that it’s that low?  Hmmm, well, better siphon the wine and plug her up to see if there is any yeast activity still.
Siphoning was an interesting process for me.  I don’t yet have an auto-siphon, but after reading some of the home winemaking and home brewing threads, it sounds like it would be a smart investment.  Since I don’t have an auto-siphon, I first attempted the siphon-by-mouth method.  I tried to dry my lips as much as possible, and inhaled through one end of the siphon tubing with the other end was attached to the siphon cane that was placed in the primary fermentation container.  Having failed at this, since I was too afraid to inhale so hard that I would end up drinking it, I went to the message boards again to figure out how I should siphon the wine without using my mouth (and without an auto-siphon).
The advice I found on the home winemaking thread turned out to be great, as I was able to successfully siphon my wine in just one shot.  Basically, I filled up the siphon tubing with the wine, and kept my (sterilized) finger over the end so it didn’t pour right back out.  Once it was full, I put the siphon cane end into the batch of wine and put the other end of the tubing into my new secondary fermentation carboy (which was lower than the original container so gravity could work it’s magic).  The wine flowed and flowed and filled up that carboy pretty quickly!  I tried to minimize the amount of oxygen bubbling into the wine, but I’m sure I couldn’t completely protect against it.
So, now that I had all the wine moved into the new secondary fermentation carboy (which I sterilized with the cleaning solution I got in the kit), I was wondering if secondary fermentation would even happen since the specific gravity level I read at the end of primary fermentation was just as low as the instructions indicate it should be at the end of secondary fermentation.  Did it go so fast that I finished both primary and secondary fermentation?
To convince myself that the wine was still OK, I simply stopped up the carboy with the stopped and secured the air lock in place.  I figured if there was no yeast activity anymore, there wouldn’t be any movement in the air lock.  Lo and behold, however, the yeasts are still kicking!  The air lock almost immediately started slowly releasing CO2 in the airlock, so I’m convinced that everything is still going to plan.  I hope I’m right, anyway…..only time will tell, I suppose.
Here is a short video of the air lock action right after I siphoned the wine and closed it off to all air:

Everything looks pretty good so far (at least I think so), so now I am to wait 12 days until secondary fermentation is complete.  It’s going to be tough waiting that long, but I think I’ll manage.

——————————————————————————————————–
Leigh ErwinMy name is Leigh Erwin, and I am a brand-spankin’ new home winemaker! E. C. Kraus has asked me to share with you my journey from a first-time dabbler to an accomplished home winemaker. From time to time I’ll be checking in with this blog and reporting my experience with you: the good, bad — and the ugly.

Stirring A Slow Wine Fermentation

Stirring A Slow Wine Fermentation
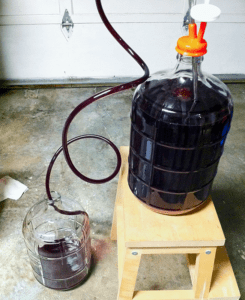
I just wanted to ask you if you think stirring or swirling a wine must when it starts to slow down before the first racking, because point zero hasn’t been reached yet, would that help or hurt anything as far as the wine is concerned, or should I just add more nutrient and not stir or swirl at all?
Thanks,
James
—–
Hello James,
The first thing that should be pointed out is that it is not unusual for a fermentation to slow as it reaches the end of fermentation. A lot of it has to do with the viability of the particular wine yeast strain you have chosen. Having said this, there is nothing about a slow wine fermentation that is inherently bad. The wine will turn out the same. Just think of it as the wine getting a little aging time in during the fermentation.
If you are making your wine from fresh fruit or fresh grapes, you should be stirring the wine once or twice a day while the pulp is the wine must, but it as nothing to do with the fermentation being slow or sluggish. The reason the stirring is done is to make sure that the wine fermentation does not form a dried floating cap of pulp. If this happens the oxygen is cut off from the wine yeast at a time with the it needs the oxygen the most.
Air or oxygen is what allows a wine yeast to grow into a colony large enough to ferment all the sugars in your wine must. If the air is limited, the colony will not grow successfully. The result is a slow wine fermentation, which by the way, is what you are experiencing right now.
Here’s what you can do for a slow wine fermentation…
If it has been going for at least 4 days in the primary, with the fruit pulp, I would go ahead and rack the wine into a secondary fermenter. Do it in a splashing manner so as to introduce oxygen into the wine must. This should help to invigorate the wine yeast.
Also, add a dose of yeast nutrient. If you already added yeast nutrient at the beginning of the fermentation, then go ahead and add another half-dose. This would be a 1/2 teaspoon per gallon. The yeast nutrient will add nitrogen to the wine must which can help the yeast in some of the same ways oxygen will.
Even though this is a slow wine fermentation, I would still put an air-lock on the secondary fermenter. The fermentation is coming towards a time when it will be susceptible to spoilage, so the air-lock is a necessity once racked. By the way, if you had the primary under air-lock, this can contribute to a sluggish wine fermentation with or without a dried cap.
Hope this information helps you out a little.
Best Wishes,
Ed Kraus
———————————————————————————————————
Ed Kraus is a 3rd generation home brewer/winemaker and has been an owner of E. C. Kraus since 1999. He has been helping individuals make better wine and beer for over 25 years.

Leigh Erwin: A Beginner's Wine Making Journey: Part 3

Thanksgiving meal with wineHappy Belated Thanksgiving, everyone!  Leigh here, just checking in!
While eating the delicious meal I prepared for my guests, my only regret is that I didn’t decide to start making my own wine earlier than I did.  OK, I don’t regret anything, but I did think it would have been really nice to serve my own homemade wine with the meal!
One of my “problems”, if you can even call it that, is that I get so excited about things that I just want them to happen RIGHT NOW!  Making my own wine for the first time has definitely been a lesson in practicing the art of patience, that’s for sure!  Day 1 for my first batch of wine (that Pinot Grigio kit from California Connoisseur) was about 5 days ago, so there are only 2 more days to wait before I test the specific gravity to see if it’s less than the required 1.010.  I really hope it’s “on time”, as I somewhat stupidly planned the timing of everything so that I leave for my Christmas/New Year vacation almost immediately after the predicted bottling date.  Whoops 😉  Hope nothing is running slow 😉
Last time I expressed a little concern/confusion over the whole “do I use the air lock for primary fermentation or do I not”?  Well, after asking the team at Homebrewing.org, and reading up on a few of the blog posts there, I determine that no, I do not need to use the air lock during primary fermentation.   The yeast actually requires some oxygen during primary fermentation in order to do convert the sugars into alcohol, so in a completely anaerobic environment (i.e. no access to oxygen), the fermentation would go really slow, and possibly get stuck.
Since I have a tiny space, and one which I share with another human, 2 canines, and 1 kitty, I can’t just have the cover open the entire time.  So, as a “compromise” to the yeast, I crack the lid open when I am in the condo so I can keep an eye on any curious animals, and when I’m sleeping at night or gone off to work, I close the lid and use the airlock.  This way, my yeasts are still getting some oxygen a decent chunk of the day, and are protected from little paws and tongues of the beasts running around my house when I’m not home or not conscious.
So, how’s my fermentation doing?  Well, seems to be going well!  The yeasts started doing their thing over night after the first night, and I woke up the next day to the site of some foamy bubbles on the top of the must.

This video shows basically what my wine was doing 24 hours after I added the yeasts.  If you listen closely, it sounds like the fizz from a soda can after you open it, and you can see some tiny bubbles and activity on the surface.  It’s really difficult to hear the sound of the “fizz” in the video, as obviously the camera used to record it was pretty basic, but you can definitely see the bubbles coming up and you’ll just have to take my word for the sound.  5 days later, I still hear the fizz going strong, and it definitely smells like a wine in the middle of fermentation.
Crossing my fingers everything stays on schedule, though one never knows what can happen, I suppose.  I’ll for sure report back to you guys on Day 8, which will be here before we know it!

——————————————————————————————————–
Leigh ErwinMy name is Leigh Erwin, and I am a brand-spankin’ new home winemaker! E. C. Kraus has asked me to share with you my journey from a first-time dabbler to an accomplished home winemaker. From time to time I’ll be checking in with this blog and reporting my experience with you: the good, bad — and the ugly.
 

I Added Too Much Wine Tannin Powder To My Wine

Wine Tannin From Grape StemsWhat happens when you add too much tannin? I’ve been making wine for about 5 yrs now and have had good results for each of the many fruit wines that I’ve made…I was always very careful to make sure measurements were accurate…this time making a pear wine, I made the mistake of picking up wine tannin powder and added 2 tbls…I was suppose to be adding pectic (which is what I thought I was holding)….when I realized what I had done, I was able to pull some of the tannin out, since I hadn’t mixed the must…though I’m sure I didn’t take enough of it back out…can this be fixed or do I need to trash this wine…
Name: Lu
State: NY
—–
Hello Lu,
Wine tannin powder adds a dry, puckering zest to the wine. It is the zest, literally. It comes from the stems and outer skin of the grapes. Think of what it would taste like to chew on a grape stem or some grape skins, and that’s the flavor we are dealing with in this situation.
It is possible that that you added enough wine tannin powder to make your pear wine permanently unpleasant to drink, but there is hope. Much of the wine tannin you added will simply drop out of the wine. Any wine is only able to saturate so much tannin. The excess will never dissolve, or only temporarily dissolve, and drop out as sediment during the fermentation.
One thing you can do to help drop out excess wine tannin is to warm up the wine. As the temperature goes up the wine’s ability to hold tannin goes down. It drops out as more sediment. The problem with doing this is that heat also promotes oxidation. This is where a white wine will turn amber, or in the case of a red wine, it will turn orange or brown. Pear wines are very susceptible to oxidation, so this make this a very delicate situation.
Here’s What I Would Suggest
Once the wine is done fermenting and has cleared the best it can on its own, gently warm the wine up to 85°F. This can be done with a heat source as mild as a 100 watt light bulb. It may take a day or better for the temperature to rise.
Once up to 85°F. add a dose of bentonite to the wine. Bentonite is great for dropping our excess proteins — tannin being one of them. It is the closest thing to a wine tannin remover as you will find. Keep the wine at 85°F until it becomes clear again, usually 2 to 4 days. Then rack the wine off the sediment and allow to cool back down to normal temperatures.
Three things that would be helpful in reducing the affects of oxidation from this process would be:

  1. Add ascorbic acid to the wine, now. Ascorbic acid will help to limit the oxidative reactions throughout the wine making process and from heat. The dosage should be 1/8 teaspoon per gallon.
  2. Keep the wine vessels topped-up. Don’t allow air-space to be in with the wine.
  3. Keep the wine sulfited. You should add a dose right after the fermentation has completed and again, after adding the bentonite. This could be either: Campden tablets, sodium metabisulfite or potassium metabisulfite.

Some additional thoughts: Wines with too much wine tannin powder tend to need more aging, but once aged out they tend to taste better than the same wine low in tannin. This is all subjective, of course, but it is a general consensus among winemakers. So you have that going for you. Also, wine tannin lowers the pH of a wine. Low pH is deterrent to oxidation, so this is a good thing for your pear wine, as well.
It sums up to this: the fact that you added too much wine tannin powder does not necessarily mean your wine is ruined. There are ways of reducing it. Both heat and bentonite act in concert as a wine tannin remover to some degree. Time can also help to reduce any astringent effects the wine tannin powder that may still be left in the wine, so there are a lot of reasons not to give up on your pear wine.
Best Wishes,
Ed Kraus
———————————————————————————————————
Ed Kraus is a 3rd generation home brewer/winemaker and has been an owner of E. C. Kraus since 1999. He has been helping individuals make better wine and beer for over 25 years.

Leigh Erwin: A Beginner's Wine Making Journey: Part 2

Leigh Erwin - First-Time WinemakerWell, hello there readers of the Homebrewing.org blog!
My name is Leigh Erwin, and I am a brand-spankin’ new home winemaker!  E. C. Kraus has asked me to share with you my journey from a squeaky-clean new home winemaker to what I hope will eventually be an expert!  Well, maybe not an expert, but perhaps “more experienced”.
Over the next few months I plan on sharing with you my experiences as a beginning winemaker: the good, bad — and the ugly. I hope all of you will take the journey with me as I periodically post my trials and tribulations as a first-time home winemaker on this blog. The is my second post. To start at the beginning you can go to my first post.
—————————————————————————————————–
Wine Yeast Sprinkled Onto The Wine Must
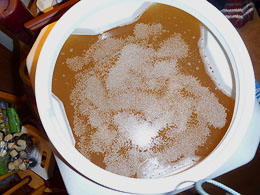
Last time I “saw” you all, I had just received my new home winemaking kit from Homebrewing.org.  Due to the timing of things this past week, I let the kit sit for almost a couple of days before I did anything with it.  I finally had some time on a chilly afternoon to start Step 1 of the wine making kit instructions.
I know later on I’m going to think my feelings were pretty silly, but right now I feel pretty nervous about whether or not this is actually going to work!  Eek!  Did I sterilize everything sufficiently?  Is the temp OK?  Is that cat going to find a way in and drink it?
It’s not like I have much space to deal with here.  I live in a 750 square foot 2 bedroom condo with my fiancé, our two big dogs, and our cat. That leaves very little space for winemaking, but I’m going to try my best to make it work.  Right now, I have everything situated on a little side table in between the living room and dining areas, as this side of the condo tends to retain heat better than the two bedrooms.  I wrapped the spout of the fermenter with plastic wrap and a twist tie, in hopes that it’ll mask any smells from the cat or dogs and hopefully avoid them trying to get into it.
So, getting right down to it!
I first sterilized all the equipment I was going to need today by following the kit instructions on the cleaning solution I received with my kit.  I’m hoping I did it right—I’m banking on the fact that the kit is brand new, so hopefully even if I “missed a spot”, it’ll still be OK.
Once sterilization was finished, I launched into “Stage 1” of the wine making kit instructions.  Removing the base wine from the bag was a little tough at first, as I wasn’t sure how much force I would need to remove the cap while avoiding any spillage!  It ended up being easier than I thought, though I did have to use a little elbow grease to get that cap off.
For water, I ended up getting bottled water from the store, and made doubly sure that it said it had undergone reverse osmosis, as suggested in the instructions.  I actually used one gallon of the bottled water for the sterilization process, then used another 4 gallons for the wine (the juice concentrate itself was nearly 2 gallons).   The wine making kit instructions said I could use tap water as long as I let it sit out overnight to blow off any chlorine that may be there, but I was too nervous to try that on my first go around, and I didn’t really have anywhere to put 5 gallons of water overnight since my place is so small.
Taking A Hydrometer Reading
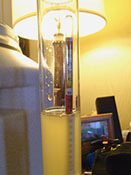
The initial specific gravity reading on my juice was 1.086, which was in between the recommended 1.080-1.095 levels.  So far, so good, right?
I basically followed all the basic kit instructions to a T, reading them all multiple times just to be sure I wasn’t forgetting everything.
The only thing I’m not sure about is the use of the cover and/or airlock.  The wine making instructions said to close the lid and use the airlock, though when I went to the ECKraus blog, there was a recommendation saying NOT to use the airlock but to leave the lid open for at least the beginning in order to get the fermentation process off on a good foot.  My problem with leaving the lid open is that the cat is going to drink it.  I know she will—she’s a piggy!    I think what I might try is leaving the lid just resting on top but not sealed while I’m in the room, then when I have to leave, I’ll close it and use the airlock.  Hopefully this will allow the fermentation to get enough air to get started, whilst keeping the animals out.
Other than the lid, I feel pretty confident about this first stage, and I’m hoping that within the next 18-36 hours, I’ll be confident that fermentation has actually started.  I think right now it kind of smells like it (when I open the lid and sniff), and there are some tiny bubbles on the side of the fermenter, but it’s still too early to tell if it’s going to get started or not.
In the meantime, I’ll keep my fingers crossed and hope for the best.  Now, it’s just a matter of waiting 7 days.  Hopefully at the end of that time I’ll have a positive progress report to give you all!
Cheers!

How To Handle A Stuck Fermentation In Wine Making

man_looking_at_glass_of_wineI purchased 5 – 6 gallon buckets of wine juice on 10/17/13. All the juices where pH-acid balanced and inoculated with wine yeast. All completed fermenting quite quickly and have been racked to and stabilized in glass carboys, except the Sauvignon Blanc. My starting Specific Gravity (SG) for this juice was 1.080.
On 10/31/13, I racked the Sauvignon Blanc from the primary fermenter (plastic bucket) at SG 1.020 for secondary fermentation under airlock in a glass carboy as per the manufactures directions. I then checked the SG on 11/7/13 and it had dropped to 1.010. I rechecked the SG last evening (11/13/13) and it has remained unchanged at 1.010.
Is this a stuck fermentation? I really don’t want to stabilize this wine at 1.010 since it is Sauvignon Blanc and at that Specific Gravity it taste too sweet.
This wine has had a bit of a sulfur odor indicating that the yeast may be having problems fermenting this juice. Any suggestions? Pitch another package of yeast? Appreciate your help as always, thanks!
Name: Michael N.
State: Pennsylvania
—–
Hello Michael,
Yes, I would consider this a stuck fermentation.
The sulfur odor is the biggest clue here. This indicates that the fermentation was occurring while the wine yeast was under much stress. The yeast was not happy.
My best guess is that the amount of viable yeast in the fermentation was lacking. This can happen in one of two ways:

  1. The wine yeast pitched into the must was old or significantly compromised, or
  2. The primary fermentation was conducted under an airlock. Any yeast desperately needs air available to it in the beginning so that the colony can multiply into sufficient numbers. If an airlock is used during the primary fermentation this can not happen very well. A standard packet of wine yeast needs to multiply between 100 and 200 times itself.

One thing we do know is that as the alcohol rises the wine yeast comes under more and more stress with each additional percent. This is why most wine fermentations go a little slower and slower with each passing day. Add on top of that other stressing factors, and you can very easily end up with a stuck fermentation in wine making.
What I would do at this point would be to read over The Top 10 Reasons For Fermentation Failure that are listed on our website. If any of the 10 ring true to your situation, then go ahead and take any corrective actions necessary.
In addition, I would add a 1/2 dose of yeast nutrient. This would be 1/2 teaspoon per gallon of wine must. If you did not add any yeast nutrient when starting the fermentation, then add a full dose… 1 teaspoon per gallon. There is no down side to adding the yeast nutrient, only potential upside.
After a couple of days, if you do not observe any renewed fermentation, then I would suggest taking a more radical step by making a yeast starter and adding that to wine must. A yeast start is like repitching a grown yeast colony into the fermentation. It is the ultimate solution if active yeast numbers is the issue here.
If this does not cause the fermentation to start, then you need to strongly consider one of the other 9 reasons for a stuck fermentation listed in the above article.
Having a stuck fermentation in wine making is not a fun thing. It requires an extra effort on the winemakers part. That’s the bad news. The good news is that almost all stuck fermentations in winemaking can be remedied. It is simply a matter of identifying the underlying issue at hand.
Hope this helps you out.
Happy Winemaking,
Ed Kraus
————————————
Ed Kraus is a 3rd generation home brewer/winemaker and has been an owner of E. C. Kraus since 1999. He has been helping individuals make better wine and beer for over 25 years.

Leigh Erwin: A Beginner's Wine Making Journey: Part 1

Leigh Erwin - First-Time WinemakerWell, hello there readers of the Homebrewing.org blog!
My name is Leigh Erwin, and I am a brand-spankin’ new home winemaker!  E. C. Kraus has asked me to share with you my journey from a squeaky-clean new home winemaker to what I hope will eventually be an expert!  Well, maybe not an expert, but perhaps “more experienced”.
Over the next few months I plan on sharing with you my experiences as a beginning winemaker: the good, bad — and the ugly. I hope all of you will take the journey with me as I periodically post my trials and tribulations as a first-time home winemaker on this blog.
—————————————————————————————————–
Winemaking Kit Packages
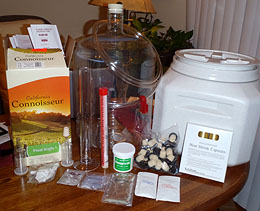
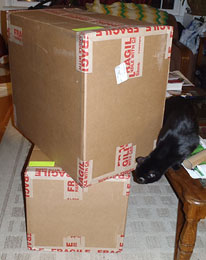
Today is a great day for me, as it is the day I received my very first home winemaking kit from Homebrewing.org.  The UPS guys dropped it off at my house before I got home, so I had to wait a couple of hours to open my new “babies”.
I ordered my items on November 14th, and received the items in one piece 5 days later, just as promised.  The whole ordering experience was really easy for me.  I had a couple questions for customer service, and they addressed them all very quickly.  I placed the order in the morning on 11/14, and it was packaged up and shipped out that very same afternoon.  I’m not sure if it’s always sent out the same day—it probably has to do with what time of the day you place your order, but since I placed my order so early, it was no problem!
Even though this is my first time making my own wine, I do have quite a bit of book knowledge about wine and winemaking.  I decided to order a beginner wine making kit, as I felt this would be a perfect start for someone who has only read about winemaking but never actually practiced it.  I chose a white wine, as I know the holidays are coming up, and since mine and my fiancé’s parents only drink white wine, it would be a nice gift to bring to them (provided I don’t mess it up!) at that time.
Unpacked Winemaking Starter KitSo, what did I order??
The main item(s) I ordered was the California Connoisseur Winemaking Kit, Pinot Grigio.  When I opened the box, everything that was listed as being present was accounted for, and nothing appeared to be damaged.
What does this kit come with?  Well, I received the following items all for one price by getting the Connoisseur Winemaking Kit:

  • Wine Yeast
  • Bentonite
  • Potassium Metabisulphite
  • Potassium Sorbate
  • Fining agents
  • 1 – 9 Gal. Tuff-Tank with Rubber Stopper
  • Plastic 6 Gal. Carboy with Rubber Stopper
  • 2 – Air Locks
  • 21″ Curved Racking Tube
  • Racking Tube Clamp
  • Triple Scale Hydrometer
  • Hydrometer Jar With Base
  • Vinyl Racking Hose
  • 24 Inch Stirring Spoon
  • Wine Bottle Brush
  • 5 oz. CleanPro SDH Cleaner
  • 50 Heat-Shrink Capsules
  • 30 Mushroom Style Corks
  • Instructions

So much stuff for such a small price!  I took a picture of everything I received, so see for yourself!
I’m really excited to start making wine with this beginner wine making kit, and am really excited to share my journey with you.  Feel free to leave comments on if you think I’m ever doing something not quite right, if you have advice for me as a newbie winemaker, or maybe even words of encouragement!
Cheers!

#Leigh