 Making homemade wine doesn’t have to be this impossible task: in fact, making homemade wine can be downright easy with the right tools, equipment, and knowledge! Easy homemade wine begins with education-you’ll want to become familiar with the history, science, methods, and typical issues that may arise along the way.
Easy homemade wine is certainly within your reach! Start by purchasing a few wine making books to increase your winemaking knowledge. The Joy of Home Winemaking is a great resource that has information for all levels of home winemakers, and covers many common and not so common problems that may arise. The Home Winemaker’s Companion is great for the beginning home winemaker, and includes instructions on how to make 100 different wines as well as a troubleshooting guide for problems that may come up on your quest to make easy homemade wine.
If you’re more of a visual learner, easy homemade wine can be yours with the push of the play button! The DVD: Home Wine Making in 7 Easy Steps is a fantastic resource for the beginner wine maker, and covers basically the same topics that many of the winemaking books cover. Only with the DVD, you can see what the experts are talking about and you can more easily visualize what you will be doing with your own home winemaking practice. The DVD Wine Making Video is another great resource for the visual learner, and is also aimed for beginner winemakers and helping you make easy homemade wine.
Starting off your winemaking practice with a home winemaking kit is probably the simplest way to jump into making easy homemade wine. Everything you need in terms of wine making equipment and instructions are all packaged together nicely in the winemaking kit, and is one of the best ways to ease into making easy homemade wine. Once you get more comfortable in your own home winemaking practice, you can start expanding by purchasing individual pieces of home winemaking equipment, but for the beginning winemaker, everything you need to make easy homemade wine is right there in one simple kit!
What if you run into trouble and can’t figure out what to do next even after reading all your shiny new wine making books and/or wine kit instructions? Well, the fact that you’re reading this blog means you already know one way to tackle these seemingly unsolvable problems and that is to ask ! The team here at Adventures in Homebrewing trys hard to provide you with endless information on the website and blog related to making your own wine. Making easy homemade wine shouldn’t be just a pipe dream, and with the right tools and support, you can be successful in your own home winemaking practice!
———————————————————————————————————
Ed Kraus is a 3rd generation home brewer/winemaker and has been an owner of E. C. Kraus since 1999. He has been helping individuals make better wine and beer for over 25 years.
How To Brew A Chipotle Smoked Porter
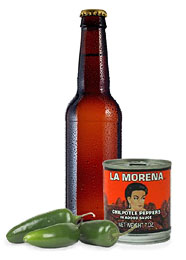 Are you ready for some fire?
If you’re a fan of spicy foods, you might want to try to brew a spicy beer made with hot chile peppers. It’s definitely a specialty item, but sometimes that extra kick can give your tastes buds a much needed wake-up call.
Not sure if spicy beer is for you? Try some commercial examples before brewing your own hot chile pepper beer. Twisted Pine’s Ghost Face Killah, Rogue Brewery’s Chipotle Ale, and Dogfish Head’s Theobroma are all made with hot peppers and are pretty well regarded among craft beer fans. Levels of spice will vary from beer to beer, but if you can stand the heat, keep reading.
Brewing beers with unusual ingredients may sound intimidating, but it’s actually pretty easy. Here are some instructions for brewing your own Chipotle Smoked Porter, inspired by Stone Brewing Company’s Chipotle Smoked Porter. Feel free to substitute the base beer or switch type of pepper to come up with your own variation!
- First, consider whether you really want several gallons of spicy beer. Maybe a friend will join in and split the experiment with you?
- Once you’ve decided that you’re willing to give it a try, start out with a Robust Porter recipe kit, a Smoked Porter recipe kit, or an all-grain porter recipe. To add smoked flavor, just add 1/4 to 1 lb. of smoked malt to your grain bill, depending on the intensity of smoked flavor you’re going for. (By the way, it is possible to smoke your own malt, if you’re so inclined.)
- Buy a small can of chipotle peppers. Chipotle is just a fancy word for smoked jalepeños. It won’t take much to add significant heat to your brew, so a 3-6 oz. can will be plenty!
- Chipotles peppers are often packed in adobo sauce. On brew day, rinse the chipotles to get most of the sauce off of them. Whatever you do, don’t rub your eyes after handling the peppers!
- Add the peppers about halfway through the boil. Don’t feel like you have to use the whole can — just a few peppers will definitely be noticeable! Want to go nuts? Brew at your own risk!
- Proceed with your brew as you would otherwise.
- After 2-3 weeks of bottle conditioning (or after carbonating your keg) sample some of your spicy beer. If it’s too hot, allow the beer to age a bit. The spice will mellow out over time.
Spicy beer is definitely an acquired taste — be prepared because not everyone will like it. I for one love these chipotle smoked porters, so I think it’s worth a shot.
Have you brewed chile beers before? What peppers did you use? What base style?
——————————————————————————————————-
David Ackley is a beer writer, brewer, and self-described “craft beer crusader.” He holds a General Certificate in Brewing from the Institute of Brewing and Distilling and is founder of the Local Beer Blog.
Cleaning A Wine Barrel With Sodium Bisulfite
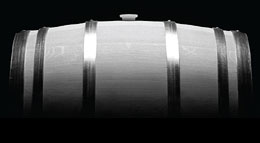 I put a sterilization solution in the barrel of citric acid and sodium bisulfite. I am now ready to put the wine in, but am worried the rinsing won’t be enough to get the chemicals out of the wood. The directions say to rinse, fill with water, wait 24 hrs then empty and fill with your wine.
Name: Craig R.
State: Wisconsin
—–
Hello Craig,
I understand your concern, but you really have little to be worried about. Having a remnant amount of sodium bisulfite left in the wine barrel is of little consequence. If some did get left behind and into the wine, it would have an unnoticeable effect on it. Even if a lot actually got into the wine, it would not ruin it. Any negative effects from such an accident could be remedied as well.
Sodium bisulfite is something you should be using directly into the wine, anyway: before the fermentation, after the fermentation, and again before bottling. It is also interesting to note that sulfites are a natural by-product of a yeast fermentation, so it’s something that is very much a part of wine regardless if you add it or not.
Another factor is that sodium bisulfite wants to turn into a gas when dissolved in a liquid. It wants to leave through dissipation. Citric acid is also added to the solution to help this release of sulfites. By lowering the pH of the solution your are increasing the ability of the sulfites to release as SO2 gas. By the time you drain the barrel and rinse it, most of the sulfites have already left.
With this in mind, all that can really be left behind after preparing the wine barrel is pretty innocuous: trace amounts of citric acid, sodium and sulfur. None of them harmful in any way to the wine or to us humans in such insignficant amounts.
Happy Winemaking,
Ed Kraus
———————————————————————————————————
Ed Kraus is a 3rd generation home brewer/winemaker and has been an owner of E. C. Kraus since 1999. He has been helping individuals make better wine and beer for over 25 years.
Tips and Tricks to Home Brewing in the Summer
No home brewer wants to take summers off, but the high heats brought on by this season create some challenges. When homebrew temperatures increase beyond their ideal zones, it can ruin a batch of beer. Summer then becomes a serious threat to your brew if you’re unable to regulate the temperature in your storage area, such as an unfinished basement.
Despite this complication, there’s no reason to hold off on home brewing when the summer heat strikes. Take advantage of the following tips and tricks to preserve the quality of your homebrew throughout the warm season.
Lower wort temperatures quickly
Chilling wort in short order is key to the quality of the finished product. An immersion wort chiller is less effective in the summer because the water running into the lines is warmer than what you get in the winter — summer water is usually above 60 degrees. One easy tip for cooling wort is to freeze plastic jugs of water and to then set them into a water bath that half submerges the fermenter. This water bath works well in conjunction with an immersion wort chiller.
Choose brews ideal for warmer temperatures
Every beer has its ideal fermenting temperature. In the summer, it’s easiest to simply choose beer types that are best in warm weather. According to HomebrewJunkie.com, Belgian Saisons usually start the fermenting process at 75 degrees, and some home brewers have successfully allowed fermentation temperatures to increase to 90 degrees. A beer that accommodates a warmer fermentation temperature will be much easier to manage as outdoor temperatures increase.
Use fans and cool wraps to keep down temperature
One simple trick is to place cool towels over the carboy, and/or to keep a fan blowing onto the container at all times. This will help reduce heat during fermentation. The use of a fan can drop fermenting temperatures by as much as 10 degrees. You’ll want to keep an eye on water levels, though, because this method of cooling can cause some evaporation.
Buy or build a temperature-controlled container
It’s not the preferred method of temperature regulation because it can get costly, but if other cooling methods fail, it’s about your only option.
Keep a close eye on fermenting temperatures at the start of this process and be prepared to make adjustments. It may take a little trial and error, but you should be able to find ways to overcome the challenge of summer’s heat wave.
Winemaking Equipment Guide: Fruit Press, Digital Scale & pH Meter
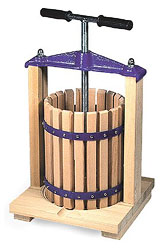 There are lots of pieces of homemade wine equipment than can be described in one post. It’s important to learn about each piece of homemade wine equipment and whether a particular item is needed in your own home winemaking practice. Today’s post features the fruit press, the digital scale, and the pH meter.
- The Fruit Press: If you’re making wine from fruit, you’re going to need homemade wine equipment that squeezes the juice from the fruit. A fruit press is going to be necessary for this, and there are a couple of different styles that you can get. For smaller batches or for work areas that are limited on space, a Table-Top Fruit Press is a great choice. This piece of homemade wine equipment uses a screw-type press design, sets up easily on a table or lab bench, and is strong enough to press enough juice out of the fruit that the remaining fruit bits are barely damp. If you make larger batches of wine (up to 30 gallons at once), the Double Ratchet Fruit Press may be a better piece of homemade wine equipment for you. This fruit press stands on the floor, and uses a commercial double-ratchet design to efficiently press your fruit and extract as much juice as possible without leaving much behind.
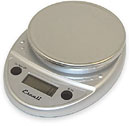 The Digital Scale: This piece of homemade wine equipment is a very important tool that will help you measure ingredients more accurately, ultimately creating a more refined wine. There are a couple different types of digital scales that you can get, which basically differ in their complexity. The Escali Primo Digital Scale is provides accurate weight measurements of up to 11lbs (5kg) and measures in pounds, ounces, or grams. On the other hand, the Escali Alimento Digital Scale provides accurate measurements up to 13.2lbs (6 kg) and measures in a greater variety of units, including g/kg, lbs/oz, oz, g, and lbs. In general, the Alimento scale is piece of homemade wine equipment that is a bit more complex and provides more options than the Primo scale.
 The pH Meter: This piece of homemade wine equipment is essential for monitoring the progress of your wine. If you don’t monitor the basic chemistry of your wine, you won’t know if there is a problem or if you need to adjust the pH at any point during the process. The Hanna Checker Digital pH Meter gives you accurate pH measurements down to a tenth of a pH in a matter of seconds.
Finding the right homemade wine equipment for you will not only save you from headaches and extra work, but will also help to improve your winemaking skills and ultimately help you create better wines!
———————————————————————————————————
Ed Kraus is a 3rd generation home brewer/winemaker and has been an owner of E. C. Kraus since 1999. He has been helping individuals make better wine and beer for over 25 years.
Why is Sugar Necessary in My Home Brew Process?
Quick – name something intriguing and sweet that also produces beer and liquor. No, not your favorite bartender – it’s sugar. This complex ingredient is not only a vital component in the creation of home brew products, it’s also a large part of the taste profile that gives various liquids their drinkable personalities. While some sugars are simply added during the initial brewing process, others contribute simply by existing in ingredients such as fruits for wines. Sugar isn’t simply a one-note contributor, either; while the overall level of sugar used in a home brew needs to be monitored, blends of different types of sugars can produce a full-bodied and delicious spirit.
Feeding The Yeast
For something so small, yeast packs a big punch. This one-celled organism is responsible for the fermentation, otherwise known as breaking down sugars to turn them into alcohol, process of home brewing. According to popular how-to site HowStuffWorks, “yeasts obtain food from fructose, glucose, and other monosaccharaides (simple sugars), which are found in most fruits.” This means that without the addition of some sort of sugar in sufficient quantities during the brewing process, you’ll end up with an old bottle of yeast-filled grape juice instead of a smooth wine. Feeding yeast sugar also produces carbonation, a necessary component to satisfying home-brewed beers.
Adjusting To Your Taste
When it comes to sugar, these sweet powerhouses aren’t just workhorses. Beyond the fermentation process, sugar also makes a finished spirit palatable, helping to balance stronger flavors like hops or slightly bitter flavors like herbal additives. Sugar can also be a final flourish during bottling, as well. A recent article from the San Antonio Current follows home brewer Jerry Lockey as he adds extra sugar prior to siphoning his latest project into bottles. In the article, Lockey explains to the Current that this last dash of sugar helps further ferment the new beer as it ages.
Sugar comes in several different varieties for home brewing projects, such as corn sugar and light and dark candied sugar for brewing various types of ales. Stumped for what sugars will work best with your brew? With a full range of articles, advice, and helpful customer service agents, the Adventures in Homebrewing website has all the “sweet” knowledge you’ll need to bottle a sensational spirit. Once you find the right sugars for your project, ferment something fantastic and you’ll discover just how impressive a single home brewing ingredient can be.
4 Tips For Making Wine In A Damp Basement
 I really enjoy your website with all of the winemaking information. You’re truly educating the winemaking public. My question is, I’m storing my carboys and wine bottles in the basement. Its a damp basement that gets water in it when it rains. Who knows what organisms are living down there when its damp. I always clean my carboys with b-brite and a good dose of sulfite before using. I rinse my bottles with a bottle washer (stream of warm water) and rinse well with sulfite. I have to work in the basement now, because I’m getting to the point of not being able to carry the carboys up and down the stairs anymore. Even though I’ve never had a problem, should I be storing the carboys and bottles another way.
Thank You
Name: Nino P.
State: New York
Hello Nino,
I understand why you would be concerned. Without being there to inspect what you are dealing with, I would say that you can get away with it just fine, but you have to take some precautions. It is important to remember that mold and bacteria can be airborne. For this reason you need to keep in mind that it’s not just a matter of what touches the wine, but also a matter of air exposure is given to the wine.
With that being said, here are 4 things you can do to help keep your wine protected, regardless of the environment:
- Keep Air-Locks Filled: When an air-lock has water in it, it is cutting off this questionable environment from the wine. If the air-lock goes dry then there is no protections at all. For this reason it is important to keep air-locks full. A little trick that can keep the water form evaporating on you is to not use water. Instead, use glycerin. It does not evaporate, and it does not facilitate the growth of microbes
- Keep Your Fermentations Healthy: The better your wine ferments, the more it is protected from contaminants. When the wine yeast is fermenting hard, foreign microbes don’t have a chance to grow. Think of it as having a good stand of grass in your yard. When the grass is thick and full, the weeds do not have an opportunity to grow and spread.
- Use Sulfites After Rackings: Once the fermentation has completed and the wine is still, do not hesitate to add a dose of sulfite in the form of either Campden tablets or potassium metabisulfite. Either of these will easily destroy any cells or spores that may have made their way onto the wine. You might want to take a look at Racking Your Wine: The When’s, Why’s & How’s for further direction on when to rack your wine and when to sulfite it.
- Spray The Area With Bleach: This is something that should be periodically done to the immediate winemaking area. Using a weed sprayer works great for this. Just make sure it is a new one. Use a 1/4 cup of bleach to each gallon of water. Lightly spray over surfaces, starting with any exposed floor joists and then work your way down from there.
I think you can kind of get the picture by now. Making wine in these not-so-perfect conditions is very possible. It’s just a matter of keeping aware and being vigilant.
Happy Winemaking,
Ed Kraus
———————————————————————————————————
Ed Kraus is a 3rd generation home brewer/winemaker and has been an owner of E. C. Kraus since 1999. He has been helping individuals make better wine and beer for over 25 years.
Do You Have A Malt Liquor Recipe?
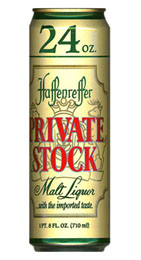 I would like to try brewing Haffenreffer Private Stock malt liquor. Do you have a recipe for this American malt liquor 6.90% ABV? Whole grain or extract would be OK. I can go either way. I have been brewing about ten years and would like to try to make an old favorite from back in the 50s. Not available in Arkansas. Hoping you can help with a workable recipe.
Name: Roger B.
State: Arkansas
—–
Hi Roger,
Thanks so much for your question! This sounds like a fun experiment!
As you probably know, malt liquor is a basically a high-gravity lager brewed with high levels of adjuncts, usually corn, sugar, or a combination of both. Malt liquors tend to be around 6-8% alcohol by volume and are lightly hopped.
While I’ve never had the particular malt liquor you mentioned, I’ve had my fair share of Olde English, so I have a general idea what you’re going for. You may want to do some experimentation to find what works best for you, but here’s what I recommend:
- Crack open a 40 of your favorite malt liquor.
- Get a Brewers Best Cream Ale or American Light recipe kit.
- Supplement the recipe with an extra can of Briess Pilsen Light liquid malt extract plus a combination of flaked corn and corn sugar to bring your estimated original gravity to about 1.070.
- Use a clean fermenting lager yeast, such as Wyeast 2035.
- Lager the beer, fermenting it at cold temperatures to make the beer as smooth as possible.
- Drink a number of 40s over the following weeks so you can reuse them to bottle your own malt liquor.
You could also try an all-grain recipe like this one (for a 5-gallon batch):
- 7 lbs. two-row barley malt
- 2 lbs. flaked maize
- 2 lbs. corn or cane sugar
- .5 lb. caramel 20L malt
- 1 oz. of a low alpha acid hop at :60
- 1 oz. of a low alpha acid hop at :10
- 1 pack lager yeast (Try Vierka German Lager dry yeast, Wyeast 2007, or Wyeast 2035
Or, you may want to try Charlie Papazian’s recipe for an “Olde English 800”, found in the Complete Joy of Homebrewing:
Olde English 800
5 Gallons
OG: 1.055
FG: 1.004
ABV: 7%
Color: 4.5 SRM
Bittering Units: 14
3.5 lbs. American 2-row pale malt
3.75 lbs. American 6-row malt
3 lbs. flaked corn
2 HBU (56 MBU) American Cluster hops (pellets) – 105 minutes (bittering)
1.5 HBU (43 MBU) American Nugget hops (pellets) – 105 minutes (bittering)
1/4 tsp. Irish moss
Wyeast 2007 Pilsen Lager yeast
Instructions: A step infusion mash is employed to mash the grains. Add 10 quarts (9.5L) of 130-degree F (54.5 C) water to the crushed grain and flaked corn, stir, stabilize and hold the temperature at 122 degrees F (50 C) for 30 minutes. Add 5 quarts (1.9 L) of boiling water. Add heat to bring temperature up to 150 degrees F (65.5 C). Hold for about 60 minutes.
After conversion, raise temperature to 167 degrees F (75 C) water, lauter and sparge with 4 gallons (15 L) of 170 degree F (77 C) water. Collect about 6.5 gallons (25 L) of of runoff, add bittering hops and bring to a full and vigorous boil.
The total boil time will be 105 minutes. When 10 minutes remain, add Irish moss. After total wort boil of 105 minutes (reducing wort volume to just over 5 gallons), turn off the heat, then separate or strain out and sparge hops. Chill the wort to 65 degrees F (18 C) and direct into a sanitized fermenter. Aerate the cooled wort well. Add an active yeast culture and ferment for 4 to 6 days in the primary at 55 degrees F (15 C). Then transfer into a secondary fermenter, chill to 50 degrees F (10 C) to age for two more weeks, then lager for two to four more weeks at 40 degrees F (4.5 C).
When secondary aging is complete, prime with sugar, bottle or keg. Let condition at temperatures above 60 degrees F (15.5 C) until clear and carbonated, then store chilled.
It may take a couple tries to get the flavor just right, but I’m sure you can do it! Good luck and let us know how it turns out!
——————————————————————————————————-
David Ackley is a beer writer, brewer, and self-described “craft beer crusader.” He holds a General Certificate in Brewing from the Institute of Brewing and Distilling and is founder of the Local Beer Blog.
Which Grape Press Is Right For You?
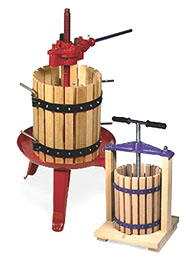 Whether you’ve recently made the decision to make your own homemade wine from grapes or you’ve been toying with the idea for a while but haven’t made the leap yet for one reason or another, it is important to know your options in regards to how you plan to process your grapes. Making wine from grapes requires the extra steps of processing the grapes into must that you didn’t have to do when making wine from juice that requires extra equipment that you haven’t had to use until now.
When you think about grape presses, the first thing that may come to mind is the good old foot! The historical and romanticized version of the grape harvest culminated with the ceremonial stomping of the grapes by barefoot ladies in huge vats. In these modern days of health codes and sanitation, the grape stomp has been retired in winemaking and is now only performed as ceremonious activities and the juice of which is not used for any winemaking or consumption purposes.
If you’re not planning on stomping your grapes to get to the juice (which I recommend you don’t), the biggest equipment acquisition you will need to make prior to making wine from grapes is the grape press. In order to turn your grapes (or other fruit) into the must, you need to somehow get the juice out of the fruit. Getting yourself a reliable grape press is an investment you must pursue in order to even think about making wine from grapes or other fruit.
One type of grape press you could use is the Table Top Fruit Press. This grape press is made of hard woods and is put together using strong cast iron supports. You can load up to 20 pounds of fruit into this grape press, and can actually press all sorts of fruits inside of it—not just grapes! If you’re planning on making 5, 10, or 20 gallons of wine from grapes or fruit, this grape press is the ideal size for your needs.
If you’re planning on producing wine at a larger scale, in the range of 15 to 50 gallons of wine, the R-30 Double Ratchet Fruit Press would be an ideal choice for your needs. Made of similar hardwood and cast iron as the Table Top Fruit Press, the Double Ratchet Fruit Press comes equip with a solid ratchet crank to efficiently and easily press a lot of fruit in a short period of time.
Once you’ve made the decision to make your homemade wine with grapes (or other fruit), it’s very important to invest in a good grape press. A grape press is not only more sanitary and clean than stomping with your feet, but it’s more efficient and you’ll be much more productive!
———————————————————————————————————
Ed Kraus is a 3rd generation home brewer/winemaker and has been an owner of E. C. Kraus since 1999. He has been helping individuals make better wine and beer for over 25 years.
What Should I Know About Home Brewing with Raw Honey?
When making alcoholic beverages using honey, mead is generally the go-to by-product. In fact, you can find a wide variety of meads on the market that blend honey with inventive ingredients and flavor profiles into their drink. However, that’s far from the end of the line when it comes to brewing and fermenting with honey. Whether you homebrew wine, beer, or cider, you can incorporate honey for a fun, exciting twist in your brew.
Honey is highly fermentable, which makes it a great ingredient in alcoholic beverages. When you’re using raw honey though, you need to be mindful of a few variables and considerations that could affect your end product. Here’s a quick guide to help you make the most of this fantastic ingredient.
Honey’s flavor ferments out if you aren’t careful.
Honey is composed of dense carbohydrates, but the fermentation process can eat up its character. If you simply add honey to the fermentation process you’ll likely end up with very little honey character, if it’s noticeable at all. That’s fine if you simply want a lighter body and higher alcohol content, but raw honey typically isn’t used for that purpose. To retain the character of the honey you need to add diluted, heat-treated honey to the primary fermenter.
Enzymes and wild yeast need to be taken care of.
According to Brew Your Own, raw honey features wild yeast and other enzymes that could negatively affect the quality of your fermented beverage. There are two ways to handle these organisms before they have a chance to ruin your brew. The simplest method is adding honey into a long, roiling boil right at the start of the cooking process. This will denature enzymes, kill any yeast, and remove any beeswax still present in the honey. The downside to this harsh process is that the high, immediate heat can hurt the natural smells and flavors of the honey, impacting the end product.
By contrast, you could attempt home pasteurization. This process will preserve the qualities of the honey character, but it’s a fairly involved process that only experienced brewers should attempt.
Add honey based on your desired end product.
It comes as no surprise that different amounts of raw honey produce different results. When deciding how much to add, measure your honey as a percentage of total fermentables in the brew. Anything below 10 percent is intended to provide light notes and flavors of honey to the brew. If your brew is between 11 and 30 percent you should expect a strong honey flavor. This can be balanced out by stronger flavors in other ingredients, as well as dark specialty malts.
It may take a little trial and error, but raw honey can be a fantastic addition to your brewing arsenal, whether it’s cider, beer or wine. Try out some different recipes and see what works best for you.
