Degassing Wine With A Drill Mixer

Illustration of Degassing Wine With A DrillThank you so much for all the information–it has been a lifesaver at times! My question is on degassing wine with a drill Mix-Stir in the carboy. How fast should I be using it with my drill? It seems like I just keep making more and more foam if I speed it up and I don’t know if that’s a good thing or not. It also takes forever. Should I slow the drill down? And when should I stop-is it okay to have just a few bubbles left? Thanks so much from a “Newbie”, and keep up the good work.

Name: Eileen M.
State: Florida
—–
Hello Eileen,

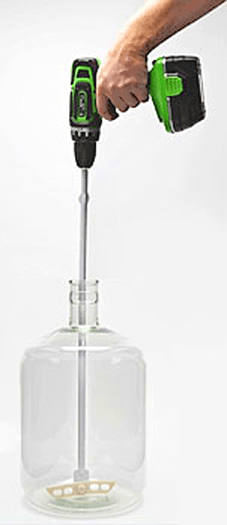
When degassing wine the a drill mixer, you want to run the drill as fast a possible. The only thing that should be slowing you down is the foam that is wanting to come up and out of the wine. Like pouring a glass of hot soda pop over ice, this may require a little patience on your part. But other than that go as fast as you can. No reason to keep things slow. Degassing the wine quickly will not hurt the wine in any way.

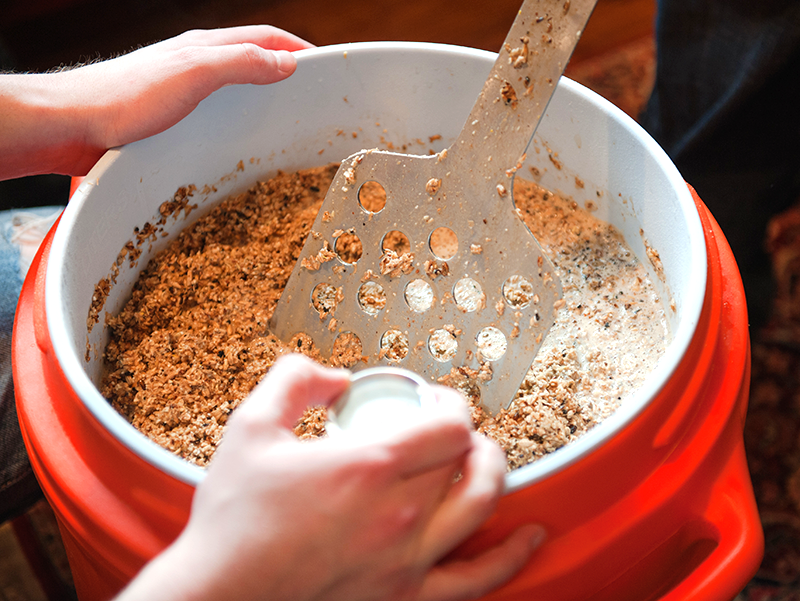
Having said this, the one thing you definitely do not want to do when degassing with a drill is splash the wine. Splashing is different than mixing the wine. When the Degassing/Mixing Paddle is submerged into the wine it is only agitating the wine within itself. When you are splashing the wine you are disrupting the surface of the wine.

Splashing the wine can allow air to saturate into the wine. This would be a bad thing since air in the wine will promote wine oxidation. Splashing is not so much an issue when you are first starting the degassing process because so much CO2 gas is coming off the wine that air can not saturate. But it does become a consideration as you finish up degassing the wine with a drill mixer.

As to your question about how long you should be degassing the wine or how far you should go, you want to get it to a point where there is only a small amount of foam being produce. Don’t worry about getting all the gas, just get to a point where it’s relatively hard to make foam. If a remnant amount of CO2 gas is still in the wine, that’s okay. This amount will have opportunities to leave during racking and bottling.

Shop Wine Bottle CorkersJust realize that degassing wine with a drill mixer is a safe and efficient way to go about it. Just get the paddles in the wine before spinning it, and you’ll have no issues whatsoever.

Happy Winemaking,
Ed Kraus
—–
Ed Kraus is a 3rd generation home brewer/winemaker and has been an owner of E. C. Kraus since 1999. He has been helping individuals make better wine and beer for over 25 years.

Style Guide For Brewing Brown Ales

Home Brewed Brown AleGenerally speaking, brown ales are relatively mild and malt-forward beers that pair well with many different foods. Sometimes brown ales are nutty. This is from the character of the malted barley being used. Whether you prefer the classic, English version or the slightly more hoppy and robust American-style, brown ales make for good drinking. And without a doubt, brewing brown ales is well worth the effort.

You could try brewing an English brown ale from a kit, or follow a brown ale beer recipe, but sometimes it’s fun to develop your own beer recipe. Here are some guidelines and suggestions for brewing your own brown ale:

Style Guidelines For Brewing Brown Ales

  • ABV: Brown ales tend to be fairly sessionable, usually 4.2 – 5.4% alcohol by volume. American brown ales go as high as 6.2% ABV.
  • IBUs: English brown ales range from 20-30 IBUs. Again, American versions tend to push the envelope a bit, reaching 40 IBUs or higher.
  • Color: Northern English versions are copper to light brown in color, 12-22 degrees on the SRM color scale. Southern English and American brown ales reach as high as 35 SRM.

Water Treatment For Brewing Brown Ales

If brewing English brown Ale, try to recreate the hard water of the UK. To simulate a beer from Burton-on-Trent, use some gypsum and calcium carbonate, or Burton water salts. A brew from London will be high in sodium (100 ppm) and fairly high in carbonate (160 ppm). Note: You should know the mineral content of the water you’re brewing with before you start amending it.

Typical Grain Bill For Brewing Brown Ales

  • All-Grain: As with many beers, a standard 2-row malt will be the foundation (70% or more) of your brew’s grain bill. A US 2-Row Malt will work, or try using Maris Otter for an English Brown. Chocolate Malt is the next most important component of the grain bill and will lend the beer a somewhat roasty, slightly bitter chocolate flavor. You don’t need a lot: 4-8 oz. for a 5 gallon batch should be sufficient (less if using other kilned malts). You may also wish to use up to 1 lb. of Crystal Malt, and maybe a pinch (2 oz. or less) of Roasted Barley if you’d like a more roasty beer.Shop Steam Freak Kits
  • Extract: If brewing with extract, use a combination of light and dark malt extracts or 100% Amber Extract. Definitely consider steeping a little chocolate malt with some lightly kilned crystal malt. Note: Steeping even a little chocolate malt will add a lot of color. To keep your beer brown and not black, steep at most about 4 oz. of chocolate malt.

Adjuncts For Brewing Brown Ales

You may want to consider using a pound or so of brown sugar or a ½ pound of molasses for color and complexity.

Hops For Brewing Brown Ales

If brewing an English brown ale, stick with the classics: East Kent Goldings or Fuggles. For American brown ales, use primarily US-grown varieties. Consider finishing with Cascade, America’s most popular hop.

Yeast For Brewing Brown AlesShop Liquid Malt Extract

For an English Brown Ale, consider using Wyeast’s #1098 British Ale or #1028 London Ale. Nottingham is a good dry beer yeast. If brewing an American brown ale, try Safale US-05 or Wyeast’s #1056 American Ale. Or, if you want to get really creative, use a Belgian Ale Yeast to make it a Belgian brown ale!

So do you have a good Brown Ale recipe? What flavors do you look for when brewing brown ales?
—–
Ed Kraus is a 3rd generation home brewer/winemaker and has been an owner of E. C. Kraus since 1999. He has been helping individuals make better wine and beer for over 25 years.

What Information Goes On A Wine Bottle Label?

Wine Bottle Label ExampleAs a home winemaker, you don’t have to worry about conforming to all the strict rules regarding wine bottle labels that are in place for commercial winemaking.  However, creating wine labels that will allow you to easily identify your wine in your cellar is highly recommended.

Simply writing a “Cab” for Cabernet Sauvignon or “P” for peach on the top of the cork or side of the bottle with a grease pencil isn’t going to cut it. The information that goes on the wine label is going to become more important as you start producing more styles and vintages.

Designing and creating a wine bottle label system that helps identify exactly what’s in the bottle and that looks stylish and professional if you’re gifting it for a friend or family member will save you a lot of headaches in the future.

You can as much or as little information on the wine bottle label as you’d like. You can make the wine bottle label as simple or as complex as you’d like. This is because it is your wine. You are the winemaker and are not bound by strict wine bottle label laws.

Each country has different laws in regards to what information must go on the wine label, however, most of them have basic similarities that you can apply to your own wine label.  If you’re looking to design a wine bottles label that’s similar to those from commercial wines, you’ll need a few standard pieces of information.

  • Brand Name: What do you want to name the wine? Joe’s Amazing Chardonnay? Sweet Peachy McGee?  You can get creative with this one!
  • Vintage:  What year were the grapes or other fruits picked?
  • Variety/Fruit Information:  What’s in the bottle? Is it Sauvignon Blanc? Or is it Raspberry wine?
  • Region/Geographical Location:Shop Wine Bottle Labels  Where did you make the wine?  Where did the fruit come from?  You could very well be making your wine in a different location from where you purchased the fruit, and that’s OK! Since you’re not bound by any wine bottle label laws, you have the freedom to write what you want here.  On commercial bottles, it must be made clear where the fruit is coming from as well as the location of the winery.
  • Alcohol content: This is information that goes on any wine label you see on the commercial shelf.  It might be nice to include this on your wine label as well, particularly if you’re going to be gifting it to someone else that isn’t familiar with how you made the wine.
  • Volume: This information indicates the volume of wine contained within the bottle.

As a home winemaker, what information goes on your wine labels is completely up to you. You have freedom to do anything you want with your wine label. However, it is important to label your wines in such a way that you can easily identity them. And, if you’re giving the wine to someone as a gift, it would be nice to design your wine label in such a way that it creates a little fun, as well.
—–
Ed Kraus is a 3rd generation home brewer/winemaker and has been an owner of E. C. Kraus since 1999. He has been helping individuals make better wine and beer for over 25 years.

3 Ways To Become An All-Grain Brewer!

Brewing Using One Ot The All Grain Brewing MethodsIf you’re new to all-grain brewing, you may have heard about infusion mashing, step mashing, and decoction mashing techniques and wondered what all the fuss is about. Don’t let the jargon confuse you. These are just 3 all grain brewing methods you can use to mash your malted grains to extract fermentable sugar. (If you’re not ready for brewing all-grain yet, you may want to check out our Introduction to Partial Mash Brewing.)

Let’s see if we can shed some light on the three mashing processes:

Single Step Infusion Mash

A single step mash is the most basic style of all grain mashing. It simply involves soaking the crushed grains in water at a steady temperature for a specified period of time. Most homebrewers mash for about 60 minutes, though in theory 30 minutes should do the trick.

This process, called conversion, allows naturally occurring enzymes in the grains to break down the starches into fermentable sugar. One of the cool things about mashing is that by controlling the temperature of the mash, you can change the fermentability of the wort. By mashing in the lower end of the temperature range (around 148°-152°F), you achieve a more fermentable wort, and ultimately a drier beer. Mashing your grains in the upper end of the spectrum (152°-158°F) creates a less fermentable wort and a sweeter beer. Since I don’t have a very advanced brewing system, I’m usually happy just keep the mash in the 150°-154°F ballpark.

Brewers have the option of raising the mash at the end for the mash out. Bringing the mash up to about 170°F will stop enzymatic activity and make it easier to run off the wort.

Multiple Step Infusion Mash

Shop Brew KettelsThis all grain brewing method is often used when brewers need to break down proteins in the malt. This is only necessary when using under-modified lager malts. Because under-modified haven’t germinated as much during the malting process, a protein rest is used to allow enzymes to break down proteins in the grain. In a protein rest, the mash is usually held at around 122°F for 15-30 minutes, and then the mash is raised to conversion temperature (the temperature at which starches are broken down into fermentable sugars). The protein rest generally improves head retention and reduces haze when brewing with under-modified malts and unmalted adjunct grains.

Once again, brewers may want to raise temperature for mash out at the end of the multiple step mash.

Decoction Mash

Of the 3 all grain brewing methods mentioned here, decoction mashing is the most traditional brewing technique. It was developed by brewers who had a lack of temperature control. Brewers would remove a portion of the mash, boil it, and add it back into the mash. They might repeat this up to three times. These brewers found that the decoction process allowed them to bring the mash through each of the various rests and end up with a fermentable wort.Shop All Grain System

Today, since we have thermometers and other methods of temperature control, decoction mashing isn’t really necessary, though some brewing still use decoction mashing for brewing certain traditional styles.

So there you have it: Ales use single step mashing, lagers use multiple steps, and decoction mashing is an option for brewing certain traditional styles.

Which of these all grain brewing methods do you prefer?

Buying Corks For Wine Bottles

Corks For Wine BottlesSo, your homemade wine is just about ready and you’re preparing to bottle! All the hard work creating your masterpiece is nearly complete and transitions into a more passive process of waiting for the wine to be ready to be shared and enjoyed!

But you must be careful and not get too lax about things, as the bottling process is just as important as every step up until now. Buying corks for your wine bottles is a critical step, as well. Not all corks are the same and the corks you buy must ensure the proper fit for the aging at hand.

Selecting the right wine cork can be an overwhelming process. There are countless sizes, and source materials used. How are you supposed to buy corks when there are so many types from which to choose?  It helps to have a elementary understanding of the basic differences between the different wine corks. And, this is were we will start…

Your first decision when buying corks for wine bottles is whether or not you want to use synthetic corks or natural corks.  The difference between the two is that natural cork allows more oxygen into the wine than synthetic. This is preferable if you want a wine to age more quickly. The downside, however, is that the wine will not keep as long. In other words, the wine will have a short life-cycle. Instead of being fresh in the bottle for 5 or 10 years, it may be necessary to consume the wine within 2 or 3. We have different natural wine corks with different densities for this reason.

Conversely, synthetic corks are great for aging and keeping wines for longer periods of time. The amount of oxygen that is allowed to pass a synthetic cork is very minimal. They are as oxygen restrictive as our best quality natural corks. So as you can start to see, when buying corks for your wine bottles, natural vs. synthetic become an important decision.

Now, you need to consider the size of the corks. You’ll be happy to know that all cork-finish wine bottles have the same opening. This is regardless if they are 375 mL or 750 mL in size. The bottle opening is 3/4 inch. So, this is not an issue. But, natural corks are sold in different diameters:

Which of these diameters you choose depend on two thing: 1) Whether or not you have a wine bottle corker to insert the corks, and 2) How quickly you would like the wine to age.Shop Wine Bottle Corkers

If you do not have a wine bottle corker, then you will be limited to size #7 corks. Corks larger than this require that they be pressed into the wine bottle. They can not be put in by hand. Another option would be to use T-Corks instead of straight corks. These can be put in by hand as well.

If you would like the wine to age as quick as possible, then you would want to consider size #7 corks. If you would like the wine to keep as long as possible then #10’s may be an options. However, I would recommend staying away from these both these options when buying corks for your wine bottles. Remember, fast aging equals short keeping time. And the size #10’s are so hard to put in, you will need a professional floor-model corker to put them in. They are also hard to take out.

Most wine makers will either use size #8 or #9. This provide a nice balance of aging and shelf-life. It is also important to not that the standard size for the commercial wine industry is the size #9. All synthetic corks are size #9.

Buying corks for wine bottles doesn’t have to be stressful, and knowing what source material you’d like and the type of wine bottle you’ll be using will help you tremendously in narrowing down which you should ultimately purchase. You may want to take a look at another blog post, “Getting The Wine In The Bottle…“. It carries this subject a little further.
—–
Ed Kraus is a 3rd generation home brewer/winemaker and has been an owner of E. C. Kraus since 1999. He has been helping individuals make better wine and beer for over 25 years.

First Wort Hopping: A Cooler Way Of Adding Hops To Your Brew

Pour Hops Into WortWhile it’s most common to boil the hops or “dry hop” by adding them to fermenter, there’s another technique of adding hop aromas to your brew called First Wort Hopping. Hops are many homebrewers’ favorite ingredient. Aromas of citrus, pine, resin are unique, pleasing at first smell, and somewhat addictive. Once you get the hophead bug, it’s hard to turn back! Some brewers claim the first wort hopping provides a better overall hop profile than the typical bittering, flavor, and aroma additions.

Let’s investigate what first wort hopping is all about:

What is First Wort Hopping?

First wort hopping is a technique which involves pouring the runnings from a mash over hops. This is usually done by taking some or all of the finishing hops and adding them to the kettle as hot wort runs into it.

Some brewers claim that first wort hopping (FWH) improves the aromatic hops qualities in the finished beer. Marty Nachel points out that “In fact, one study among professional brewers determined that the use of FWH resulted in a more refined hop aroma, a more uniform bitterness (i.e. no harsh tones), and a more harmonious beer overall compared to an identical beer produced without FWH.”

But how does first wort hopping work?

According to John Palmer, “The aromatic oils are normally insoluble and tend to evaporate to a large degree during the boil. By letting the hops steep in the wort prior to the boil, the oils have more time to oxidize to more soluble compounds and a greater percentage are retained during the boil.”

In other words, the pre-boil steep helps to keep aromatic oils in the wort. Palmer recommends using only low alpha-acid hops for first wort hopping and at least 30% of the recipe’s hops for this addition.

As Bradley Smith of BeerSmith points out, there’s a lot of debate surrounding first wort hopping and its effect on beer. The best thing to do is try it out and decide whether or not it works for you.

First Wort Hopping Tips for HomebrewersShop Accurate Scales

  • Since most homebrew recipes only call for 2-4 oz. it may require a digital scale to weigh out the 30% or so of hops used for first wort hopping.
  • Use low alpha-acid hops, such as the noble hops for first wort hopping. These usually have a best aromatic qualities.
  • First wort hopping is mostly a technique for all-grain brewers, but that shouldn’t keep extract or partial mash brewers from giving it a shot. Either make a “hop tea” while heating water for adding extracts, or steep the hops at the same time as steeping specialty grains. It’s an experiment, so take notes on the results and decide for yourself whether the technique works or not.

Have you used first wort hopping in your homebrews? How did it turn out? Share in the comments below!

—–
David Ackley is a beer writer, brewer, and self-described “craft beer crusader.” He holds a General Certificate in Brewing from the Institute of Brewing and Distilling.

Augmented Reality Wine Labels

Unless you’re a true oenophile, we can all agree that it’s a difficult decision selecting a bottle of wine for any occasion. When deciphering between brands you’ve never tried, it often comes down to which bottle with the best label.

That’s why some brands started using augmented reality technology on their wine labels. This technology combines art and technology to bring wine labels, and brands, to life. Would you choose an average-looking bottle of wine over one that uses augmented reality to tell you a story?

AUGMENTED REALITY ON WINE LABELS?!

With augmented reality, each wine label is an individual piece of art that uses smartphone technology to tell the story behind the label. It’s as easy as downloading a free app on your phone, scanning the label on a bottle of wine, and watching a creative, storytelling video that will keep you entertained while drinking your wine.

Marketers have always used a brand’s story to connect with customers and build loyalty. They know that storytelling sets a brand apart from its competition and can add value to its customers. 

Global winemaker, Treasury Wine Estates, understands the power of storytelling and the ability to use technology to tell stories in different ways. That’s why they created the Living Labels app, a free app that allows customers to watch their bottles of wine come to life. After downloading the app, the only thing users have to do is take a picture with their smartphone to watch the label transform into a video-like story.

Consumers can interact with a brand, quickly navigate to a company’s website, and even find coupons and promotional offers. Having augmented reality wine labels at our fingertips enhances the wine-drinking experience while engaging and creating loyal customers.

ENHANCING THE WINE-DRINKING EXPERIENCE

Imagine that you’re at a party, and your friends are gathered around the wine bottle watching the video. The use of interactive videos makes everyone want to jump in on the fun and watch the story together. You’re even able to learn more about the brand through the content they display in the video, like coupons or links to the brand’s website.

Here are some fun brands that are taking advantage of augmented reality storytelling. 

The Walking Dead

The Living Labels app animates an impressive display of The Walking Dead characters. There are multiple wine labels for The Walking Dead, and each label tells a different story. The app’s features even allow you to turn your passion for wine into a game. If you combine multiple bottles, you’re able to unlock the greatest clash between the living and the dead. The labels on the bottles do a great job telling the story of The Walking Dead, keeping everyone entertained.

https://youtu.be/SuK9hfiRnmI

19 Crimes

Cheers to the Infamous! By the scan of a smartphone, this 19 Crimes infamous convicts from history telling their sides of the story – a customer favorite! 19 Crimes is currently growing 21 times faster than the red wine category, according to Treasury Wine Estates chief marketing officer, Angus Lilley

The emBRAZEN Living Labels collection shows prominent women from history, like Josephine Baker, Nellie Bly, and Celia Cruz. When the labels are scanned, a fire is set aflame, and consumers are able to interact with the label by dragging their finger over the label to reveal how each woman made her mark in history.

What Is ‘Bench Testing’ And How Does It Apply To Wine Making?

A Bench Trial Of Red Wines.I understand the practice of using bench trials, but don’t know how to apply it to my wine making. I want to blend Cabernet, Merlot, and Sangiovese to produce an Italian Chianti style red. I’ll take a small amount of each and get what I want. How do I use this “formula” to make a large batch.

Name: Cos S.
State: PA
—–
Cos, thanks for a very good wine making question. For those of you who have never heard of bench trials, in terms of wine making, it is basically taking a small sample of a batch of wine and treating it in a specific way, and then evaluating the effects on that wine sample. If the results are favorable, you do the same thing to the rest of the wine batch. That’s basically how you go about using bench trials in winemaking.

As an example of using a bench trial, if some one has 10 gallons of wine and wants it sweeter, they can take 1 measured gallon of wine from the batch then add measured amounts of sugar syrup to the wine until it is the sweetness desired to establish a dosage. The best part is if you accidentally add too much sugar to the sample, you can add it back to the other 9 gallons and start all over with a new sample — without ever jeopardizing your wine. No risk to the entire batch.Shop Wine Bottle Corkers

Cos, in the instance of using bench trials to blend wines together, it is a matter of getting the ratios down for each wine. It’s all about the ratios. This means that you need to measure each wine before adding it to your blended sample. Once you know how much you used of each wine, you can then apply the formula in larger numbers.

Let’s say after playing around with different blends for a couple of days and several bench trials, you have determined that you like the blend of:

6 oz. Sangiovese
3 oz. Merlot
1 oz. Cabernet Sauvignon

You now have your ratio: 6/3/1. Right now it’s in ounces, but it could be in any measuring units that is convenient for you: mL’s quarts, gallons, barrels. If you wanted to create 10 gallons of the blend you would use:

6 Gals. Sangiovese
3 Gals. Merlot
1 Gals. Cabernet Sauvignon

If you want to only blend 5 gallons of wine it would be:

3 Gals. Sangiovese
1.5 Gals. Merlot
.5 Gals. Cabernet Sauvignon

shop_wine_barrelsOne fun activity you can do when using bench trials in winemaking is to do blind tastings. Have someone make several different variations without revealing which sample is which. Then you and friends can taste them and see which one you like best. Use the winner to change the rest of your wine(s).

I hope this clears thing up a bit for you. The key to using bench trial in winemaking is to get everything measured that goes into the test sample. That way if you like it, you have a clear recipe as to what to do with the rest of the batch of wine.

I also wanted to mention that there is an article on our website titled, “Blending To Improve Homemade Wines” that you may want to look over. It goes into the art and science of blending homemade wine in more detail and covers a little more about using bench trials, as well.

Happy Winemaking,
Ed Kraus
—–
Ed Kraus is a 3rd generation home brewer/winemaker and has been an owner of E. C. Kraus since 1999. He has been helping individuals make better wine and beer for over 25 years.

Beer Recipe of the Week: Newcastle Brown Ale Clone

New Castle Brown AleConsidered by some to be the quintessential northern English brown ale, Newcastle was at one time the best-selling bottled beer in the UK. The beer, now ubiquitous throughout the US, was originally brewed in 1927 at Newcastle Upon Tyne. It’s a reddish-brown ale that highlights nutty malt flavor.

Though Newcastle is now brewed by the macro-brew powerhouse Heineken, many craft beer drinkers remember it fondly as a “gateway beer” to other traditional beer styles from around the world. Brew this Newcastle clone beer recipe and rediscover your love for brown ales!

Newcastle Brown Ale: Ingredients and Procedures

  • Malt – The key component in this brown ale is the crystal malt. The mid-range crystal 60°L malt is responsible for the nutty flavor in the beer. Small amounts of chocolate and black malt contribute color and a hint of dryness.
  • Hops – The classic English hop, East Kent Goldings, is used mostly for bitterness. Some hop flavor should be detectable, but will not overpower the malt.
  • Yeast – English ale yeast for this style of beer is essential. In the traditional brewing of this beer, the brewers would actually brew two separate beers, one high-gravity and one low-gravity. The high gravity beer would encourage the yeast to produce more fruity esters, which can then be blended down by the lower gravity beer. This is a lot of extra work for the homebrewer and is completely optional. It’s not impossible to do, but you’ll need an extra fermenter. It will be easiest if you’re using the all-grain method, taking the first runnings for a high-gravity boil, and the second runnings for the low-gravity boil. Then ferment the beers separately and blend them together at bottling time. (Again, this is completely optional.)

The beer recipe below is modified from the American Homebrewers Association. It was original printed in Zymurgy Magazine.

Newcastle Brown Ale Clone Beer RecipeShop Dried Malt Extract
(5-gallon batch, extract with specialty grains)

Specs
OG: 1.049
FG: 1.012
ABV: 4.8%
IBUs: 26
SRM: 15

Ingredients
5.5 lbs. light dry malt extract
12 oz. Crisp 60L crystal malt
4 oz. torrified wheat
1.5 oz. black malt
1.5 oz. Crisp chocolate maltShop Hops
1 oz. Kent Goldings hops at :90
1 oz. Kent Goldings hops at :30
1 tsp. Irish moss at :15
Fermentis Safale S-04: English Ale Yeast
corn sugar for priming

Directions
Heat about 3 gallons of clean, chlorine-free water to 150˚F. Place crushed grains in a grain bag and steep for 30 minutes. Discard grains and bring wort to a boil. Remove from heat, and stir in the malt extract. Return to a boil, taking care to avoid a boilover. Boil for 90 minutes, adding hops and Irish moss according to schedule above. At the end of the boil, chill wort to 70˚F or boil. Add enough cool, chlorine-free water to make five gallons of wort. Mix well with a sanitized spoon to aerate, then pitch yeast. Ferment at 65-70˚F. When fermentation in complete, bottle with priming sugar and cap. Beer will be ready to drink in 2-3 weeks.

Do you have a Newcastle brown ale clone beer recipe you’d like to share? Just leave it in the comments below.

—–
David Ackley is a beer writer, brewer, and self-described “craft beer crusader.” He holds a General Certificate in Brewing from the Institute of Brewing and Distilling.

How Long Does Homemade Wine Last?

How long can a finished homemade wine be stored or aged before going bad?

Gabe
—–
Hello Gabe,

There is nothing unique to homemade wine that makes it spoil or go bad any faster or keep any better than commercially made wines. As long as the homemade wine is treated properly, it will keep just as long and as good as wines you purchase at the store. So when you ask, how long does homemade wine last?, the simple answer is, just as long as any other wine!

But what does treated properly actually mean?

  1. It means your wine must be dosed with sulfites, and
  2. Your wine bottles must be sanitized before using

Treating Your Wine With Sulfites
This is very simple do and is very beneficial to the keeping qualities of the wine. If the wine is being made from fresh grapes or other fresh fruits, just add a standard dose of potassium metabisulfite or Campden tablets 24 hour before adding the yeast. If you are making wine from a wine concentrate this process can be skipped.

Another dose of potassium metabisulfite or Campden tablets should be added to the wine right before bottling. This dose before bottling goes for any wine – regardless if it’s made from fresh fruit or grape concentrate. There may be other times that sulfite should be added, depending on how many times the wine is being siphoned or how long it’s being bulk aged. You can find more information on this in the blog post: Using Campden tablets: The How, When And Why.

Shop Campden TabletsBy performing these simple steps your homemade wine will stay fresher much longer and will degrade in quality much slower. And, you will have have virtually eliminated the chance of your homemade wine experiencing out-right spoilage.

Sanitizing Your Wine Bottles
This is the second part of the equation. How long does a homemade wine last? It depends on how well the wine bottles were sanitized. Fortunately, it’s a simple process.

All you have to do is clean the wine bottles as you normally would anyway. Use some dish soap and a wine bottle brush. If the wine bottles are brand new, you can skip this part. Then use a cleaners such as Basic A on the wine bottles to sanitize them. Both of these products come with complete directions on their usage. Once the wine bottles are mostly dry, they are ready to be filled with wine.

The wine bottle can be cleaned ahead of time, but the sanitation part should only be done when you are actually ready to bottle.

Shop Basic AFinal Word…
It’s important to understand that these are the same critical steps that any winery would take. It’s what keeps all those bottles of wine consistently fresh on the store shelves, and that’s why your homemade wine can last just as long as any commercially made wine – stay fresh and free from going bad.

Follow these procedures. Make them habits. And you’ll never have a problem with any of your wines keeping while in storage.

Best Wishes,
Ed Kraus
—–
Ed Kraus is a 3rd generation home brewer/winemaker and has been an owner of E. C. Kraus since 1999. He has been helping individuals make better wine and beer for over 25 years.