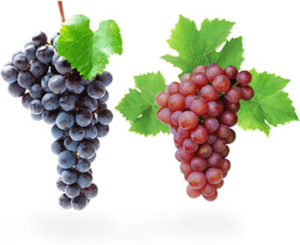
 There are many wine enthusiasts who can attest they like drinking wine, and may even prefer white over red (or vice versa), but many can’t really put into words the difference between a red wine and a white wine. That’s okay – we’re here to help.
A key difference between red wine and white wine is tannin. Tannins are natural, organic compounds found in grape skins, seeds and stems, which help give wine its structure and texture. They are what can lead to the pucker feeling in the moth and back of the throat. Tannins are also used for wine preservation – the more tannin, the longer the wine should age.
White vs. red is the general level of wine categorization, but there are six standard types of wine: white, red, rosé, sparkling, dessert and fortified wines.
White wines are wines that contain little or no red pigmentation and are almost always made from white grapes without their skin (with a few exceptions). Popular white wines include Chardonnay, Pinot Grigio, Riesling and Sauvignon Blanc.
Red wines are made from red or black grapes and have a red tint. Due to the fact that grapes have a colorless juice in order to make red wine the grape skins, which contain nearly all of the grapes pigmentation must remain intact with the juice during all or part of the fermentation process. Popular red wines include Beaujolais, Cabernet Sauvignon, Chianti, Merlot, Pinot Noir and Zinfandel.
A rosé wine has a pink shade to it and can range from a soft, subtle hue to a vibrant pink depending on the grape used and how long the grape skins were in contact with the juice. The majority of rosé wines are made from a red grape. Sparkling rosés are traditionally made with a blend of red and white grapes. Rosé’s are typically served chilled and are very refreshing in the summer months.
Sparkling wines will have a significant level of carbon dioxide allowing the wine to have a fizzy aspect. The carbon dioxide may be a result from natural fermentation or as a result of carbon dioxide injections. Sparkling wine is usually white or rosé but there are red sparkling wines as well. The sweetness of a sparkling wine will range among the different kinds. The best example of a sparkling wine is champagne.
Dessert wines are typically very sweet, full of flavor and served with dessert (hence its name) and they include port and sherry wines. Dessert wines are typically thicker and come from grapes picked later in the harvest to preserve sugars.
Fortified wines are typically made from adding additional alcohol during the fermentation process. The usual alcohol content of a fortified wine is usually much higher, 17-20%. They can be either sweet or dry in flavor. Similar to dessert wines, the most common types of fortified wines are ports and sherries.
Home vintners can enjoy and experiment with the different grades and flavorings of wine on all ends of the spectrum with their own wine making kits and wine making equipment.
Popular Wine Recipe for the Fall Grape Harvest
It’s late August and the dog days of summer are nearly over. The sun’s rays are becoming less strong, and the daylight hours fewer as fall fast approaches. It’s time to prepare ourselves for football, harvest festivals, crisper weather, and the Super Bowl of wine making—the grape harvest!
The North American grape harvest season falls between August and October. Usually picked based on sugar, acid, and tannin levels; grapes ripen and sugars, tannins, and other phenolics develop during this season creating wine’s flavorful base.
Our favorite fall grapes for home winemaking include shiraz and cabernet sauvignon, which create warm complex wines with hints of chocolate, vanilla, cedar, licorice, and black cherry. The perfect compliment for cooler weather and heartier meals. This wine recipe (more wine recipes) will surely be a favorite to make and savor in the months ahead.
Harvest Grape Wine Recipe
- 13 to 15 lbs ripe fall grapes
- 1/3 to 1/2 lb finely granulated sugar
- 1 crushed Campden tablet
- 3/4 tsp pectic enzyme
- 1 pkg Lalvin 71B-1122 yeast
- 1 tsp wine yeast nutrient
Sanitizing Your Winemaking Equipment Is No Hocus Pocus
 Hello Winemakers:
I am getting ready to start my first batch of wine from concentrate. I am a little confused about the sanitizing process for large pieces of equipment. The directions say to dissolve so much sanitizing stuff to one gallon of water. Does this mean a gallon will do the job? With a 6 gallon tuft tank or a 6 gallon glass carboy, for example, do you pour the gallon in the container and slosh it around? If so for how long? Directions say to soak corks from 5 to 10 minutes. Small items such as hydrometers can be submerged, but I am a little vague on doing the big items and some of the other details?
Thanks,
Mike H.
—–
Hello Mike,
The methods you are referring to are appropriate when using sulfites (sulfur dioxide) to do your sanitizing.
Sulfite is the most common ingredient home winemakers use to sanitize their equipment and supplies. Sulfites can be purchased as either Sodium Metabisulfite or Potassium Metabisulfite — both are granulated powders — or as Campden Tablets. Any of the three can be mixed with water to create a solution with the same active ingredient, SO2 (sulfur dioxide). Some of the sulfur dioxide will bond to the water itself. Some will start to release slowly as a gas. This gas is known as the ‘free’ SO2. This free gas is what actually does the sanitizing.
In the case of sanitizing your fermenters, you only need to put in a few inches worth of the solution to sanitize them. Just seal the fermenter up with a lid and/or airlock, and let it sit for a few minutes. The fumes from the sulfite solution will do all the work. You do not need to slosh, soak, scrub, or do any of that kind of stuff. Just follow the directions that are listed on the side of each of the containers we offer.
If you are sanitizing a container with a larger opening such as a bucket-type plastic fermenter, you can also put all your smaller winemaking equipment inside, and sanitize everything at the same time. Hydrometers, hoses, rubber stoppers, airlocks can be put in the plastic fermenter and easily taken care of in a single step.
It is important to realize that a sulfite solution made with any of these three ingredients: Sodium Metabisulfite, Potassium Metabisulfite or Campden Tablets, are the only solutions that do not need actual surface contact time to do their sanitizing. All the other sanitizers we offer ‘do’ require some contact.
These contact sanitizers work well for the smaller items that can be easily soaked, and for larger items that can be easily wiped down, such as grape crushers and grape presses. But when it comes to sanitizing fermenters, wine bottles, glass jugs and other containers, it’s hard to beat using a sulfite solution.
Happy Wine Making,
Customer Service
———————————————————————————————————
Ed Kraus is a 3rd generation home brewer/winemaker and has been an owner of E. C. Kraus since 1999. He has been helping individuals make better wine and beer for over 25 years.
How to Choose the Right Wine Glass

Image provided by athome.allentate.com
You’ve finished making your own wine and now want to serve it – but do you know which glass to serve it in to maximize its flavor? With wine glasses, size and shape does matter.
In general, red wine glasses are characterized by their rounder, wider bowl, which increases the rate of oxidation. As the oxygen from the air chemically interacts with the wine, flavor and aroma are subtly altered. The height and bowl of the glass help direct the wine to the back of the mouth giving you a better tasting experience. White wine glasses, on the other hand, generally have thinner, smaller bowls, which preserve a crisp, clean flavor while keeping the sparkling wine desirable during consumption.
Here’s a short guide to wine glasses to help you prepare for your next wine tasting party (and links to get you started on making your own):
Pinot Noir – The pinot noir glass is designed for fruit-forward noirs. The glass has a wide bowl and a turned out rim, which allows for the drinker to direct the intense flavors immediately to the palette. The stem of the Pinot Noir glass will also have a shorter stem then other red wines.
Chardonnay – These glasses have a wide bowl and a slightly tapered top. Chardonnays with good acidity thrive in oversize bowls, which allow plenty of air into the glass to coax out its nuanced flavors. Chardonnay glasses also tend to have a longer stem to allow you to keep the wine as cool as possible while drinking.
Sauvignon Blanc – The perfect Sauvignon Blanc glass will be tall and slim, offering the freshness and aromas of the wine on the nose. The narrow glass along with a tapered top concentrates aromas.
Burgundy – These wines are best served in tapered glasses that swell in the middle allowing the bouquet to develop fully. Try making your own burgundy wine with our at home wine making kit.
Stemless White Wine – Stemless glassware has a casual appeal that many people like and actually works in the drinkers favor. While holding the stemless glass you are inadvertently warming the wine, which will help unleash its flavors.
Rosé– The flared rim directs wine to the top of the tongue, to temper acidity, while the moderate width was designed to emphasize the fruity aspect of the rosé.
Syrah – The Syrah glass was designed for rich new-world reds; it tends to be smaller than the other red wine glasses. The wide shape bowl allows for the fruit aroma to be presented first to the drinker followed by the tannin flavors.
Champagne – The champagne glass is usually a tall, slender glass designed to concentrate the bubbles of a liquid on the tip of the tongue. The shape conveys the rich scent of the Champagne immediately upon sipping; the wide base of the champagne flute provides stability to the glass.
Port – Due to the sugars, high level of alcohol and intense taste of port, the port glass is finely tuned with a small and slender shape. This style of glass helps mask the overwhelming alcohol odors emitted and instead focus on the bouquet on the subtle oak and other prevalent flavors.
Want more information on making your own wine? Narrow down your choices and pick the right wine for you with our wine selector tool.
Homegrown Hops for Homebrewed Beer?

Image Courtesy of botanical.com
Due to the growing environmental changes and the desire to feature “farm to table” edibles and drinks today, more and more farmers and beer breweries are looking into growing their own hops. These farmers aren’t only selling their hops but they are also doing their own home beer brewing.
Interested in growing your own hops and brewing your own beer? Here is a complete guide to everything you will need to know about growing your own hops, so start your planning now!
A hop plant is a perennial that will flower during the summer months. Hop cones will begin to grow from the sidearms of the plant causing the flowering process to occur. In order for the flowering process to occur properly there needs to be at least 120 days which are frost free, there must be ample moisture and there must be plenty of lengthy sunny days.
First, you will need to order your own Rhizomes (a piece of root taken from a larger hop plant), which are only available about once a year, typically in March or April. Next you will want to decide where to plant your own Rhizome. The best place to plant will be in a southern light exposure area with well-drained soil. Make sure to plant your root about a foot deep and begin to think about what you will use to help strengthen the plant as it grows.
Typically, late August or September is when you will want to harvest your hops. Once you begin harvesting make sure to lay everything down flat so it can dry and you can begin to pick off your hop cones for further drying. Don’t forget to research the general alpha acid range of the hops you grew to determine how much to use in your own brew.
Remember that hops have a minimal root system so the production will only get better and better as the years go on! And, don’t forget you’ll need a beer brewing kit to actually brew your creation!
No More Tart Wine
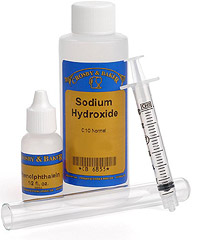 Are you a winemaker who loves to make wine with fresh fruits? If you are, here is one of my quick and easy wine making tips for you. The simplest thing you can do to make your wines better is to start using an Acid Test Kit.
By taking acid level readings of your wine or wine must with an Acid Test Kit you can get the tartness of your wines perfect instead of just close.
This fruit acids along with any Acid Blend you might add to your wine recipes are what control how tart or flat your wines will taste. Too much, and your wines can be enough to give you heartburn. Not enough, and your wines can taste lifeless.
Wine recipes can generally tell you how much Acid Blend to add along with the fruit to get the wine to an acceptable range of acidity — one that’s in balance. But the reality is, fruits vary in the amount of acid they bring to a wine. How acidic the fruit is can vary based on the growing season, variety, etc. By testing the acid that the fruit is actually providing, you can know exactly how much Acid Blend to add to make up any difference.
Using an Acid Test Kit is relatively simple. You take a small sample of the wine or wine must and add a couple of drops of an activator solution to it. Then you add a second solution, known as the Reagent. You keep adding the Reagent until the wine sample changes color. By measuring how much Reagent it took to change the wine’s color, you can determine exactly how much acid is in your wine recipes.
The Acid Test Kit comes with these two solutions along with a glass test tube and a measuring syringe. So, you’ll have everything you need to do the test. But more importantly, the Acid Test Kit comes with complete directions. It also has a chart that tells you what range of acidity your wine should be in for great balance. The directions also tell you how much Acid Blend you need to add to the wine or wine must to get from point ‘A’ to point ‘B’. All the guesswork has been removed.
———————————————————————————————————
Ed Kraus is a 3rd generation home brewer/winemaker and has been an owner of E. C. Kraus since 1999. He has been helping individuals make better wine and beer for over 25 years.
How To Make Homemade Applejack
Interested in home wine making or beer brewing but want something that offers more of a kick? Applejack is a time-tested classic with a temperament that makes it the ideal exploratory option for any aspiring home brewer. All you need is a finished apple wine, extremely cold temperatures, and a lidded plastic container.
To begin, be sure to use a plastic container – not glass – to reduce the risk of cracking as a result of the subzero temperatures your wine will experience during its transformation. Any subtle fruit wine can be used to achieve the same delicious results for a distinctive experience. Using homemade wines will give you the most control over your final product and are just as easy to make.
The most difficult step is often just finding a place to store your wine at below freezing temperatures. This enables a process to occur known as fractional crystallization, in which the water in the wine will freeze and rise to the top, while the alcohol remains in liquid form. Scooping off the ice buildup everyday will result in more concentrated alcohol content and a more intense apple flavor.
The initial alcohol content of your wine has no bearing on the final levels that will be expressed in your Applejack. The temperature at which the wine is stored directly determines the amount of ice that will ultimately form, which determines the resulting alcohol concentration. At zero degrees, ice will appear until 14% alcohol by volume is reached, and at 30 below you can attain an alcohol concentration of 33% (66 proof). That is substantially higher than the 5% alcohol per volume championed by hard ciders and the 10-12% offered by apple wines.
So, how did this ingenious beverage come to be? Applejack reached its peak popularity a few hundred years ago in the New England colonies, who had barrels of apple wine that would freeze during the winter and thaw come spring – being a heck of a lot stronger. After using your wine making kits to develop the perfect apple wine, celebrate history with some homemade Applejack!
Beer or Cocktail? Yes, Please. The Maturation of Beer Cocktails
Late summer is in full swing and you may find yourself in quite a dilemma as Happy Hour rolls around and you are again stuck deciding between a refreshing beer and a tasty cocktail.
Not to worry my friend, a new era has dawned and it is now acceptable to have both – at the same time! That’s right, beer cocktails have burst onto the bar scene with their vibrant creativity, diverse flavors, and serious ability to pack an alcoholic punch.
The surge in popularity stems from the nostalgia of shandygaffs, which is a mixture of beer and soda popularized by old Englishmen and the more recently nostalgic car bombs, sake bombs, and Jäger bombs popularized by college students across the nation.
These beer cocktails are not the fist pounding, unceremoniously plunged together, and gulped down drinks of the past. The creators of alcoholic bombs have graduated and matured into adulthood and so have their palates.
Recipes that have hit mainstream include:
- Black Velvet: a mix of stout and champagne
- The Boilermaker: a combo of quality beer and a shot of whiskey
- The Groundskeeper: a medley of ale and single-malt scotch
- Michelada: a beer, lime juice, and hot sauce mixture served margarita style with a salt rim
Quality ingredients and flavor seems to be the main criteria of beer cocktail mixology. Aficionados and novices alike are ordering beer brewing kits, hoping to create the perfect blend of hops, barley, and other accompaniments to produce the perfect base for their savory beer cocktails.
Beer brewing at home has become a pastime for these beer cocktail diehards who are never satisfied with the status quo. Some opt for brewing with flavor profiles such as chocolate and orange, coriander and rosemary or lemon pepper. Effectively producing the perfect craft beer requires marrying together of spirits and shaping the next bar room staples.
Texture, complexity, and flavored beer cocktails are now the sophisticated choice. So next time you find yourself stumped on what to order at your local bar, get the best of both worlds and indulge in a craft beer cocktail.
Top Five Facts You May Not Know About Beer Brewing

- Beer brewing dates back to 6,000 BC. The oldest beer brewing recipe was found on a Sumerian tablet. It contains a prayer to Ninkasi, who is the goddess of brewing. In fact, this is the world’s oldest known recipe! For those curious about what the first beer may taste like, Anchor Brewing Company produced a limited time replica based off the original recipe. (We wonder what their beer brewing kits looked like!)
- The Mayflower landed at Plymouth Rock because it ran low on beer. The Mayflower was originally destined for the Hudson River, but ran low on certain resources, including beer.
- Home beer brewing was made legal in the United States on February 1, 1979. This ruling was made possible by California senator, Alan Cranston. Homebrewing kits are now perfectly legal, and found in many homes across the country. Hats off to Mr. Cranston!
- There are approximately 750,000 home brewers in the United States. This number is growing rapidly each year!
- Beer is the second most popular beverage in the world, coming in right behind tea!
Tell Me More About This Airlock Thing You Mentioned
 Hi:
Hi:
I have always made my wine in a humongous stone crock. What is an airlock thing that is mentioned? My wine is really good, and I’ve never gotten sick from it. Nobody else has either. So would that airlock thing make my wine better??? By the way, I make Elderberry and Choke Cherry wine.
Thanks, Lois
—–
Hello Lois,
I’m glad you brought this up. Many people misunderstand the role airlocks play in home winemaking. Now is just as good as time as any to clear things up.
An airlock is basically a water trap that you attach to the neck of a jug with the aid of a rubber stopper. It cannot be attached to an open vessel such as the stone crock you are using. It needs a neck of some kind. You put the rubber stopper in the opening and then insert the airlock into a hole that is in the rubber stopper.
You fill the airlock halfway with water. As the gas comes off the fermentation, it bubbles through the water within the airlock and then out of the container. At the same time this water keeps outside contaminants and bugs from getting into the wine. This helps keep the wine free from spoilage.
The first thing I would like to point out about an airlock is that it has nothing to do with the quality of the wine you make. It will not make a good wine great or an average wine good. It does nothing of the kind.
What an airlock does is reduce your chances of having a wine spoil. It keeps your wine protected from infection during and after the fermentation. It does so by creating this barrier between the fermentation and airborne molds and bacteria. Allowing these little nasties to get into your wine and then giving them a chance to grow is the essence of spoilage.
If the wine is fermenting and foaming like it normally should, all these foreign intruders do not really have a chance to take over a wine. There is CO2 gas coming off the fermentation, keeping fallout from landing directly into your wine must.
So just getting to the wine is a big challenge for these little spoilers. But beyond this, if they are able to get into the wine, having an opportunity to grow is very slim for them. All the yeast activity from the fermentation keeps them in their place and even destroys them in most cases.
What all this means for you, Lois, is that using your stone crock for fermenting your wine is fine up to this point. The wine is fermenting strong and spoilage is close to impossible during this time.
It is when the fermentation begins to slow down that you could have some issues with spoilage. Fermentations do not typically stop all at once. They usually taper off over the course of a few days. As the fermentation becomes less and less active, the window of opportunity becomes larger and larger for contaminants to get to the wine and spoil it. It is in this context that the airlock becomes valuable and in my view a necessity.
Happy Wine Making
Customer Service
———————————————————————————————————
Ed Kraus is a 3rd generation home brewer/winemaker and has been an owner of E. C. Kraus since 1999. He has been helping individuals make better wine and beer for over 25 years.