
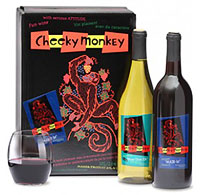
 Can l combine two 10 liter wine kits (cab.franc) to one single batch; l do not want to dilute the juice with too much water. Will this work ?
Your answer would indeed be very appreciative.
Name: Richard
State: California
Hello Richard,
The answer to your question is no. The issue is the acid in the juice. Your wine would have double the acidity making is very sharp tasting. I strongly suggest that you only use one wine making kit per 6 gallons. You will be very surprised at the amount of body and flavor your wine will have when using these wine making kits in this way.
Thank you for your question,
Ed Kraus
———————————————————————————————————
Ed Kraus is a 3rd generation home brewer/winemaker and has been an owner of E. C. Kraus since 1999. He has been helping individuals make better wine and beer for over 25 years.
My Watermelon Wine Keeps Fermenting
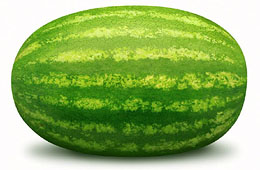 I have a batch of watermelon wine that seems to keep on working. It seems there is no end to its fermentation. Should I add campden tablets to make it stop or do I just wait?
Name: Bill P.
State: Connecticut
Bill,
It sounds like you have a stalled fermentation — one that just won’t get up and get going. I would suggest the you go over the “Top 10 Reasons For Fermentation Failure” that are listed on our website. See which on of these 10 reasons fits your scenario. We have found that these 10 reasons cover 95% of the issues we run across. Once you know what the problem is you can fix it and allow the fermentation to finish more quickly.
As far as adding Campden Tablets, I would strongly recommend against using it at this point in the wine making process. Campden Tablets are not that effective at stopping a fermentation. They will give the fermentation activity a “punch in the gut”, then the fermentation will typically pick up again, just enough to be annoying. You are much better off letting the fermentation finish then add the Campden Tablets once the wine clears.
Best Wishes,
Ed Kraus
———————————————————————————————————
Ed Kraus is a 3rd generation home brewer/winemaker and has been an owner of E. C. Kraus since 1999. He has been helping individuals make better wine and beer for over 25 years.
When is the Best Time to Drink Red Wine from a Kit?
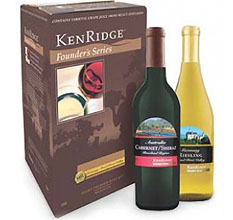 For the past year a group of us have been making red wine from kits. We began with a Tempranillo in May. Next we made a Super Tuscan which we bottled in Sept. This was followed by a Zinfandel which we bottled in Nov. In Dec. we will bottle a Syrah and an Amarone. Most of the kits say that these fines are good to drink in 3 months. Will these kit wines improve with age? Can any go a year or 2? How can we tell when they are mature? Will they all be different?
Name: Charlie J.
State: PA
Hello Charlie,
It depends on the wine making kit, and to some degree, the type of red wine. In general, the fuller or heavier the wine, the more it will take advantage of aging and the longer it will take to reach its full potential.
Most all wines will mature or improve with time, but some need more time than others. Once they reach maturity they then will typically plateau in quality for a period of time. This could be for a couple of years, some maybe 5 years. Then the wine will start to slowly degrade. This is something that happens very slowly over many years, not months. The point is once a wine reaches this plateau there is no “reason” to wait longer to drink the wine. This is no different than wines you would by commercially.
You may want to take a look at the blog post, “The Importance Of Aging Your Wine“. In this blog post, there is an aging chart for most of the brands we offer. You may want to use this a general guide.
Happy Winemaking,
Ed Kraus
———————————————————————————————————
Ed Kraus is a 3rd generation home brewer/winemaker and has been an owner of E. C. Kraus since 1999. He has been helping individuals make better wine and beer for over 25 years.
home
Brew Your Own Beer with the Partial Mash Method
Partial mash is a great way to brew your own beer at home, and is used by people who are good at extract brewing, but do not have the equipment or expertise for all grain brewing. Even experienced brewers prefer this method as it requires minimal effort and time, and yields high quality beer. Partial mash does not require a lot of equipment and the process is fairly straightforward. If you know how to make extract brews, you probably already have the required equipment. The only additional things required are a grain bag for storing the grain, an extra cooking pot, and a floating thermometer.
First you need to lightly crush the brewing grains so that their exterior shell cracks, enabling wort to start the process of conversion of starch and proteins into non fermentable and sugar for flavor. Remember, you do not have to grind the grain into a powder, just lightly crush it. You can do this with the help of a grain mill that is attached to a cordless drill. Now heat two gallons of water in a five gallon pot to a temperature of 170F – this is your “strike-water”. When this strike- water is ready, gently submerge the bag filled with crushed grains, all the while stirring continuously to avoid the formation of dough balls.
Now cover the cooking pot and wait for an hour. Constantly monitor the temperature during this one hour and keep it maintained at 150-155F. Separately heat two gallons of water at 175F – this sparge water is required to strain sugars. When the pot starts giving a sweet aroma, your partial mash is complete. Separate the wort and the spent grains. Sparge the spent grains to press out the wort that has been converted. Make sure that you are gentle while washing the grains; you do not need to crush them.
That’s it, now you can brew at home in a manner similar to extract brewing. Just adjust the recipe and use less malt extract than usual.
An Overview Of Barley Malt Syrup Uses And Storage
Barley grains are processed through a number of heat drying and cooking steps to produce barley malt syrup. This syrup has a distinct, smooth, dark brunette hue with a silky and often sticky texture. The malting  process produces composite edible sugars like glucose and maltose, and due to this the malt syrup is often used as an alternative sweetener in food.
Malt syrup is used widely in the food and beverage industry. It is an important ingredient in snacks like bagels, sauces, pretzels, and bakery products and accessories like frosting sugar. It is a natural sweetener and is extensively used to reduce yeast and make bread extra delicious. The pet food industry too uses malt syrup to develop dietary elements for pets.
However the most popular application of the syrup is seen in the beer manufacturing industry where malt sweetener imparts the characteristic malty aroma to beer along with a fine grainy texture and rich, warm color. Malted beer is extremely popular, and huge volumes of beer malt are used for this purpose daily. Besides, malt syrup contains high percentage of proteins, which is another reason to rejoice for malted beer lovers.
Since barley is allowed to germinate through restricted sprouting, the grains develop a balance of nutrients. Barley grains are well protected by a hard husk which shields it from rough weather conditions, like extremes of cold, heat, and drought. A can of barley malt syrup too stays unsullied and usable for a long time when packed in a right, air-lock container. However, any malt syrup that develops flakes or snowy mold on its surface should be considered polluted.
Ideally, canned barley malt syrup remains fresh for around a couple of years. Plastic storage reduces its shelf life. Malt syrup needs to be protected from oxidation, moisture and allergens.
Ales vs. Lagers: Beer Yeast at Play
Ales vs. lagers – what’s the difference? That’s something people have been asking for a long time. It is not easy to explain, but I will try to break it down in simple terms.
Yeast
Ales generally use top fermenting yeast (beer yeast that rises to the top of fermentation tank), while lagers use bottom fermenting yeast (beer yeast that sinks to the bottom of fermentation tank). Since it collects at the bottom, it can mostly be reused. Yeast doesn’t really add to the flavor, it’s the hops and malt that do 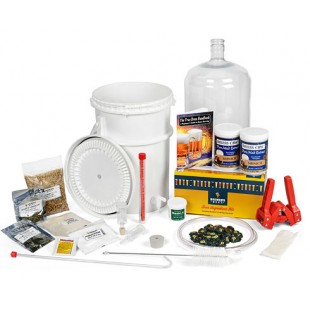 that job. Though this ‘beer yeast rule’ applies in most cases, there are certain exceptions.
Time and Temperature
Ale yeast ferments the best at warm temperatures (generally up to 75F). This is why they ferment and mature quicker than lagers.
Lagers ferment at cold temperatures (between 46F and 59F). In fact, lagers historically come from continental Europe, where the climate is generally cold. The combination of cold fermentation and bottom fermenting beer yeast gives a crisp taste to most lagers.
Extra Ingredients
Ales generally have more of malt, roasted malt, and hops, thus having a bitter and malty taste. Also, ale brewers are generally more experimental than brewers of lager, and they add some extra ingredients to experiment with their brews. So you might find ales with several different flavors.
Flavor
While ales are generally fruity, healthy, and robust; lagers are mostly clean, crisp, smooth, and elegant.
Types
Ales generally have ‘ale’ in their name. For example, amber ale, pale ale etc. They also include stouts and porters. Lagers include dopplebocks, bocks, and pilsners etc.
In the End, Beer for Thought
There is no point thinking about it- what’s important is to enjoy whatever kind of beer you’re drinking. A strange fact is that though lagers take longer to brew than ales, they are not as respected as ales.
Which is your favorite? Tell us your ale or lager story in the comments below or contact us about other homebrew stuff.
How to Bottle Your Beer: Tips on Bottling Beer
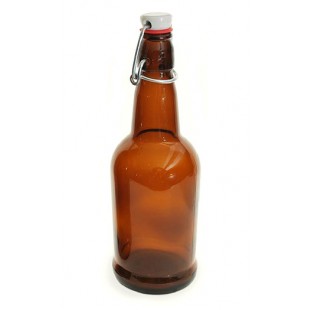 Once you have brewed your beer, it’s ready to be bottled. Though bottling beer might sound really easy, it’s not so. You have to take care that the beer that you made with utmost care is bottled right so that there are no taste-killing bacteria in the bottle.
Here is how to bottle your beer:
Don’t bottle it right away
Beer takes some time to ferment. When there are no more bubbles in the fermentation lock, it means your beer is ready for bottling. Verifying that the fermentation has completed by testing it with a homebrew hydrometer is not a bad idea either.
Choose the right bottles
Your bottles should be made of colored and thick glass. The darker they are the better. Sunlight destroys beer like anything else, so store it in colored bottles; brown bottles are perfect for this. Also, make sure all your bottles are of the same size. This makes storing them easier and provides overall consistency in the batch.
Hygiene
Beer can spoil really easily. You need to make sure that the bottles in which it is being stored are completely clean. Clean your bottles, rinse them, and then soak them in a sanitizer. Also, soak your other equipment (whatever is going to touch your beer- bucket and siphon hose, etc.) in sanitizer as well. It is best to soak them for about 10 minutes. This will make your equipment and bottles nice and clean, before you start bottling beer.
Priming
Carbon dioxide is expelled during fermentation. In fact, there is so much carbon dioxide that you just have to let it break out through air locks. So now you have beer that has alcohol but no fizz. To get fizz in your beer, you need to prime. Put a little corn sugar in the bottles. Before you pour beer in bottles, add about 1 teaspoon corn sugar in each 12 oz bottle.
Siphoning
This is where you actually start bottling beer. You need a siphon hose to carry beer into its destination. Be sure not fill your bottles to the brim- leave some area for carbonation.
After filling the bottles, you just need to cap them. When that’s done, you should store the bottles in a cool and dark place. What is your favorite homebrew stuff when it comes to bottling beers?
What Are Noble Hops?
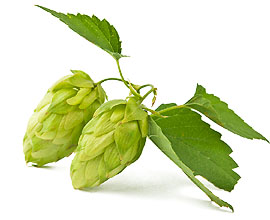 The term ‘noble hops’ is very frequently used in beer making and refers to four varieties of hops that were originally cultivated in Central Europe. These four varieties share a set of common characteristics as they are highly aromatic and have very low alpha bitterness. Humelene or hop oil is abundant in these hops. This humelene is often used in the production of perfumes as it gives a woody, herbal, and robust aroma. However, it is extremely susceptible to breakdown due to heat, light, and oxidation, and hence beers containing noble hops must be properly stored.
Because the alpha acids are very low in noble hops, they make the brew bitter and add an aroma, but at the same time they do not make it harsh. They have very low amounts of acids that are harsher in taste such as beta acids. Conditions and soil during growth lend their characteristic properties to theses hops, hence only hops grown in a particular region are known as noble hops.
There are basically four varieties of noble hops:
- Tettnanger/Tettnang–These are originally from a small town located in South Germany called Tettnang. It comes with slightly spicy and mildly floral characteristics. They are used for flavor as well as aroma and are commonly used in the production of French Ales, Bocks, Belgian ales, Pilsners etc.
- Saaz – It is from Bohemia and the present Czech Republic and is responsible for almost two thirds of the hop produced in this region. The flavor is mild, earthy, and at the same time spicy. It is mainly used in Budvar and Pilsner Urquell.
- Spalt – It is from the Spalter region in Germany. It’s hard to obtain as its production is limited to a small area. With a strong aroma and a mild spicy flavor, it is used for making ales, lagers, and bocks etc.
- Halltertau – It derives its name from its region of origin called Hallertau in central Bavaria. This hop lacks the spicy character and is floral and slightly earthy.
All these four noble hops are rich in aroma. What is your favorite variety of noble hops? What do you use for your homebrew recipes?
What You Need to Brew Beer at Home
Ever thought about what it would be like to make your own beer? To custom brew a combination of flavors exactly to your personal preferences? You don’t need a factory or plant – all you need are some basic materials and a little bit of space to start brewing beer at home!
We offer the Beermakers Necessities Box as the premiere home beer making kit. It has all you need to start brewing beer at home. For those just starting out home brewing,
- Screw-top Fermenter – The fermenter is usually in the form of a tub or jug. This is where the yeast ferments, both in the first and second fermentation cycles. The best fermenters offer airtight concealment and faucets to make draining and bottling easier.
- Plastic Carboy – In case your fermenter isn’t optimal for both fermentations, a carboy is ideal for the second fermentation cycle. Its main purpose though is to store the beer (or wine) you’ve created at home in mass quantities (they usually come in 3-6 gallon sizes!
- Triple Scale Hydrometer – The purpose of a hydrometer is pretty basic: to track the progression of your fermentation process. The triple scale hydrometer found in this kit can also measure the alcohol content of the finished product.
- Curved Racking Cane – The cane’s purpose is to take away any sediment during the siphoning process by acting as a filter system of sorts from the beer to the hose. You want to get a curved racking cane so you don’t have to worry about crimping hoses.
- Double Lever Capper – A Capper crimps standard caps into beer bottles and assists with the finishing touches of the bottling process.
The other items included in the kit are: the handbook, vinyl hose, SDH cleaner, a beer bottle brush, and your choice of Brewer’s Best ingredient Kit.
Once you understand the purpose of the basic products necessary for home beer brewing you’ll be on your way to be a beer-brewing master!