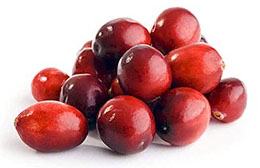
 Help!! I am going to try to make cranberry wine from fresh frozen cranberries. What is the best way to get the juice from them. I have tried the blender to break them up… didn’t work…and it would take forever to cut each one— Now I am cooking them as that seems to pop the berry for me. what is the secret???
Ellen
Name: Ellen Nelsen
State: Wisconsin
Hello Ellen,
When making wine from almost all fresh fruit, you do not what to extract the juice, but rather you want to put the fruit in the fermentation, itself. The fermentation activity is what extracts the juice and flavor from the fruit. It does it for you.
This doesn’t mean that there’s nothing for you to do. You still have to break the fruit up, but not nearly to the degree you where envisioning for extracting the juice. All that is required is that you coarsely chop the cranberries. It is important that you do not mince them or put them in a blender. This would be over-kill and would most likely result in a bitter wine. Only a coarse chopping is required.
During the fermentation, enzymes from the wine yeast will break down the cranberries fiber and release of the fruit’s good flavor. On around the 5th day of fermentation you will want to move the wine must to a new fermenter, leaving the sediment and cranberries behind. This is a process know as racking.
Optionally at this point, you can squeeze the cranberries by hand, or if you have a lager volume to deal with, by wine press. One of the wine making products we offer is a fermentation bag. It makes this process very easy to handle. It is basically a nylon bag with a coarse mesh and drawstring that keeps the fruit collected while in the fermenter. You just put the whole bag of fruit into the fermenter. After a few days of fermentation you simply pull the fermentation bag out and wring the juice out by hand.
Ellen, I hope this information helps you out.
Happy wine making,
Ed Kraus
———————————————————————————————————
Ed Kraus is a 3rd generation home brewer/winemaker and has been an owner of E. C. Kraus since 1999. He has been helping individuals make better wine and beer for over 25 years.
Some Useful Tips For Home Brewing
 For individuals who are inexperienced and are probably brewing beer for the first time, the entire experience may seem quite an uphill task. Perseverance is the key to success, and with time, one masters the technique of making beer. A comprehensive list of some simple yet effective tips for the beginners is given below.
- Homebrew stuff consists of key ingredients namely water, hops, malt, and yeast along with some brewing equipment. The basic homebrew equipment consists of a boiling pot, a fermentation bucket, a stirring spoon, a thermometer, some sanitizer, beer bottles, a siphoning tube, bottle caps, and bottle brushes. The list of equipment is virtually endless and you should always purchase good quality stuff.
- Starting out with a one of the many malt extract beer kits that are available is a really good way to go when just starting out. It’s simple, quick and harder to mess up, yet progressing to all-grain brewing may be a goal for which you’ll want to strive, particularly if you want to completely understand the entire brewing process.
- Make sure you carefully select the hops as they are one of the main ingredients in beer. Some people prefer to use pellet hops while others advocate the use of fresh hops. If you are looking for a good flavored bitterness, pellet hops should work just fine for you. It the beer’s hop aroma is important, then you may want to consider using some fresh hops as well.
- Hygiene plays a pivotal role in making beer. Regardless of the home brew method you are using, the equipment should be clean and hygienic. There are many good sanitizers on the market for this purpose. Some of the more popular ones among home brewers are: Iodophor, B-Brite, Star San and One Step.
Follow these tips for home brewing and make your own golden elixir. Beer is the most relaxing and fulfilling when it is brewed in your own home.
________________________________________________________
Read More Beginner Tips And Other Home Brewing Topics,
FREE EMAIL NEWSLETTER:

________________________________________________________
I Need A Wine Recipe For My Ground Cherry Jam!
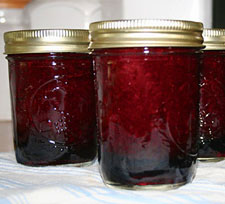 I have really become enamored with the flavor of ground cherries and have made jam and marmalade with them this year, but really want to make some wine with the few quarts left in the freezer from summer, but none of my wine making books mention using them…any ideas? Was planning on mixing white grape concentrate with them, but don’t know what amounts to use. Thanks for your help-
Name: Debra Macone
State: Tennessee
Hello Debra,
While it is possible to make wine using ground cherries, there are two issues that need to be brought up:
The first is the ground cherries themselves. One of the common mistakes I see among beginning wine makers is over processing the fruit they use. If one was to normally make wine from fresh cherries, they would only want to burst or crush the cherries. Smash them up; that’s it. Shredding the cherries or making a puree out of them is way too much from making wine. Doing so allows too much tannin from the skins to release into the wine, giving it a bitter astringency.
Your cherries have been ground. This may be great for jam and marmalade, but a real concern when making wine. One thing you mentioned was that you would like to use a white grape concentrate in the wine recipe. This may be the one thing that will allow you to get away with using the ground cherries. By cutting them with something with less tannin, such as the white grape concentrate, you can bring the wine recipe back into balance. I would recommend somewhere around equal parts of each.
This brings ups to the second issue which is the wine recipe, itself. I do not know of a wine recipe that is going to directly help you out. In all honesty you can create your own recipe with just a little bit of reading and understanding. Some great information is in the article, “Creating Your Own Wine Making Recipe” that is on our website. It explains that by learning how to use a wine hydrometer to adjust the sugar of the wine must, and how to take acid test readings to adjust the acidity of the wine must, you can develop your own recipe out of almost any source of produce you run across. As far as how much of your jam or marmalade to use, I would guess between 1 and 1.5 pints of jam with an equal part of white grape concentrate for each gallon of wine.
Thanks for the great question.
Ed Kraus
———————————————————————————————————
Ed Kraus is a 3rd generation home brewer/winemaker and has been an owner of E. C. Kraus since 1999. He has been helping individuals make better wine and beer for over 25 years.
The "Other" Valuable Benefits of Beer Hops
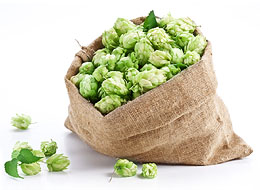 When it comes to making your own beer at home, hops are an essential ingredient. Hops are added to beer to make it taste bitter. It’s what counters the sweetness that the malted barley brings to a recipe. There are many different types of hops that are available on the market. Along with the bitterness each one imparts it’s own unique subtleties to the beer.
But besides being a flavoring component, hops also act as preservatives. This is a much lesser know fact. In earlier days, hops were depended upon to help keep the beer from spoilage. Since the advancement of sanitation over the last couple of centuries, hops are not need for this purpose, but we still put it in the beer anyway because we like it!
Besides having this preservative power, hops have been found to have other valuable qualities as well. Here are some of the amazing benefits of beer hops listed below:
- According to the recent researches, the female flowers of the hop plant contain a chemical known as xanthohumol, which has anti-carcinogenic properties. Hence, there is hope that drinking beer may actually reduce the chances of cancer, and inhibit the growth of tumors.
- They also have potent phytoestrogens which are as present as synthetic estrogens. The phytoestrogen, ‘8-prenylnaringenin’, is found to be extremely effective in reducing hot flushes of menopause. It also reduces cramping pains in legs and abdomen, which are associated with menstrual disorders like dysmenorrhoea. Many women have claimed to experience considerable relief in these common female disorders after taking beer.
- There are some suggestions that hops have sort of a sedative effect, so they are good for people who are suffering with sleep disorders. Many beer drinkers feel that they sleep more peacefully after consuming a few beers, but they are unaware of the reason behind it.
Some Interesting Facts About The Corney Keg…
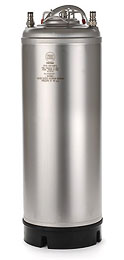 Kegging homebrew is a fun and simple way to prepare your homebrew for consumption. It’s quicker than bottling your beer and by far easier. Corney kegs, also known as soda kegs or Cornelius kegs, are used to dispense and store homebrew beer and homemade sodas. Some interesting facts about Cornelius kegs are enlisted below.
- A Corney keg is made of stainless steel and can hold up to 130 psi of pressure. They are easy to clean because of the large opening in the top of them. It’s large enough to easily fit your hand inside.
- Ball-lock kegs were first used by Pepsi so they are also called as Pepsi-style corney kegs, and pin-lock kegs were first used by Coca-Cola so they are likewise called Coke-style kegs.
- Although people use both types of kegs for their homebrew, the ball-lock system is more commonly used than the pin-lock system.
- A safety relief valve in the corney keg guards the keg in case of excessive pressurization. A ‘tab relief’ valve or a ‘static relief’ valve is present in Coke-style kegs. A manual relief valve is used in Pepsi-style keg which requires manual actuation.
- A kegerator is used to chill the kegs and despense the beer. The Cornelius kegs can hold the same homebrewed beer for months without comprimising its quality. Also, many kegorators can hold several kegs at a time. This mean you can have several homebrews to choose from without haveing to worry about spoilage or stale beer.
Cornelius kegs are quite versatile. You can even use them for fermentation. It is a much neglected application and has several added advantages. Most people use a plastic bucket in their home brewery for fermentation. Unless being mindfully careful, this can leads to scratches in the plastic that ultimately become a breading-ground for bacteria. In contrast, cleaning kegs is pretty easy. The fact that they are stainless-steel means that the surfaces are smooth. Combine that with the large opening and you can see how keeping them sanitized is an effortless task.
________________________________________________________
Read More About Kegging Home Brew And Other Beermaking Topics,
FREE EMAIL NEWSLETTER:
________________________________________________________
Some Interesting Facts About Beer Hops
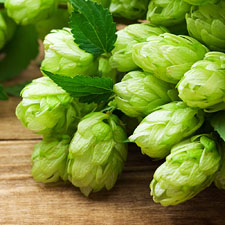 Hops are one of the main ingredients used in making beer and they have been cultivated by farmers since times immemorial. These days hops are grown in many countries like Germany, Kent (in UK), USA, Belgium, and Russia. But Germany is still the leading supplier of hops, and captures about 25% of the market. Some interesting facts about beer hops are given below:
- The alpha acid content of hops determines its bitterness, while the aromatic oils present in hops give it the characteristic aroma. Usually bitter hops have high alphacid content. Dry hopping removes the bitterness and imparts an awesome fresh hop aroma. In this method, hops should be added in the stage of secondary fermentation.
- The hop has female and male plants. The female plant is used in brewing and these flowers produce a special type of oil which is used to flavor beer.
- Growing hops for your home brewery is a wonderful and fun filled way of saving few bucks. It is a nice idea to cultivate your own hops since these plants are easy to grow. Temperate climate is best for them and they are dried after being harvested.
- Beer hops do not require much space to grow. The stalks of the plant wind around any support (like a trellis or a fence). This is quite different than vines that make use of tendrils to climb. This is why hop plants are called bines.
Some brewers prefer to use whole hops as they feel that it delivers the best aroma and taste. Whole hops are also known as leaf hops or raw hops and many people believe that processing of hops changes the chemical attributes of the product. Fresh hops are used immediately after harvesting, so they have a lot of extra weight, owing to the high water content. In a stark comparison, dry hops weigh far less.
________________________________________________________
Read More About Hops And Other Home Brewing Topics,
FREE EMAIL NEWSLETTER:
________________________________________________________
Wine Yeast, The Central Ingredient Of Any Great Wine
 One of the most important ingredients in winemaking is yeast. Without yeast, the wine must will not undergo fermentation. During fermentation, wine yeast functions to convert the sugar in the wine must into alcohol and carbon dioxide. The interaction of the yeast with the wine must creates aromatic byproducts which, depending upon which yeast strain you use, will express different aromatic characteristics from wine to wine.
Most wines are made with the yeast species Saccharomyces cerevisiae, though the exact strain used varies widely. Depending upon what type of wine you’re creating, and what aromatic profile you’d like to achieve, you must select a specific strain of wine yeast in order to create your desired style of wine.
Once the yeast cells die, they sink to the bottom of the fermentation vessel. The dead yeast cells in combination with skin, seed, and pulp fragments form what is known as “lees”. The longer the wine is in contact with the lees, the more they contribute to the overall complexity and quality of the wine. This practice of leaving wine “on the lees” has been documented for generations, dating as far back as ancient Roman times. Presently, this practice of leaving wine on the lees is employed often in red wine making as well as Champagne or Sparkling wine making and occasionally white wine making.
One type of yeast that is undesirable in wine is Brettanomyces bruxellensis (a.k.a. “Brett”). Brett is responsible for economic hardships for many wineries due to the ability of this yeast to decrease wine quality. The presence of Brett in wines is somewhat controversial, as there are some individuals that believe Brett is beneficial (particularly with some dessert wines). In general, higher levels of Brett in wine results in poor wine quality, due to the yeast’s ability to produce ethyl phenol compounds that significantly contribute to “off” aromas in wine, including “barnyard” and “Band-Aid” aromas.
In order to avoid the wine yeast B. bruxellensis from infecting your homemade wine, a sterile working environment is key. Generally, Brett infections can be well controlled in a home winemaking environment through the simple use of sanitizers. Sodium metabisulfite and water being a common one. B. bruxellensis is naturally present everywhere (particularly in cellars) one must always take precautions and maintain a clean environment.
In general, if you’re following a wine recipe, pay close attention to which type of wine yeast the instructions call for. If you’re creating one of your own wine recipes, it’s very important that you do some research in order to determine exactly which strain of yeast will be optimal for the style of wine you’re trying to create. Finally, maintaining a sterile environment will help ensure that you don’t have any rogue infections from any other undesired yeasts in your wine.
———————————————————————————————————
Ed Kraus is a 3rd generation home brewer/winemaker and has been an owner of E. C. Kraus since 1999. He has been helping individuals make better wine and beer for over 25 years.
The Basics Of All-Grain Brewing
 Beer is one of the most popular alcoholic beverages in the world, and it has innumerable health benefits. It is a rich source of magnesium, potassium, phosphorus, selenium, and the B complex group of vitamins. Because of the fact that it is loaded with nutrients, beer has earned the title of ‘liquid bread’.
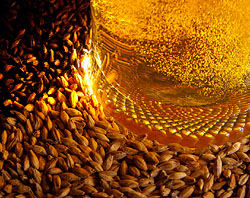
With the all-grain brewing method, beer is made directly from malted barley grain. No malt extract is used in this process. All the brew’s malty character comes from the barley, itself. Here are the basic steps:
- Milling: The first step is to crush the malted barley grain. This is done with a grain mill. All you are try to do it break up the outer husk of the grain. It is not necessary nor desirable to process it any more than this.
- Mashing: This consists of mixing the milled grain with hot water and letting it mash/steep. The natural enzymes that are in malted barley convert the starch which is present in the milled grains into fermentable sugar.
- Sparging: During this process, the sugars are rinsed out of the mash with the help of hot water. Batch sparging and continuous sparging are the two commonly used methods and each has its own pros and cons.
- Boil: Finally the wort is boiled in a brew kettle. Hops are added, which impart an element of bitterness. Beer hops neutralize the sweetness of the malt and make it taste slightly bitter. A wide range of beers are available on the market and the ones which are rich in hops having high alpha acids are comparatively bitter than the ones which have a low concentration of alpha acids.
- Fermentation: The wort is cooled down, and beer yeast is added, which ultimately transforms the wort into beer. The fermentation normally lasts about 5 days. The exception is when a lager beer yeast is used. Then the fermentation can potentially be drawn out for months.
- After The Fermentation: Once the fermentation is complete, the beer is packaged into kegs, casks, aluminum cans, or bottles etc. In the case of homebrew, beer bottles or soda canisters are the preferred norm.
Barley and wheat are the most commonly used brewing grains. However, other grains such as rye are also used in making beer and the flavor of the beer largely depends on the type of grain used.
________________________________________________________
Read More About All-Grain Brewing And Other Beer Topics,
FREE EMAIL NEWSLETTER:
________________________________________________________
Part Of My Batch Of Wine Is Bland!
 I made 25 gallons of yellow plum wine this summer (began in August 2012). One batch in one of the 5-gallon carboys looks and has the consistency of water (not very interesting) and appears to have finished all of its fermentation. I’ve calculated its alcohol content to be around 12%, but its bland, dry flavor suggests that I add sugar before bottling, but this doesn’t seem to help much when I add sugar syrup in a glass to taste. Can I add brandy to fortify it? How much or what would you add to a very dry, uninteresting wine like this? It hasn’t turned bad, it’s just poor quality.
Name: Kathy
State: WA
Hello Kathy,
Thanks for the interesting question. I think that we can both agree that since these carboys of wine are all yellow plum, started at the same time, that some of the batch was not treat the same as the rest. Therefore, you have this one carboy that sticks out like a sore thumb.
From the symptoms you gave it sound like the particular carboy in question is lacking in body and flavor. This is caused by the fermentation not have enough contact with the pulp. This pulp is where the flavor and character of the wine comes from. Since this 5 gallons of wine is short on pulp, my guess is that you may have another carboy or two that is long on pulp.
With that said, there are two ways you can go about resolving this issue. Adding plum brandy is not one of them:
The first method is to cross-rack the 5 carboys of plum wine that you have. This is how a commercial winery would have handled it from the beginning. With each racking they would have gone from two carboys simultaneously into one carboy, and then another. By the time you get to the last racking, before bottling, the wine would be evenly blended. Since I assume that you have already done most of the rackings, this may not be a practical option for you at this time. It’s up to you as to whether or not you want to go through this process a couple of times. I you do decide to, I would urge you to make sure that your sulfite levels in the wine are correct after complete the blending.
The second method you could use is to treat the 5 gallons of wine in question and leave the others out of it. Adding brandy would not resolve the issue. While the additional flavor the brandy would add — particularly a plum brandy — would be great, the additional alcohol would make the wine too high in alcohol, or too hot. This additional alcohol would numb the tongue while drinking, giving the wine an even more watery impression.
Adding flavor is about your only option if you choose to take this route. I would suggest using one of our liqueur flavorings. These have been used successfully by many winemakers to enhance their wines. They come in many, many flavors and are very, very strong. One bottle per 5 gallons is the most I would recommend using.
Best Wishes,
Ed Kraus
———————————————————————————————————
Ed Kraus is a 3rd generation home brewer/winemaker and has been an owner of E. C. Kraus since 1999. He has been helping individuals make better wine and beer for over 25 years.
Wine Tasting Tips for the Novice
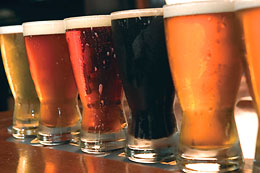
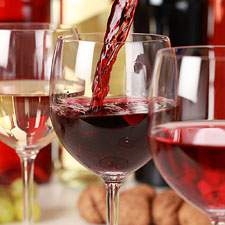
A Wine tasting is a perfect excuse for friends to get together and share their favorite vintages. However, if you’ve never attended a wine tasting, let alone hosted one, it can seem rather daunting… but it doesn’t have to be.
What Is a Wine Tasting?
A wine tasting brings individuals together to sample one or several wines and share their impressions. As wine tastes slightly different to different people, sharing thoughts can lead to a greater appreciation of the wine. There are usually cards that allow individuals to put down their thoughts on the wines flavor, body, legs, clarity, and smell. Wine tastings don’t have to be pretentious affairs. In fact, they are usually more fun if they aren’t.
What to Include in a Wine Tasting
If you’re hosting a wine tasting this season, make a list that includes:
- One to three wines. Although it may be tempting to serve a large variety of wines, it’s better to limit your tasting to just a few. Similar to testing perfume samples, your nose can get overwhelmed by too many different scents. Consider planning your tasting around a theme, such as Pinot Noirs from the Pacific Northwest or dry Rieslings. A fun to twist to add is to make the tasting a blind test – your guests won’t know which wine they are trying, so they won’t have preconceived notions.
- Water. Offer carafes or bottles of water at your wine tasting so that participants can cleanse their palate (rid their mouth of the taste of one wine) before tasting another wine.
- Crackers. Dry, unflavored crackers serve a similar function as the water. They cleanse the palate between wine tastings.
- Spittoons. Although it may sound uncouth to those unfamiliar with wine tasting, many experienced tasters spit out the wine rather than swallow it. After all, the purpose of a wine tasting is to experience the bouquet and flavor profile of the wine, not to get drunk. Metal wine buckets work well as spittoons.
- Food (optional). Though not essential to a wine tasting, food adds an additional sensory dimension to your event. Pick foods that complement your wines, such as shellfish with Champagne, chocolate with (red) Zinfandels, or most ethnic foods with Riesling.
Don’t be afraid of throwing a wine tasting event. Pick a few interesting wines, gather your friends and enjoy the camaraderie of a shared experience.