 Want to learn how to use a wine bottle corker? Then here’s some information that you will definitely want to take a look at…
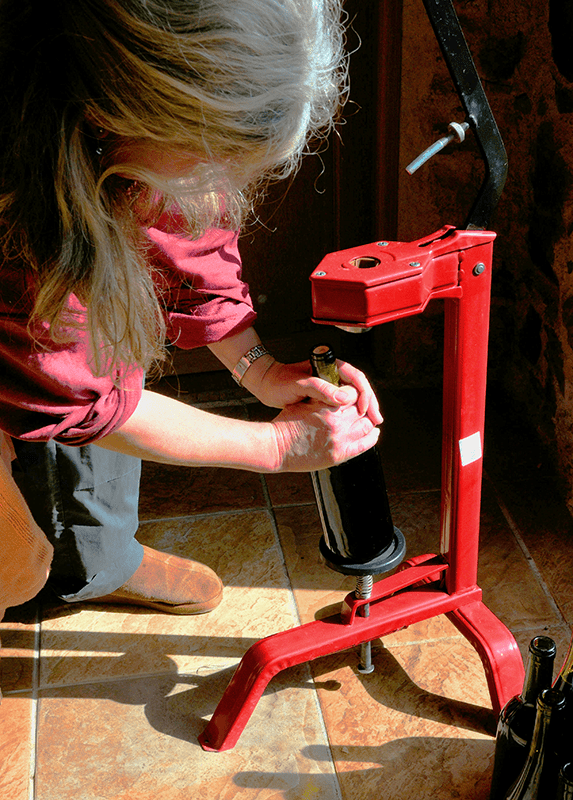
Just as the name sounds, a wine bottle corker is a tool that is used to insert a cork into a wine bottle. It compresses and plunges the wine cork. Below are some tips on how to use a wine bottle corker and how to get the cork into the bottle with minimal effort.
- Use The Right Corks:
First and foremost you want to use the right corks when bottling your wine. Without the right cork your bottling efforts will be doomed from the start. This means using either a size #8 or size #9 straight cork. Anything smaller and you can expect some seepage when the wine bottles are laid on their side. Anything larger and the wine bottle corker will have too hard of a time corking the bottle. As a side note, you’ll also have an incredible time getting the cork out.
- Prepare the Corks:
The wine bottle corks can be prepared in one of two ways:
1. You can steep or steam the corks in hot water for a short period of time. Bring a pan of water to a boil; turn the burner off; put the corks on the water; and place a lid over them. About three minutes is all the time recommended. Never go over five. Get the corks off the heat. Heating the corks for too long will cause the them to become brittle and crumble while in the bottle.
2. The second method is to submerge the corks in a sulfite solution for a few hours or overnight. You will need to use a container with a lid to keep the floating corks submerged. I use an old plastic jar. The sulfite solutions consists of either 1/4 teaspoon of potassium metabisulfite or 4 Campden tablets in a quart of water.Regardless of which method you use, you will want to drain the excessive water from the corks by placing them in a colander, strainer or something similar.
- Loading The Cork:
Now we’re getting down to how you actually use the wine bottle corker. This step is very straight-forward. Each corker is a little different, but essentially all you are doing is dropping the cork into the corker’s chamber.
- Compressing The Cork:
What this is doing is taking the cork that is almost an inch in diameter, and squeezing it down to about the diameter of a dime. Depending on the corker, this action requires that you pull down or squeeze some kind of lever.
- Inserting The Cork:
This is where the actual corking takes place. Once the cork is compressed, a plunger is used to slide the cork into the wine bottle. Some style of corkers compress and plunge all with one lever action. This is normally the case with floor-standing wine bottle corkers. Other corkers may require two steps as described above. First you compress. Then you plunge. This is sometimes the case with hand-held corkers.
- Adjusting The Depth Setting:
Once you cork your first wine bottle you will want to take a look and see how far the cork was inserted into the bottle’s opening. The goal is for the cork to be flush with the top lip of the wine bottle opening. A little lower is okay, but you never want the cork sticking out of the wine bottle. Most wine bottle corkers will have a depth setting adjustment that will allow you to control how far you corker plunges. Play with this adjustment until the corks are being inserted at the proper depth.
- Seating The Corks:
All wine bottles that are sealed with a cork in this way will eventually need to be stored on their side. This helps to keep the cork swelled so that it can continue to maintain a tight seal. But before laying the bottles down you need to give the corks time to set. After the corks are compressed by the wine bottle corker, it takes a little time for them to expand all the way back and apply full pressure on the inner side walls of the wine bottle opening. If the wine bottle are laid on their side too soon some could leak. For this reason you need to let the wine bottle sit upright for a day or two before stowing away in the cellar.
So there you have it, the essentials of how to use a wine bottle corker. All-in-all you’ll be surprised at how simple it is to cork a bottle of wine. It’s a fun part of the wine making process and one that’s just perfect for getting the whole family involved.
Happy Wine Making,
Ed Kraus
—–
Ed Kraus is a 3rd generation home brewer/winemaker and has been an owner of E. C. Kraus since 1999. He has been helping individuals make better wine and beer for over 25 years.
Thank you for your article on using a bottle corker. I thought you once had another article on keeping/preparing corks. And that is with a cork humidor. Is this correct or did I dream that one night after passing by a tobacco store? And if it is correct, would you review that process again?
Enjoy all your articles.
I would advise against the potassium metabisulfite as it seals too tight and causes many a cork screw to break. Bad Idea. Soak the corks in water for 5 minutes and you’ll be fine.
I dislike using corks that have been soaked or steamed ’cause they seem to contribute to messy jaws and a messy corker. Instead I use corks that have been in a sulfited humidor, or just put some sulfite in the bag of corks when I purchase them. Do you see problems with this method? As an aside, when I’m on winery tours and see them bottling, the corks are put into their corking machines dry.
Yes, at wineries the load the corking machines with bags of dry, but sterilized corks. Some have been pre-treated. They don’t open the bags until they are loading the machine for a run. I use #9 right out of the bag, dry.
On the matter of using a corker:
There is no reason to cover the corks with the sterilizing liquid as it is the gas that is liberated from the liquid that sterilizes…not the liquid itself.
Also, if you use synthetic corks there is no need to store your wine on its side. The synthetic corks are a "closed cell" material as opposed to natural corks.
I’ve made wine for about 10 years (using your excellent products) and have never had a problem with the wine going bad in storage.
Hope this helps.
Logan
Ok. But what if its those corks that Are made by compressed Cork bits?
Rene, none of our corks are made from agglomerated, glued, cork bits but I do not imagine the process is any different.
Lynn, I do not recall an article along those lines on our blog. Normally, the cork is prepared just as mentioned above.
Rod, anyway you can get the SO2 gas on them to sanitize them will sufficient. If you can smell the sulfite, then it is more than strong enough to sanitize the corks. Wineries do put them in dry. This is because their corks are still "factory seal", so to speak. The corks come in bags of 1,000 with SO2 gas still purged into them. Once the bag is open for use or to be repackaged into 100’s you loose the gas.
should i leave the bottles stand longer before laying them on the wine rack, if i added potassium sorbate and back sweetened when bottling?
Pete, adding potassium sorbate and sweetener does not factor into how long you leave the bottle upright before laying them on their side. The reason that you leave them standing for a few days before laying them down is so that the corks have enough time to expand back out to properly seal the bottles.
Thanks for that info. I have a blue Italian corker that I’ve been using for 15 years without problems. My son noticed that the bottom portion where the brass jaws ride on has scraped the paint off and is beginning to rust. To take a closer look we took the top off and looked at the jaws and springs and wondered how much of this needs rebuilt. The springs had some surface rust and may explain why it has been progressively getting stiffer while bottling. I need to know if there is any maintenance manual or someone with experience on keeping this corker corking. It has been a great tool that I highly recommend. On average I’ve used it to bottle 500 bottle per year, so it’s a great tool and I hope to restore it. Do you know anything about what to use as a food based lubricant? Thanks Ed.
I have never seen a maintenance manual for any of these iris-type corkers. Nor to we have parts for the corker you’ve described. It sounds like your have a Ferrari corker. If you look around, you may find parts elsewhere from someone who carries this corker. As for lubricate, we have always recommended Vasoline. The trick is to use as little of it as possible. You do not want the Vasoline on the corks for obvious reason. Also, I would suggest taking a picture of the jaws and springs before taking it apart, for reference later on.