 If malt is the heart, or the backbone, of beer, then yeast is its soul. While malt is responsible for flavor, color, and body, and hops for bitterness, yeast often contributes many subtle and sometimes incredibly complex nuances to beer. Without yeast, beer would not exist as we know it.
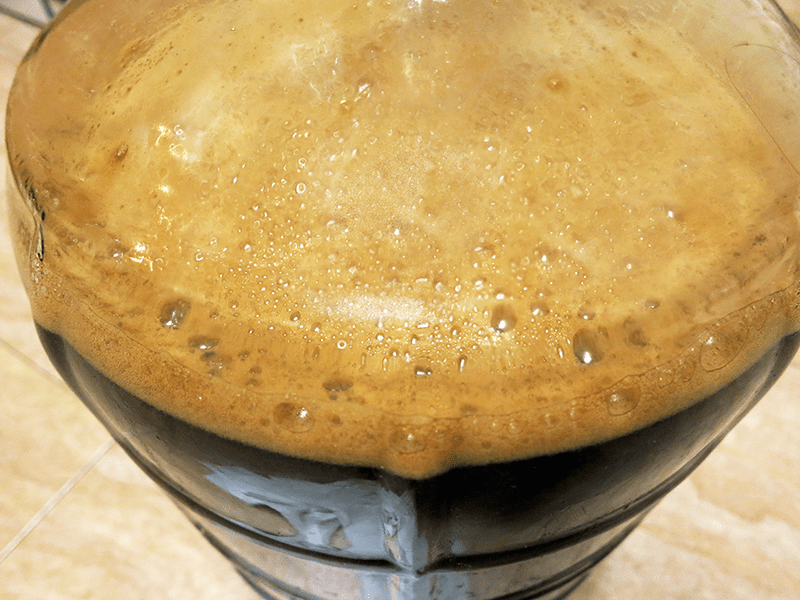
It stands to reason then that in order to make good beer we should do everything we can to make sure we are having a healthy homebrew fermentation with each batch we make.
Yeast is a living, breathing microorganism that responds to stresses or challenges it faces during storage and fermentation. In some cases, and for some beer styles, it’s actually beneficial to stress the beer yeast, but more often than not, it’s critical to make sure that the yeast is happy and that you have a healthy homebrew fermentation with little stress on the yeast.
In fact, good yeast management is one of the best ways to improve the quality of your homemade beer. Having a healthy homebrew fermentation is what it is all about.
Below are 7 tips for making sure that your homebrewing yeast is happy, healthy and well cared for:
 Use fresh yeast – All living things die eventually, and beer yeast is no exception. Over time, the yeast loses its viability, so it’s important to use the freshest beer yeast you can when homebrewing. Otherwise, what few living yeast cells might remain in the package will have a very hard time fermenting your beer, possible resulting in a stuck fermentation. Dry yeast is best used within 1 to 2 years of the packaging date. Liquid yeast is best used within about three months of the packaging date. Check the yeast package for this information to make sure you’re brewing with a fresh yeast culture.
- Check your pitch rates – The pros recommend pitching a specific amount of beer yeast depending on the gravity and the style of beer being made. In general, a pack of dry beer yeast that has been stored under the right conditions has enough yeast cells for a beer of moderate gravity. Lagers and high-gravity beers require more yeast. If brewing with liquid yeast it’s usually recommended to use a yeast starter (see below) and/or to pitch multiple packs of yeast.
- Make a yeast starter – This is an easy and effective way to help insure that you’ll have a healthy beer fermentation. A yeast starter will help to guarantee that there are enough healthy yeast cells for fermentation. Read our blog post on yeast starters to learn how to make one.
 Use a stir plate – A stir plate helps make yeast starters healthier by infusing oxygen into the starter, giving the yeast what it needs in order to grow and multiply. It’s a really cool device that spins a magnetic stir bar inside a flask or jar, driving out CO2 and at the same time making oxygen available for the yeast. It’s a really good investment that will pay off through many happy, healthy fermentations.
- Use yeast nutrient – Though yeast nutrient is not essential to making beer, every professional brewer I know uses it. Yeast nutrient simply provides some of the nutrients that support a healthy fermentation. It is typically added during the last 10 to 15 minutes of the boil, usually right along with Irish moss or another kettle coagulant. It can also be added to the secondary fermenter to help resolve a slow or stuck fermentation.
- Oxygenate the wort – After yeast is pitched, it goes through an aerobic growth phase called respiration. Oxygen is critical to this step of the process. For this reason, aerating the wort by stirring it very vigorously can go a long ways in helping your beer have a healthy fermentation. Just give the wort a good stir right before you pitch the yeast. Even better, invest in an oxygenation system to pump pure oxygen right into the wort.
 Control fermentation temperature – After making sure that the yeast that goes into your beer is up to the task, keep it happy by maintaining a steady fermentation temperature within the recommended range for whatever strain of beer yeast you’re using. Ales do best in the ballpark of 65-70˚F., while lagers require temperatures between 45 and 55˚F. Either way, some techniques for controlling homebrew fermentation temperature will serve you and your yeast well for many batches to come.
Using some or all of the techniques above will encourage your brews to have a healthy homebrew fermentation and help you make the best beer possible.
What techniques do you use to keep your homebrew yeast happy?
—–
David Ackley is a beer writer, homebrewer, and self-described “craft beer crusader.” He holds a General Certificate in Brewing from the Institute of Brewing and Distilling and is founder of the Local Beer Blog.
Hi there
I use bakery yeast because in my country isn’t any beer yeast,i add a tea spoon yeast and 1 kilo sugar and 12 litre of non-alcoholic beer.at the end it will be a very strong beer but smell a little bad.
what i have to do to make it smell better?
and why its so strong??
Tofigh, the strong smell is probably hydrogen sulfite. This is what a yeast produces when it is under stress. Since you are using baker’s yeast in a situation that it is not bred to do, this puts the yeast in a stressful situation where it will produce hydrogen sulfide. Try pouring your beer through cooper wool pad. When the beer comes into contact with the copper this will cause the hydrogen sulfide to release. You will notice the copper becoming corroded from the exchange, so you may need more than one copper wool pad.