Leigh Erwin: A Beginner's Wine Making Journey: Part 1

Leigh Erwin - First-Time WinemakerWell, hello there readers of the Homebrewing.org blog!
My name is Leigh Erwin, and I am a brand-spankin’ new home winemaker!  E. C. Kraus has asked me to share with you my journey from a squeaky-clean new home winemaker to what I hope will eventually be an expert!  Well, maybe not an expert, but perhaps “more experienced”.
Over the next few months I plan on sharing with you my experiences as a beginning winemaker: the good, bad — and the ugly. I hope all of you will take the journey with me as I periodically post my trials and tribulations as a first-time home winemaker on this blog.
—————————————————————————————————–
Winemaking Kit Packages
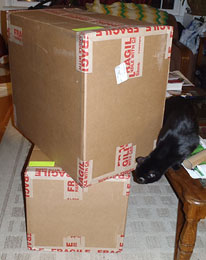
Today is a great day for me, as it is the day I received my very first home winemaking kit from Homebrewing.org.  The UPS guys dropped it off at my house before I got home, so I had to wait a couple of hours to open my new “babies”.
I ordered my items on November 14th, and received the items in one piece 5 days later, just as promised.  The whole ordering experience was really easy for me.  I had a couple questions for customer service, and they addressed them all very quickly.  I placed the order in the morning on 11/14, and it was packaged up and shipped out that very same afternoon.  I’m not sure if it’s always sent out the same day—it probably has to do with what time of the day you place your order, but since I placed my order so early, it was no problem!
Even though this is my first time making my own wine, I do have quite a bit of book knowledge about wine and winemaking.  I decided to order a beginner wine making kit, as I felt this would be a perfect start for someone who has only read about winemaking but never actually practiced it.  I chose a white wine, as I know the holidays are coming up, and since mine and my fiancé’s parents only drink white wine, it would be a nice gift to bring to them (provided I don’t mess it up!) at that time.
Unpacked Winemaking Starter KitSo, what did I order??
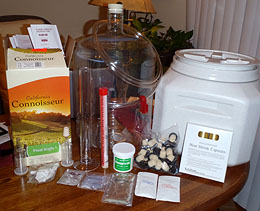
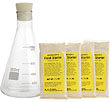
The main item(s) I ordered was the California Connoisseur Winemaking Kit, Pinot Grigio.  When I opened the box, everything that was listed as being present was accounted for, and nothing appeared to be damaged.
What does this kit come with?  Well, I received the following items all for one price by getting the Connoisseur Winemaking Kit:

  • Wine Yeast
  • Bentonite
  • Potassium Metabisulphite
  • Potassium Sorbate
  • Fining agents
  • 1 – 9 Gal. Tuff-Tank with Rubber Stopper
  • Plastic 6 Gal. Carboy with Rubber Stopper
  • 2 – Air Locks
  • 21″ Curved Racking Tube
  • Racking Tube Clamp
  • Triple Scale Hydrometer
  • Hydrometer Jar With Base
  • Vinyl Racking Hose
  • 24 Inch Stirring Spoon
  • Wine Bottle Brush
  • 5 oz. CleanPro SDH Cleaner
  • 50 Heat-Shrink Capsules
  • 30 Mushroom Style Corks
  • Instructions

So much stuff for such a small price!  I took a picture of everything I received, so see for yourself!
I’m really excited to start making wine with this beginner wine making kit, and am really excited to share my journey with you.  Feel free to leave comments on if you think I’m ever doing something not quite right, if you have advice for me as a newbie winemaker, or maybe even words of encouragement!
Cheers!

#Leigh

10 Gifts Ideas for Your Favorite Homebrewer

Beer Recipe Kit Gift IdeaWith the holidays coming up, it’s time to start thinking about what gifts you’ll be giving out this year. To get the ball rolling, here are ten gifts ideas for that special homebrewer in your life.

  1. Beer! – You can’t go wrong with quality beer. Ask your local bottle shop for recommendations or check out the Top 250 Beers on BeerAdvocate for ideas. Try to get your hands on something rare or pricey that they probably won’t drink otherwise.
  2. Beer Recipe Kit – E. C. Kraus offers dozens of homebrew recipe kits to choose from, everything from IPAs and Irish stouts to Belgian saisons and German lagers. Pick a style you know your brewer enjoys, or choose something they’ve never brewed before.
  3. Books – A good brewing book is a great way to find inspiration and expert advice. Some of my favorite brewing books include Marty Nachel’s Homebrewing for Dummies, Charlie Papazian’s Complete Joy of Homebrewing, and Ray Daniels’ Designing Great Beers.
  4. Beard Conditioner – Odds are pretty good that your favorite homebrewer has a beard — or some kind of facial hair. I recommend the Bluebeards lineup of conditioners and lotions for keeping that scruff in check.
  5. Automatic Siphon Gift IdeaAuto-Siphon – This is one of those items that every homebrewer should have (it’s included in some homebrew equipment kits, so make sure your homebrewer doesn’t have one already). An auto-siphon (3/8”, 1/2”) makes transferring beer and wort from one vessel to another extremely easy and hassle free. Plus, it’s shape makes it a great stocking stuffer!
  6. Mash Tun Gift Idea10 Gallon Mash-Lauter Tun – This mash-lauter tun setup is an excellent upgrade for someone with a basic equipment kit who wants to move up to all grain brewing. With this equipment, the brewer will have no problem collecting 7.5 gallons of wort, plenty for a full volume boil and more than enough to end up with a five-gallon batch.
  7. Homebrew Draft System Gift IdeaHomebrew Draft Kit – If you really want to show your brewer how much you love them, help them transition from bottled to draft beer. The Homebrew Draft System includes everything needed to put homebrewed beer on tap. Bonus: no more bottles taking up valuable closet space!
  8. Gift Certificate – Sometimes it’s nice to be able to pick your own gift. With a gift card from E. C. Kraus, your homebrewer can pick out whatever homebrewing gear they need the most!
  9. 3 Gallon Draft Canister Gift Idea3 Gallon Keg – This compact, commercial grade 3 Gallon Cornelius Keg is great for splitting up batches for experimentation and transporting beer to social events. Keep in mind your brewer will need a CO2 tank, ball lock disconnects and a method for dispensing the beer.
  10. Beer Yeast Starter KitBeer Yeast Starter KitPreparing a yeast starter is a great way to improve the quality of your homebrew. Our Beer Yeast Starter Kit includes: 1000 mL Flask, Foam Stopper and 4 Beermaker Food Starters.

Don’t wait til the last minute! The holidays are right around the corner…
———————————————————————————————————–
David Ackley is a beer writer, brewer, and self-described “craft beer crusader.” He holds a General Certificate in Brewing from the Institute of Brewing and Distilling and is founder and editor of the Local Beer Blog.

Preparing Corks For Bottling Wine

Just made a bottle of peach wine. This is my first batch and I’m getting ready to bottle it. What is the best way to prepare the corks for bottling?
Thanks,
Chris
—–
Hello Chris,
There are a couple of methods for preparing corks for bottling wine. The way I personally like to do it is to take a container that has a lid that is large enough to hold all the corks you will need — something like an old tin coffee can, or I have a old instant Lipton tea jar I use. One or two Mason jars would work as well. Put all the wine corks in the container. Then fill it up with a water/sulfite solution.
This solution should consist of 1 teaspoon of either sodium metabisulfite or potassium metabisulfite for each gallon of water. If you are using Campden tablets, add at the rate of 16, crushed, per gallon.
As you fill up the container with this sulfite solution the wine corks will want to float out, so you will need to use your spare hand to corral them back down into the water. Once the container is completely full, put the lid on and let them sit over night. When you are ready to use the corks, dump them out into a colander and let them drain for 20 minutes or so, and they’ll be ready to go, no reason to rinse.
The second method for preparing corks for bottling wine is to steam them. The advantage to this is that the wine corks will be ready sooner. The disadvantage is that if you over-steam the corks you can activate the natural enzymes within them, causing the corks to bread down and become brittle over time. The result is crumbling corks that are difficult and unattractive to remove from your wine bottle.
If you decide to steam the corks you do not want to do it for any longer that 5 minutes — 3 would be better. Take a pot of water, and bring it to a boil. Then move off the burner; throw the corks on top; and cover with a lid. After the 3 to 5 minutes, take the corks off the water. You can just pour it through a colander. But whatever you do, don’t leave them on the heated water.
The method I prefer the most for preparing corks is the first one. Submerging the corks in a sulfite is affective and will not compromise the cork in anyway. The only downfall is that you will need to plan a day ahead. No big deal.
Anyone else have any ideas they’d like to share for preparing corks for bottling wine?
Happy Winemaking,
Ed Kraus

———————————————————————————————————
Ed Kraus is a 3rd generation home brewer/winemaker and has been an owner of E. C. Kraus since 1999. He has been helping individuals make better wine and beer for over 25 years.

Making Apple Wine Without A Press

Sliced Apples For Making Wine Without A Press
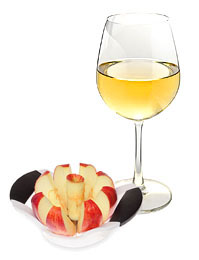
Can you make wine from cut up apples instead of using only juice. I found recipes for all kinds of whole fruit, but not apples. I have made several batches of wine with your products and they have all turned out well. I have a large apple tree and would like to make apple wine, but don’t want to squeeze the juice. I have made chokecherry and blueberry that are wonderful.
Name: Jerry S.
State: Nebraska
—–
Hello Jerry,
It is possible to make wine apple without a press and use cut up apples, instead. The issue is that water needs to be added along with the chopped apples to make it a fermentable must. The result is a weaker flavored apple wine than what you would get with straight apple juice. This is not a particularly good thing when you consider that fact that apples do not have that much flavor to begin with as compared to chokecherries and blueberries.
So you have to ask yourself if you would be happy making an apple wine that was a little lighter in body and with a little less flavor. If you’ve got the time and the apples would be going to waste anyway, I say go for it. If you have limited time and you’d eat the apples anyway, then I might reconsider, but of course, it’s up to you.
If you do decide on making apple wine without a press the first thing that should be realized is that if you are making 5 gallons, you will need about 10 gallons of fermenter volume. This is to make room for all the apples and water needed. By the time you remove all the apple solids during the fermentation you will be left with about 5 gallons.
To start out you will need to decide how you are going to chop the apples. I would suggest focusing on making slices of apples instead of cubes. This will allow more flavor to be extracted more easily during the fermentation. An apple coring/slicing knife would not be a bad option for this. You nee to be chopping about 80 pounds of apples to end up with 5 gallons of apple wine.
Dump all the sliced apples in the fermenter(s). Add a sugar/water mixture to fermenters until the apples are covered. This sugar/water mixture is made by dissolving 1-1/2 pounds of sugar to each gallon of water.
You will need to add acid blend to the apple must. For now, add 2 tablespoons to entire 5 gallon batch. If the batch is divided into two fermenters, put 1 tablespoon in each. This is just to get the acidity close enough for a proper, safe fermentation. Once the fermentation is complete and the apple wine has cleared and it is ready to be bottled, you will want to test the acidity with an acid test kit to make a final acidity adjustment.
You will also want to add yeast nutrient at the rate of 1 teaspoon per gallon of actual must. You will also need to add wine tannin — 1 teaspoon over the entire 5 gallon batch is plenty.
The final steps for preparing the apple wine must is to add 1 crushed Campden tablet per each gallon of wine must. If you have 10 gallons of actual must, add 10 tablets. Wait 24 hours for the Campden tablets to do their thing, then add a packet of Red Star Pasteur Champagne Wine Yeast. During this 24 hour period you want to leave the fermenter(s) uncovered, or covered with a very thin towel, at most.
From the point of adding the wine yeast on, the wine making process is like making any other wine. After 5 days or so you will want to remove the apple pulp and then get the wine must under air-lock. You may want to consider using a fermentation bag in the fermenter. This will make pulp removal a breeze. And, you will have a lot of it.
So there it is, all the steps for making apple wine without a press. Just understand that the flavor will be a little weaker, but it will most certainly taste like an apple wine.
Happy Winemaking,
Ed Kraus
———————————————————————————————————
Ed Kraus is a 3rd generation home brewer/winemaker and has been an owner of E. C. Kraus since 1999. He has been helping individuals make better wine and beer for over 25 years.

Winemaking Terms You Should Know: Part 5

Bottle Shock SceneIn several earlier posts, we introduced a few home winemaking terms that you may or may not be familiar with.  There are many terms to learn in home winemaking, and this post, like all the previous posts, gives you a short introduction to a few of those terms to help you get started in home winemaking, or perhaps brush up on some of the terms you may not have seen in a while.

  • Bottle shock – If you’ve ever seen the movie, starring Bill Pullman and Chris Pine, you might already been familiar with this term.  Bottle shock, also known as “bottle sickness”, is the term used for the temporary condition that wines sometimes get immediately after being bottled or being shaken up due to shipping or other general jostling around.  A wine experiencing bottle shock will sometimes taste as though its flavors are “muted” or otherwise out of balance.  The good thing about the condition of bottle shock is that it doesn’t last that long, so after you’ve bottled your wines, just let them sit for a period of time before opening and enjoying them.
  • Casein – Casein is compound that is derived from milk proteins, and that is used as a fining agent in winemaking.  Casein is often recommended for use during white winemaking, as it is very effective in reducing any browning caused by oxidation.  One problem that can arise with casein is that if you use too much, it can strip the color out of your wine, so be sure to use the recommended amount necessary for your homemade wine.
  • Maceration – Maceration refers to the process of the grape skins contacting the must during fermentation.  The main purpose of maceration is to extract polyphenols, anthocyanins, and tannins, as well as adding complexity to the aroma, flavor, body, and texture of the finished wine.  Maceration is primarily used during the red winemaking process, though some have experimented with using the technique in white winemaking with mixed results.
  • Süssreserve – Süssreserve is probably a term you’re less familiar with, though all it refers to is the un-fermented grape juice that is used to sweeten a finished/fermented wine.  German in origin, this technique was and still is used today for semi-sweet German Rieslings.  According to German law, no more than 15% of the final wine’s volume may be this “sweet reserve” juice.  Süssreserve effectively increases the sugar content of the finish wine, while at the same time reduces the alcohol level.  Making a sweet wine using süssreserve is different than simply stopping the fermentation process early, as süssreserve results in mostly glucose and fructose sugars, while stopping fermentation early results in mostly just fructose sugars.

— Other Winemaking Terms You Should Know:
Part 4
Part 3
Part 2
Part 1
———————————————————————————————————
Ed Kraus is a 3rd generation home brewer/winemaker and has been an owner of E. C. Kraus since 1999. He has been helping individuals make better wine and beer for over 25 years.

7 Tips for Gifting Your Homebrew

Wooden Six Pack Holder For Gifting HomebrewThe holiday season is upon us and all you’ve got to offer is a closet full of homebrew. But don’t worry! Beer makes an excellent gift — especially for us beer geeks! With homebrew, you can be pretty sure that your gift won’t get tossed in a closet and forgotten about. Plus, it’s a gift that someone can enjoy, share with others, and create lasting memories around.
Here are a few tips to consider when gifting your homebrew:

  1. Plan ahead – Most brews take at least four or five weeks from start to finish, sometimes longer for high gravity beers and lagers. Try working backwards from the holiday or special event, calculating the bottle conditioning and fermenting time required to arrive at your “brew by” date. This way your beer will have plenty of time to mature and carbonate before reaching its destination.
  2. Brew something special – Pick something a little more festive than a standard pale ale or lager. Spruce beer, Russian Imperial Stout, Oak Barrel Imperial IPA? Make it something the recipient won’t soon forget!
  3. Make some for next year – If brewing something that can age, like a barleywine, set aside some bottles for next year. Imagine the appreciation when gifting homebrew from your “2013 vintage” as they realize you’ve kept it safe for them for a whole year — and managed not to drink it yourself!
  4. Spruce up the packaging – Consider adding customized bottle caps and labels to give your bottles a personal touch. Brewer’s Friend has a make your own label feature.
  5. Go the extra mile – Go deluxe with a custom made wooden 6-pack holder from somewhere like Etsy. You can even get the recipient’s name branded on it. Just imagine how proud they’ll be to carry their brews around in a personalized holder!
  6. Throw in a little something more – Go the extra mile by including something they can put to good use, like this hand-forged iron bottle opener. Again, get it personalized to make it extra special.
  7. Don’t ship USPS. It’s illegal! – Hopefully this will change in the future, but until then, stick with a carrier like FedEx or UPS. Pack the beer bottles snugly with peanuts, packing paper, or styrofoam, and wrap each one in a plastic bag, just in case there’s breakage in transit. The tubes used for shipping posters work well too. Label the box “collectable bottles” or “yeast samples” to reduce the likelihood of the shipment getting tampered with.

Looking for more holiday gift ideas and inspiration? Consider these Gift Ideas for Homebrewers.
———————————————————————————————————–
David Ackley is a beer writer, brewer, and self-described “craft beer crusader.” He holds a General Certificate in Brewing from the Institute of Brewing and Distilling and is founder and editor of the Local Beer Blog.

Day 5: My Cider Is Dry. Can I Sweeten it?

Bottle Of Apple Cider
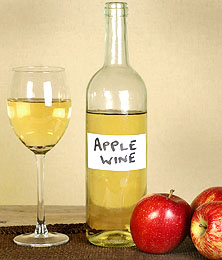
I am into the 5th day of the 2nd fermentation of my apple cider. I took a sample of the cider yesterday and found it to be very dry and cloudy. I have two questions. 1) Can I add sugar at this point to sweeten or will this just increase the alcohol content? 2) Can I add pectin at this time or is that only mixed with the must? Or is there a better fining additive? Thank you.
Name: Chuck F.
State: NY
—–
Hello Chuck,
You are correct in thinking that more sugar will only contribute to more alcohol. If you want to sweeten the wine you want to do it right before bottling, not day 5 of the fermentation.
Once the cider has come to a point that it is ready to bottle, add sugar to taste. The sugar should be in a simple syrup form made by heating up equal parts of sugar and water in a sauce pan. Add the sugar syrup to get the sweetness you like.
You will also need to add potassium sorbate at the same time to keep the fermentation from restarting. Potassium sorbate will keep a wine that is still and clear from starting a renewed fermentation. You may want to read more on sweetening your wine before actually doing it.
Most of the cloudy stuff you are seeing in the wine at this stage is yeast. A little packet of wine yeast will typically grow to 100 to 150 times what you put in. It is finer than flour, so it does take time for it to settle out.
It is completely normal for the cider to be cloudy at this stage. Once the fermentation stops, you will slowly see the cider begin to clear. It may take a week or two to completely clear, but it will clear. You can add bentonite to help speed up the clearing process, but do not add it before the fermentation has completely finished.
Now for your second question about adding pectic enzyme. If you have not added pectic enzyme to the cider, you should go ahead and do it now. We recommend adding double the recommended dosage. This is because you are adding it after the fermentation has started. You need more enzymatic power to get it up to speed.
Pectic enzyme does two things: 1) it helps to break down the pulp so that you can get more juice and flavor from it; 2) it breaks down pectin that can cause cloudy haze in the cider. You can read more about using pectic enzyme, as well.
I hope this helps you out. Just be a little patient. Give the wine some time and things should come together like they should.
Happy Winemaking,
Ed Kraus
———————————————————————————————————
Ed Kraus is a 3rd generation home brewer/winemaker and has been an owner of E. C. Kraus since 1999. He has been helping individuals make better wine and beer for over 25 years.

Homemade Wines Fermenting At Different Rates

Homemade Wine Fermenting A Different Rates
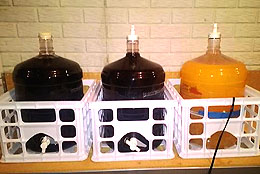
I’ve recently started making wine again after about ten years away and, of course, the changes in wine kits over that time are striking! Specifically, I’ve started three different kits from different manufacturers and followed each set of instructions accurately. All three completed fermentation (as measured by hydrometer), but the first one was visibly vigorous with a lot of foaming, the second just bubbled a bit and completed in only three days, and I had to look carefully at the third to see the tiny bubbles rising up the sides of the carboy. Why did these fermentations look so different, was one “better” than the others, and were these differences intentional by the manufacturers?
Name: Dave S.
State: Ohio
—–
Hello Dave,
Fermentations will more often then not will vary in both their appearance and speed, even when they are sitting side by side. Some of the reason for this is that there are just so many variables involved with a wine fermentation.
From the set of nutrients in one fermentation verses another, to the fact that one is slightly closer to the basement window than the other — all of these little things can make a difference in the way a wine ferments. And, the list of these little things (variables) goes on and on… They affect the fermentation time, and they effect the bubble rate.
But having said this there are two factors that trump all these variables: 1) what is being fermented, and 2) the type of wine yeast being used.
Different juices foam differently. They also vary in the set of nutrients they provide for the fermentation. These nutrients can directly affect the wine yeast’s ability to ferment. Some wine yeast will foam more than others. It just part of their character. Some yeast will also ferment harder than others, given the same set of fermentation variables.
Now for a final word. None of this matters. How much the fermentation foams or how quickly it finishes will have no direct effect on the final outcome of the wine. Whether it is 3 days or 10 days, it will result in the same wine when matured 6 months down the road.
What does matter is that the best wine yeast for the particular job at hand is used. That is why these kit manufactures will use an array of different yeast strains across their line of wine kits. Some work better with certain wine juices then others. Some of it is because of the flavor nuances the wine yeast provides. Some of it is because it is better at fermenting the situation at hand. Here is a yeast profile chart that may help you to understand this a little more clearly.
Thanks for the great question and happy wine making,
Customer Service at E. C. Kraus
———————————————————————————————————
Ed Kraus is a 3rd generation home brewer/winemaker and has been an owner of E. C. Kraus since 1999. He has been helping individuals make better wine and beer for over 25 years.

The Logistics of Transporting Beer

boxes stackedYou made it through brew day.
You warded off infections and imperfections.
You want to show off your new homebrew. But how?
Sure, you can have friends over to your place or grab a six-pack for NFL Sunday at your in-laws, but what about your friends hundreds of miles away or that homebrew competition you’ve been itching to enter?
Sometimes getting your brew from point A to B can be something of a hassle, both logistically and legally. All hope is not lost, however.
Transporting Beer Yourself
Whether you keg or bottle your homebrew, two key elements come into play when moving your homemade beer:
1. Avoid intense heat swings.
2. Keep the beer as calm and settled as possible.
If you’re traveling across town, heat is the least of your problems. If you spend a day driving with a box of homebrew in your trunk or backseat – that’s a different story.
Remember that like you, the yeast in your keg or bottle are living organisms and prefer comfortable temperature ranges. As a beer’s temperature inches past 80 degrees, you may get bad-tasting esters from uncomfortable yeast, or the yeast my simply die out. As best you can, keep your homebrew close to fermenting temperature.
During any transport, you’ll want to make sure your beer doesn’t move around too much. The more bumps you hit, the more yeast sediment will get knocked around. The last thing you want is a cloudy, yeasty homebrew (unless it’s a hefeweizen!).
Like you do for conditioning, store the bottles or kegs upright and put them in a secure space – a box with cardboard protective pieces will do. You can always strap a seatbelt around a keg, too. Wrapping beer in towels prevents extra movement and breakage, so don’t feel nervous about protecting your babies.
Always make sure you know applicable laws when moving beer across state lines yourself. The Homebrewers Association has a list of laws for all 50 states.
Sending Beer via Mail
This is a bit tricky, as it’s currently illegal to ship beer through the United States Postal Service and UPS and FedEx will only ship beer between licensed companies and consumers. If you want to send your homebrew for judging, you may have to get inventive.
How to send your homebrew with parcel companies? If asked about what’s being shipped, homebrewers will often reply “yeast samples,” “collectable bottles” and the like. The Homebrewers Association received a record 7,823 entries for their 2012 National Homebrew Competition, so it’s clear that there are many out there who will ship their beer no matter what. After all, participating in competitions is the best way to test your mettle as a homebrewer and get insight into how to become better.
Before bringing your bottles to a UPS or FedEx facility, make sure they’re safe for transport. First wrap each in a plastic bag – in case of a break the beer won’t spill. Then, find a box that will fit the wrapped bottles and cushioning snuggly. Paper towels, crumpled newspapers and packing peanuts are all worthy choices to pack around the bottles and keep them safe during travel.
When dropping off your homebrew at a shipping facility, make sure everything is boxed up, ready to go and hand over your “yeast samples.”
With a little foresight and some careful packaging, your homebrew will arrive safe and sound at its final destination every time!
*It’s important to note the Homebrewers Association is working to rectify the issue of shipping beer and the Postal Service has discussed lifting its ban on alcoholic products.
————————————————————————————————————–
Bryan Roth is a beer nerd and homebrewer living in Durham, North Carolina. You can read his thoughts on beer and the beer industry on his blog, This Is Why I’m Drunk, and send him suggestions on how to get his wife to drink craft beer via Twitter at @bryandroth.