 Learning how to harvest, wash, and reuse your beer yeast is a neat skill that gets you one step closer to making beer the way the pros do. Besides, washing and reusing beer yeast can help you save a few bucks so you can get those homebrewing gadgets you’ve always wanted.
A few important things to consider before reusing your beer yeast:
- When harvesting beer yeast, sanitation is very important! When you practice good sanitation, you can reuse yeast for ten generations or more!
- Yeast should be harvested from a clean and healthy fermentation. Take notes on how your batch turns out. If the beer didn’t come out well, you probably don’t want to reuse the beer yeast.
- Consider the color of the beer you’re harvesting yeast from. Yeast harvested from a dark beer and pitched into a lighter beer will likely affect the color of your beer, so try to pitch yeast from light beer to a dark one.
- Just like with color, think about the hoppiness of the beer you’re harvesting yeast from. A yeast slurry from a very hoppy beer may affect the bitterness of your beer.
Now, here’s an easy step-by-step guide to harvesting and washing beer yeast. Follow these steps when reusing beer yeast and you’ll have not problems, whatsoever:
- The night before transferring your beer from primary to secondary fermentation, boil a half gallon of water for 20 minutes to sterilize it. Carefully pour the water into a sanitized jar or growler, seal it with a sanitized lid, and place the growler in the refrigerator to cool overnight.
- The day of the transfer, clean and sanitize several (four or more) glass jars and lids. Remove the growler of cool water from the fridge.
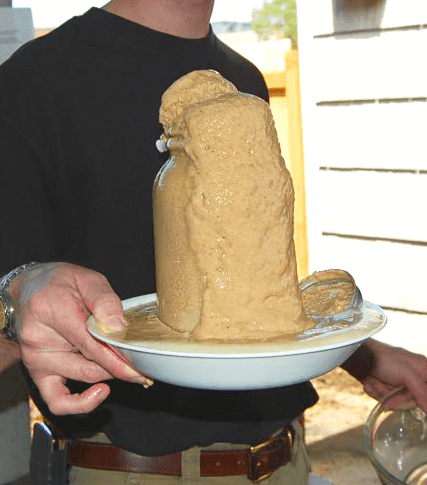
- After transferring to secondary, pour half of the water from the growler onto the yeast cake left behind in the primary fermenter. Swirl the water around to stir up the beer yeast and let sit for several minutes. The slurry will stratify into three layers: watery beer mixture on top, dead yeast and trub on the bottom, and healthy yeast in the middle.
- Pour off and discard the watery top layer. Then pour the healthy beer yeast slurry into half of your glass jars, taking care to leave the darker yeast slurry at the bottom of the fermenter. Allow these jars to sit for several minutes.
 In ten minutes or so, the slurry will separate. Just like before, pour off and discard the watery stuff on top, then pour the white yeast slurry into the remaining jars, leaving behind the darkest part of the slurry.
- Place the lids on the jars of washed yeast and place in the refrigerator. Don’t forget to label the jars!
- Use the harvested beer yeast within a few months, the sooner the better, and prepare a yeast starter to ensure optimal viability for your next batch.
Have you ever tried reusing beer yeast from a slurry or cake? Did you end up with more beer yeast than you can use? Yes, you can make bread with it!
—–
David Ackley is a beer writer, brewer, and self-described “craft beer crusader.” He holds a General Certificate in Brewing from the Institute of Brewing and Distilling and is founder of the Local Beer Blog.
What is the recipe for bread, using your leftover beer yeast?
Barbara,
Below is the link to the bread recipe.
Bread Recipe
http://www.eckraus.com/blog/how-to-make-spent-grain-bread
I do the above on my more expense yeast except I perform a couple of additional steps. After isolating the aqueous yeast fraction I refrigerate the whole thing. The yeast will separate from the water and settle, I pour off the water and add the concentrated yeast slurry to a test-tube. I then add an equal amount of 30% glycerine, pour it into test tubes, ~ 25 – 30 mL and then place into a freezer. When I’m ready to use it I thaw in 37 oC water for 2-3 minutes, add it to a yeast prop and let if grow overnight the day before I brew. Yeast frozen lasts years.