Winemaking Equipment Guide: Airlocks, Refractometers & Filters

Refractometer Be Used To Test GrapesThere are many more pieces of homemade wine equipment than can be described in one short post.  It is very important to understand the different types of homemade wine equipment, how they function, and whether or not a particular piece of winemaking equipment is needed in your home.  Therefore it’s important to introduce to you as many pieces of equipment as possible in as many posts as it takes!
For today’s homemade wine equipment post, you’ll be introduced to three important pieces of equipment: Wine Airlocks, Wine Refractometers, and Wine Filters.

Wine Airlocks:
The first piece of homemade wine equipment today is the airlock.  If you’ve done your reading or if you’re already familiar with homemade winemaking, you know that too much oxygen exposure to wine is a bad thing.  Too much oxygen can cause oxidation in wine, which effectively ruins it and causes off-flavors and aromas.
One way to combat the over-exposure of oxygen to your homemade wine while it is fermenting is by using a piece of homemade wine equipment called an airlock.  Airlocks function is such a way that the CO2 that is produced by the wine yeasts during fermentation is released through the lock, while remaining closed to outside air, preventing oxygen from damaging your fermenting wine.  There are many styles of airlocks, designed for varying batch sizes and varying speeds and intensities of fermentation.

Wine Refractometer:
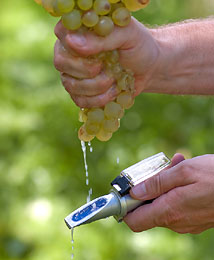
The next piece of homemade wine equipment today is the wine refractometer.  This piece of homemade wine equipment is important for those of you home winemakers that plan on using grapes to make your wine.  Refractometers are used in the vineyard and are designed to indicate how much sugar is present in the grape.
Functioning similarly to a prism, the wine refractometer separates light into different wavelengths depending upon how much sugar is present in the sample.  It works by pressing a sample in between the prism assembly and the daylight plate.  When held up toward natural light, the user can peer through the eye piece and view exactly how much sugar is in the sample by reading the marking indicating the Brix % present.  It is really quite fascinating! It is important to test multiple grapes and not just one, to get a good average sugar level for the entire batch. Another blog post that explains this in more detail is, How Refractometers Work.

Wine Filters:
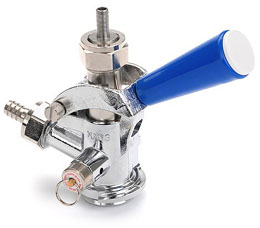
The last piece of homemade wine equipment for today is the wine filter.  There are varying styles of wine filters, from slower gravity-fed filters to pump-action pressurized filter systems. Wine filters allow you to effectively rid your homemade wine of undesirable matter (i.e. small pieces of fruit, fermentation by-products, dead yeast cells, etc.) and leave a clear, esthetically pleasing beverage.

Stay tuned for more posts describing other important pieces of homemade wine equipment!
———————————————————————————————————
Ed Kraus is a 3rd generation home brewer/winemaker and has been an owner of E. C. Kraus since 1999. He has been helping individuals make better wine and beer for over 25 years.

What’s Better: All-Grain Brewing or Extract Brewing?

Malted Barley Grain SyrupWhen it comes to brewing at home, you have two options: you can choose all-grain brewing, or you can choose extract brewing. If you’ve never done either before, you might be wondering which is the better of the two; and you might have already heard a number of arguments for each. So, which one is it?
The debate is a difficult one, as both methods are perfectly valid and both deliver perfectly good beer. Which one you choose will largely depend on how much time you want to put into your beer making, and what kind of beer you’re looking for.
With all-grain brewing you place cracked malted barley, with water and cook (mash) it a specific temperatures over a period of time. This is a delicate process that needs to been done with great care. The liquid is then removed from the barley grains and boiled with hops.
With malt extracts on the other hand, you are skipping the cooking (mashing) part of the process. All that is need is that you pour the malt syrup in with water into a kettle and boil the mix (wort) and boil the hops in as before. No critical temperatures need to be followed. No grains need to be dealt with.
So which one is better?
Some beer brewers simply prefer one method over the other, just as cooks do in their kitchen. Those who prefer that everything be made “from scratch” will probably find more satisfaction in working with all grains, while those who would prefer to use mixes and a more hands-off approach might find malt extracts more convenient.
If you’re really picky about the type of beer you’re striving for, you might want to choose all-grain when you want a light, amber-colored beer with an all-malt Pilsner. However when the mood strikes for a bold stout, using malt extracts could possibly give you better results.
Another related blog post that you may want to take a look at is, “The 3 Different Methods Of Homebrewing“. It goes over the different ways that you can approach brewing your own beer at home.
________________________________________________________

Read More About All-Grain Brewing And Other Homebrewing Topics,
FREE  EMAIL NEWSLETTER:

________________________________________________________

How to Clean Your Keg Tap

Keg TapIf you’re going to be kegging homebrew, you might think that the most difficult part is going to be installing the keg tap. Truthfully though, once you’ve done it once installing the tap is pretty easy. Cleaning it on the other hand, is something that you’ll need to master throughout the entire time you’re making homemade beer.
Start cleaning your tap by first finding the appropriate tap cleaner for it. The instructions will also be on this cleaner, but you’ll most likely have to combine it with water and then make sure it’s fully blended.
Then remove the knob from the tap’s faucet. This, along with the rest of the faucet and the beer hose, will then need to be placed inside a large bucket. Using a cleaning attachment, connect it to the faucet of the tap. Place the bucket underneath the main portion of the keg, placing the hose inside the bucket so that it will be able to steam everything inside.
Start pumping the cleaning solution into the bucket, but be sure to allow the cleaning detergent to sit inside the hose for some period of time before you add it to the bucket. This will help break down any bacteria that’s inside, and the instructions you receive with the cleaner will tell you how long the hose needs to soak with it inside. After that soaking time, the solution can then be poured into the bucket, where it will clean everything inside.
After everything has been thoroughly cleaned, you then just have to make sure no solution or detergent is left on any of the equipment. Otherwise, it will have an adverse effect on the beer you make afterwards. To rinse, fill the bottle used to pump the cleaner and ensure it’s cleaned properly. Fill it with clean, cold water and pump it the same way you did the solution. It will rinse everything off. When that is complete, make sure to also rinse all other pieces and parts used during the cleaning process.
Once you’ve fully cleaned and rinsed all of your kegging equipment, you just have to allow it to dry fully, and then store it for the next time you’re ready to have some friends over!
Another blog post you may want to look over is, “Some Tips For Kegging Homebrew“. This post has some ideas on kegging your own home brewed beer.

If You Struggle With Acid Testing Your Wines, Then Read This!

Testing Your WineI am making a red wine. I am trying to get the right level of acid. I used a titration kit and got a reading of 15% tartaric. When I used pH papers it had a pH level of 3.8. What do I do follow the tartaric? I am worried that if I do it will be to acidic. It already tastes sharp and sour.
Name: Justin Maddock
State: Missouri
Hello Justin,
We have some conflicting information going on. Your titration reading indicates that your wine if ‘very low’ in acid. Your pH reading indicates that it’s a ‘little low’ in acid. And, your taste buds are indicating that it is ‘too high’ in acid. The only thing I can say with this type of information is that you need to get to the bottom of what’s really going on with your wine before doing anything to it.
Depending on the type of wine, you should be expecting a titration reading between .55% and .75% tartaric. A reading of .15% would not taste anywhere near sharp, in fact it would have an impression closer to flavored water, so I doubt if this reading is correct for whatever reason.
The pH reading is believable. This is because it is not way whacked out and the fact that taking a pH reading is simple, straight-forward and hard too mess up. For most wines you would like a reading between 3.4 and 3.6. Your reading of 3.8 indicates that your wine is a little shy of being within a normal range. Remember that the pH scale works backwards. This means your reading of 3.8 is less in acid than the 3.6.
Then we have your personal taste perception. You stated that it taste a little sharp or sour. In reality your own personal taste is what really matters, so we could forget all about the rest and say that your wine has too much acid — for your own personal tastes — and lower it by whatever means. But I have found that most home winemaker’s would rather rely on technology than on themselves.
With that being said, I would do a titration test on a commercially made wine with your Acid Test Kit and pH papers. If you don’t have one, just go buy the cheapest wine you can find. If you do not get a reading around .60% or .70%, tartaric with the Acid Test Kit, then I would be suspicious of how old the titration solutions are, or your ability to administer the test. Your pH papers or litmus papers could be too old to be accurate as well, but not likely. It takes several years for these to become too old to use. But since you spent the money on the wine, I would test the pH as well to see what your get.
If you don’t get a reasonable reading with either of these methods, then you need to either get them replace with new, or contact one of our very, very nice customer service representatives on the phone and they will step you through the testing process. Another blog post that you might like to take a look at is “Using An Acid Test Kit“. It’s a two-parter that goes into a little more detail about how to use the Acid Test Kit Like I said before, I would not recommend doing anything to the wine until you get readings that make sense.
Happy Wine Making,
Ed Kraus
———————————————————————————————————
Ed Kraus is a 3rd generation home brewer/winemaker and has been an owner of E. C. Kraus since 1999. He has been helping individuals make better wine and beer for over 25 years.

Valentine’s Day Pairing: Does Wine or Beer Pair Best with Chocolate?

Wine and chocolate: what’s more romantic than that? As Valentine’s Day approaches, it’s time to consider which wines – and beers – go well with chocolate. However, just like not all white wines taste the same, not all chocolate is created equal. The differences between milk chocolate, dark chocolate and white chocolate just skim the surface of that subject. Specific types of chocolate taste better with different wines and beers. Here are a few good pairings to help you plan your Valentine’s Day menu:
Wine & Chocolate
According to “Food and Wine” magazine, the best wines to pair with chocolate are full-bodied red wines, like Zinfandels, or rich, blended wines from California. They also offer a few more specific suggestions, such as pairing chocolate-covered popcorn with a sparkling red wine like Banfi’s Rosa Regale and pairing a chocolate brownie with a Ruby Port, and matching filled chocolates with an exotic Madeira. Some advise pairing Sherry with white chocolate; a glass of Pinot Noir with a chocolate that’s half-cocoa, half-milk; and putting Champagne together with the mild milk chocolate.
Beer & Chocolate
Pairing beer with chocolate is a little more complicated than pairing with wine, but it’s by no means impossible. According to The Kitchn.com, stout and dark chocolate are an ideal pairing. “Maryland Life” magazine (now defunct) suggests serving Belgian-style pale ale with orange-filled truffles. They also suggest an amber lager with a salted, dark chocolate caramel. In Maryland and elsewhere around the United States, beer and chocolate tastings are becoming increasingly popular. Get as crazy as you want with it and try an oatmeal stout with a high-end peanut butter cup.
Of course, you don’t necessarily have to ingest your beer and chocolate separately. There are several chocolate beers on the market, including Samuel Adams Chocolate Bock, Rogue Chocolate Stout and Belgium’s Ommegang Brewery’s Chocolate Indulgence. It’s a dessert in a glass!
Chocolate, an adult beverage and love are a natural Valentine’s Day combination. Plan ahead this year and dazzle your sweetheart on February 14th with one of these tasty pairings.

Pairing Wine with Valentine’s Day Dinner

Wine makes a nice addition to most gatherings, whether it’s for the holidays or just for fun. With Valentine’s Day right around the corner adding a bottle of wine to your romantic dinner can be the perfect finishing touch. However, finding the right wine pairings for your dinner can prove to be stressful and challenging. If you’re struggling to find just the right wine, here are a few pointers on what to serve with traditional holiday foods:
1. Turkey. Turkey, by itself, isn’t difficult to pair wines with, but when you add the conglomeration of flavors that traditionally make up a Thanksgiving-type dinner, the result can clash with many lighter white wines. For a wine that will meld nicely with stuffing, cranberry sauce, green beans and scalloped potatoes–as well as turkey–opt for a dry rose, like the ones crafted in Provence, or a New Zealand Sauvignon Blanc with its tropical-fruit bouquet. For example a Beaujolais Nouveau; the new vintage of light, fruit-forward Burgundy wine, compliments a heavier turkey-based dinner perfectly.
2. Ham. The saltiness of ham plus the traditional sweet glaze makes for a wine-pairing puzzle. Many wine enthusiasts suggest serving Beaujolais with your ham dinner or a California Fume Blanc or California Syrah. The secret is to choose a wine with a high acidic content, which will create a fruity taste in your mouth when combined with the salty ham.
3. Roasted Pork. The right wine to serve with roast pork depends on how it’s prepared. As pork is generally light and mild, you want to avoid overpowering the meat with full-bodied red wines. Instead, opt for California Chardonnay, advises Food and Wine magazine, if you are serving an herbed pork loin, or choose an Alsatian Gewurztraminer if your pork is spicy.
4. Beef Tenderloin. Beef is a little easier to pair with wine, but many of the traditional choices, such as aged Bordeaux or a heavy Argentine Malbec, may be too profound or complex for a novice wine drinker. If your Valentine’s Day date isn’t a big wine drinker you want to make sure your date enjoys the wine; opt instead for a Cabernet from the Columbia Valley of Washington State, advises the Wine Spectator magazine. They also say to make sure that you use the same wine for your sauce as you use on the table (Always a good rule).
Don’t be afraid if the responsibility of bringing the Valentine’s Day dinner falls on you this year. Avoid the extremes and the esoteric wines in favor of fruity, off-dry, drinkable wines and your choices are sure to be a success. Really add a personal touch to the dinner by brewing your own wine with a wine making kit from Adventures in Homebrewing. If your date is the wine connoisseur then adding a wine making book would be the perfect addition as a gift for Valentine’s Day.

My Persimmon Wine Cleared And Tastes Great!

Homemade Persimmon WineI am the one who made the persimmon wine and had trouble with it clearing. I used a mix of Kieselsol and Chitosan and waited about a week and it cleared perfectly. It is a golden color and it tastes like sweet persimmons. Real tasty.
Name: Sandra Fey
State: Ky
Hello Sandra,
Yes, I remember that post on our blog: “My Persimmon Wine Won’t Clear!“. Thanks for share the picture of those beautiful bottles of wine. I’m glad that everything worked out for you and your wine. If you ever have anymore questions, just feel free to ask and we’ll do what we can to help you along with your wine.
Happy Winemaking,
Ed Kraus
———————————————————————————————————
Ed Kraus is a 3rd generation home brewer/winemaker and has been an owner of E. C. Kraus since 1999. He has been helping individuals make better wine and beer for over 25 years.

How to Inspect Your Bottles When Bottling Beer

Beer BottlesWhen you brew at home you’ll need to take a lot into consideration, from what malt products you’re going to use to bottling beer and how you’re going to do just that. Before you choose a method though, you’ll need to first choose your beer bottles – and make sure you inspect them properly before using them.
Over time, the bottles you use for storing your beer can become chipped, scratched, or otherwise damaged, especially if you’re using the same beer bottles over and over again. If the bottles are damaged in any way, they could potentially explode during the brewing process while they’re being sterilized or put under extreme pressure. Because those chips and scratches affect the pressure inside the bottle, it could end up ruining the entire bottle. To avoid that, inspect the beer bottles properly by using the method below.
First start by looking at the bottles the same you would look for clean drinking glasses – by holding them up to the light. It’s here that minor damages will be most apparent. Make sure you pay special attention to the mouth of the bottle for cracks, and the sides of the bottle for small cracks. Once you see that all parts of the bottle are smooth and damage-free, then check to make sure that they’re completely clean.
Small water spots aren’t such a big deal, but grime that gathers in the bottom of the bottle is. This is a common area for bacteria and mildew buildup and, because it’s at the very bottom and on the inside, it’s one of the most often overlooked. If there is mold or other dirt inside, another cleaning and sterilization may be required. If however the dirt cannot be removed, or you notice damage on the bottle, it must be thrown out.
Inspecting your beer bottles for damage or dirt may seem like a minor task when you first start bottling your own beer. But taking a few minutes to ensure your bottles are in good condition will save you a lot of time, and beer, in the end. Another blog post that may be of interest is, “How To Bottle Your Beer: Tips On Bottling Beer“.

The Minimum Equipment You Need to Brew Beer Yourself

Home Brewing KitLots of people love the idea of whipping up a batch of their own homebrew stuff, but think that it takes a great amount of cash and equipment in order to get just one bottle. This is a misconception, and one we’re knocking down with our own customers all the time. When you want to make a great-tasting beer, you can brew it yourself – and you don’t need a lot of home brewing equipment backing you up.
A very large cooking pot should be all you need in order to hold all of the home brewing ingredients that you’ll use during the brewing process. In addition to that you’ll need a primary fermenter and a secondary fermenter that are equipped with an air-lock attached in order to keep the integrity of the brew at its highest quality. A bottle capper is also necessary, to ensure that bottles are capped properly, and are air-tight; and a gravity hydrometer, which will let you know when it’s time to bottle the beer. You’ll also need a large spoon to stir, and a sanitizer to ensure that all equipment is properly cleaned and sterilized before use.
Even these few ingredients can seem overwhelming to someone who is just learning how to brew their own beer, and they can often wonder where exactly they can find them. Luckily, at Adventures in Homebrewing we’ve got you covered with our own Beermaker’s Necessities Box.
This box includes all of the minimum equipment you’ll need to start making your own home brew quickly and easily, and without running around for all the different pieces you’ll need. This box contains the same quality pieces of equipment you can buy individually, but at a special, reduced price as a kit.
Because we believe that the very best beer is the beer you make yourself, we think it should be practical and accessible for everyone. Order your Beermaker’s Necessities Box today, and start sipping your own brew tomorrow!
Want to learn more about what it takes to brew your own beer? Then you might want to take a look at this recent blog post, “The 3 Different Levels Of Brewing Beer At Home“. It goes into a little more detail about the home brewing process and what it’s all about.

________________________________________________________

Read More About Getting Started And Other Home Brewing Topics,
FREE  EMAIL NEWSLETTER:


________________________________________________________

What's My Wine's Alcohol Level?

Homemade Wine Alcohol LevelI started a fermentation with 10 lbs. of cleaned orange fruit, 6.5 lbs. of sugar, 3 gallons of water, yeast, pectic enzyme etc. I forgot to take the original specific gravity. If I remember correctly when I racked the first time my reading was 1.030. I just racked it a second time and am getting the reading of .990. Any way to accurately figure out the alcohol content or not? I’ll know better next time. Smells like its got a kick to it.
Name: Barney
State: Louisiana
The short answer to your question is, “Not unless your willing to spend some bucks on lab equipment”.
As a home winemaker, determining the alcohol level of a finished wine without a beginning wine hydrometer reading is difficult. Knowing the beginning reading along with an ending reading make it just a simple matter of easy math to figure out, but when you don’t have the beginning reading, determining the alcohol level quickly turns into a science project.
Without the beginning reading the wine hydrometer is no longer of any value to you for this purpose. It’s good to know that your wine is at 0.990 on the Specific Gravity scale, indicating that the fermentation did complete, but beyond this it is of no help. You’ll need to rely on some other piece of equipment.
Your first option is to use a Vinometer. The big plus to using this apparatus is that it is not too terribly expensive. The big minus is that it is not too terribly accurate, either. And, if your wine has any significant residual sugar in it, — which yours does not, with a reading of 0.990 — the measurement will not be accurate at all. In fact, it will be in another ballpark.
The Vinometer is fairly simple to use. I works off the surface tension of the liquid, in this case the wine. You start by filling up a thin channel in a glass pipe or pipette. Then turn the pipette upside-down to allow the wine to run out. You determine how much alcohol is in the wine by observing how much wine stays in the Vinometer verses how much falls out. There is a scale along its side to help you do this.
Your second option is to use an Ebullioscope. This apparatus is much more expensive but much more accurate. It is basically a lab-quality mini still. You take a measured sample of the wine and bring it to the boiling point of alcohol, which is lower than water, and essentially steam all the alcohol out of the wine. The steam is collected in a closed environment, then cooled and measured in relation to the wine sample size. As you can start to see, unless you’re a small winery, this is probably not to practical.
While the Ebullioscope is very accurate, it is not completely accurate. Other trace amounts of volatile elements do rise with the alcohol steam, otherwise known as “essence”, so there is even a third way to measure the alcohol level, one that is ultimately accurate, and it’s the way the big boys do it. That is to use chromatography.
What it means for the home winemaker, or even the small winery, is send it to the lab with a large check, and they’ll tell you what the alcohol level of your wine is with great accuracy. What it means for the large winery is they’ll send the sample to their in-house lab and run it through a piece of equipment that costs thousands of dollars.
Another blog post that you may want to take a look at that is related to this subject is “Controlling Alcohol With A Gravity Hydrometer“. It goes into a little more detail about actually using the hydrometer to determine the alcohol level of your wine.
I guess the moral to this blog post would be to, “Never forget to take your beginning wine hydrometer reading!” It is vital to determining the alcohol level of your homemade wine. Without it your pretty much out of luck.
Best Wishes,
Ed Kraus
———————————————————————————————————
Ed Kraus is a 3rd generation home brewer/winemaker and has been an owner of E. C. Kraus since 1999. He has been helping individuals make better wine and beer for over 25 years.