 Your role as a home winemaker doesn’t stop until you’ve put that bottled wine to bed. It’s important to keep your focus all the way to the very end of the process without skipping any steps that you may think are not important, but all that hard work you put into making that wine could all be for not if you are complacent about the final steps.
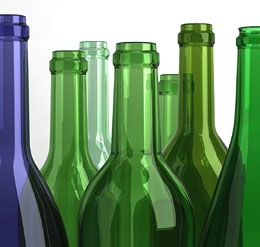
Even though it’s just about the last step and you’ve been so patient up until now, bottling is just as important as any other step during the home winemaking process. You’ve been very diligent about sterility and cleanliness up until now, so why stop now? Regardless of whether or not you are using new wine bottles or recycling old ones, it’s important to take the time to clean and sanitize your wine bottles, as putting your homemade wine into a dirty bottle is a recipe for disaster.
The only equipment you really need is a bottle washer, a bottle brush, and a bottle tree (and soap, of course). The bottle washer shoots a very strong blast of water into your bottles, which is perfect for removing soap residue or other solid particles. It has a garden hose-type thread on the end so you can easily attach it to outside faucets or laundry faucets. If you need to attach it to a kitchen faucet-no problem! Just purchase the handy “kitchen faucet thread adapter”!
The bottle brush is pretty self-explanatory: you need a skinny brush that will fit into the neck of a bottle in order to clean any soap or solid particles off the insides of your wine bottle. Once you’ve given your bottle a final rinse with the bottle washer, you can hang it on the bottle tree to drain and dry.
For both recycled and new wine bottles, you want to give them a good rinse in hot soapy water. For recycled bottles, it’s important to use the bottle brush, as there could be solid particles left behind from the previous wine. For brand new wine bottles, you probably don’t need to use a bottle brush, since the only likely thing in the bottle after shipping to your home is cardboard dust, and that will come right out with a good rinse.
Of course, it never hurts to use the bottle brush, so if you’re worried about it, brush away! Finally, give all wine bottles a good shot of the bottle washer/jet and let dry on the bottle tree. Keep in mind, if there are any labels on your old bottles, you’ll want to soak them in hot water and scrap off the label bits!
Once you have the wine bottles soapy clean, it is time to give them a quick sanitizing bath. It’s fairly easy, and it’s quick. There are many products you can use to sanitize these bottles, but one I’m partial to is Basic A. The reason being, it is a no-rinse cleaner. All you need to do is dip the wine bottles in a solution of Basic A, then allow them to air-dry on the bottle tree. The actual sterilization happens as the solution evaporates from the bottle’s surface. Once the wine bottles are drained and dried, you are ready to go.
Cleaning and sanitizing your wine bottles is an important step in the winemaking process and one not to be glossed over. It’s just as critical to the quality of the wine as any of the other steps performed along the way, so don’t waste all your previous efforts by not giving due-diligence to a step that can have such a critical effect.
———————————————————————————————————
Ed Kraus is a 3rd generation home brewer/winemaker and has been an owner of E. C. Kraus since 1999. He has been helping individuals make better wine and beer for over 25 years.
Is It OK To Bottle A Carbonated Wine?
 I started bottling a Red Zinfandel which I started in March. It is now June 29. I noticed bubbles in the bottles as I was filling them. I tasted the wine and it felt like it was slightly carbonated. The SG is .998. What might I do to prevent any exploding bottles or should I put the wine back into a carboy and make adjustments. This is the 7th or 8th wine I have made and I have had no problems in the past with either reds or whites.
Thank you for your prompt response.
Tom
Name: Tom M.
State: New York
Hello Tom,
It is possible that the bubbling action you saw was from a slight fermentation but not very likely. With a specific gravity reading from the wine hydrometer of .998, I would say that the wine yeast have little to nothing to ferment and therefore have no way of causing any re-fermentation problems after you bottle the wine.
What you are most likely seeing is the leftover CO2 gas from the original fermentation. A wine fermentation creates both CO2 gas and alcohol. The CO2 gas is what you see coming through the air-lock. The CO2 gas is also the same stuff that’s puts the fizzy in beer and soda pop.
Most of the gas wants to leave, but some of it will stay saturated into the wine. It is only when the wine is agitated that it will take the opportunity to escape. This result is the bubbles you are seeing.
One thing you should do is degas the wine before bottling. Degassing the wine is simply agitating it so that the CO2 gas will leave before bottling. If you made your wine from a wine ingredient kit, the directions generally say to stir or shake the carboy before adding any clarifiers and bottling. If this is a step you did not do, or do enough, then this is what you are seeing.
One handy piece of wine making equipment we offer is a Degassing / Mix Paddle. It is a paddle that actually chucks onto a hand drill. The paddles are hinged so that it folds up small enough to fit into the opening of a glass carboy. Just stick it into the wine and pull the trigger.
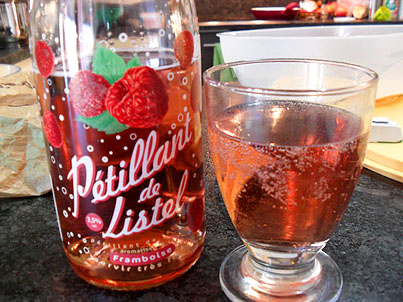
I would like to point out the CO2 gas does not negatively affect the wine in any way. Upon decanting the wine you will see some bubbles, but nothing near to the degree of a sparking wine. A sparkling wine has a lot more CO2 gas in it. It is kept in the wine under pressure. This wine will not be under pressure in any way. The wine will only be holding the CO2 gas it can without pressure, which is not very much. Wines like this are known as crackling or petillant wines.
To sum up, the only way the bubbles could be causing a problem is if the wine were still fermenting. With the reading you gave of .998 on your wine hydrometer, this is not very likely. This reading indicates that there are no sugars left to ferment. If you have already bottled the wine there is no reason to be concerned. If you haven’t that you have the opportunity to degas the wine completely then bottle, but this is not necessary from a safe wine perspective.
What you are most likely seeing is the leftover CO2 gas from the original fermentation. A wine fermentation creates both CO2 gas and alcohol. The CO2 gas is what you see coming through the air-lock. The CO2 gas is also the same stuff that’s puts the fizzy in beer and soda pop.
Most of the gas wants to leave, but some of it will stay saturated into the wine. It is only when the wine is agitated that it will take the opportunity to escape. This result is the bubbles you are seeing.
One thing you should do is degas the wine before bottling. Degassing the wine is simply agitating it so that the CO2 gas will leave before bottling. If you made your wine from a wine ingredient kit, the directions generally say to stir or shake the carboy before adding any clarifiers and bottling. If this is a step you did not do, or do enough, then this is what you are seeing.
One handy piece of wine making equipment we offer is a Degassing / Mix Paddle. It is a paddle that actually chucks onto a hand drill. The paddles are hinged so that it folds up small enough to fit into the opening of a glass carboy. Just stick it into the wine and pull the trigger.
I would like to point out the CO2 gas does not negatively affect the wine in any way. Upon decanting the wine you will see some bubbles, but nothing near to the degree of a sparking wine. A sparkling wine has a lot more CO2 gas in it. It is kept in the wine under pressure. This wine will not be under pressure in any way. The wine will only be holding the CO2 gas it can without pressure, which is not very much. Wines like this are known as crackling or petillant wines.
To sum up, the only way the bubbles could be causing a problem is if the wine were still fermenting. With the reading you gave of .998 on your wine hydrometer, this is not very likely. This reading indicates that there are no sugars left to ferment. If you have already bottled the wine there is no reason to be concerned. If you haven’t that you have the opportunity to degas the wine completely then bottle, but this is not necessary from a safe wine perspective.
Happy Winemaking,
Ed Kraus
———————————————————————————————————
Ed Kraus is a 3rd generation home brewer/winemaker and has been an owner of E. C. Kraus since 1999. He has been helping individuals make better wine and beer for over 25 years.
Harvest Your Grapes Like A Pro, With A Wine Refractometer!
 As you progress in your wine making practice, you may find yourself making wine from grapes (if you aren’t already). Taking it a step further, you may find yourself gaining access to grapes that are still on the vine, allowing yourself much more control over things like: when the grapes should be picked.
Now that you’re diving into the realm of viticulturalist, you’ll need to become familiar with one piece of wine making equipment that is a must-have for all those making wine from grapes.
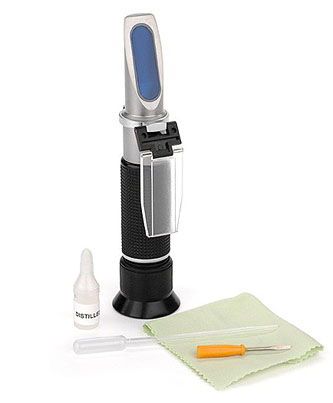
The wine refractometer is a piece of equipment that you must have if you will be in charge of determining when to pick your grapes. Before you harvest your grapes, you want to be sure the grapes have matured to a particular sugar level best suited for a well-balanced finished wine. Wine refractometers act to measure the Brix present in the grapes, thus allowing you to determine if they are ready to be harvested or if they need to remain on a vine for a longer period of time.
Wine refractometers work by using light to measure the density of water-soluble compounds in a sample. What these devices are actually measuring is the refractive index of a fluid sample. Basically, as light travels through a sample, it will move faster or slower depending upon how dense the fluid is. The denser the sample is, the slower the light will refract, and the higher the value on the refractometer is read. In other words, the more sugar that is in the sample, the more dense the sample is, thereby the reading on the wine refractometer will be higher than if it was a sample of pure water (less dense than a sugar solution). Here’s more information on how a wine refractometer works.
Wine refractometers come is various styles and designs and all are functionally very similar. To operate a wine refractometer, you’ll need a grape sample. Ideally, you’ll want to take multiple samples throughout the vineyard to check for variation in maturation times (you may want to harvest different sections at different times). You’ll want to try and harvest those grapes that are all at the same stage in their maturation process, in order to create a more balanced wine.
Next, squeeze the grape into a plastic bag in order to release the juices. Then, place a couple of drops onto the refractometer, close the attached cover, and peer into the device while holding it up to the light. The reading will be clearly marked on striations inside the device, allowing you to determine if the grapes are ready to be harvested or not.
There is a lot to learn once you’re at the point of harvesting your own grapes, however, the refractometer is certainly one piece of equipment you’ll never want to be without.
Happy Winemaking,
Ed Kraus
———————————————————————————————————
Ed Kraus is a 3rd generation home brewer/winemaker and has been an owner of E. C. Kraus since 1999. He has been helping individuals make better wine and beer for over 25 years.
Racking Your Wine The Optimal Way
 I have been making your wine for many years. Every time i make a wine kit I have that air space in the top of the carboy. I use to add wine I already made to the carboy to top it off but it takes 2 bottles and that kills me. I am very conservative with the racking tilting carboy on one side to minimize loss and only rack once. I like to bulk age but I am concerned about the effects of the air so I bottle as soon as possible. Is there an option that makes sense. can the sediment be run through a filter to retain more wine? Name: Joe G.
State: RI
Hello Joe,
The first thing I’d like to say is two bottles seems like a lot. We need to figure out what’s going on.
The first thing to consider is maybe you are not starting out with the full amount. So you might want to double check any level markings that are on your primary fermenter to confirm that they are correct. Make sure you are starting with the full amount intended.
Assuming that you have measurements correct, I suspect that it is the way you rack your wine that is at issue here. You stated that you only rack your wine once. I believe that you can get more wine by doing more rackings. Here’s how:
You should be doing 3 rackings:
- One on about day 5 of the fermentation
- Another after the fermentation has completed
- One more right before bottling.
Some winemakers will even add a fourth racking between the fermentation completing and the one before bottling. This is particularly important if you want bulk age your wine.
Here’s the trick that will get you more wine
When doing the first two rackings, get as much liquid as you can, even if there is sediment coming along with it. Only worry about getting all the liquid at this point. You are only concerned with getting rid of the bulk of the sediment at this time, not all of it. If you try to leave all the sediment behind at this stage you will be wasting a lot of wine.
When doing the first two rackings, get as much liquid as you can, even if there is sediment coming along with it. Only worry about getting all the liquid at this point. You are only concerned with getting rid of the bulk of the sediment at this time, not all of it. If you try to leave all the sediment behind at this stage you will be wasting a lot of wine.
It is only when you get down to the very last racking that you need to worry about leaving all the sediment behind. But fortunately for you, by the time you get to this stage there should only be a dusting of sediment left to deal with. By racking your wine in this way you will be surprised to find that you may loose about a half a bottle of wine, at the most.
As to your question about filtering the sediment through a some type of filter, there is no successful way I know of to do this. This issue being that that amount of sediment will clog the filter almost immediately. It is important to understand that the sediment from the yeast itself is as fine as flour, so most filters wouldn’t help anyway. Even a coffee filter would allow all of the yeast sediment to pass through.
I have heard of people putting the sediment in jars or jugs and let it separate while under refrigeration, but it my view it is hardly worth the effort, nor is it necessary if you rack your wine as described above.
There is a blog post you may want to take a look at that covers this as well, Don’t Waste The Wine.
Happy Winemaking,
Ed Kraus
———————————————————————————————————
Ed Kraus is a 3rd generation home brewer/winemaker and has been an owner of E. C. Kraus since 1999. He has been helping individuals make better wine and beer for over 25 years.
Ed Kraus
———————————————————————————————————
Ed Kraus is a 3rd generation home brewer/winemaker and has been an owner of E. C. Kraus since 1999. He has been helping individuals make better wine and beer for over 25 years.
Crush And Destem Your Grapes Like A Pro
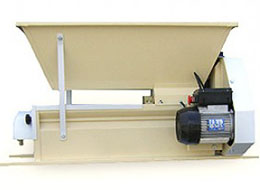 Perhaps you’ve been making homemade wine from juice or other fruits up until now, and you’ve recently decided that you would like to start making wine from grapes. It is important to know your options in regards to how you plan to process your grapes, so you don’t end up with green or other off flavors from the grape stems and other debris.
We’ve already covered grape presses in another post, but I’ll briefly remind you that a grape press is a piece of equipment required to actually press the grapes to extract the juice from the fruit. It is certainly a piece of equipment you’ll need for making wine from grapes, but for the purposes of today’s post, we’re going to focus primarily on the grape destemmer.
Prior to using the grape press, you first need to destem your grapes, as well as get rid of any leaves, bugs, or any other debris that may be hanging on for dear life to the grapes. There are basically two ways you can do that: 1) using an motorized grape destemmer; and 2) using a manual grape destemmer.
The Marchisio Crusher & Destemmer is a motorized grape stemmer that allows you to process up to 2,200 pounds of grapes per hour. Basically, there is a set of rollers that act to gently crush the grapes in order to loosen the stem from the skin of the grape. Then, the crushed grapes are passed through the grape destemmer, which effectively removes up to 90% of the stems that were loosened from the grapes by the crusher. Finally, the stems are separated from the juice and pulp of the grapes by being discarded out to the side of the destemmer, while the pulp and juice remains at the bottom.
The manual grape destemmer is a very similar product as the motorized version, and crushes the grapes in a very similar fashion. However, the main difference between the two grape destemmers is that the manual version is powered by a crank wheel powered by human force, whereas the motorized grape destemmer is powered by a machine. If you’re looking to save a little money or perhaps add a little extra “elbow grease” into your winemaking experience, the manual grape destemmer may be the best option for you.
Crushing and destemming is very important for making wine with grapes, and must be done in a certain manner so that you do not over extract your grapes to reveal too much bitter tannin or potentially green flavors if the grapes aren’t fully seed ripened. Choosing the appropriate grape destemmer for you will put you well on your way to making a quality wine from grapes.
———————————————————————————————————
Ed Kraus is a 3rd generation home brewer/winemaker and has been an owner of E. C. Kraus since 1999. He has been helping individuals make better wine and beer for over 25 years.
The Ultimate Wine Pairing Guide
Not sure what wine to serve at your next dinner party? Check out our brand new wine pairing infographic for help selecting the right wine for the right meal. Throughout the month of July we will be featuring various recipes and suggested wine pairings for each food category, so keep checking back!

You Think You Know Beer? Become A Beer Judge!
 Ready to take your homebrewing to the next level? Consider being a certified beer judge! Guest blogger Jason McLaughlin gives us the run down:
——————————————-
Many homebrewers have tried entering a homebrew competition at some point to see either how their beer stacks up against others, or to just get feedback on where one may have gone wrong. The job of a beer judge is a big one, and qualified BJCP (Beer Judge Certification Program) judges have gone through extensive training to become proficient and calibrated on knowing when a beer fits a particular beer style (Is this a Baltic Porter or a Robust Porter?), or perhaps has any off-flavors or aromas.
The Role of a Beer Judge
Judges need to know when a brewer has nailed a style, or what action they could take in the future to enhance their beer. They also need to understand and detect beer faults, and inform the brewer where in the process it may have stemmed, and how to correct it in the future. It’s truly a huge job because entrants are paying hard earned money in entry fees and often shipping expenses for their beer to evaluated and scored. Judges need to be educated and have sharp palates, and therefore the process of becoming a judge is not set up to be obtainable without extensive studying and… well… drinking beer.
About the BJCP
At the core, the purpose of the BJCP is to promote beer literacy and the appreciation of real beer, and to recognize beer tasting and evaluation skills. One becomes a BJCP ranked judge by taking a series of exams that test potential judges on their brewing knowledge, as well as their tasting and communication skills. The first step, called the BJCP Beer Judge Entrance Examination, is an online exam that is made up of questions dealing with the BJCP Style Guidelines, technical processes of brewing, knowledge of ingredients, recipe formulation, and beer faults. Examinees with passing scores are then qualified to take the BJCP Beer Judging Examination, which is a practical tasting examination administered at a registered exam site.
Studying for the Exam
To cover all the topics that can be included in taking the exams, a firm understanding of brewing practice is required. Books such as Designing Great Beers and Complete Joy of Homebrewing are fantastic resources. Many potential judges also form study groups to go over the materials they are required to know. A study group is a great way to learn with others and gain perspective of all the facets of brewing and evaluation. Class time is often comprised of covering the technical information and science behind the brewing processes and ingredients, studying of the BJCP Style Guidelines and the history of styles, and in depth beer style evaluation of classic as well as flawed examples. The knowledge one learns going through a well planned study group is vast, and becoming a BJCP judge may quite possibly be the single best thing a homebrewer can do to better their beer. Judges have all the tools they need to evaluate their own beers, and that is a huge advantage when creating the perfect brew.
Interested in Becoming a Judge?
A lot of information is available on the BJCP website, including test dates and locations. Due to the high interest in becoming involved with the program, scheduling the tasting portion of the exam can be booked out for quite a while. The exam is individually graded by volunteers, which puts a limit on how many exams can be administered in a month. With that being said, there is no better time than present to round up your brewing friends or local brew club members to start the planning now.
In the meantime, a great way to see first hand what goes into a BJCP sanctioned competition is to volunteer as a steward at a homebrew competition. Competition organizers are almost always in need of extra help, and what better way to see behind the scenes of judging is all about!
——————————————————————————————————
Jason McLaughlin is a homebrewer, National Level BJCP certified beer judge, and one of the admins of the Nebraska Beer Blog. Additionally, he is a columnist for Omaha Food & Spirits and President of the Lincoln Lagers Homebrew Club.
A History of Home Brewing: Colonial Crafting
Though it has enjoyed a recent run of popularity, the hobby of home brewing has quite a pedigree – one that stretches back over three centuries in America.
New Beer for a New World
Home brewing was once a matter of survival – when the Pilgrims arrived in the 1620s, they built the nation’s first brewery to start setting up their new home. The process of brewing killed the pathogens and bacteria that lurked in regular drinking water, making a safe liquid for the intrepid new-worlders to use for slaking their thirst.
One Nation, Drinking Beer
Home brewing became such an everyday occurrence in colonial times that several of America’s first presidents indulged in their own brews – most notably Thomas Jefferson and George Washington. Like tending fields or keeping the pantry stocked, brewing was simply another chore to be done around the house – albeit a delicious one.
Banned Brews
The Prohibition Act of 1919 didn’t simply put an end to bars and public establishments serving up suds, it also dropped the hammer on home brewing efforts. Beer, wine, and other liquors were no longer allowed to be created in the home until 1933, when the 21st Amendment made at least some home-brewed products legal once more. To every beer enthusiast’s sadness, however, a clerical error left off that pair of very important words – “and beer.” This meant that home beer brewers would have to wait until President Carter set things right in 1978 through the passage of H.R. 1377.
Brewing Up the Future
Today, home brewers enjoy unprecedented access to specialty equipment, such as the bottles and kits offered on the web by home brew supplier Adventures in Homebrewing. By using these tools, any beer enthusiast can now create their very own ales, stouts, and lagers in the privacy of their own backyard or basement. Everyone, that is, except for Alabamians – Alabama is the last state in the United States that still considers brewing beer at home an illegal activity. While this is unfortunate for residents of the southern state, the rest of the nation is busily crafting their own beer while simultaneously honoring the efforts of their pilgrim predecessors.
Help! My Homemade Wine Is Cloudy!
 I have a Apple-Peach wine that is six months old. It’s done fermenting, so I used bentonite thinking it would clear so I could bottle. The bentonite didn’t clear at all. It’s not oxidized (I’ve been there and really worked this time to make sure that didn’t happen). I also tried the Kitosol 40 on a six-gallon batch and that didn’t clear either. However, the Kitosol 40 was a batch I bought last year. Can I treat both batches now with the Sparkloid Hot Mix?Name: Becki P.
State: Nebraska
—–
Hello Becki,
I’m going to assume that the fermentation has actually completed and you have verified this with a wine hydrometer. Sometimes a fermentation can carry on extremely slowly, to an unnoticeable degree, and stir up sediment that will make the wine cloudy.
Becki, if both the bentonite and the Kitosol 40 had no effect on the wine, then I am fairly confident that what you are dealing with is a pectin haze. If this is the case, then there is no fining agent that will be able to clear your cloudy wine.
Fining agents such as the bentonite and Kitosol 40 are designed to collect very fine particles and drag them to the bottom of the fermentation vessel as sediment. These particles can be finer than flour and still be cleared from the wine with these wine ingredients.
But a pectin haze is not caused by particles that make the wine cloudy. It is caused by the molecular make up of the wine. Just like lemonade or apple juice can be cloudy or clear, so can a wine. The cloudiness is caused by pectin cells that are molecularly bound to the liquid. There is no way for a fining agent to collect them and clear them out of the wine.
Pectin is found naturally in any fruit. It makes up the gel that holds the fruit’s fiber together. With most fruit the pectin is broken down by naturally-occurring enzymes during the wine fermentation. This makes the resulting wine clear. But some fruits have higher levels of pectin than others. Peach is one of them. Others are strawberry and plum. Apple has a moderate level of pectin.
When making wine from these fruits additional enzymes may be needed to help breakdown the larger volume of pectin cells. All our fruit wine recipes include the addition of pectic enzyme for this reason.
If you did not add pectic enzyme to your wine recipe then this would be another clue that points to the fact that you are dealing with a pectin haze. If you did add pectic enzyme, then you can still have a pectin haze, but this is not the normal result. It is a matter of how much pectin is in the wine verses how much pectic enzyme is being added.
Here’s What You Can Do To Test For A Pectin Haze:
Assuming you have a 5 gallon batch of wine, take a sample portion of it, like a half gallon or even a gallon, and add a full dose of pectic enzyme to the wine. When I say full dose, I am referring to the amount you would add to the entire 5 gallons. This will concentrate that dose into your smaller sample.
Blend the pectic enzyme evenly throughout the wine, and let it sit for at least two weeks, maybe even a month. What you are looking for is to see if the pectic enzyme in concentrated doses will clear the wine sample. If it does, add the sample back to the rest of the batch and give pectic enzymes a few weeks to work on it. If no improvement is made add another full dose of pectic enzyme to the entire batch and give it some more time.
If your homemade wine is still cloudy then you will have to re-examine the possibility that there is a minor fermentation going on or that the fining agents you chose were just not the right ones for these particular cloudiness. In all honesty I don’t believe this will be the case. There have been many cloudy homemade wines that have cleared up brilliantly have a little pectic enzyme and some patients.
Happy Winemaking,
Ed Kraus
———————————————————————————————————
Ed Kraus is a 3rd generation home brewer/winemaker and has been an owner of E. C. Kraus since 1999. He has been helping individuals make better wine and beer for over 25 years.
———————————————————————————————————
Ed Kraus is a 3rd generation home brewer/winemaker and has been an owner of E. C. Kraus since 1999. He has been helping individuals make better wine and beer for over 25 years.
Solving the Plastic Taste In Wine And Beer.
 I have seen a couple people asking about the plastic taste and smell in wine and beer that sometimes shows up. I have been making wine and beer since the early 80’s and have found through my research, (I’m a Chemical Engineer) that if you use concentrated Chlorine bleach with plastics or rubber (hoses, filters, pumps, gaskets etc.) that it can very easily be absorbed into these materials and then releases the chemical compounds that smell and taste like water from a garden hose exposed to sunlight.
Over the years I have lost two kegs of beer and one batch of wine to this, even though I am careful. Now, I eliminated Chlorine bleach from my wine and brew room and never use it for cleaning any surfaces either. It is relegated to the laundry only.
Hope this bit of advice saves your batches from the dreaded garden hose effect.
Name: Mike S.
State: Shanghai, China
———————————————————————————————————
Ed Kraus is a 3rd generation home brewer/winemaker and has been an owner of E. C. Kraus since 1999. He has been helping individuals make better wine and beer for over 25 years.