 Hi… Just wondering if your liqueur flavorings could be added to a fruit wine.. for a little stronger flavor… Our peach, this year, is not real “peachy”…. and wondered if this would give it a flavor boost…
Thank you,
Sandy M.
—–
Hello Sandy,
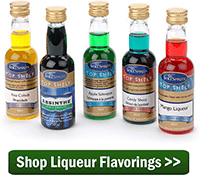
These liqueur flavorings where originally intended to be used for taking an inexpensive spirit such as everyday Vodka and turning it into something special such as Amoretto, French Brandy, Peach Schnapps or dozens of other popular liqueurs. They are used in conjunction with thickening and/or sweetening Liqueur Bases to produce these lush cordials.
Having said this, we discovered long ago that these bottles of liqueur flavorings can do great things when added to a homemade fruit wine. Quite often we recommend using them to add additional flavor and aroma to homemade fruit wines that are in the situation you described. So yes, absolutely you can use these liqueur flavorings to enhance your wines flavor. This is one of my favorite wine making tips because it’s so easy to do.
One bottle is probably the max you will want to use in a 5 or 6 gallon batch of fruit wine, and sometimes even less than this is best. These little bottles of contain an unexpected amount of flavor in them. Adding too much to your homemade wine can be worse than adding none at all. Doing so can bring an unwanted bitter astringency to the wine that will later need to be masked with sweetening of some sort.
Starting with a half of bottle of liqueur flavoring in 5 gallons of wine is a safe way to go about it. You can use a measuring syringe to help you control the amount you are actually adding to the wine.
You can also expect somewhat of a delayed reaction with these flavoring. There full affect is not immediate, particularly the aroma. They need some time to mingle with the wine before their full affect can be experienced. I usually let the wine sit overnight before making and determinations.
Happy Winemaking,
Customer Service
———————————————————————————————————
Ed Kraus is a 3rd generation home brewer/winemaker and has been an owner of E. C. Kraus since 1999. He has been helping individuals make better wine and beer for over 25 years.
Just How Organic Is Your “Organic” Wine?
As much of the world attempts to incorporate more sustainable methods into their production processes, you may wonder what your options are when it comes to drinking organic wine (or beer). Can you tell from a wine label whether it is truly organic?
There are only two farms noted as the first growers to be certified organic, which was based on an inspection of their raw materials, production methods and records by the California Department of Health Services. Only a handful of other wineries have since become certified processors of organic wines.
There are four levels of organic that winemakers can claim to help consumers know what they are really drinking (definitions from USDA guidelines):
- 100% Organic. Wines claiming to be 100% Organic must be made from organically grown grapes and give information about the certifying agency. It can have naturally occurring sulfites, but the total sulfite level must be less than 20 parts per million, and it cannot have any added sulfites. When labeling your product as 100% Organic, it must contain 100% organically produced ingredients and have been processed using organically produced processing aids.
- Organic. Wines claiming to be “Organic” must contain at least 95 percent organically produced ingredients, not counting added water and salt. In addition, they must not contain added sulfites and may contain up to 5% non-organically produced agricultural ingredients (provided the accredited certifying agent has determined the ingredients to be not commercially available in organic form).
- Made with Organic Ingredients. Wines claiming to be “Made with Organic Ingredients” must contain at least 70% organically produced ingredients, not counting added water and salt. In addition, wine may contain added sulfites and may contain up to 30% non-organically produced agricultural ingredients and/or other substances.
- Some Organic Ingredients. This level is identical to “Made with Organic Ingredients” but must indicate the presence of non-organic grapes in the “made with Organic…” statement on the label to qualify.
While it might be difficult to make your own organic wine at home, you can still read “Home Winemaking For Dummies” and come up with some creative wine recipes.
Top 5 Fall Beers Not to Miss
Fall is a great time for beer. There are plenty of pumpkin flavored beers, Oktoberfest and college and pro football to celebrate. Check out one of these world class brews the next time you’re cruising your local beer store.
Buffalo Bill’s “Original Pumpkin Ale”
Buffalo Bill’s was the first brewery in modern times to brew with orange squash, which is starting to become the official vegetable of fall and with Halloween and Thanksgiving, the demand is just increasing over time. It has been said that their Original Pumpkin Ale is modeled after the pumpkin ale George Washington is believed to have brewed. This beer has a golden orange color and a spicy nose reminiscent of the first whiff of a freshly baked pumpkin pie; it is pumpkin pie in a bottle.
Gordon Biersch’s “Weizeneisbock”
Part of Gordon Biersch’s Braumeister Selekt limited release series is the German Weizeneisbock beer. Dan Gordon, the co-founder of Gordon Biersch, speculates that his brewery could possibly be the first in the world to brew this unique style of beer. Weizeneisbock is made primarily from malted wheat, and is transformed through a process of freezing the water molecules and then removing the frozen portion. This results in a concentration of alcohol and flavor, making the alcohol strength more noticeable at 10% and with a rich dark roasted malt flavor. Gordon notes the black licorice flavor is rounded out with a banana and clove flavoring that compliments the top fermenting Bavarian Hefeweizen yeast strain. Get this soon because production was limited to only 3,500 cases!
Harpoon’s “Octoberfest”
Harpoon’s Octoberfest is brewed with two festivals in mind; their own Octoberfests in Boston, MA and Windsor, VT. Harpoon “loves the style” of its Octoberfest beer and feels it’s a great beer for the fall season. The Harpoon Octoberfest is their malty tribute to fall, balanced by gentle hop bitterness. It is a Marzen-style beer, brewed with an abundance of munich, chocolate malt and pale malts. These malts provide a solid, full body and create the beer’s deep color. It is a rich, flavorful beer. Many people especially like this beer because it’s still hoppy, while being careful not to taste too much like pumpkin pie.
Clipper City Brewing Company’s “Heavy Seas Marzen”
In 1994, Hugh Sisson, turned his brewpub (Sisson’s) into the Clipper City Brewing Company. The brewery has scored big with their Marzen offering, capturing seven medals at the Great American Beer Festival and World Beer Cup from 2006-2012. Typical for a Marzen, it pours a copper orange color and is well balanced with just enough Noble hops to allow the Crystal, Vienna and Munich malts to dominate with flavors of caramel and toasted bread. This beer is not watery and has a lot of carbonation that gives it a satisfying feel.
New Belgium Brewing’s “Dunkel Weiss or Dunkelweizen”
Dunkelweizens is a darker and more robust version of their German hefeweizen cousin. New Belgium Brewing’s adaptation of the German wheat beer style bumps up the alcohol to a nice 9% ABV. Adding black pepper gives this beer its Belgian-like character. Earthy, toasty and chocolate notes are derived from dark malts, making this beer a big strong dark Weiss beer that is a worthy companion for the cooler fall temperatures. The Dunkelweizen has a deep amber brown appearance and a dense off-white head. Focusing on its environmental side, New Belgium Brewing has become the first brewery in the U.S. to purchase 100% of its electricity from wind-generated power.
While these are just some of the great fall beers, this is by no means a comphehensive list. Visit your local beer store and talk to them about their favorite beer for the fall. Everyone will have an opinion on this topic and don’t forget you can always make your own special fall beer by brewing beer at home.
Selecting the Right Type of Glass for Your Beer
Just like wine, different beers have different characteristics that require special glasses to fully capture the flavor profiles of each type. As soon as the beer hits the glass, its color, aroma and taste is altered – the subtle and hidden characteristics can become more pronounced, colors begin to shimmer and aromas burst.
The shape of glassware will impact head development and retention. The main goal of the glass is to promote a healthy foam head and enhance the trapping of certain volatiles. As different styles of beers have different foam levels, different styles of glassware should be used accordingly. So which glassware do you use to achieve that maximum level of enjoyment?
The original purpose of the shaker pint glass was originally used to shake cocktails, but in the 1980’s it started to be filled with beer. Due to its straight sides and large mouth this glass is ideal for most ales, however, it also allows the beer to get warm and flat fast, which can show off the malty notes of some English-styled ales. Many bartenders love to use this glass because they are sturdy and easy to stack and provide an equal serving size for each beer your pour.
The tulip pint is the classic glass for Guinness beers and other dry stouts. Named appropriately after the flower it most represents, it is easily identifiable by the way it flares above the center before gently tapering near the mouth. This glass does a good job of capturing a beer’s aromas than a more straight sided glass or one that flares towards the top because the deep bowl shape helps trap aromas. According to Guinness, a perfect, two-part pour that lets the head rest before topping off should take exactly 119.53 seconds.
The nonic pint glass bulges out a couple of inches from the top. This is partly for an improved grip, and to prevent the glasses from sticking together when stacked, and partly to give strength and stop the rim from becoming chipped or nicked; the term “nonic” even derives from “no nick”. The major benefit from this glass is that they are cheap to make, easy to store and easy to drink out of. The nonic pint glasses are frequently marked with a fill line, to encourage pouring with a 1-inch head. This wasn’t always the case and bartenders would fill them usually to the rim of the glass.
The snifter glass (also known as the balloon glass) is a short-stemmed glass whose vessel has a wide bottom and small mouth opening to concentrate aromas while minimizing the amount of foam. The snifter glass is perfect for barleywines, quads, eisbocks and big stouts. This type of glass helps allow the beer to warm a bit while the glass is in your hand. The snifter glass can also be used for brandy and cognac, volumes will range in these glasses but they all provide room to swirl your drink and allow aromas to burst.
Not to be mistaken with the tulip pint, the tulip glass has a bulbous body but has a flare out at the top to form a lip, which helps head retention. The tulip glass not only helps trap the aroma, but it also aids in maintaining large heads, and creating a visual sensation. This glass is recommended for serving Scottish ales, double and imperial IPA’s, barleywines and Belgian ales – anything flavorful that you wouldn’t drink a lot of.
The goblet glass is shaped to keep your grip low in the step to help the beer inside keep cool. A wide mouth dissipates the carbonation fast, letting strong abbey beers show off their flavor. Goblet glasses range from delicate to long stem to heavy and thick walled. The more delicate ones may also have their rims laced while the heavy boast sculpture-like stems. Some goblets are designed to maintain a two-centimeter head. The best aspects of these glasses are they are designed to maintain head and are wide mouthed for deep sips.
Now that you have a basic knowledge to the differences between the different beer glasses, you should be able to hold a party for your own home brewed beer. Just remember when you’re at the bar; never accept a frosted glass from your bartender. As the beer hits the frosted glass, condensation will occur and dilute your beer, while at the same time altering the serving temperature.
New Wine Bottle Corker: Bottle Wine Like A Pro!
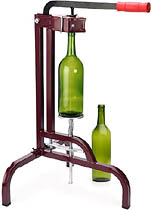 We’ve just added a new corker to our website, and it’s one that we are very excited about. It’s called the Winery-Grade Floor-Corker. Not only is it a quality corker, it’s a corker that we’re able to offer at a deceptively-low price of $69.95!
It’s a floor-model style corker that stands 30 inches tall. What this means is that you are able to stand over it to gain greater leverage. Because it is so well designed and constructed, it can easily insert size #9 cork with very little effort — both natural wine cork stoppers and the denser synthetic corks.
It’s fast and simple to use. With the lever all the way up, just drop a cork into the chamber in the corker’s head. Then place a wine bottle on the spring-loaded table.
As you push the lever down two things begin to happen at the same time:
- The wine bottle table locks into place, securing the wine bottle against the bottom of corker’s head.
- The corker slowly starts to compress the cork with its jaws.
As the lever goes all the way down it smoothly plunges the compressed cork into the wine bottle.
This floor-corker is great for the home winemaker who needs more than a handle-held corker. It allows them to cork a good size batch without straining their hands. But this is also a great corker for bottling larger batches. It can cork wine bottles at a very brisk pace. And if you want to put it into overdrive, you can use it as a two-man unit: one person loads and unloads the wine bottle; the other person loads the cork and plunges the lever.
You can find our more about this Winery-Grade Floor-Corker on our website. We have plenty in stock. And remember, as an added boost to this already great value, we’ll get it to your front door at no charge. Shipping is absolutely free!
———————————————————————————————————
Ed Kraus is a 3rd generation home brewer/winemaker and has been an owner of E. C. Kraus since 1999. He has been helping individuals make better wine and beer for over 25 years.
3 Most Popular Types of Beer
Our previous blog discussed the most important ingredients needed for brewing beer at home; now it is time to define the different types of beer you can make with your home beer brewing kit.
Ale
Ale is the oldest type of beer made and is brewed from malted barley using a warm fermentation with a strain of brewers’ yeast. The yeast will ferment the beer quickly, giving it a sweet, full bodied and fruity taste. Most ales contain hops, which help preserve the beer and impart a bitter herbal flavor that balances the sweetness of the malt nicely. Varieties of ales include brown, pale, scotch and mild.
Brown ales tend to be lightly hopped, and fairly mildly flavored, often with a nutty taste. Brown ales first appeared in the early 1900’s, with Newcastle Brown being a top example of what brown ale is. Brown ales became the most popular beer to home-brewers in North America in the early 1980’s.
Pale ale was a term used for beers made from malt dried with coke. Coke had been first used for roasting malt in 1642, but it wasn’t until the early 1700’s that the term pale ale was first used. Pale ale is a beer, light in color, which uses a warm fermentation and predominantly pale malt. The pale ale is one of the world’s most popular beer styles. Different brewing practices and hop levels have resulted in a range of taste and strength within the pale ale family.
Stout
Stout is a dark beer made from using roasted malt or barley, hops, water and yeast and sometimes bitter in taste. Stout is traditionally the generic term for the strongest or stoutest porters. Other types of stouts are made with oatmeal, which usually produces a sweeter beer. Like ales, they come in many variations including dry or Irish stout, imperial stouts, porters, chocolate stouts, and oatmeal Stouts.
Oatmeal Stouts are probably one of the most popular stout versions. The oatmeal stout is a stout with a proportion of oats, normally about 30%, added during the brewing process. Oatmeal stouts usually do not specifically taste like oats but the smoothness of oatmeal stouts comes from the high content of proteins, lipids, and gums imparted by the use of oats. The gums increase the viscosity and body adding to the sense of smoothness.
In the early 1900’s when oatmeal stouts were being predominately made outside of the United States, Samuel Smith commissioned Charles Finkel to make its own version. Samuel Smith’s Oatmeal Stout has become a template for other breweries’ versions of the oatmeal stout.
Lager
Lagers are a type of beer that is fermented and conditioned at low temperatures. In certain countries lagers contain or often feature large proportions of adjuncts, usually rice or maize. These were added as a means of thinning out the body of American beers, balancing the large quantities of protein being introduced by high amounts of barley.
There are two main types of lager: pale lager and dark lager. Pale Lager is a very pale to golden colored lager with a well-attenuated body and noble hop bitterness. The brewing process for the pale lager was quickly picked up by breweries around the world and has become one of the most popular beer types to drink. It was until the 1840’s that lagers in general would typically be darker in color. They typically ranged in color from amber to reddish brown, and could have been termed dunkel, schwarzbier, or Baltic porter depending on the region or brewing method.
Now you know the main types of beer you can make it’s time to get together your beer making equipment and ingredients and brew away!
Watermelon Wine Help!
I’m making watermelon wine and would like to give it strong melon flavor. I have been racking my brain thinking how to do this since you can’t boil it down, because it said to kill the flavor. So after giving it a lot of thought, this is what i was thinking, can I add a finshed bottle, of the same type of wine i’m making would this help or hurt . 2nd idea is to dehydrate the watermelon and make watermelon power. Then take the powder and add it in the place of, or with the sugar. and use fresh melon juice has the recipe calls for. keep in mine im trying to make a powerful melon taste but dry not to sweet. Thank you for your time to help a noobie like me .
Name: Jason
State: nc
Home Beer Brewing 101: Yeast, Hops and Barley
There are literally hundreds of different styles of beer. The basic ingredients that ever homebrewer needs are water, malted barley, homebrewing hops and beer yeast. It’s the types and combination of these ingredients that determine the result.
Yeast
The amount or type of yeast used during the fermentation process can be the deciding factor between a lager or ale. To obtain a broader range of beer types, many brewers will use specialty grains in a certain way to change the color and flavor of the beer without having to add sugar during the fermentation process. Brewers will also use anything from spices to candy to fruits to help flavor their beer a certain way.
Yeast is responsible for converting carbohydrates to carbon dioxide and alcohols. Yeast can be classified in two different ways: “top cropping” and “bottom cropping.” Top cropping yeasts create foam at the top during fermentation, and typically create ales. Bottom cropping yeasts are typically used to produce lager type beers although they can also produce ale type beers.
Hops
Hops are female flower clusters, primarily used as a flavoring and stability agent in beer, and typically impart a bitter or tangy flavor in beer. Before hops, many brewers would use spices or fruits as their primary flavoring ingredient.
There are also a number of different kinds of hop varieties. These include Amarillo, Centennial, Cluster and Tettnang among others. Tettnang hops are the original noble hop from Germany, although they are now grown in the U.S. in Oregon and Washington State. The tettnang hop is ideal for your finest lager and wheat beers.
Barley
Barley is the seed part to the barley plant, a grain similar to wheat in appearance. It is the specific types of barley used in the production of beer that make one different from another. Each strain imparts a unique characteristic taste and body to each of the different beers. Malted barley is barley that has been allowed to germinate to a degree and is then dried. Sending a barley seed through a germination process converts the seed to a starch. The seed’s stored energy turns the starch into a simpler sugar that is used in its initial growing stage. The germination and drying stages capture fermentable sugars, soluble starch and diastase enzymes for beer brewing. Malted barley is the eventual source of the fermentable sugar consumed by the yeast. Eventually the barley becomes a malt extract becoming a suitable ingredient for beer.
We will discuss the different categories of beer – lagers, ales and other specialty brews – in our next post.
Brewing Your Own Beer at Home
First, you need a beer brewing kit. Then it’s time to order your beer brewing ingredients and figure out what type of beer you’ll make!
Wine Oxidation:Part II: Avoiding The Slow Death
 This is Part II of a 2 part series on wine oxidation. Part I covers the effects of oxidation. Part II, this part, covers how to avoid it.
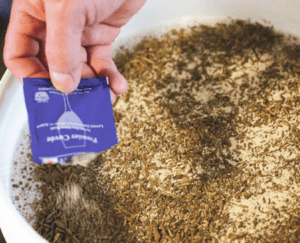
The first thing I’m going to say about avoiding oxidation might not be what you’d expect, but it’s important to know. Make sure the fermentation has plenty of oxygen in the beginning — particularly the first 2 to 3 days of fermentation. This is the time when the little packet of wine yeast you add to the must needs to multiply itself into a colony that is 100 to 200 times its original size. The wine yeast desperately needs oxygen to accomplish this.
Oxidation is not of a huge concern at these beginning stages of fermentation, because the CO2 that is being produced is saturated within the wine, keeping oxygen (air) out of it. If the CO2 was not in the wine, oxygen would then be capable of being saturated.
It is later, when the fermentation begins to slow down, that controlling air exposure always needs to be considered. The CO2 releases as a gas and dissipates giving an opening for oxygen to take over.
1. RACK YOUR WINE CAREFULLY
Racking is a time when excessive oxygen can be introduced into the wine, but this is not going to happen to you because you are going to do some simple things that are going to keep this oxidation under control.
The first thing is to eliminate the splashing. When you splash a wine you are increasing the wine’s ability to soak up oxygen. When you rack or siphon a wine, do it in a way that does not splash. I like to make sure that the siphon hose is all the way to the bottom of the fermenter being filled. I fill the fermenter from the bottom-up, so to speak.
If the fermentation has already completed at the time of racking, the second thing you should do is add a dose of Sodium Metabisulfite. The SO2 from the sulfites will help to drive out any oxygen that may have made its way into the wine.
2. ELIMINATE ANY HEAD-SPACE THAT’S WITH YOUR WINE
If the fermentation has completed, there is no longer any CO2 gas coming off the wine to protect it. Because of this you want to avoid having large amounts of head-space in your fermenter with your wine. Having too much head-space is not a problem for a week or so, but anything longer than this should be avoided. There are two common ways to handle this:
- Change Fermenters: Move the wine from a bucket fermenter to an appropriately-sized carboy., something that has a narrow neck. Make sure the wine is up into the neck of the carboy. You may even want to use a series of glass gallon jugs for this purpose. If you have 4 gallons of wine, a 5 gallon carboy is not a good option. Four 1 gallon glass jugs would be better.
- Replace The Head-Space: Fill-up the head-space in the fermenter. This can be done by adding a similar wine to the batch. This could either be a commercially made wine or a wine you made yourself. This method would be appropriate if the head-space were small — a quart or less. Another way is to use glass marbles to fill the head-space. It is important that the glass marbles be sanitized first. Be careful not to crack your carboy with the marbles as you put them into your wine fermenter.
3. USE PROTECTIVE INGREDIENTS THAT FIGHT OXIDATION
Sulfites should always be used before bottling your wine. Also, Ascorbic acid should be used in some cases where oxidation is very likely.
- Sulfite: It is important to treat your homemade wines with a sulfite such as Sodium Metabisulfite or Campden Tablets before bottling. This will go a long way towards fighting oxidation. The sulfites also have the added benefit of squashing the growth of any microorganisms, including acetobacter which is what causes a wine to turn to vinegar.
- Ascorbic Acid: Some wines are more susceptible to oxidation than others. White wines in general are more sensitive than reds to oxidative forces. And more specifically apple and pear wines are very sensitive to oxidation. We recommend adding ascorbic acid to these to wines. It raises the acid level of the wine without raising the acidic flavor or tartness of the wine. Having this higher level of acid in your wine will help to slow the effects of oxidation.
4. TAKE CARE WHEN STORING YOUR WINE
Even if the oxygen level of your wine is very low, oxidation can start to adversely affect your wine, if given enough time. There are two external factors that can control how fast your wine will respond to oxidation. One is light the other is heat. Have too much of either, and you will speed up the oxidative process.
- Light: If you bottle your wines in green wine bottles you are already doing something to help keep light exposure down. The green filters out much of the UV rays which is the actual catalyst for oxidation. But beyond this, how about keeping it simple. Store your wines in a dark place then you won’t have to worry about what color of wine bottles.
- Heat: You need to keep the wine’s temperature from being too hot. Almost all wine experts agree that the optimal temperature for storing wine is 55º F. But understand that if you can only keep that wine at 60º or 70º F. that’s still several times better than 80º F. So, just do the best you can with what you’ve got.
There you have it: The basics of keeping your homemade wines from succumbing to the effects of oxidation. They are all really very simple things to do. Practice them and your wines will live a long and healthy life.
———————————————————————————————————
Ed Kraus is a 3rd generation home brewer/winemaker and has been an owner of E. C. Kraus since 1999. He has been helping individuals make better wine and beer for over 25 years.
Wine Oxidation: Part I: The Slow Death Of A Wine

Not Louis Pasteur
Sorry to give this post such a grim title, but oxidation is really not a very happy subject for me. I’d rather be writing about something more positive, but that wouldn’t be doing you any favors. Every home winemaker needs to learn about the harsh realities of wine oxidation. If not for any other reason, so that they can learn how to avoid it.
Louis Pasteur, the father of modern microbiology, once said: “Oxygen is the greatest enemy of wine”. He may have been right. We see oxidation inflicting way too many homemade wines… needlessly.
WHAT IS OXIDATION?
In its strictest terms, oxidation is a chemical reaction between the oxygen in the air we breath and the phenolic compounds in your wine. Phenolic compounds are the “organics” of your wine. It’s the stuff that makes up the wine’s color, flavor and bouquet — the wine’s heart and sole.
As oxygen comes in contact with these phenolic compounds it deteriorates them along with everything they represent to the wine. As a result, a wine that becomes oxidized will take on a brownish or orange tinge to its color. Its flavor will become flat or more one dimensional with no fruity notes. And, its aroma will be mostly that of raisins or caramel. In extreme cases, the wine can even develop unpleasant off-flavors and aromas.
WHO HAS THE MOST PROBLEMS WITH OXIDATION?
Almost all the cases we see are wines made from fresh fruits: grapes, berries, apples, etc. as opposed to wines made from concentrates or wine ingredient kits. This is partially because of the way the ingredient kits are set up, but it’s also because of the great directions that come with these kits. The directions keep you on the straight-and-narrow, so to speak — keeping you away from oxidation without you even realizing it.
So the good news is, if you make wine using wine ingredient kits, follow the directions, and oxidation will not be of much concern to you. The bad news is, if you make wine from fresh fruit, oxidation needs to be your concern. You need to understand it and know what causes it so that you can avoid it. If not your wine could fall victim to this ‘disease’ called wine oxidation and ‘die a slow death.’
In part II of the is two part blog we go over the meat-and-potatoes of avoiding oxidation. You’ll discover that with just a few simple precautions and maybe a minor change or two in your winemaking procedures, you’ll be able to eliminate any chance of oxidation in your precious homemade wines.
———————————————————————————————————
Ed Kraus is a 3rd generation home brewer/winemaker and has been an owner of E. C. Kraus since 1999. He has been helping individuals make better wine and beer for over 25 years.