A previous post, Wine Myth #64: The Older the Wine Is the Better It Is. was so popular that we decided to continue to debunk, or prove, other popular wine myths.
When describing how a wine looks or tastes, many people describe the flavor, aroma, balance, body, and legs. Most of those are self-explanatory, but some might not fully understand the concept of wine “legs”. Wine legs can also be referred to as “tears of wine”, but for our purposes let’s just call them legs.
When you are at a wine tasting and someone swirls a glass of wine and stares at the glass, they are likely looking at the legs. That’s how the wine runs down the glass after swirling; more specifically, the legs are the droplets that run down the glass side from the top of where the wine swished. This phenomenon has been named the Marangoni effect. What’s that? At least define it – don’t tease!
Reality: The legs do NOT determine the quality of the wine.
In fact, legs only indicate the alcohol content of the wine. The more alcohol the wine has, the better chance legs will appear. Not to get into specifics, but think of it as a science experiment. As most home wine makers know, wine mainly consists of water and alcohol. Those two major components have different surface tensions and rates of evaporation. Therefore, when wine is swirled in a glass and disturbed from its usual consistency, the two ingredients can form a ring on the drinker’s glass. Keep in mind, however, that to truly see a difference between wines, they would have to be as different as a fortified and table wine.
The 5 Steps Of Making Homemade Wine
There’s a lot of variation in how to make your own wine, however, the same basic steps apply regardless of what type of wine you make.
- Must preparation: For this step of how to make your own wine, the fruit or wine grapes are made into a mushy substance, known as the “must”. During this stage, sugar and acid levels must balance so that when following the wine recipe it leads to a well-balanced wine.
- Primary and Secondary Fermentation: During the primary fermentation, wine yeast converts sugar to alcohol and carbon dioxide. This is also known as aerobic fermentation, since the fermentation container is exposed to air. Primary fermentation lasts for 3 to 5 days, and accounts for around 70% of the entire fermentation activity. Secondary fermentation is much slower, lasting one or two weeks, and ferments the remaining 30% left unfermented by primary fermentation. This is also known as anaerobic fermentation, since the fermentation container is closed off to air. This focuses the wine yeast on converting sugar to alcohol instead of multiplying.
- Racking & Aging: The purpose of the racking step is to transfer the wine from one fermenter to another, leaving behind sediment in the bottom of the first fermenter and out of the finished wine. You may rack wine multiple times if there’s a lot of sediment to remove. Aging wine can occur over any time period, depending upon what type of wine you are making. Aging allows the wine to evolve and develop, which effectively alters the flavor, aroma, and taste of the wine. Typically, red wines require longer aging than white wines, in order to develop the more complex characteristics that are unique to red wines.
- Clarification and Stabilization: The clarification step acts to further “fine” the wine from sediments by adding finings or further racking to remove solid particles and sediment. Changes in temperature, humidity, or other environmental factors can cause chemical reactions in wine, which sometimes results in the precipitation of solids. Stabilizing the wine using chemical or temperature treatments will prevent your wine from experiencing this precipitation when exposed to less-than-ideal conditions.
- Bottling and Storing: The last step in this overview on how to make your own wine, comes after you’ve finished your delectable wine. Bottle it to protect it from overexposure to air, light, and other environmentally detrimental conditions. Finally, you want to store your wine under “cellar conditions” in order to preserve the life of your wine. Lay the bottle on its side, keep it in the dark, and store around 55°F.
———————————————————————————————————
Ed Kraus is a 3rd generation home brewer/winemaker and has been an owner of E. C. Kraus since 1999. He has been helping individuals make better wine and beer for over 25 years.
Incorporating Fruit into Your Homemade Wine
Have you had success with making homemade grape wine and want to branch out into something a little different? Do you have fruit trees on your property and want to be able to use that extra fruit in your wine-making? Adding fruit to your homemade wine is a little different than making wine entirely from grapes, but it’s not difficult to do.
Beyond Grapes
Homemade grape wine isn’t the only tasty wine that a amateur winemaker can create. Peaches, plums, apricots, cherries, strawberries, currants, blackberries and nectarines are just some of the fruits that can be fermented in wine-making to create wine at home. The best fruits to use are fully ripe and fresh off of the vine. Thus, it’s best to avoid grocery store fruit and deal with your local orchard or farmers market instead. If you have your own fruit trees or plants that’s even better.
Preparing the Fruit
- To prepare your fruit, clean the fruit gently in a 1:40 bleach solution to get kid of any bacteria, dirt or residue from pesticides.
- Rinse thoroughly twice with fresh water and pat dry.
- Cut the large fruit in half and gently remove the stones, if applicable.
- De-stem, if necessary, and cut out any browns spots.
- At this point you can either freeze the fruit or proceed by adding it to your wine. Freezing the fruit helps you buy time if your fruit is ripe, but the rest of your wine isn’t quite ready. Some also feel that frozen fruit makes for tastier wine because it breaks down the fiber in the fruit.
Adding Fruit to Wine
Most fruits lack the body and substance to create a tasty wine by themselves so they are generally added to grapes or grape concentrate. To extract the juice, tie the fruit in a cheesecloth bag and mash gently with your hands over a bowl until no solids remain except for the skins. The amount of fruit to be used will vary with the fruit you chose. There are just as many recipes for making fruit wines as there are successful winemakers. All include yeast, sugar and water.
Don’t be afraid to experiment with different fruits as you gain experience as a winemaker. Wine-making shouldn’t be limited to just grapes.
Synthetic Or Natural Wine Bottle Corks: A Corker's Conundrum
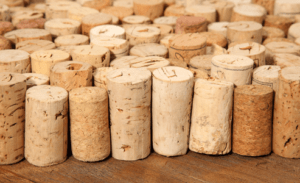 There’s a lot of debate regarding what type of closure you should be using to bottle your homemade wine. Understanding the qualities of each type of closure and how they fit in with the style of wine you intend to create will allow you to make an informed decision and give you confidence that you are selecting the perfect wine bottle closure for your homemade wine.
Two of the most common types of wine bottle closures are natural cork and synthetic cork.
Natural wine bottle cork comes from the bark of the cork tree, which is indigenous to Spain and Portugal. They do not kill the tree in order to harvest the cork, but instead they simply strip the bark off the tree, which subsequently regenerates new bark. In this way, the method can be considered renewable and environmentally friendly. Natural cork is also the oldest method of bottle closure, and has been widely used and accepted for hundreds of years.
Natural cork allows small amounts of oxygen into the wine, which is beneficial during the aging process. One problem with this is that the amount of oxygen let in is extremely variable from cork to cork, and one can never be sure their wine is being exposed to too much air. You always run the risk of having a “corked” bottle of wine, caused by TCA (2,4,6-trichloroanisole), which is produced by fungus living in the natural cork. Finally, natural cork can sometimes crumble when trying to remove it, which leaves undesirable chunks of cork floating around in your glass of wine.
Synthetic corks are alternatives to natural cork that have been picking up a lot of steam in recent years. One concern about synthetic corks is that not enough oxygen is allowed through the cork and into the wine; however, there is currently ongoing research that is making progress in alleviating this issue.
One benefit of synthetic cork is that you’ll never have a wine that is suffering from cork taint. Also, synthetic cork can be very easy to remove from the bottle, and you never have to worry about crumbling or breaking. Finally, synthetic corks are recyclable, so you don’t have to worry about being unfriendly to the environment when you use this alternative wine bottle cork.
Since over 90% of wines are designed to be consumed in their youth, the issue of synthetic cork subpar breathability is no longer an issue. Oxygen transfer is extremely important in the aging of wines, however, if you are making a wine that’s designed to be consumed immediately, then buying synthetic corks may just be the way to go!
———————————————————————————————————
Ed Kraus is a 3rd generation home brewer/winemaker and has been an owner of E. C. Kraus since 1999. He has been helping individuals make better wine and beer for over 25 years.
How to Properly Taste Wine
Do you enjoy drinking wine, but feel a little intimidated when you order wine at a restaurant or share wine with wine-knowledgeable friends? Are you confused about how to properly taste wine? You needn’t be. Tasting wine the right way is easy when you get the hang of it. Plus, it not only increases your wine confidence, but allows you to enjoy the full aroma and taste of wine. Here’s how:
1. Use the right glass. Think that one wine glass will suffice for any wine? Think again. The proper glass enhances the flavor of the wine. At minimum, you should have three styles of glasses: a clear, stemmed glass with a narrow rim for white wines; a clear, stemmed glass with a bowl and a wide rim for red wines; and a flute for sparkling wines. Remember, too, to hold the glass by the stem so that the warmth of your hand doesn’t change the temperature of the wine.
2. Fill the glass less than half full. Filling the wine glass no more than half full isn’t being stingy with the wine; it’s allowing the drinker to enjoy the full scent (called “bouquet” in wine circles) of the wine.
3. Look at the wine. The color of the wine can tell you a lot about what to expect from the taste. Notice more than just red or white. Is the red wine maroon, ruby, brownish-red or burgundy? Is the white wine pale, straw-colored, yellow or even light green? Look also at how clear or opaque the wine is and whether the liquid clings to the sides of the glass as you move the wine around.
4. Smell the wine. Next, swirl the wine gently in the glass for about 10 seconds, bring the glass under your nose and inhale deeply. What do you smell? Think beyond berries. Wine aromas can include hints of such things as leather, oak, melons and vanilla.
5. Sip the wine. Finally, put the glass to your lips and take a small sip of the wine. Roll the wine around in your mouth before swallowing to allow the flavors to fully develop. Follow with a slightly larger sip and hold the wine in your mouth again for several seconds.
So, stop feeling you don’t know anything about wine. Follow these five steps and not only will you gain more enjoyment from tasting wines, but your wine friends may just start turning to you for advice.
Popular Options for the First-Time Beer Homebrewer
More than one million Americans brew their own beer at home at least once a year, according to the American Home Brewers Association. They also estimate that nearly 90 percent of professional brewers got their start as home-brewers. Crafting your own beer is legal in 48 states (all except for Alabama and Mississippi), and even a first-time effort can yield tasty results.
Have you decided you’re ready to make your own beer, but you don’t know where to start? Tasty home-brewed beer isn’t difficult to make, but you do need the right tools before you begin. Below are just a few popular ways on how to brew to create your own beer at home.
- Use a kit. Home-brewing kits take much of the guesswork out of making your own brews. Such kits include all of the tools and equipment you’ll need to craft your brew: a book of recipes and instructions, and the necessary ingredients for the brew of your choice (such as pale ale, Irish stout, India Pale Ale, or a host of other brews).
- Start with Pale Ale. If you decide not to use a kit, it’s best to keep your first beer brewing effort simple. Starting with pale ale allows you to learn the process without the complications of extra ingredients. The only ingredients you’ll need to make pale ale are ale extract syrup, sugar, yeast, hops and water.
- Use a grain recipe. Although using extract syrup to make your beer is easy and affordable, don’t rule out using a grain recipe for your first brew. This technique of home brewing allows you to craft beer the same way George Washington, Thomas Jefferson, and James Madison did more than 200 years ago. A grain recipe uses all natural ingredients, such as barley and wheat, in addition to yeast, hops, water, sugar and other flavorings.
So, what are you waiting for? Delicious home-crafted beer is within your grasp. Start creating your own home brews today.
Need A Gift Idea? How About A Wine Making Book!
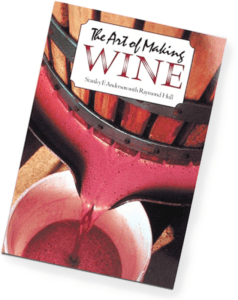 The holidays are about 6 weeks away: have you started shopping for your friends and family? Are you looking to add to your own gift list? Here are some wine making book suggestions for you to think about now for the home wine maker that is near and dear to your heart. Don’t celebrate the holidays? It’s never the wrong time to surprise an aspiring enologist with a wine making book!
Techniques in Home Winemaking:
The Comprehensive Guide to Making Chateau-Style Wines
by Daniel Pambianchi: Popular among home wine makers, this wine making book provides instructions for making wine that is written in a straight forward way that both novices and experts can understand and covers every aspect of the wine making process. It provides technical explanations of the science behind the art, but not so technical that a novice would feel overwhelmed.
The Joy of Home Winemaking
by Terry A. Garey: This wine making book is popular among beginners, though is certainly a good reference for experts. Written in an easy, comprehensive, and often humorous manner, this wine making book adds adventure and variety to your home wine making experience. Want to know how to make a cherry pie wine or rhubarb champagne? This book has the recipe for fun with home wine making!
The Home Winemaker’s Companion:
Secrets, Recipes, and Know-How for Making 115 Great-Tasting Wines
by Gene Spaziani: This wine making book is great for beginners who aren’t looking for a technical explanation for the wine making process. If you are a more advanced home wine maker, this may not be the best wine making book for you. Looking for recipes that contain many of the same base ingredients for easy wine making? You may want to put this book on your list!
———————————————————————————————————
Ed Kraus is a 3rd generation home brewer/winemaker and has been an owner of E. C. Kraus since 1999. He has been helping individuals make better wine and beer for over 25 years.
The Art of Properly Tasting Beer
You might enjoy drinking beer, but have you ever stopped to actually taste it? Properly tasting beer, especially your own homebrew, is a lot different than sipping from a glass or a bottle. It’s a process that will enhance your enjoyment of the drink. Learning how to taste beer will open a new world of flavors and tastes to you. Once you learn to taste beer fully, the watery mass-produced beers you might have enjoyed in the past will lack appeal.
Follow Your Nose
The senses of smell and taste are very closely connected, according to brewer Randy Mosher in “All About Beer” magazine. The sense of taste is considerably less complex than the sense of smell. Traditionally, there were four tastes: bitter, salty, sweet and sour. A fifth and a sixth flavor have been recently discovered: umami and fat. Unlike taste, your sense of smell is far more developed. You can smell tens of thousands of aromas.
When tasting beer, you actually taste with your nose before you taste with your mouth and tongue. Up to 95 percent of the flavor of beer comes to you through smell, according to “Beer Advocate.” Try these steps when learning to taste beer:
- Agitate the beer in glass to release aromas. Swirling the glass with your hand will gently release aromas.
- Bring your nose towards the glass and sniff the beer, breathing in through your nose.
- Make note of what you smell. Your descriptions of the aromas can be as creative as you wish. Don’t worry about censoring yourself. Just describe what comes to your head first.
- Smell and taste the beer in an area that is free from other aromas. A smoky location is not a good spot to taste beer. Don’t wear a lot of perfume or cologne when tasting beer, as the fragrance will interfere with the tasting.
Tasting the Beer
Once you’ve smelled the beer, it’s time to taste it in your mouth. Tasting beer is much more that taking a sip and swallowing. When you sip the beer, hold the liquid in your mouth. The beer should travel over your tongue so that you are able to fully appreciate all the flavors in it. As the beer travels around your mouth, think of the tastes that occur. It might taste sweet one moment, then bitter. Try breathing through your nose as you swallow the beer so that you can fully appreciate all the aromas and flavors.
Making it Personal: Brewing Your Own Beer for Holiday Gifts
Who doesn’t love receiving their own personalized gift for the holidays? Why not give your own home-brewed beer? Don’t forget that the full beer brewing cycle does take around 45 days so get started soon and you’ll have time to give your perfect gift.
In order to brew your own beer at home you’ll need to make sure you have at least one beer brewing kit, which should contain all of the main supplies and ingredients you will need to brew beer, except for something to pour your finished beer into. We suggest purchasing the EZ-Cap Beer Bottles, which hold 16 oz. of beer and they already come with a top so you don’t have to worry about capping your own bottles for each individual bottle of beer. The EZ-Cap Beer Bottles are also a nicely designed bottle, which could serve as a nice gift.
Lastly, don’t forget to jazz up your beer bottles, not only with your own personalized beer label, but you can also package your beer with your secret recipe or with a special message to family and friends.
Halloween Fun: Turn your pumpkin into a keg
Want a way to spice up your Halloween party and you think pumpkin carving is fun? Now that it’s fall, it’s time to try turning your pumpkins into a kegs. Just like you would when you are carving your favorite scary faces into a pumpkin, for a keg, the steps will be quite similar. Follow this guide and you’ll have a pumpkin keg in minutes.
- Carve a circle around the pumpkin stem to create the “top” of the pumpkin.
- Take out the “guts” of the pumpkin – get every last seed, as even one could clog your keg!
- Pick the sturdiest part of the pumpkin for spigot placement and trace a hole for cutting. Note: Don’t make the hole too big! Carve it a little smaller so you can force the spigot through and create as tight of a connection as possible.
- Pour your favorite fall beer into the pumpkin and enjoy. Try your favorite pumpkin ales or other similar beers. Just don’t leave them sitting too long with beer in them or they’ll get soggy.
Hint: Place your pumpkin keg on an elevated surface so your guests can easily serve themselves. A cake stand is a perfect solution for this.