 When I do my first racking, there is a lot of carbonation in the wine, and it does not siphon well at all. How should I handle this?
Name: Bryan P.
State: GA
Hello Bryan,
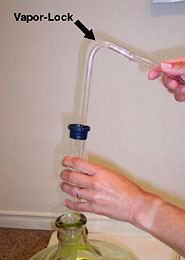
Yes, this can be quite a problem. For the readers out there who don’ t understand what Bryan is talking about, let me explain a little bit.
During a fermentation, CO2 gas is created by the wine yeast. This is the same stuff that creates the fizzy in beer and soda pop. This CO2 gas is saturated into the wine must.
When Bryan is racking [siphoning] his wine must from his primary fermenter to his secondary fermenter, the gas starts to release from the liquid within the siphon hose. This is because the liquid is being agitated, much like shaking a bottle of soda pop. The gas collects and rises to the highest point of the siphon hose and forms a gas pocket, which eventually breaks off the siphon and stops the flow of the liquid. This is known as a vapor-lock.
One thing I have done in the past, is raise the exit-end of the siphon hose as high as I can to get the gas pocket to rise and release out the end of the hose and then start the siphon again, but this is a very annoying process and may be required more than once during a 5 gallon racking. It is also very hard to do if you are employing a curved racking cane in the siphon process. The rigid curve in the racking cane requires you to turn the cane completely upside-down to get the gas to release.
Siphoning without a racking cane is no good either. This is because a loose hose in the bottom of a fermenter will do nothing but sabotage your racking efforts by stirring up the sediment that has collected at the bottom. The rigid tube of the racking cane allows you to keep the end of the siphon under control a not sloshing all around, sort of like a wand.
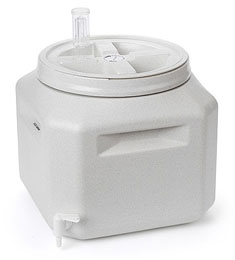
The only way I’ve been able to get completely around the vapor-lock issue is to use fermenters that have spigots at the bottom. You attach the siphon hose directly onto the spigot . Then you can depend completely on gravity to start the flow. By siphoning in this way there is no opportunity for a CO2 gas pocket to develop. There is no rising curve coming up and out of the top of the fermenter as with a regular siphon.
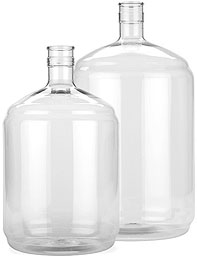
All the primary fermenters we offer have spigots at the bottom that will accept a 3/8″ I.D. vinyl siphon hose. The spigots are strategically placed away from the bottom so that sediment will not be drawn. As you get towards the end of the siphon, gently tilt the fermenter towards the faucet-side to round up the last bit of liquid.
Last year we also introduced secondary fermenters that have the same faucet at the bottom. They are plastic carboys of varying sizes: 3, 5 and 6 gallon. They are all made out of the same exact plastic that is used to 2 liter soda pop bottles, only thicker.
By using these types of fermenters you can avoid the vapor-lock issue all together. Also, you are not sticking anything into the fermenter that can potentially stir up the sediment. The sediment stays at the bottom quiet and undisturbed through the entire racking.
Happy Winemaking,
Ed Kraus
———————————————————————————————————
Ed Kraus is a 3rd generation home brewer/winemaker and has been an owner of E. C. Kraus since 1999. He has been helping individuals make better wine and beer for over 25 years.
Category Archives: Wine
My Wine Formed Sediment After I Bottled It!
 I racked and filtered my Pinot Grigio and it was crystal clear when I bottled it. Now, some bottles (but not all) have a white almost milky sediment in the bottom of the bottles and it has a slightly “dirty sock” aftertaste. I’ve been told it was a protein and I might be able to remove it with Sparkolloid but have not tried it yet. Any suggestions?
Name: Neal C.
State: CA
Hello Neal,
Normally, when someone tells me they have a milky/dusty/silty substance at the bottom of their wine bottles, I tell them that they either bottled their wine too soon — before everything had a chance to clear out completely — or that the wine started slightly fermenting again while in the bottle.
But something you have explained has changed this whole scenario: that is the fact that you have filtered the wine. I’m assuming that when you say filtered, you mean that you put the wine through an actual wine filter and didn’t just strain it through some cheesecloth or similar.
Filtering the wine would have taken out anything that could have caused a visible sediment later, so having the sediment caused by particles that were still suspended in the wine at bottling is out of the question. Filtering would have also taken out a huge chunk of the yeast cells that may have remained in the wine, so a re-fermentation is highly unlikely, as well.
What this means is that what you are seeing is something that was created after the wine was bottled. It wasn’t from microscopic particles still in the wine. It wasn’t from a re-growth of yeast cells. It was from something that was precipitated out of the wine while in the wine bottle.
Precipitation occurs when there is more of a particular compound in a liquid than the liquid can hold. Instead of staying dissolved or saturated within the liquid, it releases as a solid substance.
By far, the two most common substances to precipitate from a wine are tartaric acid and tannin. Tartaric acid will precipitate as little crystals, about the size of popcorn salt or smaller. It may look white, but is more likely to be beige in color. Tannin precipitates as a powdery substance, about the consistency of flour. It can be white in color, but it is more likely to be beige, or in the case of a red wine, rose colored.
Based on your description I would say that you have a tannin precipitation problem. I would also like to point out that the person that said it was protein was correct. That’s because tannin is a protein. And like that person said, I would also recommend putting the wine back into a common vessel and treating it with Sparkolloid, with only one difference. I would also treat the wine with Bentonite, beforehand. Both are fining agents.
One other thing I would recommend is that after pouring the bottles of wine back into a fermenter you should immediately treat the wine with sulfites such as sodium metabisulfite. This will drive the oxygen out of the wine that was just introduced through the splashing. Once the wine has been successfully treated with the Bentonite and then the Sparkolloid, you will want to treat the wine again with sulfites and bottle right away.
Finally, you may want to take a look at the following article that is listed on our website: Maintaining Temperature Stability In Your Wine. This article goes over the precipitation issue in much great detail than I can here: how to determine it; how to prevent it.
Happy Winemaking,
Ed Kraus
———————————————————————————————————
Ed Kraus is a 3rd generation home brewer/winemaker and has been an owner of E. C. Kraus since 1999. He has been helping individuals make better wine and beer for over 25 years.
There's A Plastic Taste And Smell In My Wine
 Hi, I was told by a local winemaker, that if you add vanilla bean to a racking of chardonnay, it gives it a subtle nice flavor. Well, we put just half a vanilla bean in and racked it for a month. We just racked again and took the vanilla bean out. The wine has a weird plastic-like taste and smell to it that is rather unpleasant. We are so disappointed because we were so looking forward to this batch of chardonnay! Is this smell and taste because of the vanilla bean? Did we leave it in too long? And, how do we salvage this batch of chardonnay? Help!
Name: Mary A.
State: MA
Hello Mary,
Adding vanilla bean to a wine recipe is one of those tricks that many home winemakers try out from time to time. I have not used vanilla beans, myself, but I have tasted wines with their addition and observed no negative effects — certainly, nothing like you are describing. I’ve also had lots of other winemakers describe to me their use with varying degrees of success, but I’ve never had someone come to me with a bad experience from its use. So, I think it is highly unlikely that the vanilla bean is the root of your problems.
By far the most common reason for having a plastic taste or smell in your wine is using fermenters that are not made of a food-grade plastic. It is very important to verify that any plastic vessel that comes in long-term contact with the wine be food-grade. Plastics that are deemed food-grade are made from a plastic that is more pure, with no dyes or other additional chemicals that can leach out into the wine. They are also mostly made from non-recycled plastic.
Any container you that get from a food supplier or that is being sold for the purpose of holding consumables, should work just fine. Stay away from containers that you find at the hardware store and other such places. The only exception to this is if the container is being sold specifically for food use or actually says “food-grade” on it.
One common misconception is that you can tell if a plastic container is food-grade by the recycling symbol that is stamped onto the container. The recycling symbol is the arrowed triangle that’s seen on plastic containers. It will have a number in the center of the triangle ranging from 1 through 7. These numbers denote the type or class of plastic from which the container is made. These symbols are used so like-plastics can be easily sorted together for recycling.
But one thing these symbols do not do is tell you if the plastic is food-grade or not. While only certain types of plastics are capable of being food-grade for liquids (numbers 1, 2, 4 and 5), not all containers made from those plastics are food-grade. What makes them food-grade is how pure of plastic is being used. Is it made mostly from recycled plastic or not? Does it have dyes and other chemicals that can release from the plastic.
Mary, hopefully this is not what’s going on with your wine, but based on your description, that’s what it sounds like. I know of no effective way to reverse these types of defects. You may get some marginal benefit from fining the wine with gelatin. You may also notice a reduction of the odor with the addition of a sulfite such as Campden tablets or potassium metabisulfite. Time may also reduce these effects. But beyond this there is not much else you can do.
Best Wishes,
Ed Kraus
———————————————————————————————————
Ed Kraus is a 3rd generation home brewer/winemaker and has been an owner of E. C. Kraus since 1999. He has been helping individuals make better wine and beer for over 25 years.
Keeping Your Winemaking Area Sanitary
 There appears to be plenty of information on equipment and supplies, cleaning/sanitation/sterilization, yet I”m having a difficult time of locating a protocol specifically related to maintaining a production area for a home winemaker (counters, floor, fixtures, sinks, drains, walls, etc.). I currently clean up splashes as they occur and monthly I do a fairly thorough wipe down of all surfaces with a B-brite dilution and spray with a kms [potassium metabisulfite]/citric solution. Hope you can provide some guidance.
Name: Roy R.
State: North Carolina
Hello Roy,
You are absolutely correct. There is not much information out there in regards to sanitizing a winemaking area. You can find some mention of it in several winemaking books, but not much more than a paragraph.
I have to tell you that what you are doing is pretty much what I do, however there are some differences in how I approach it.
- The first main difference is that I do not clean on a monthly schedule. I clean and sanitize right before I plan to use the area. These mean I sanitize anytime I plan on exposing the wine or wine must.
- The second difference is that I do not use B-Brite as a wipe-down solution. This product works well for sanitizing wine bottles, fermenters, stirring paddles, etc, but I have found Five Star: Star San to be better for wiping-down counters. It has a slight foaming action to it that helps get into corners an crevasse. After this, I spray everything down with a solution of sodium metabisulfite and citric acid, just as you do.
- The last difference is, that since I do my winemaking in a basement area that has exposed floor joists, etc., I feel it is necessary to spray the joist and sub-flooring that is immediately over the winemaking area. I do not do this every time, but only on occasion. I use the same sodium metabisulfite/citric acid mix that I use to spray the counter, faucets, etc.
One additional thing I do is anytime I’m checking on the wine, or just down there, I will spray the sulfite solution on to the air locks and around the neck area of any carboys.
Having said all of this, one thing I would like to make clear is that most of the spoiled wines we run across do not become infected because of an unsanitary work area, but rather, because of unsanitary wine making equipment. So while it is always good to keep your winemaking area sanitary, it is critical that you keep your wine making equipment sterile.
Happy Winemaking,
Ed Kraus
———————————————————————————————————
Ed Kraus is a 3rd generation home brewer/winemaker and has been an owner of E. C. Kraus since 1999. He has been helping individuals make better wine and beer for over 25 years.
How To Find The Best Wine Recipes
 When you’re relatively new to home winemaking, following each and every step of a wine recipe is critical, but where do you even begin finding good wine recipes? There are a lot of resources out there, and hopefully this post will shed some light on where to find them.
- Wine Making Books
There are a large number of wine making books out there that are full of wine recipes. It is important to note that if you’re just looking for a book containing only recipes, you’ll want to pay close attention to the description of the book, as a lot of wine books contain other important educational information and fewer recipes than a book dedicated only to wine recipes. One book that is dedicated solely to providing you with great wine recipes is the Winemaker’s Recipe Handbook. This book contains over 100 wine recipes to create nearly any type of wine. From apricot and beet, to rose hip and grapes, this book has you covered! If you’re a beginner and are looking for a book that not only has recipes but also teaches you how to become a successful winemaker, The Art of Winemaking is a great choice. It uses simple language, has a nice selection of wine recipes, and can act as a quick reference guide whenever you need it. - Wine Making Kits
If you purchased a wine making kit, then you already have some recipes! Some kits are designed with a particular type of wine in mind, and rather than give you the equipment and ingredients while leaving you high and dry, winemaking kits come equipped with wine recipes to help you in your new winemaking adventure. - Internet Search
You can always find anything on the internet, so a search for “wine recipes” will certainly pull up a few. Be advised, there is a lot of bad information on the internet, so you’ll have to have a critical eye open when perusing these sources. You can find wine recipes on our website on the recipe page. There is also the 7 Easy Steps To Making Wine which are specific step-by-step instructions for making wine with these recipes. They are all dependable recipes that have been used many, many times by winemakers all over the country.
What if you want to tweak the recipes you already have?
If you have a good handle on some recipes and you’re getting more comfortable with different ingredients, you may want to experiment with altering those recipes somehow. You’ll want to keep a careful record of what you change, in case you love the results and want to reproduce it or it’s terrible and you want to avoid that change in the future. In this case, you want to get start a log book to keep track of everything you do while making your wines. Even if you aren’t changing your recipes, it’s probably a good idea to take notes so you can review hydrometer readings and dates, etc.
———————————————————————————————————
Ed Kraus is a 3rd generation home brewer/winemaker and has been an owner of E. C. Kraus since 1999. He has been helping individuals make better wine and beer for over 25 years.
Can You Have Head-Space In Your Secondary Fermenters?
 I have purchased 2 of your 9 gallon Tuff-Tanks and planned to use as both the primary and secondary fermenters. I read your article re: vinegar issues and you indicated air exposure can be an issue. Is using the 9 gallon tuff tank an issue for secondary fermentation? I find the tuff tanks an easy apparatus to use for transferring and racking as gravity flow works well and sediment separation is manageable. Should I use a carboy vs the tuff tank?
Name: Al
State: Maine
Hello Al,
Thanks for the great question. There always seems to be some confusion surrounding primary fermenters, secondary fermenters and head-space, so it’s great to have this opportunity to clear it up a little.
The important thing to understand is that air-exposure can only become an issue after the fermentation has stopped. During the fermentation there is plenty of CO2 gas coming off the liquid to keep the wine must protected from any foreign, airborne contaminants and to keep the air from getting to the wine and breathing life into the few bacterial cells that may be in it already.
The CO2 gas coming off the fermentation is heavier than air. This means that if the Tuff-Tank is left undisturbed, the CO2 gas will have to be force out with more gas. It will not simply float away on its own. This is an important point. This means that as long as you leave the lid and air-lock on the Tuff-Tank, there is no way for air to get into its head-space. This is true for any primary fermenter. There is nothing but CO2 gas in the head-space. It is only after the fermentation has ceased and you take the lid or air-lock off, that the air-exposure will actually have an opportunity to begin.
Typically, having air in with the wine for a few days is not going to matter that much. And the fact that you should be adding sulfites to the wine at this point, such as Campden tablets or sodium metabisulfite, also helps to protect the wine from any type of spoilage. The the sulfite gas will form a protective layer in the fermenter as well. So there is no great urgency in any of this, however once you take the lid off the fermenter and determine that the fermentation is complete you will want to make plans to get the wine clear and bottle it. If you can not get it bottled in a matter of days, then you should consider putting the wine in a carboy or something similar that will not allow for head-space until you do have time.
I hope this clears if up some. In short, as long as you have CO2 gas from the fermentation in your Tuff-Tanks there is nothing to be concerned about. It is only after you the fermentation has completed and you have taken the lid or air-lock that you have to take some form of action: either bottling the wine in a few days or move the wine to a carboy or similar.
Happy Winemaking,
Ed Kraus
———————————————————————————————————
Ed Kraus is a 3rd generation home brewer/winemaker and has been an owner of E. C. Kraus since 1999. He has been helping individuals make better wine and beer for over 25 years.
Can You Help Me Clear My Red Wine?
 My red wines have been coming out great, but are not clear even after many rackings. Is there anything to add to reds wines to prevent this?
Name: Bruce K.
State: CA
Hello Bruce,
Anytime a wine is not clearing the first thing you have to ask yourself is: “has the wine completed its fermentation?” The number one reason a wine does not to clear is because the fermentation is still continuing very slowly. The slightest amount of fermentation can cause a significant amount of cloudiness in a wine.
For this reason it is important that you check your wine with a hydrometer to verify that the fermentation has finished. You should expect to find a reading of .998 or less on the Specific Gravity scale. If your reading is higher than this, then your problem is getting the fermentation to finish, not clearing the wine. Going over the article, Top 10 Reasons For Fermentation Failure should help you in this regard.
If your fermentation is complete, then yes, there are some things you can do to help speed the clearing along. Winemakers use what’s called fining agents to help clear a wine. There are several different types of fining agents. Each will clear a wine in its own way. Often, more than one type of fining agent will be used in the same wine.
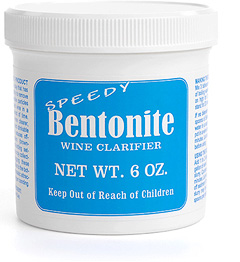
If it seems that the cloudiness is not minor, but significant, then you’ll want to start off by adding a dose of Bentonite. We offer it as Speedy Bentonite and it comes complete with its own directions. Bentonite is good for clearing out yeast cells and other proteins that are causing a significant haze.
What bentonite is not good at is giving a brilliant polish to the wine. For this you will want to follow up with either Isinglass or Kitosol 40. Each of these are good at giving your wine a illuminating polish, but they should not be used until the bentonite has had ample time to remove the bulk of the cloudiness, first. This can happen as quickly as 24 hours, but can take up to 3 days. After each of these treatments you will want to rack the wine off the resulting sediment.
Happy Winemaking,
Ed Kraus
———————————————————————————————————
Ed Kraus is a 3rd generation home brewer/winemaker and has been an owner of E. C. Kraus since 1999. He has been helping individuals make better wine and beer for over 25 years.
Taking Your First Steps In Winemaking
 Home winemaking is an enjoyable hobby that can bring you great joy, but if you’re not prepared, it can be frustrating and near impossible. It’s important to understand the first steps in winemaking; to get a solid grasp of the basics, as well as an understanding of why it is you are doing what you are doing at any step of the way.
One of the first steps in winemaking that you should do is to get educated. Sign up for classes at your local University or Community College, or purchase some home winemaking books and get reading. There’s nothing worse than buying homemade wine equipment and launching right into making wine without knowing what you are supposed to be doing. Having knowledge of why it is you’re doing what you’re doing, again one of the first steps in winemaking, is extremely important, particularly when it comes to needing to adjust a fermentation on the fly. Written wine recipes are great when everything goes according to plan, but if something goes awry, it’s very important to have the knowledge and understanding as illustrated in these first steps in winemaking in order to know how you can adjust things to get back on the right path.
Another one of the first steps in winemaking is to decide what type of wine you’d like to make. Determining what type of wine you’d like to make will ultimately decide what type of winemaking equipment you need. As we learned about in the first steps in winemaking listed in the previous paragraph, knowing what type of wine you’d like to make is important, as you’ll need to know what type of equipment you need to buy and what steps you’ll need to take during the winemaking process. There are slight differences between making wine with grapes and making wine with fruit or anything else, so it’s important as one of the first steps in winemaking to have a solid grasp on what you’d like to do.
One final first steps in winemaking is to purchase the appropriate winemaking equipment. If you’re new to winemaking, purchasing a winemaking kit is a great idea. This way, you’ll know you aren’t missing any particular piece of winemaking equipment and you have a nice, easy wine recipe to follow along with. If you’re a more seasoned home winemaker, you may wish to purchase pieces of winemaking equipment individually, as this will give you more options and flexibility in terms of the style of wine you’d like to create, and ultimately how easy and fun it is to make! It’s important never to lose sight of the first steps in winemaking, as forgetting the basics could come back to haunt you!
———————————————————————————————————
Ed Kraus is a 3rd generation home brewer/winemaker and has been an owner of E. C. Kraus since 1999. He has been helping individuals make better wine and beer for over 25 years.
Blending Wine Like A Pro
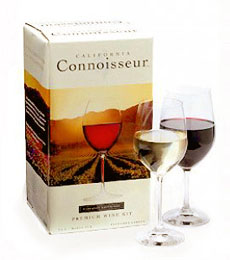 I am making a Cab Sauvignon from the California Connoisseur wine kit. I also plan on making a Merlot next and would like to blend some of the two wines before bottling. I would like to save half of the Cab in a 3 gal carboy and bottle the other half. However, at what step in the process is it best to store the bulk Cab while I am making the Merlot? After Stabilization and Clarification?
Name: Darryl M.
State: Montana
Hello Darryl,
I’m so glad to get a question on blending wines. This is something I always love to talk about. It’s also something that I feel is greatly underutilized in home winemaking. Thanks for the great question.
You want to get the wine to the point of being ready to bottling before putting it in a carboy to be bulk aged. You want to get all the steps in the provided winemaking directions out of the way before leaving the wine to rest. That means making sure the wine is clear. I would also suggest that you add a dose of potassium metabisulfite to any wine that is going to go through a bulk aging of any kind.
One thing I would like to point out is that the Cabernet Sauvignon you made is not 100% Cabernet Sauvignon grape. Smaller amounts of other grapes are blended in as well, probably some Merlot grape. We don’t exactly, because the producer of this brand does not provide this information. The same will be true for the Merlot. This is no different than the Cabs and Merlots you buy commercially at the store. They have small amounts of other grapes blended with them to round out the character of the wine.
Because of this and because all small-batch wines tend to come out slightly different each time you make them, It is impossible to know ahead of time just how much of each wine you will want to use in a blending. Something like 3 gallons of one and 3 gallons of the other seems clear-cut and simple, but it may not be the optimal blend or ratio for your two wines. In fact, you may be making a wine that taste worse than each of the wines used to produce it. It is possible. With that being said, don’t assume a particular plan of action without basing it on some type of test-tasting first.
If I were in your shoes I would bulk age the entire 6 gallons of Cabernet Sauvignon. Once the Merlot wine is ready, then I would do blind taste-testings with an array of different blends/ratios of the two wines, by the glass. Have one person blend and the others taste without knowing what’s in each glass. Whatever blend is the most like is the blend you apply to the rest of the batches. Go through this step and you’ll be blending wine like a pro.
As a side note, this makes a great party event. Invite your friends and have them help determine the blend to use with blind tastings.
If you do not want to commit the entire 6 gallons, that’s okay. I understand. It’s hard to have 6 gallons of wine sitting around when you could be drinking on it, but to get the most ‘bang’ out of your blending efforts, this is how I would proceed.
There’s a great article on our website on blending wines that I would urge you to check out, Blending To Improve Homemade Wines. It goes into both the art and science of blending wine in much greater detail than I can go into here.
Hope this helps you out.
Happy Winemaking,
Ed Kraus
———————————————————————————————————
Ed Kraus is a 3rd generation home brewer/winemaker and has been an owner of E. C. Kraus since 1999. He has been helping individuals make better wine and beer for over 25 years.
________________________________________________________
Read More About Blending Wines And Other Winemaking Topics,
FREE EMAIL NEWSLETTER:

________________________________________________________
Winemaking Equipment Guide: Heating Pad, Transfer Pump & Steam Juicer
 There are so many more pieces of homemade wine equipment than can be described in one post. It’s important to understand each piece of homemade wine equipment, how it functions, and whether or not a particular piece of equipment is needed in your home winemaking practice. Today, you’ll be introduced to three important pieces of equipment: the Copper Tun Heating Pad, the Transfer Pump, and the Steam Juicer.
Copper Tun Heating Pad:
The Copper Tun Heating Pad, while not a required piece of homemade wine equipment, is a piece of equipment that once you try, you’ll wonder why you hadn’t used it before. This piece of homemade wine equipment is fantastic for those that don’t have good regulation of heat within their work space, and who often run into trouble with stuck or slowed fermentations due working in temperatures too low for the yeasts to perform efficiently. The Copper Tun Heating Pad keeps the must at an appropriately warm temperature without overheating the wine yeasts. This device works with both plastic and glass fermenters and has the ability to heat musts from between 10 and 20 degrees F.
 Transfer Pump:
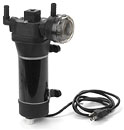
The Transfer Pump is a highly efficient piece of homemade wine equipment that will make the racking of your wine significantly easier than doing it by hand. This piece of homemade wine equipment runs on electricity, and has the ability to transfer between 1 to 3 gallons of wine every minute. Another nice feature of this piece of homemade wine equipment is that there is both an on/off switch and a variable flow adjustment dial to allow you to have more control over how fast you rack your wine from one vessel to another.
 Steam Juicer:
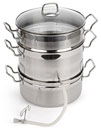
The last piece of homemade wine equipment for today is the Steam Juicer. This piece is not as common in home winemaking, but those that use it claim that it has contributed significantly to their home winemaking practice. Basically, the Steam Juicer is a mechanism for extracting the juices out of fruits or vegetables. Many, if not all, of you are familiar with extracting juice from fruits or vegetables using the press, and the Steam Juicer is just another way to achieve the same end result.
The Steam Juicer acts similar to a steamer in your kitchen, by using the power of steam heat to break down the tough skin exterior and release the juice components into a central collector. Different from your standard kitchen steamer, the Steam Juicer has a spout attached to it so that you may drain off the juices in order to proceed with the winemaking process.
Other Winemaking Equipment Guides from the past:
• Winemaking Equipment Guide: Airlocks, Refractometers & Filters
• Winemaking Equipment Guide: Hydrometer, Fermentation Carboys & Bottle Corkers
———————————————————————————————————
Ed Kraus is a 3rd generation home brewer/winemaker and has been an owner of E. C. Kraus since 1999. He has been helping individuals make better wine and beer for over 25 years.