I Need A Beginner Wine Making Kit For Dummies!

Beginner Wine Making KitHello Kraus:Is there a wine making kit for dummies that is both easy and cheaper than buying at the store (dry wine)?Thanks

———-
Hello Anthony,

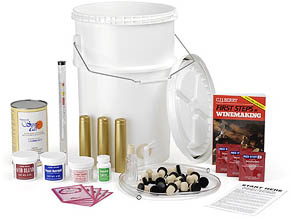
Yes, we have just that!Our SunCal Wine Making Kit is a beginner wine making kit that was designed to allow you to make wine less expensively than what you can buy it at the store. It includes all the wine making materials and ingredients you will need to make your first 5 gallon batch of homemade wine. After that, you can continue to make wine for about $3.00 dollars a bottle.You can choose from 16 different wine grape concentrates to make wines such as Cabernet Sauvignon or Chardonnay. And you can make them as sweet as you like or as dry as you like. That’s one of the great bonuses of making your own wine. Not only are you saving money, but you get to make wine the way you like it.The SunCal Wine Making Kit comes with fool-proof, homemade wine instructions that take you by the hand and guide you through the whole wine making process. And what’s really great is once you’ve made your first batch, there’s no more learning. All the other SunCal wine concentrates you can choose are made exactly the same way.
The beginner Wine Making Kit is a simple, painless way to learn how to make your own wine. You can also give us a call any time you like if you have a question. We’ve been helping beginning home winemakers just like yourself for over 45 years now. We know how to guide you through the wine making process and get your first batch of wine brewing.
Best Wishes,
Customer Service at E. C. Kraus
———————————————————————————————————
Ed Kraus is a 3rd generation home brewer/winemaker and has been an owner of E. C. Kraus since 1999. He has been helping individuals make better wine and beer for over 25 years.
Wine Recipe Conundrum: 5 Gallons Of Water, Or Water To 5 Gallons?

Wine RecipesHi:
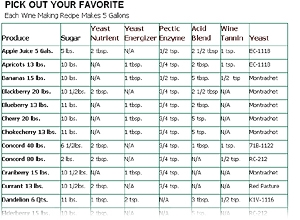
When looking at your chart for wine recipes, when you say it makes five gallons, is that five gallons of water plus the fruit and sugar or is it five gallons total with the water, fruit, sugar, etc included? I’m asking this because I want to know if I go over the five gallons, do I need to add more ingredients (yeast nutrient, etc.) according to how much I went over the five gallons?
Bernie C.—–
Hello Bernie,
Thanks for the great question and for giving us a chance to clear some of the confusion surrounding our wine recipes. I would like to add that this issue pretty much comes up with any of the wine recipes you might run across, whether it be from a friend, or in wine making books, or from our website.
Here is the short answer. You should end up with 5 gallons of wine while using no more than what is being called for in the wine recipes. The only variable is the water.
A simple way to approach this is to add water to the batch until the total volume reaches 5 gallons. After the first racking, when all the sediment and pulp is removed, you will then add additional water to bring the batch back up to 5 gallons.
This is known as topping up. On average you might have to add a half gallon of water back to the batch, but this amount can vary wildly depending on the type of wine you are making.
In certain cases where you know you are going to be removing a lot of pulp, you may want to go ahead and start the batch size a little more than 5 gallons. For example, this could be the case with any of the Muscadine wine recipes you might run across.
All in all, how much water you start out with is not too critical. Just be in the ballpark. The important thing is to end up with 5 gallons wine when you are finished. And yes, it is okay to add more water during the fermentation.
Best Wishes,
Customer Service
———————————————————————————————————
Ed Kraus is a 3rd generation home brewer/winemaker and has been an owner of E. C. Kraus since 1999. He has been helping individuals make better wine and beer for over 25 years.

Bubbles! We Don't Need No Stinking Bubbles!

Bubbles In Homemade WineHi:
I bottled my wine for the first time this year – i bottled 45 – i have went thru several bottles and given a few away.  But recently the last couple of bottles that i have opened have tasted fine – but i notice that the wine glass will have bubbles clinging to the side of the glass after sitting for a while. Do you know why this is?
Thanks,
Jon

———-
Hello Jon,
What I’m understanding is that the first few bottles of this wine were perfectly fine. Then as time went on you began to notice bubbles in the wine after pouring it into a glass.
This could really only mean one thing… your wine has started fermenting in the bottles. It is important to understand that even the slightest amount of fermentation can cause a lot of CO2 gas. The bubbles you are seeing is this gas.
What can cause a refermentation to happen is one of two things:

  1. Either the wine was bottled while there was both some sugar and residual wine yeast still in the wine.
  2. You added sugar to the wine to sweeten it and did not add a wine stabilizer a.k.a. Potassium Sorbate before bottling to keep the wine from supporting a renewed fermentation.

The solution to #1 above is to give the wine plenty of time to finish its fermentation and to clear out the wine yeast before bottling. Also verify with a gravity hydrometer that the wine is, in fact, finished and did not stop prematurely for some unknown reason. If you didn’t, you should also add Sodium Metabisulfite at bottling to help deter this type of activity and keep the wine fresh tasting.
The solution to #2 is to always use Potassium Sorbate in addition to the Sodium Metabisulfite when adding sugar for sweetening. Potassium Sorbate keeps the wine yeast from reproducing.
And as before, you always want to give plenty of time for the wine yeast to clear out of the wine. Even with Potassium Sorbate the wine yeast can give you trouble if there are too many cells floating about in the wine.
I hope this information helps you out. We also have an article on our website that my be of some help, Making Sweet Wines.
Happy Winemaking
Customer Service
———————————————————————————————————
Ed Kraus is a 3rd generation home brewer/winemaker and has been an owner of E. C. Kraus since 1999. He has been helping individuals make better wine and beer for over 25 years.

Sediment In My Wine Bottles

Crystal Clear WineHi
After I bottle my wines, I’m getting a small amount of sediment in the wine bottles after about a month. Talking to several people about this, they say I’ll probably always have this unless I start filtering my wine. I don’t make a lot of wine so it is hard to justify buying a pressure wine filtering system.
My question is how do coffee filters compare with the wine filters you sell with your pressure filtering system for effectiveness on removing sediment? Or is there something else I could try? I use a clearing agent and my wine usually sets about 5 months before I bottle it.
Thanks in advance for any information you can give me.
Bernie C.———-
Hello Bernie,
To answer your question, coffee filters do not compare to a pressurized wine filter. The typical coffee filter will filter down to somewhere around 20 microns. That’s about half the size of a human hair. A typical wine filter can filter down to a 1/2 micron. That is 40 times finer than the coffee filter.
How fine a wine filter can filter holds true regardless if you’re using our less elaborate Pressurized Wine Filter System or our more professional SuperJet wine filter system. The difference between the two is speed, not how well the are able to filter a wine.
A second area of concern with using a coffee filter is oxidation. If a wine is exposed to excessive air this can cause a browning and other oxidative effect on the wine. This is because when using a coffee filter to filter wine there is a lot of air exposure. This is do to the slow nature of filtering wine without pressure and the fact that the wine has to drip and splatter.
Now lets talk about the sediment in your wine and the most likely causes and solutions for this type of problem.
Your friends are completely wrong when suggesting that you will need to tolerate this sediment if you don’t filter. Filtering is never a necessity to a visually clear wine. In fact, wine filters are not designed to clear a cloudy looking wine, they are design to make a clear looking wine become more brilliant and polished in appearance. Attempting to filter a visibly cloudy wine will only clog the pads in a matter of a gallon or two of wine.
Sediment in the wine bottle is usually caused by one of two things: Either it is wine yeast is still settling out of the wine, and it just hasn’t had enough time to do so. Or, it could be a precipitation of some sort that is occurring after the wine has been bottled.
Precipitation means particle are developing out of thin air, so to speak… liquid in this case. Precipitation is most common when making a homemade grape wine.
In the first case the solution is simple: either speed up the dropping out of sediment with fining agents such as bentonite or Sparkolloid, or wait longer before you bottle. Wine yeast is as fine as flour so gravity can take some time to drag it to the bottom.
You stated that you let your wines set for around 5 months before bottling, so this is not likely to be the cause in your particular issue.
In the second case, things can be a little more tricky. When we say a precipitation of some sort is occurring in your wine, what we are really saying is your wine is unstable. Not unstable in the sense that it is still fermenting, but in the sense that change can potentially still occur in the wine.
The two most to common forms of precipitation in a wine comes from tannin proteins and excess acid. A temperature change of the wine can cause either to occur. If the wine becomes warmer than before tannin may drop out. If the wine becomes cooler than before acid may drop out. This is known as temperature stability, or the lack of, as the case may be.
Tannin will show up as a dusty, caked deposit. Acid will show up as salty or sugary looking crystals. There are tests and treatments you can do to a wine before bottling to make sure these deposits are kept in check.
To read more about stabilizing your wine you may want to take a look at the the article, Maintaining Temperature Stability In Your Wine, listed on our website. This article goes over how to do simple tests to determine if your wine has a temperature stability problem, and if so, how to go about resolving the issue.
I would like to point out at this time that if you are making a wine from homemade wine kits like our California Connoisseur, KenRidge Classic or any other brand, temperature stability is not your problem. All of these type of homemade wine kits, regardless of what brand you get or where you get it, have been stabilized for you ahead of time. So if you are getting deposits in the wine bottle with these wine kits you should suspect wine yeast deposits as the issue.
Happy Wine Making,
Customer Service
———————————————————————————————————
Ed Kraus is a 3rd generation home brewer/winemaker and has been an owner of E. C. Kraus since 1999. He has been helping individuals make better wine and beer for over 25 years.

My Wine Recipes Don’t Call For Any Water

Water In Wine RecipesHi,
I have started with 32 lbs. of concord grapes, sorted and crushed.  The recipe (doubled) on page 19 of your book named “Winemaker’s Recipe Handbook“, recipe #54, the Concord “Fresh -Dessert” one does not call for any water, where the other Concord choices of wine recipes do call for water.
As I have never made wine before that did not call for some water, what can I expect this wine to be like, dryish, or not, I am at a loss as to what to expect. Should I add some water?
Thanks
Kelly
———-
Hello Kelly,
Just to let you know, all the commercially made grape wines you see of the store shelf: Cabernet Sauvignon, Merlot, Chardonnay, Concord and hundreds of others, are made from 100% grape juice– no water added. The straight juice from these grapes are near optimal for making wine in terms of acidity, flavor intensity and sugar level. That’s why most wines are made from grapes.
But fruit wines such as raspberry, blackberry, plum, etc., all need to have their juice cut with water in their wine recipes. This is mainly because these juices have too much acid in them. This makes their flavor too sharp/sour for drinking. You can see some of these wine recipes on our website.
Using straight Concord grape juice when making a homemade grape wine will produce a full-bodied wine — rich in color with plenty of flavor. The other wine recipe with the water added, will make more of a blush wine, not as bold, more crisps in character.
It is important to note that one of theses wine recipes is not necessarily better than the other, they simply produce different styles of wine. Personal preference will dictate as to which one you think is best.
As to your question about the sweetness, either of these wine recipes can be made sweet or dry. How much water is, or isn’t, in these wine recipes does not factor into the sweetness. All the sugar in the wine must will be fermented into alcohol and the wine will by dry, regardless if water is used or not.
If you want your wine sweet it is just a matter of adding sugar at bottling time. It is also important to realize that if sugar is added you will also need to add potassium sorbate to stabilize the wine, otherwise a re-fermentation could occur.
Best Wishes,
Customer Service at E. C. Kraus
———————————————————————————————————
Ed Kraus is a 3rd generation home brewer/winemaker and has been an owner of E. C. Kraus since 1999. He has been helping individuals make better wine and beer for over 25 years.

Keeping A Fermentation Warm

Heat MatHello
Are there electric heater covers available for carboys or plastic fermenters to keep the working wine at a constant temperature?  I have no ideal place in my location where a constant temp is available.
Thank You
Carl M.
———-
Hello Carl,
The difficult part about keeping a fermentation artificially warm is that you need a very mild heat source. It is easy to over-heat a fermentation and ruining the wine must with too much heat.
An example of this would be an electric blanket. Every electric blanket I’ve seen would make a fermentation way, way too hot — even on their lowest settings. In fact, we’ve had customers attempt this with great failure.
Besides keeping the room’s ambient temperature between 70F and 75F, there are two simple methods I’ve seen work fairly well for keeping a wine fermentation warm.
The first method is to use a 100 watt incandescent light bulb. If you can still find one. Put it in an old lamp and put it off to the side of the fermenter about 12 inches. This will raise the temperature of 5 gallons about 8 to 10 degrees. Because light can promote oxidation in a wine, this works best with a opaque plastic fermenter, but I’ve used this method with clear, wine carboys, too. I just wrapped a heavy towel around it to guard it from the light.
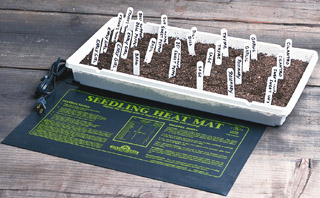
The second method I’ve seen work is using a seedling heating mat. This is a little mat you can buy at a gardening supply retailer. They are used to keep nursery plants warm while sprouting in the early months. They are a very mild source of heat and are about the right size for a wine carboy or a typical plastic fermenter.
One of your best friends in these types of situations is a thermometer. Keeping a very close eye on the temperature when the temperature is so volatile is crucial to a successful fermentation. That is why I would urge you to buy a Liquid Crystal Thermometer for each wine carboy of plastic fermenter you have.
I hope this information has helped you out a bit and given you an idea of what needs to happen. I’m sure there are other ways to keep a fermentation cozy, some that haven’t even be thought of yet, but at least now you have some clue as to what is needed.
Best Wishes,
Customer Service
———————————————————————————————————
Ed Kraus is a 3rd generation home brewer/winemaker and has been an owner of E. C. Kraus since 1999. He has been helping individuals make better wine and beer for over 25 years.

Getting More Fruit Flavor In The Fruit Wine (Part II)

Making Fruit Wines FruitierThis is the conclusion of a two part blog on how to making your fruit wines fruitier. You may want to start at the beginning with Part I.

One of the reasons you dilute fruits and their juice with water and sugar in most fruit wine recipes is because of the fruit’s acidity. If you use too much of the fruit you can end up with a wine that tastes too sharp or sour.
But wine recipes can only guess as to how much the fruit should be diluted. The fruit’s acidity can vary from year-to-year and from one variety to the next. This can make for a wide variable in these wine recipes.
But there is a way of eliminating this variable. By using an Acid Test Kit you can test the acid level of the wine and dilute the fruit with no more water than is necessary to bring it down to a drinkable/pleasant level. This means you can make the wine as strong flavored as possible from the fruit itself without making it too sharp or sour tasting.
Once you have the acidity under control with water, the next variable is the sugar. The sugar you add in the beginning as well as the sugar naturally in the fruit are fermented into alcohol. Having the right amount of sugars available to the fermentation will get you the right amount of alcohol.
Fortunately, the right amount of sugar can easily be determined by taking a quick reading with a gravity hydrometer. The gravity hydrometer measure how much sugar is in a liquid simply by how high or low it floats. Gravity hydrometers that are made specifically for wine making also have a scale on them that tells you how much alcohol that sugar can make during the fermentation. Perfect!
Armed with this information, you can forget how much sugar your wine recipes call for and add the optimal amount for that particular batch of wine made with that year’s crop of fruit.
Notice that earlier I referred to the right amount of sugar, and I didn’t say the maximum amount of sugar or the most or anything like that. That is because there is a balancing act to play with alcohol and flavor.
Having high alcohol levels in a wine will reduce the intensity of the wine’s fruit flavor. The opposite holds true as well. So if you want a fruity wine, you will not want to drive your alcohol up as high as possible. Shoot for around  10% to 11% in your fruit wine recipes.
The logic behind this principle is simple. Alcohol numbs the senses, including your taste-buds. As the alcohol level rises, so goes your ability to taste.
The last thing you can do to have a wine with more fruit flavor is sweeten the wine back a little bit before bottling. This was touched on in the previous blog, but it bares repeating. You don’t necessarily need to make the wine sweet, but bringing it away from bone-dry will help. Just remember to always add Potassium Sorbate to a wine that is being sweetened to  keep it from re-fermenting.
So as you can start to see, making better wine involves taking more control over the wine recipe. Use these simple wine making tips to do so, and you will have wines that are fruitier and bursting with more flavor.
Happy Wine Making
Customer Service
———————————————————————————————————
Ed Kraus is a 3rd generation home brewer/winemaker and has been an owner of E. C. Kraus since 1999. He has been helping individuals make better wine and beer for over 25 years.

Getting More Fruit Flavor In The Fruit Wine (Part I)

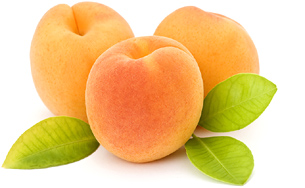
Making Peach / Apricot Wine FruityHello,
I have made some peach wine and apricot wine from my orchard.  I would like for them to taste a little more like peach or apricot.  Suggestions?
Thanks
Darlene
—–
Good Morning Darlene,
Since these wines have already been made we have to look at things we can do to them irrespective of the wine recipes used to make them. This pretty much narrows the options down to direct flavoring adjustments or flavoring enhancement.
One of the wine making products we have that can be used to enhance a wine’s flavor is our liqueur flavorings. These are flavorings that are intended to be mixed with plain vodka to instantly make anything from an orange brandy to peppermint schnapps. We have had great success with using them to enhance various fruit wine recipes.
The brand is called Top Shelf Liqueur Flavorings. They come in very small bottles, but pack a very big punch of flavor to a fifth of vodka. I would suggest adding the Apricot Brandy and the Peach Schnapps flavorings respectively to your wines.
You should need no more than one bottle to 5 gallons of wine. You may want to only add half a bottle to start out with and see how that goes. Make sure the flavor enhancer gets blended thoroughly when adding. Then let the wine sit overnight before bothering with sampling a taste. For some reason it seems that these flavorings need to mingle a bit with the wine before their full flavor comes into fruition.
A second way to enhance your wine recipes is to sweeten the wine. Many wines loose their fruitiness as they become drier from the fermentation. Dry essentially means lack of sweetness. By adding back sweetness before bottling, you can often bring back the fruitiness of the wine.
A third way to enhance your wine recipes is to both sweeten and enhance the wine at the same time by adding frozen concentrate to them. For your two wines in particular, you could use peach and apricot frozen concentrates–the same stuff you get at the grocery store.
It is important to note that if you do add any kind of sugar/sweetener to the wine, you will also need to add another one of our wine making products, Potassium Sorbate, to keep the wine from re-fermenting and becoming dry again.
Happy Wine Making
Customer Service
Watch for my next blog post (Part II) where I will explain how you can tweak your wine recipes to get the most fruit flavor you can in them even before you add the yeast.
———————————————————————————————————
Ed Kraus is a 3rd generation home brewer/winemaker and has been an owner of E. C. Kraus since 1999. He has been helping individuals make better wine and beer for over 25 years.

Crushing And Pressing Red Wine Grapes

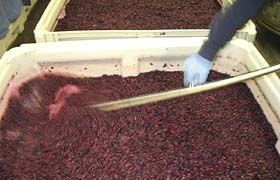
Crushed Grapes In Primary FermentationHello  E. C. Kraus:I’ve read a lot of the articles on your site concerning wine making. The one titled “Wine Making With Grapes” mentions that there is a different method of processing red grapes than there is for white grapes, but I’m not sure I completely understand the process for red grapes. What does it mean when it says that they are to be “crushed and fermented with the skin and pulp for several days and then later pressed”?
First what does it mean to crush them? Does it mean to just press them enough to cause the juice to start coming out of them, but not completely? Please explain.
Second it says that the skin and pulp will be fermented for a few days with the juice already extracted. Does this mean that the first few days I will actually start the fermentation process with the yeast, sugar (if needed), and all of the other stuff in the fermentation vessel? How many days should this be allowed to ferment, before finally pressing the grapes? And then what happens after I finally press them and separate the pulp and skins from the juice? At what point during the process for red grapes do I check and adjust the acidity and sugar levels? And when should I add the yeast nutrient, pectic enzyme, potassium bisulfite, and the yeast to all of this?  Please explain further.
 
Thanks.
Henry V.
—–

Hello Henry,
You are correct. The information on how to make white wine is different than the information on making reds. Let us see if we can clear up some of the confusion.
Fermenting red grapes with the pulp and skin means crushing the grapes and gathering the pulp into a primary fermenter along with all of the other wine making ingredients. You follow this process for red wine in order to extract more color and body from the grape. This post, What’s The Skins Got To Do With It, that is listed on this wine making blog will provide you with more information.

When crushing the grapes all you are looking to do is burst the skins. This is different than pressing which comes later. Crushing large amounts of grapes by hand can be difficult, so you may want to consider purchasing a grape crusher or even possibly a grape destemmer/crusher.
After crushing you will have a lot of free flow juice. You should check the acid level with an acid test kit and sugar level with a gravity hydrometer and make any necessary adjustments. Then you are ready to move on to the fermentation.
The primary fermentation is the first 5-7 days. The first day you will add all ingredients required including the Campden Tablets to purify your juice, with the exception of the wine yeast. You will add the wine yeast 24 hours after adding the Campden Tablets.After the 5-7 days, you will remove the pulp and press out the juice. Pressing can be done by hand.  However, when making wine from grapes you may want to consider a purchasing one of our grape presses due to the amount of grapes required. The article, Using A Wine Press listed on our website explains this process in more detail.You will then rack your wine to a secondary fermenter and attach and airlock and rubber stopper to continue the fermentation.
Best Wishes,
Customer Service at Adventures in Homebrewing
———————————————————————————————————
Ed Kraus is a 3rd generation home brewer/winemaker and has been an owner of E. C. Kraus since 1999. He has been helping individuals make better wine and beer for over 25 years.

How To Handle That Last Bit Of Sediment

Wine Sediment FermentationHi,
I have been making wine from homemade wine kits for about a year now and have a question about the sediment just when I am ready to bottle the wine. Sometimes I do another rack back to my plastic fermenter to clear out some of the sediment; however, there is always a little in the bottom. Should I buy a wine filter or just siphon the wine down to the sediment and disregard the stuff? Is the wine filter designed to filter out wine sediment and to clarify cloudy wine?
Thanks again,
Bill
———-
At this point in the wine making process it is best to siphon down to the sediment and lose some of the wine. The loss should be very minimal at this point.
One thing you can do to help make the last siphoning (racking) more efficient is to slightly tilt the plastic fermenter before siphoning the wine. This will allow you to corner some of the wine and siphon more up. The sediment should not move with it, but rather, stay in place, stuck against the bottom.
You can get a wine filter and filter the wine, but these filters are not designed for taking out visible sediment. Their wine filter pads are extremely fine and will clog up quickly if there is very much sediment at all in the wine.
Wine filters are more designed toward taking a wine clear wine and adding a polish to it. Obviously, if there is just a light dusting in the bottom of the plastic fermenter this will not be a problem, but even if the wine looks only slightly murky, or if there is more than a dusting of sediment, you may not get a 6 gallon batch of wine through a single set of filter pads.
My final advice to you would be, when making wine with one of these homemade wine kits, expect to lose a little wine at the last racking. It shouldn’t be much, maybe a cup or so. If you want to get a wine filter system, then fine, go ahead, but don’t do it for the purpose of clearing out visible sediment. Do it to give the wine a more polished, brilliant appearance.
Happy Wine Making
Customer Service
———————————————————————————————————
Ed Kraus is a 3rd generation home brewer/winemaker and has been an owner of E. C. Kraus since 1999. He has been helping individuals make better wine and beer for over 25 years.