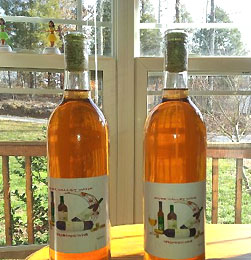
 I am the one who made the persimmon wine and had trouble with it clearing. I used a mix of Kieselsol and Chitosan and waited about a week and it cleared perfectly. It is a golden color and it tastes like sweet persimmons. Real tasty.
Name: Sandra Fey
State: Ky
Hello Sandra,
Yes, I remember that post on our blog: “My Persimmon Wine Won’t Clear!“. Thanks for share the picture of those beautiful bottles of wine. I’m glad that everything worked out for you and your wine. If you ever have anymore questions, just feel free to ask and we’ll do what we can to help you along with your wine.
Happy Winemaking,
Ed Kraus
———————————————————————————————————
Ed Kraus is a 3rd generation home brewer/winemaker and has been an owner of E. C. Kraus since 1999. He has been helping individuals make better wine and beer for over 25 years.
Category Archives: Wine
What's My Wine's Alcohol Level?
 I started a fermentation with 10 lbs. of cleaned orange fruit, 6.5 lbs. of sugar, 3 gallons of water, yeast, pectic enzyme etc. I forgot to take the original specific gravity. If I remember correctly when I racked the first time my reading was 1.030. I just racked it a second time and am getting the reading of .990. Any way to accurately figure out the alcohol content or not? I’ll know better next time. Smells like its got a kick to it.
Name: Barney
State: Louisiana
The short answer to your question is, “Not unless your willing to spend some bucks on lab equipment”.
As a home winemaker, determining the alcohol level of a finished wine without a beginning wine hydrometer reading is difficult. Knowing the beginning reading along with an ending reading make it just a simple matter of easy math to figure out, but when you don’t have the beginning reading, determining the alcohol level quickly turns into a science project.
Without the beginning reading the wine hydrometer is no longer of any value to you for this purpose. It’s good to know that your wine is at 0.990 on the Specific Gravity scale, indicating that the fermentation did complete, but beyond this it is of no help. You’ll need to rely on some other piece of equipment.
Your first option is to use a Vinometer. The big plus to using this apparatus is that it is not too terribly expensive. The big minus is that it is not too terribly accurate, either. And, if your wine has any significant residual sugar in it, — which yours does not, with a reading of 0.990 — the measurement will not be accurate at all. In fact, it will be in another ballpark.
The Vinometer is fairly simple to use. I works off the surface tension of the liquid, in this case the wine. You start by filling up a thin channel in a glass pipe or pipette. Then turn the pipette upside-down to allow the wine to run out. You determine how much alcohol is in the wine by observing how much wine stays in the Vinometer verses how much falls out. There is a scale along its side to help you do this.
Your second option is to use an Ebullioscope. This apparatus is much more expensive but much more accurate. It is basically a lab-quality mini still. You take a measured sample of the wine and bring it to the boiling point of alcohol, which is lower than water, and essentially steam all the alcohol out of the wine. The steam is collected in a closed environment, then cooled and measured in relation to the wine sample size. As you can start to see, unless you’re a small winery, this is probably not to practical.
While the Ebullioscope is very accurate, it is not completely accurate. Other trace amounts of volatile elements do rise with the alcohol steam, otherwise known as “essence”, so there is even a third way to measure the alcohol level, one that is ultimately accurate, and it’s the way the big boys do it. That is to use chromatography.
What it means for the home winemaker, or even the small winery, is send it to the lab with a large check, and they’ll tell you what the alcohol level of your wine is with great accuracy. What it means for the large winery is they’ll send the sample to their in-house lab and run it through a piece of equipment that costs thousands of dollars.
Another blog post that you may want to take a look at that is related to this subject is “Controlling Alcohol With A Gravity Hydrometer“. It goes into a little more detail about actually using the hydrometer to determine the alcohol level of your wine.
I guess the moral to this blog post would be to, “Never forget to take your beginning wine hydrometer reading!” It is vital to determining the alcohol level of your homemade wine. Without it your pretty much out of luck.
Best Wishes,
Ed Kraus
———————————————————————————————————
Ed Kraus is a 3rd generation home brewer/winemaker and has been an owner of E. C. Kraus since 1999. He has been helping individuals make better wine and beer for over 25 years.
Game Of Making Wine
 Began the game when I was 16 yrs. old when I began making wine out of pumpkins. It’s amazing the aroma you get, especially when you use the actual wine yeast carried out before as a starter. Today in a preiod of one month I can produce 100 litres having reiceved enough knowledge form this website. Big up kraus. Lets enjoy the game.
Name: Tamale Peter
State:
Winemaking Equipment Guide: Hydrometer, Fermentation Carboys & Bottle Corkers
 Whether you are just starting to get involved in home winemaking or you have been making wine at home for some time, it’s a good idea to have a good understanding of the different types of homemade wine equipment, how they function, and whether or not a particular piece of equipment is needed in your home.
Of course, there are many more pieces of homemade wine equipment than can be described in one short post, however, below are just a few of the must-have pieces of homemade wine equipment that if you don’t have in your collection already, you certainly should purchase it soon!
The Wine Hydrometer:
The purpose of the wine hydrometer is to monitor the progress of wine from the must stage through the fermentation process. The hydrometer measures specific gravity of a fluid by floating in the liquid at a certain height which can be read using the demarcations on the device. There are many types of wine hydrometers, the most common of which can measure specific gravity, sugar, and potential alcohol. This is a must-have device for your homemade wine equipment stash.
Fermentation Carboys:
Fermentation carboys come in a wide range of sizes, and are typically made of either plastic or glass. Carboys are primarily used for secondary fermentation, which is the slower fermentation step that functions to convert the remaining sugar left by the wine yeasts after primary fermentation into alcohol and carbon dioxide. Secondary fermentation is also known as anaerobic fermentation, since the vessel is closed off to air. The fermentation carboy must be closed with a rubber stopper and a fermentation lock in order to keep air and bacteria out of the fermenting wine.
Wine Bottle Corkers:
Once you’ve made your homemade wine, you’ll want to bottle it so you can either age the wine for some time, or pass it along to friends and family as gifts. One piece of homemade wine equipment that will save you a lot of time and physical distress is the wine bottle corker. This piece of homemade wine equipment comes in a variety of styles and sizes from smaller bench-top corkers to larger floor corkers. If you have a relatively small inventory or are limited in space, a bench-top corker would be a good fit for you. Alternatively, if you’re starting to produce larger quantities of wine and have a little more work space, a floor corker would be a better fit.
There are so many more pieces of homemade wine equipment that would help you in making your homemade wine experience more efficient and enjoyable than can be discussed in one simple post. Another blog post that goes through more of this equipment is “What’s In A Homemade Wine Kit?” You might want to take a look at it, but also stay tuned for more homemade wine equipment descriptions in the future!
———————————————————————————————————
Ed Kraus is a 3rd generation home brewer/winemaker and has been an owner of E. C. Kraus since 1999. He has been helping individuals make better wine and beer for over 25 years.
Do Not Dump It Out. I Repeat, Do Not Dump It Out.
 I’m in the process of making my first batch of wine. I’m making apple wine. When I started, I took a hydrometer reading and it was in between 1.080-1.100. I let it ferment in the bucket for about a week and a half. When I racked it into the carboy I took another hydrometer reading and it was about the same.(this was on the 7th of January.) I just took another hydrometer reading today( Jan 21) and the hydrometer wouldn’t even float inside the wine thief. Did I screw something up or is the wine ready to be filtered and bottled. I also tasted the wine. It had a really good flavor but it also had a little tartness to it. Please tell me that it’s ok, I really don’t want to have to dump it out!
Name: Ben Marquard
State: Wisconsin
Hello Ben,
Do not dump it out. I repeat, do not dump it out. Your first hydrometer reading of 1.080 – 1.100 indicates that it was in a reasonable range for starting a fermentation. This reading indicates that your final alcohol level should end up around 10.5% to 12%. Your second reading I can not explain. After a week and a half you should have had a reading around .996 – 1.020 on your gravity hydrometer. You said it did not change.
Now you are saying that you can not get the gravity hydrometer to float. That is good news! This is an indication that your fermentation is almost done, if not done already. The reason the wine hydrometer will not float is because you do not have it in something deep enough to test for the final reading.
You should be expecting a Specific Gravity reading at this point of around 0.994 to 0.998. This is at the very tip-top of the hydrometer’s scale, so you need something deep enough to get it to float and get the reading. Find something taller to test the apple wine in, or you can put the gravity hydrometer directly into the batch of apple wine to get the reading.
What I suspect you will find is that the fermentation has completed and all that needs to be done now is to give the wine time to clear up and then eventually bottle. You have the option of back-sweetening the wine with sugar before bottling, but you must also add Potassium Sorbate or the wine will start fermenting again in the bottle.
You should also be using sulfites such as sodium metabisulfite or Campden tablets in your wine. At minimum, you should be adding either of these right before bottling. If you plan on bulk-storing the wine before bottling then you should add a dose sooner and then again at bottling time.
One thing I might suggest for future batches is to get a hydrometer jar. This is basically a tall tube that allows you to take accurate readings. You might also want to take a look at the following article on our website: “How To Make Homemade Wine“.
Happy Wine Making,
Ed Kraus
———————————————————————————————————
Ed Kraus is a 3rd generation home brewer/winemaker and has been an owner of E. C. Kraus since 1999. He has been helping individuals make better wine and beer for over 25 years.
Why Did My Homemade Wine Start Re-Fermenting?
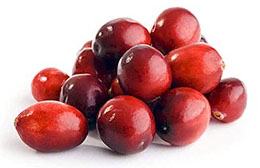
 Sort of new to the wine making process, but have been very successful or lucky so far. I’ve made 4 flavors of wine in the past and have tasted well above my expect ions. But a year ago I started a cranberry wine and it has been doing great for a year now but recently it began to start to referment. Why now? It’s temp and location hasn’t changed. I’ve racked it every 3 months as it called for, very little sediment is collected on the bottom of the carboy. Why would this occur now and how or do I want to stop the process? It is stored at temperatures between 59 and 61 degrees. I have never added a sugar solution to increase the taste. I have only racked the wine every 3 months.
I’m not sure what other information you need in order to better help me. Any input or idea’s would be greatly appreciated. Waited a long time for this one. Thank-you Renee
Name: Renee
State: MN
The fact that you are still getting any sediment out of a wine after a years time is somewhat disturbing. It is possible to get some proteins such as tannin to drop out over time, but that normally happens at warmer temperatures, not the temperatures you have indicated. Because of this, one of the first things that comes to mind is: did the wine ever complete its fermentation originally?
If a fermentation is healthy and timely it will complete in one to two weeks. The rest of the time involved is just getting the wine to clear. If you haven’t done so already, it would be useful to take a gravity hydrometer reading to make sure that all the ordinal sugars were fermented and that you don’t have a fermentation that’s spread out over a years time. The hydrometer reading should be .996 or less on the Specific Gravity scale. If you get a Specific Gravity reading that is higher than this, then this opens the the door to the possibility that what you are seeing is, in fact, a refermentation.
As to your questions, “why now?” Even though you have your wine stored in cool temperatures, the rackings could be causing the problem, themselves. When a racking is performed more oxygen is introduced to the wine. This can do one of two things: 1) it can invigorate the wine yeast to ferment some more, 2) it can invigorate bacteria or mold to grow.
If you have been adding sulfites such as Campden tablets or Sodium Metabisulfite to the wine after each racking #2 is not very likely to be the problems, but if you have not been adding sulfites along the wine the #1 or #2 is very possible.
I hope this information helped you out. My goal is to cover the most likely scenarios. At this point what needs to happen is a gravity hydrometer reading. If the reading indicates the fermentation is complete, then add sulfites to the wine to stop whatever activity is occurring.
Happy Wine Making,
Ed Kraus
———————————————————————————————————
Ed Kraus is a 3rd generation home brewer/winemaker and has been an owner of E. C. Kraus since 1999. He has been helping individuals make better wine and beer for over 25 years.
The Patron Saints Of Wine Making
 We are going to go off topic a little bit here and talk about something that I find very fascinating. In any industry or business where there is a lot invested, there can be a lot of superstition revolving around those involved. Maybe a soccer player wears dirty socks throughout the season for good luck, or someone else carries around a rabbit’s foot for “protection”. Even still, some people may wish to knock on wood in order to avoid jinxing themselves into quickly falling into bad luck. For the religious or spiritually inclined, they pray!
There seems to be patron saints for everything, with patron saints being those entities some pray to in order to be blessed with good luck and good fortune. Wine makers are certainly no different! In fact, there are several patron saints of wine makers, and whether you are spiritual, religious, or think this is all a fairy tale, it’s always fun to know a little bit of history and culture related to wine makers and the history of winemaking!
There are several patron saints of wine makers, with each having their own special niche in the patron saint realm. The most well-known patron saint of wine makers is probably St. Vincent of Saragossa. St. Vincent is not only the patron saint of wine makers (vintners) but is also the patron saint of vinegar makers.
Other patron saints of wine makers include St. Trifon the Pruner, St. Amand of France, St. Lawrence of Rome, St. Martin of Tours, St. Morand of Cluny, St. Urban of Langres, St. Goar of Aquitaine and St. Walter of Pontnoise.
St. Amand of France was also known as the patron saint of brewers, vintners, inn keepers, and bar staff. He was given these names due to the fact that he did much of his teaching in wine making and brewing regions. His Saint’s Day is celebrated February 6th.
St. Morand of Cluny was also known as the patron saint of people in the grape and wine trade. One interesting fact for this patron saint of wine makers was that it was believed he lived the entire period of Lent (40 days of fasting) on one cluster of grapes. His Saint’s Day is celebrated June 3rd.
St. Urban of Langres was also known as the patron saint of barrel makers, vine growers, vine dressers, and vintners. While trying to escape persecution, St. Urban hid in a vineyard in France. He managed to convert the vine growers to Christianity and they helped him escape and spread his message. His Saint’s Day is celebrated January 23rd.
If you’re fascinated by the history of wine makers and winemaking, as well as the history and culture of religion, learning about these historical individuals is not only entertaining but educational!
———————————————————————————————————
Ed Kraus is a 3rd generation home brewer/winemaker and has been an owner of E. C. Kraus since 1999. He has been helping individuals make better wine and beer for over 25 years.
Why Does My Wine Taste Like Vinegar?
 I have made several attempts at making wine. I have used grape juice (Welch’s), rhubarb, blackberry, and have even purchased a kit to make some Merlot. My problem is that they all taste nearly the same with a hint of vinegar. I have been careful to wash and sanitize everything. I am going to try again soon but don’t know what to do different. I even purchased new siphon hose for the Merlot kit and it still had the same off taste.
Name: Keith H.
State: KS
Hello Keith,
Sorry to hear about the trouble you are having. I can feel the frustration in your writing. There are four ways in which a wine can be taken over by vinegar to some degree, regardless of how much you clean your equipment:
1. Fermentation Is Too Warm: A fermentation should never get over 75° F. When it does it is making life more comfortable to unwanted things like mold, bacteria — vinegar growth is primarily caused by a bacteria know as acetobacter. They like the warmer temperatures and can grow quite comfortably in it. If your fermentation has been getting in the 80’s then this could be the issue.
2. Fermentation Is Too Slow: If you do not have a vigorous fermentation this can leave room for a unwanted microbes to flourish. As a bit of analogy, think of your fermentation as your lawn. The grass is the wine yeast and the weeds are the mold, bacteria, germs… everything you don’t want. One of the best ways to keep the weeds down is to make sure that you have a good stand of grass. The grass takes up everything leaving less for the weeds. It’s no different with a fermentation. By having a good stand of wine yeast you keep these threatening elements at bay.
3. To Much Air Exposure After Fermentation: If you have an active fermentation, exposure to air is not an issue. It’s after the fermentation is over that care needs to be taken. The number one source of air is having too much head-space in the fermenter. Once the fermentation is over you need to eliminate the head-space to keep the wine fresh. Move the wine to another container(s) that it can completely fill. Air allows the vinegar bacteria, acetobacter, to grow.
4. Fermenting With Yeast Under Stress: What I mean by stress is that the wine yeast is not happy. It is not in an environment that is agreeable. This is related to both #1 and #2 above. If the fermentation is too warm the yeast is not happy, and if the fermentation is slow, this is a symptom of an unhappy yeast. The reason behind this is because yeast produces vinegar just like a bacteria does. Just not very much. A healthy fermentation will produce somewhere around .04% of vinegar, but routinely goes as high as .08%. This is a very subtle amount. But if the yeast gets put under stress it can go as high as .15%. An amount that is noticeable.
What can put a yeast under stress? We already covered one of them: the fermentation being too warm. But beyond this, the wine yeast can be over-worked. This can happen when too little yeast is trying to do too much fermentation, or if you use the wrong type of yeast…say a beer yeast or baking yeast instead of using an actual wine yeast. An over-worked yeast can also result from lack of nutrients. This is common issue when water is called for in the wine recipe instead of straight juice. In these situations it is imperative that you also add either a yeast nutrient or yeast energizer to the wine must. There are others. Just realize that keeping the yeast happy will help to keep the vinegar down. You might want to take a look at the “Top Ten Reasons For Fermentation Failure“. This will go over the others in more detail.
Having said all this, please realize that keeping everything sanitary is the #1 reason for getting vinegar in a wine. What I have written above is with this assumption. Keeping things sanitary is first!
In addition, another blog post that may be helpful is “Will My Wine Turn To Vinegar By Racking It?” It approaches this issue from a slightly broader perspective.
Best Wishes,
Ed Kraus
———————————————————————————————————
Ed Kraus is a 3rd generation home brewer/winemaker and has been an owner of E. C. Kraus since 1999. He has been helping individuals make better wine and beer for over 25 years.
Question About Preparing Wine Making Fruit
 Help!! I am going to try to make cranberry wine from fresh frozen cranberries. What is the best way to get the juice from them. I have tried the blender to break them up… didn’t work…and it would take forever to cut each one— Now I am cooking them as that seems to pop the berry for me. what is the secret???
Ellen
Name: Ellen Nelsen
State: Wisconsin
Hello Ellen,
When making wine from almost all fresh fruit, you do not what to extract the juice, but rather you want to put the fruit in the fermentation, itself. The fermentation activity is what extracts the juice and flavor from the fruit. It does it for you.
This doesn’t mean that there’s nothing for you to do. You still have to break the fruit up, but not nearly to the degree you where envisioning for extracting the juice. All that is required is that you coarsely chop the cranberries. It is important that you do not mince them or put them in a blender. This would be over-kill and would most likely result in a bitter wine. Only a coarse chopping is required.
During the fermentation, enzymes from the wine yeast will break down the cranberries fiber and release of the fruit’s good flavor. On around the 5th day of fermentation you will want to move the wine must to a new fermenter, leaving the sediment and cranberries behind. This is a process know as racking.
Optionally at this point, you can squeeze the cranberries by hand, or if you have a lager volume to deal with, by wine press. One of the wine making products we offer is a fermentation bag. It makes this process very easy to handle. It is basically a nylon bag with a coarse mesh and drawstring that keeps the fruit collected while in the fermenter. You just put the whole bag of fruit into the fermenter. After a few days of fermentation you simply pull the fermentation bag out and wring the juice out by hand.
Ellen, I hope this information helps you out.
Happy wine making,
Ed Kraus
———————————————————————————————————
Ed Kraus is a 3rd generation home brewer/winemaker and has been an owner of E. C. Kraus since 1999. He has been helping individuals make better wine and beer for over 25 years.
I Need A Wine Recipe For My Ground Cherry Jam!
 I have really become enamored with the flavor of ground cherries and have made jam and marmalade with them this year, but really want to make some wine with the few quarts left in the freezer from summer, but none of my wine making books mention using them…any ideas? Was planning on mixing white grape concentrate with them, but don’t know what amounts to use. Thanks for your help-
Name: Debra Macone
State: Tennessee
Hello Debra,
While it is possible to make wine using ground cherries, there are two issues that need to be brought up:
The first is the ground cherries themselves. One of the common mistakes I see among beginning wine makers is over processing the fruit they use. If one was to normally make wine from fresh cherries, they would only want to burst or crush the cherries. Smash them up; that’s it. Shredding the cherries or making a puree out of them is way too much from making wine. Doing so allows too much tannin from the skins to release into the wine, giving it a bitter astringency.
Your cherries have been ground. This may be great for jam and marmalade, but a real concern when making wine. One thing you mentioned was that you would like to use a white grape concentrate in the wine recipe. This may be the one thing that will allow you to get away with using the ground cherries. By cutting them with something with less tannin, such as the white grape concentrate, you can bring the wine recipe back into balance. I would recommend somewhere around equal parts of each.
This brings ups to the second issue which is the wine recipe, itself. I do not know of a wine recipe that is going to directly help you out. In all honesty you can create your own recipe with just a little bit of reading and understanding. Some great information is in the article, “Creating Your Own Wine Making Recipe” that is on our website. It explains that by learning how to use a wine hydrometer to adjust the sugar of the wine must, and how to take acid test readings to adjust the acidity of the wine must, you can develop your own recipe out of almost any source of produce you run across. As far as how much of your jam or marmalade to use, I would guess between 1 and 1.5 pints of jam with an equal part of white grape concentrate for each gallon of wine.
Thanks for the great question.
Ed Kraus
———————————————————————————————————
Ed Kraus is a 3rd generation home brewer/winemaker and has been an owner of E. C. Kraus since 1999. He has been helping individuals make better wine and beer for over 25 years.