5 Easy Beer Recipes for Beginners

Making Beer Recipes For BeginnersSo you’ve just started homebrewing. Congrats! Now, what should you brew? With a seemingly endless list of possible beers to brew, where do you start? What homebrewing ingredients should you get?
Here are some easy beer recipes for beginners. These are some of the best, basic homebrewing recipes:

  1. HefeweizenThe German-style wheat beer is often a “gateway beer” for beginning brewers. The traditional weizen yeast strain produces flavors of banana and clove. Want more clove? Keep the fermentation on the cool side. More banana? Let the fermentation temperature push to the upper end of the acceptable range, about 64-75˚F. Either way, this is a beer style that’s a great companion to warm weather, goat cheese, and citrus-flavored foods.
  1. Brown AleBrown ale can be a great middle-of-the-road homebrew to enjoy year-round. It’s a malty brew, but the hop character can Shop Steam Freak Kitsvary depending on your taste. American brown ales tend to have more hop flavor and aroma than English brown ales. Try a nut brown ale to highlight the nutty flavors of some specialty malts. Of these beer recipes for beginners, this one is my favorite.
  1. StoutStout may be the most forgiving of beer styles, due in part to the roasty malt flavors and dark color that come the use of from chocolate malt, black malt, and roasted barley. This means most stouts are easy beer recipes for beginners. These attributes can also come from dark liquid malt extract or dark dry malt extract. Depending on your tastes, you can brew a dry stout, sweet stout, imperial stout, tropical stout, or even a chocolate milk stout. Whatever you do, be sure to have some Irish stout on hand for St. Patty’s Day!
  1. KölschKölsch is a great option for the homebrewer who enjoys a lighter, more delicate beer. It’s about the closest thing to a light lager while still being an ale, featuring a clear, golden color, a respectably prominent hop flavor, and a crisp, dry finish.  When brewing a German Kölsch, just make sure you can maintain control of fermentation temperatures from about 60˚F on down to about 40˚F for an authentic character. Here’s some more tips on brewing a Kölsch.
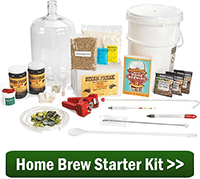
  1. Chipotle PorterAll beginning brewers reach a point Shop Home Brew Starter Kitwhere they want to branch out and experiment. If you like spicy foods, then this beer recipe is a great option. Just take a smoked porter recipe kit and add a small can of rinsed chipotle peppers to the boil. If the beer turns out too hot, just give it some time to age.

If you’re still not sure what to make, on our website we have a list of some of the best basic beer recipes for beginners. They list all the homebrewing ingredients.
Do you have an easy beer recipe that would be good for first-timers? Please share it below.
—–
David Ackley is a beer writer, brewer, and self-described “craft beer crusader.” He holds a General Certificate in Brewing from the Institute of Brewing and Distilling and is founder of the Local Beer Blog.

Wine of the Month, Peach Wine

Peach wine is a juicy, sweet selection is perfect for sipping during the summer months. Even better, since the peaches are at their peak this time of year, right now is a great time to make this wine. Read on to find out the many health benefits of peach wine, along with our exclusive recipe and wine pairing tips.

Why should I make peach wine?

Rich in vitamin A, potassium, vitamin c, thiamine, niacin, calcium, and a large amount of antioxidants, peach wine will surely do the body some good. This delicious drink can help cleanse your kidney, strengthen your immune system, and lower chances of obesity. In addition, peach wine has been known to decrease the risk of cataract and macular degeneration diseases, lower cholesterol, and repair cells and tissues.
How often do you hear about wine being associated with weight loss and energy? Interestingly enough, the abundant water content in peach wine helps hydrate the body, which in turn cuts down on fat. It also aids in the treatment of chronic fatigue disorders. Can we get an Rx for peach wine please?
Recipe:
13bs of Peaches
10 lbs. of Sugar
1 tbsp. of Yeast Energizer
1 tsp. of Pectic Enzyme
2 ½ tbsp. of Acid Blend
1 tsp. Wine Tannin
Yeast EC-1118
When you’re looking for your peaches, opt for ripened peaches (less ripe peaches contain too much pectin!). While you’re making your recipe, make sure you wash the peaches thoroughly and remove the stems and leaves. Cut out any bruises to help avoid the growth of bacteria, and don’t forget to store it away from sunlight. It is recommended that you age peach wine for about six months.

Where and how can I find peaches?

If you’re heading to your local grocery store or market to stock up on peaches, now is the perfect time. There will be an abundance of ripe, juicy peaches in the produce section from the end of June to early September. Remember to stock up, because you’ll need 13 pounds!
If you’d rather go the natural route and pick them from a tree yourself, you’ll find the best peach trees in the central and southern portions of the United States. Peach trees grow especially well in USDA zones 6 and 7, but have the ability to grow in zones 5-8. If you’re anywhere near South Carolina and Georgia, take advantage.

What foods does peach wine pair best with?

Due to the fact that peach wine is closer to a dessert wine than a dry wine, it pairs very well with spicy and smoked dishes. Start off with some smoked cheeses, then for your main dish, opt for chicken or beef topped with green chile sauce or spicy salsa. Stir-fries and crab cakes also complement the sweet flavor of peach wine quite well.
No matter what you choose to bite in between sips of peach wine, this light-bodied, crisp beverage is the perfect addition to any meal.
Are you a first time wine maker? We have great starter kits, perfect for making your first batch of peach wine. Find our starter kits along with other helpful tips for wine making here.

Our Favorite 5 Home Wine Cellars from Around the Web

What’s equally as fun as making your own wine? Finding creative ways to store and display it! Home wine cellars can be designed so many different ways, whether you have a corner of your basement or a whole room to dedicate to your delicious vino. We searched the net for the coolest wine cellars and have listed our top 5 favorites.
Traditional
This traditional home cellar is simple, elegant, and practical. If you’re producing mass amounts of wine, this is a great way to structure your cellar. The sturdy wooden shelves safely hold and organize your bottles, while the center island is great for tastings and preparation. We also love how this cellar incorporates the wine and beer crates into the design to bring everything together.
Crisp Architects Photo by Crisp ArchitectsDiscover traditional wine cellar design inspiration

Contemporary
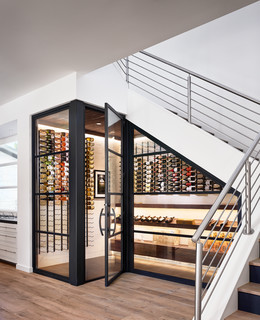
If your style is more contemporary, take note of the wine cellar in this Austin home. The designer beautifully created a main floor cellar underneath the stairs. Talk about a great use of space! The clear glass and sleek, clean lines makes this a sensible and modern solution for wine storage.
Cueva De Oro Photo by Shiflet Group Architects
Man Cave-style
Those who prefer to have a cellar that doubles as a man cave can find one our favorites in Sydney, Australia. The use of dark wood, leather chairs, big books, and array of glasses make this rustic room the ultimate man cave/wine cellar combination. The alternating shelve heights make it easy to display bottles upright or lay them down horizontally.
Wine Cellar Photo by Smyth and SmythMore Mediterranean wine cellar photos
Feminine
Ideal for “Wine Wednesday” or a girl’s night, this LA wine cellar screams posh. The two vibrant wall panels emphasize the wine selection and frame the space very effectively, allowing room for a cooler and shelving unit to display glassware. Instead of having a dining room-style table, opt for comfortable chairs and a small coffee table in the middle to create a more livable space.
Hidden Hills, CA Photo by Smith Firestone AssociatesLook for contemporary wine cellar pictures
Dramatic
Now this is a one-of-a-kind wine cellar. Highlighted by the colorful LED lights, the wine bottles at this Nashville home follow the arches of the gothic-style structures (don’t worry the LED lighting won’t harm the wine!). The designer also employed a variety of hole sizes to accommodate different bottle types. The addition of innovative seating, a dark tile floor, and supplementary wooden shelves make this one of the most over the top wine cellars we’ve ever seen.
Pool House & Wine Cellar Photo by Beckwith InteriorsBrowse contemporary wine cellar photos
The most important thing to keep in mind is to design a wine cellar that works best for you, whether you want to go all out or keep it simple. We want to know, which wine cellar is your favorite?

4 Tips For Making Wine In A Damp Basement

Winemaking In Damp BasementI really enjoy your website with all of the winemaking information. You’re truly educating the winemaking public. My question is, I’m storing my carboys and wine bottles in the basement. Its a damp basement that gets water in it when it rains. Who knows what organisms are living down there when its damp. I always clean my carboys with b-brite and a good dose of sulfite before using. I rinse my bottles with a bottle washer (stream of warm water) and rinse well with sulfite. I have to work in the basement now, because I’m getting to the point of not being able to carry the carboys up and down the stairs anymore. Even though I’ve never had a problem, should I be storing the carboys and bottles another way.
Thank You
Name: Nino P.
State: New York
Hello Nino,
I understand why you would be concerned. Without being there to inspect what you are dealing with, I would say that you can get away with it just fine, but you have to take some precautions. It is important to remember that mold and bacteria can be airborne. For this reason you need to keep in mind that it’s not just a matter of what touches the wine, but also a matter of air exposure is given to the wine.
With that being said, here are 4 things you can do to help keep your wine protected, regardless of the environment:

  1. Keep Air-Locks Filled: When an air-lock has water in it, it is cutting off this questionable environment from the wine. If the air-lock goes dry then there is no protections at all. For this reason it is important to keep air-locks full. A little trick that can keep the water form evaporating on you is to not use water. Instead, use glycerin. It does not evaporate, and it does not facilitate the growth of microbes
  2. Keep Your Fermentations Healthy: The better your wine ferments, the more it is protected from contaminants. When the wine yeast is fermenting hard, foreign microbes don’t have a chance to grow. Think of it as having a good stand of grass in your yard. When the grass is thick and full, the weeds do not have an opportunity to grow and spread.
  3. Use Sulfites After Rackings: Once the fermentation has completed and the wine is still, do not hesitate to add a dose of sulfite in the form of either Campden tablets or potassium metabisulfite. Either of these will easily destroy any cells or spores that may have made their way onto the wine. You might want to take a look at Racking Your Wine: The When’s, Why’s & How’s for further direction on when to rack your wine and when to sulfite it.
  4. Spray The Area With Bleach: This is something that should be periodically done to the immediate winemaking area. Using a weed sprayer works great for this. Just make sure it is a new one. Use a 1/4 cup of bleach to each gallon of water. Lightly spray over surfaces, starting with any exposed floor joists and then work your way down from there.

I think you can kind of get the picture by now. Making wine in these not-so-perfect conditions is very possible. It’s just a matter of keeping aware and being vigilant.
Happy Winemaking,
Ed Kraus
———————————————————————————————————
Ed Kraus is a 3rd generation home brewer/winemaker and has been an owner of E. C. Kraus since 1999. He has been helping individuals make better wine and beer for over 25 years.

New to Wine Making? 9 Wine Making Tips Debunked

Everyone who becomes a home winemaker has their own reasons for deciding to home brew their own wine. There is so much available information about wine making on the Internet, it’s enough to make your head spin. To eliminate your need to hunt for some basic “must know” information all over, we’re providing you with what we think are 9 most important aspects you need to know about home wine making so you don’t miss something important in the beginning.
1. Invest in Wine Making Kits
When you first see the price of wine making kits, the price may scare you. However, when you take the time to take a look at all the things you get with the kit you will see that almost all of the wine making supplies are reusable, so you will continue to use them when you brew future batches of wine. This, in turn, saves money over time. Plus, purchasing kits assures beginning wine makers that they have all the supplies they need for the process.
2. Making Your Own Wine Isn’t More Expensive
If you drink wine regularly, the cost of wine kits will save you money as you brew more and more batches.
3. Making Wine With Fresh Fruit Isn’t More Difficult
When making wine from fresh fruit understand the need for extra equipment such as the catch stand, crusher, destemmer and fruit press. If you don’t have a lot of room, this isn’t a good option for you.
4. Wine Concentrates Offer a Much Larger Grape Selection
Because of the huge selection, and because wine concentrates are made with grapes that are picked at the peak of their freshness, they consistently produce excellent tasting wines. If you try to buy grapes or use your own, the quality of the grapes may not be as good.
5. First Time Home Wine Makers Are Better Off Using Wine Concentrates
Wine concentrates offer reliability. Concentrates come in the exact amount needed to make a batch of wine. Consistency is important, and it will minimize discouragement and frustrations.
6. Only Use Mature Ripe Fruit When Making Fruit Wines
Unripe green fruit has too much acid and very little sugar, neither of which are qualities that will produce the best tasting fruit wines.
7. You Can Make Wine From Dried Berries or Rose Hips
Only purchase dried berries or rose hips from places that sell wine making supplies as opposed to grocery stores or other locations. These dried flowers and berries are cultivated specifically for wine making. Buying berries from these sellers assures you that you get the right amount for specific amounts of wine.
8. Adding Oak Chips to Your Fermenter Will Give Wine the Flavor of an Oak Barrel 
Oak barrels aren’t practical for home winemakers because of the cost, and because of sanitation issues. When you add oak chips to your fermenter, you are adding oak chips that are made from the same wood that is used to make wine barrels.
9. Homemade Wine Lasts Just as Long as Store Bought Wine 
Red wines get their deep color from the skins, so the longer you leave those skins on, the deeper the color will be. Acid or tannin in the wine also helps retard spoilage and prevent oxidation. The flip side of this is that high amounts of acid or tannin change the taste of the wine – though not for the better. Allowing wine to age creates a deeper and more flavorful wine.
If you are a wine lover the process of making your own wine can be a very rewarding one. You can also get customized labels to give your wine a more professional look. Regardless of whether you’re a wine connoisseur or someone who is new to the world of wine, by making your own wine, you will develop a far greater appreciation for the wine making process, and the taste of great wines.

Why Crushing and Destemming is so Important to Winemaking

When looking at the grape crushing process in winemaking one might assume that it’s really just a fancy way of juicing the grapes. In fact, without crushing, that grape juice might never actually turn to wine in the first place. Simply put, crushing and destemming are one of the most important parts of the winemaking process.
The point of crushing is not merely to juice the grapes, but to get the juice running – to get the sugars and the yeasts intermingling by breaking the grape’s skin. This allows the yeast to begin turning the sugar into alcohol and carbon dioxide. In other words, it’s not really going to become wine if you don’t crush the grapes. You can get some great grape juice, but you’re not going to get the fine wine you’re looking for.
You may be surprised to learn that it is actually the grape skin that lends red wine its color, so the winemaker might not divide the wine and the pulp immediately after crushing the grapes. Destemming takes place at this point in time regardless of what sort of wine you’re trying to make, but if you’re after a white wine, you’ll be removing the grape skins right along with the stems. When making red wine, the skin will usually be left in with the juice during the pressing and fermentation process.
There may be some variations to this step of the winemaking process depending on what type of wine is being made and who’s making it, but generally speaking, grapes need to be crushed and destemmed.
Need some help with your crushing and destemming process? Check out our assortment of crushers and destemmers.

Wine Tasting Tips for the Novice

A Wine tasting is a perfect excuse for friends to get together and share their favorite vintages. However, if you’ve never attended a wine tasting, let alone hosted one, it can seem rather daunting… but it doesn’t have to be.
What Is a Wine Tasting?
A wine tasting brings individuals together to sample one or several wines and share their impressions. As wine tastes slightly different to different people, sharing thoughts can lead to a greater appreciation of the wine. There are usually cards that allow individuals to put down their thoughts on the wines flavor, body, legs, clarity, and smell. Wine tastings don’t have to be pretentious affairs. In fact, they are usually more fun if they aren’t.
What to Include in a Wine Tasting
If you’re hosting a wine tasting this season, make a list that includes:

  • One to three wines. Although it may be tempting to serve a large variety of wines, it’s better to limit your tasting to just a few. Similar to testing perfume samples, your nose can get overwhelmed by too many different scents. Consider planning your tasting around a theme, such as Pinot Noirs from the Pacific Northwest or dry Rieslings. A fun to twist to add is to make the tasting a blind test – your guests won’t know which wine they are trying, so they won’t have preconceived notions.
  • Water. Offer carafes or bottles of water at your wine tasting so that participants can cleanse their palate (rid their mouth of the taste of one wine) before tasting another wine.
  • Crackers. Dry, unflavored crackers serve a similar function as the water. They cleanse the palate between wine tastings.
  • Spittoons. Although it may sound uncouth to those unfamiliar with wine tasting, many experienced tasters spit out the wine rather than swallow it. After all, the purpose of a wine tasting is to experience the bouquet and flavor profile of the wine, not to get drunk. Metal wine buckets work well as spittoons.
  • Food (optional). Though not essential to a wine tasting, food adds an additional sensory dimension to your event. Pick foods that complement your wines, such as shellfish with Champagne, chocolate with (red) Zinfandels, or most ethnic foods with Riesling.

Don’t be afraid of throwing a wine tasting event. Pick a few interesting wines, gather your friends and enjoy the camaraderie of a shared experience.