 Dear Sirs:
I just read a portion of your monthly newsletter on wine making and found out that I may have done something wrong. I have been putting the air lock on immediately after adding the yeast-I see now that I should have covered my wine brewings with a cloth after adding the yeast. What can I do if I need to start over. It seems to be fermenting but very slowly. Can I add yeast nutrient or what if anything or just wait and see or get me another batch of fruit and start all over?
I have not had a problem in the past by adding the air lock immediately!
John S.
———-
Hello John,
I wouldn’t worry to much. Just go ahead and take the lid off the plastic fermenter and it should start to pick up progress. Once you do your first racking, then go ahead and put the rubber stopper and air-lock back on.
Many wine making directions will tell you to do just as you did–to attach the air-lock right after adding the yeast. We see this most often with wine ingredient kits, or some kind of wine starter kit.
The idea behind this philosophy is to protect the juice from the environment just in case the beginner accidentally killed the yeast or made some other type of mistake that would not allow the fermentation to take off.
The trade off is the yeast will not be able to multiply in as great as numbers because of the lack of air. The result is a slower fermentation. The flip side of this is if you do leave the lid and air-lock off as we recommend, you need to be sure that the fermentation is starting within a days time in some fashion.
Best Wishes,
Customer Service at Adventures in Homebrewing
———————————————————————————————————
Ed Kraus is a 3rd generation home brewer/winemaker and has been an owner of E. C. Kraus since 1999. He has been helping individuals make better wine and beer for over 25 years.
Don't Let Crumbling Corks Ruin Your Wine
 Hi:
Hi:
About 18 months ago I bought 2 bags of cork stoppers from you. Well, I’ve been doing some wine brewing and made 2-3 different batches of wine and have used your wine corks. I have been having a problem getting them out of the bottles with a cork screw. The cork just comes apart and doesn’t come out of the bottle as a single unit. This has happened at least ten times with different bottles and different corkscrews. Am I doing something wrong?
Thanking you in advance.
Adam B.
———-
Hello Adam,
Sorry to hear you’re having such a problem with crumbling corks. I know it’s no fun dealing with a bunch of cork stopper bits when trying to serve your homemade wine.
There are a couple of things that can cause this type of problem. This most likely of which is that the corks were steamed or boiled for too long. Heating corks causes a natural enzyme to start deteriorating the them.
We recommend only streaming the corks for about three minutes, just long enough to make them give a little for the corker. Alternately, you can soak them in a bath of cold water with sodium metabisulfite overnight. Just make sure the corks are completely submerged when using this method. You can do this by using a jar with the lid on or similar.
The second reason that this can happen is that the cork stoppers are not being kept moist enough or they are drying out too much. This can occur if the wine bottles are stored upright to where the wine is not touching the cork or if you live in a dry climate like in the Southwest. However, I doubt if this is your situation since normally this happens to much older bottles of wine.
Best Wishes,
Customer Service at E. C. Kraus
———————————————————————————————————
Ed Kraus is a 3rd generation home brewer/winemaker and has been an owner of E. C. Kraus since 1999. He has been helping individuals make better wine and beer for over 25 years.
Do You Have Printable Wine Bottle Labels?
 Dear E. C. Kraus,
I was looking through your wine bottle labels. Can any of them be printed with a computer printer?
Thanks,
Mike
————-
Dear Mike,
Thank you for the great question. If you don’t mind, I would like to share the answer with everyone on our blog.
Currently, we have six different styles of wine bottle labels that can be put through a computer printer for customization. Each style comes four on a sheet, and we sell them in groups of 7 sheets for a total of 28 labels.
Running them through your computer printer is simple. You can use any word processor that your computer may already have on it: Word, WordPerfect, etc. Just type and layout what you want. Use whatever fonts are on your computer. Be creative and have fun!
Print a sample on a white sheet of paper first and hold it over the labels to make sure everything lines up like you want. You may have to make adjustments to what you typed at move it around a bit to get it just like you want.
These printable labels are great for turning bottles of your homemade wine into very personal wine making gifts. Commemorate a family wedding or birth of a grandchild, or you can just pass them out to family and friends as personalized gifts for any occasion.
———————————————————————————————————
Ed Kraus is a 3rd generation home brewer/winemaker and has been an owner of E. C. Kraus since 1999. He has been helping individuals make better wine and beer for over 25 years.
Don't Let Your Grapes Go To The Birds This Year!
 Hello Kraus People:
My husband is interested in making wine. We have vines and vines of grapes every year that either go for making jelly or the birds. We have tried all around us in Live Oak, Florida to find kits and my niece in California found you. We would need a starter kit with directions. Plenty of directions. If you could tell us what we need to order we will be glad to do so.
Thank you very much, Sarah E.
——
Dear Sarah,
We have three different homemade wine kits. Two of them are for making wine from concentrated grape juice. Then we have the one you would need for making wine from your grapes. It is call the “Your Fruit” Necessities Box. It contains all the essential wine making materials, ingredients and homemade wine equipment you will need to get started.
This wine kit also includes the book, First Steps In Wine Making which features tons of wine recipes, homemade wine instructions, tips and insights. In addition, for even more specific information on making grape wine I would suggest that you take a look at the article, Wine Making With Grapes, that is listed on our website.
This “Your Fruit” Necessities Box is for making up to 5 gallons of wine at a time. If you think your batches will be larger than this you may want to consider additional containers to handle the extra volume as needed.
It takes approximately 80 pounds of grapes to make 5 gallons of wine. You can destem, crush and press this amount by hand fairly easily, but as the volume goes up, so does the size of the chore involved. For larger batches you may want to consider taking a look at our grape presses as well as our grape destemmer/crusher. Otherwise, you can do this processes by hand just fine.
———————————————————————————————————
Ed Kraus is a 3rd generation home brewer/winemaker and has been an owner of E. C. Kraus since 1999. He has been helping individuals make better wine and beer for over 25 years.
Can I Make Wine In A Stone Crock?
 Hello Customer Service,
If I wanted to use a five gallon crock to make a fermentation happen is that going to be a problem? I do not want to use a plastic fermenter. I am afraid of using any plastics fearing the chemicals used to make the containers will leach into the finished food or wine? What do you think about that?
Thanks Mary
—–
Dear Mary,
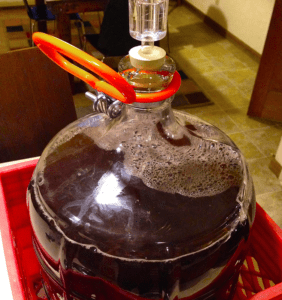
It’s okay to use a stone crock for the first few days of the wine brewing, but after the fermentation activity starts to slow down, around the fifth day, you will need to put the wine in a different type of container. One that can have an air-lock attach to it with a rubber stopper. A glass wine carboy works good for this purpose.
The inside glazing of the crock also needs to be free from cracks and chips. These types of damages can not be sanitized sufficiently for a safe fermentation. Mold and bacteria can live in these cracks just waiting for a wine to ruin.
As for using plastic fermenters, what really matters is that the plastic is food-grade. This is the key. Plastics are used to package all kinds of foods. Just look on the store shelves. Everything from lunch-meats to whiskey, to drinking water is stored in plastic.
———————————————————————————————————
Ed Kraus is a 3rd generation home brewer/winemaker and has been an owner of E. C. Kraus since 1999. He has been helping individuals make better wine and beer for over 25 years.
What Do People Make Their Homemade Wine In?
 Here’s a email I received from Linda in California this morning. She wants to know what she can use to ferment her plums.
Dear Folks:
Hopefully I won’t sound like an idiot, but what do people make their homemade wine in exactly. I’ve heard it can be done in a trash can. What material is preferable and what alternatives are there? I want to make plum wine, as my two trees here in California have produced a bumper crop. It must be obvious by now, I have no clue. Help?
Thank you–Linda G.
Dear Linda,
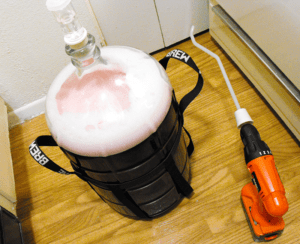
Most home winemakers use a plastic fermenter of some sort. A plastic trash can usually would not qualify because the plastic used to make them is not food-grade. The plastic that comes in contact with the wine needs to be of food-grade quality.
Glass water jugs can act as a wine carboy for fermenting. You can also use gallon glass jugs for smaller batches. In general, glass containers are perfectly fine for fermenting.
Please keep in mind that the first few days of fermentation needs to be open or exposed to air. Most people use a food-grade plastic fermenter with a thin towel draped over it. But once the fermentation starts to slow down–around the 5th day–you will need to put an air-lock on the fermenter to protect the wine from wild mold, bacteria and anything else that floats in the air.
The air-lock will need to be fitted to the container with the aid of a properly-sized rubber stopper. The stopper needs to have a small hole in it for the air-lock to fit into. Then the stopper is put into the container’s opening. In the case of a plastic fermenter that uses a lid, you may need to drill a hole into the lid for the stopper to fit into.
———————————————————————————————————
Ed Kraus is a 3rd generation home brewer/winemaker and has been an owner of E. C. Kraus since 1999. He has been helping individuals make better wine and beer for over 25 years.
Making Wine With A Steam Juicer
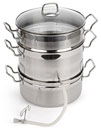 Making wine from juice collected by a steam juicer is no different than making wine from the fruit itself.
You can use the same wine recipes, the same proportions of wine yeast, sugar, water and other wine making ingredients. The only true difference is that when you use the steam juicer to collect the juice from the fruit, you’ll have no pulp to deal with during the fermentation process, only the juice.
All the wine recipes I’ve ever seen in wine making books and on the web call for pounds of fruit not quarts or pints of juice, so it is very important to weigh the fruit before putting it through a juicer. You have to know how many pounds of fruit the juice represents in order to use a typical wine recipe.
As an example, if you have a blackberry wine recipe that calls for 15 pounds of blackberries to make 5 gallons of wine, be sure to start weighing out 15 pounds of blackberries before using the steam juicer. Once all the blackberries are steamed, just pretend that that is your 15 pounds of blackberries.
———————————————————————————————————
Ed Kraus is a 3rd generation home brewer/winemaker and has been an owner of E. C. Kraus since 1999. He has been helping individuals make better wine and beer for over 25 years.
What Color Wine Bottle Should You Use?
 A customer wrote us yesterday and asked, “Does it matter what color of wine bottle I put my wine in?” This is a question we get quite often, so I thought I’d go over the answer here real quick.
When bottling homemade wine the only reason the color of the wine bottle would matter is if the wine is left out where it is exposed to light, more specifically, UV rays from the sun, florescent lighting and other UV emitters. These rays can accelerate the oxidation process of your wine.
When bottling homemade wine, the color of the glass will not matter so long as the wine is kept in a dark place. Pick whatever color you like. But if the wine bottles are kept were normal ambient light can get to it, such as in the kitchen, dinning room, etc., you would be wise to use a colored wine bottles. The coloring in the glass will help to filter out much of the UV rays that make their way to the wine bottle.
Oxidation does take time. So don’t think that just because you used clear wine bottles or glass jugs and they’ve been setting out in the light that your wine is ruined. Oxidation is a process that normally takes months, not days or weeks, to affect a wine.
Now that you know, just move your wine bottles to a darker place and remember the next time when you are bottling homemade wine that the bottle color and storage lighting does matter.
———————————————————————————————————
Ed Kraus is a 3rd generation home brewer/winemaker and has been an owner of E. C. Kraus since 1999. He has been helping individuals make better wine and beer for over 25 years.
New Lower Price On Our Grape Crusher / Grape Destemmer
 Great news! A great deal has just gotten better. We’ve just lowered the price of our Marchisio Grape Crusher / Grape Destemmer by $76.04. This makes the new price $698.28. And that includes FREE shipping to anywhere in the 48 states.
This unit is both a grape crusher and grape destemmer. It crushes the grape clusters through two roller mills and then drops them into a trough where it removes the stems. The only thing that goes in your fermenter are crushed grapes.
Not only does it do a beautiful job of preparing your grapes for fermenting, it’ll save you a lot of work and a lot time. It is able to easily handle over 2000 lbs. of grapes in a single hour. Just crank the handle at a normal, human speed and the grape destemmer does all the rest.
This is no toy. This is the real-deal. Made by Marchisio (mar-Ke-zee-oh) of Italy, a world leader in winery equipment. Visit our website to learn more and to place your order. This price will only last until we run out of our current stock.
———————————–
Ed Kraus is a 3rd generation home brewer/winemaker and has been an owner of E. C. Kraus since 1999. He has been helping individuals make better wine and beer for over 25 years.
Keeping Your White Wines White (Part III)
 In this last post of a III part series we’ll go over the importance of using sodium metabisulfte when racking you wines.
Keeping air exposure to a minimum also means that great care should be taken when racking your wine. Eliminate as much splashing as possible. Splashing will only introduce more air into the wine. You can do this by making sure the siphon hose fills the wine carboy or vessel from the bottom up. In other words, keep the end of the hose down into the wine as it is filling up the wine carboy.
Also, for rackings that are done after the fermentation has completed, sodium metabisulfite should be added directly into the wine. If the fermentation is not complete, sodium metabisulfite should not be added. It could interfere with the fermentation or wine brewing.
Sodium metabisulfite will release sulfur dioxide gas (SO2) into the wine driving out any oxygen that may have saturated into the wine during racking. As an added bonus it will also destroy any unwanted microorganism that may have gotten into the wine as well.
Because much of SO2 naturally wants to leave or dissipate from the wine it needs to be replenished at every racking. Unless you have a way of testing for sulfur dioxide (SO2) levels, how much to add can be somewhat of a guessing game. I normally add half of a full dose at rackings. This comes out to 3/16 of a teaspoon for a 6 gallon batch of wine, or 1 teaspoon to every 32 gallons of wine.
We have titration kit that is used to measure the level of SO2 in a wine at any given time. This is the most accurate way to go, and it is also what I would recommend doing if you have a larger batch of wine at stake.
The titration kit measures SO2 in parts-per-million or (P.P.M.). During rackings you would like the wine to maintain a level of SO2 at about 30 P.P.M. At bottling time you would like to raise this level to about 50 to 60 P.P.M. This is the same level found in commercially made wines.
Having this level of SO2 in the wine while it is in the wine bottle will protect it from spoilage and help to keep it stable. Eliminating this step does not mean that your wine will immediately show signs of oxidation, however it will be much more susceptible to it.
———————————————————————————————————
Ed Kraus is a 3rd generation home brewer/winemaker and has been an owner of E. C. Kraus since 1999. He has been helping individuals make better wine and beer for over 25 years.